
Make an untouched source copy, open the working file with File > Open and listen before editing. Select only the required range with waveform focus. Check Options > Snapping > Enable and Crossings rather than blindly pressing F8 and Ctrl+B: those shortcuts toggle the current state. Compare supported processing previews at similar loudness, measure before normalizing, then use Save As for a regular file or Render As for a project. Reopen the delivery to verify it.
This tutorial covers Sound Forge 2026, the current Boris FX release of the audio editor previously sold as Sound Forge Pro. Boris FX acquired Sound Forge from MAGIX on March 30, 2026 and now sells Sound Forge and Sound Forge Plus editions. The basic open, select, edit and export loop also applies to recent MAGIX-era releases, although menu locations and included effects can differ. If the editor isn't installed yet, start with the current installation guide.
Part of the Sound Forge 2026 guide and the Core Editing hub: open a real file, make one controlled edit, check the level and verify the delivery copy.
Software: Sound Forge 2026 | Edition: Sound Forge or Sound Forge Plus | Platform: Windows 11, per the current Boris FX system requirements | Skill level: Beginner | Starting file: WAV or MP3 | Result: an edited file that has been exported, reopened and checked
Sound Forge Interface: What Beginners Need
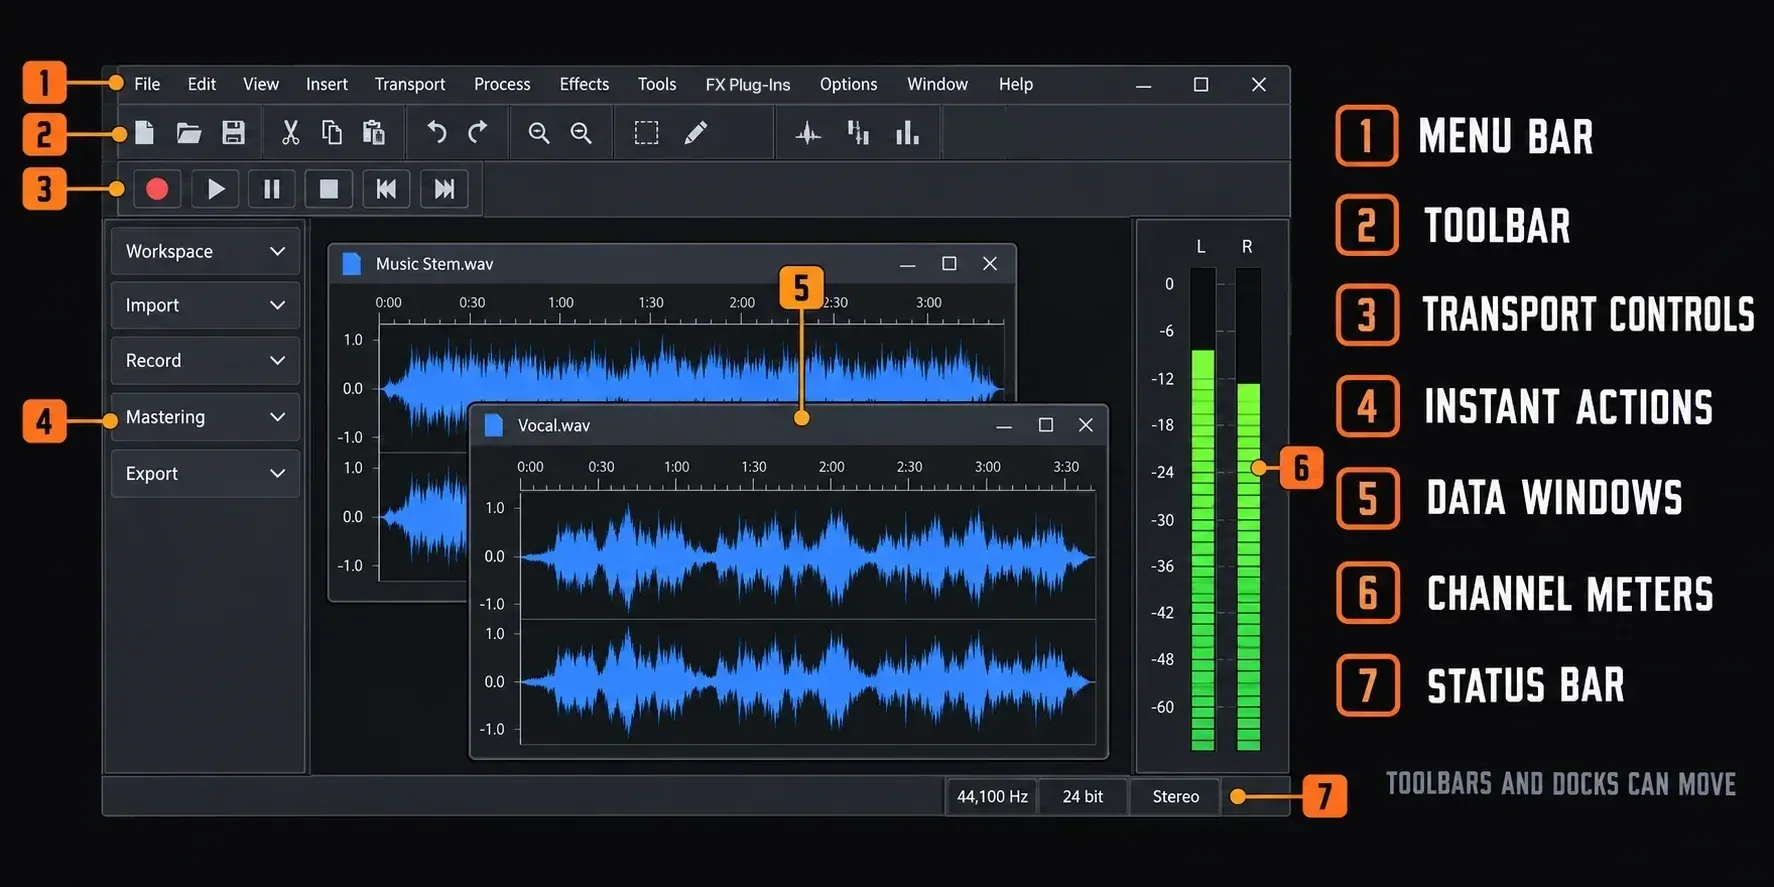
Five areas matter on the first pass. The data window holds the waveform and selection, and the transport controls handle play and stop. Peak meters warn you when the level approaches clipping. The status bar reports cursor, selection and format values. The Edit tool is what you'll use by default for selection and direct waveform work. Because toolbars can move in a custom workspace, this guide names the menu path or shortcut instead of relying on button position.
The current Standard toolbar exposes five editing tools: Edit, Magnify, Pencil, Event, and Envelope. Edit is the normal selection tool. Magnify zooms into a region without discarding the selection, while Pencil redraws individual samples only after you zoom in far enough. If your workspace has been customized, use View > Toolbars rather than expecting these controls in one fixed screen position.
The Event tool lets you adjust event positions, edges and fades. To preserve those events after closing the session, save a Sound Forge project, not just a WAV. The project-saving steps below explain the FRG file and companion media folder.
Open View > Plug-In Chain when you want to build a processing chain instead of applying effects one at a time. The current Boris FX help says a chain can hold up to 32 DirectX and VST plug-ins, preview them together in real time, and apply the chain when the file is saved. You don't need it for your first file. The Plug-In Chain guide covers that workflow when you're ready.
How to Open and Play an Audio File
Before opening important audio, make a separate untouched copy in Windows Explorer. Go to File > Open and browse to the working copy. WAV, MP3, FLAC and AIFF are common starting formats, but the installed codecs and edition determine the complete list shown in the Open dialog. File > Open avoids the paste or mix behavior that dragging onto an existing data window can trigger.
Once the file opens, the waveform appears in the data window. A stereo file shows left and right channels, while a mono file shows one channel. With the waveform focused and no range selected, Space starts and stops normal playback by default. General preferences can change it to Play/Pause; press Esc to stop. Select both stereo channels before judging channel balance. If you need to record instead of opening an existing file, use the Sound Forge recording guide for the input, driver and level setup.
If the transport moves but you hear nothing, check the selected channels, Windows output and your interface connections at a low listening level. The no-sound troubleshooting guide walks through device and playback routing. Do not keep raising gain to diagnose silence.
How to Navigate and Zoom the Waveform
Use the Up and Down arrow keys, or your mouse wheel, to adjust horizontal waveform magnification, zooming in or out step by step. To see the entire file, choose View > Zoom Time > Out Full. The Zoom Time documentation and keyboard reference disagree about Ctrl+Down Arrow, so use the explicit menu command for this step.
Press Home or End to jump to the beginning or end of the visible waveform or your active selection. Use Ctrl+Home and Ctrl+End to jump to the very beginning or end of the entire file instead. The full keyboard shortcuts guide covers zoom presets, marker navigation, and dozens of shortcuts for faster editing.
How to Make a Precise Selection
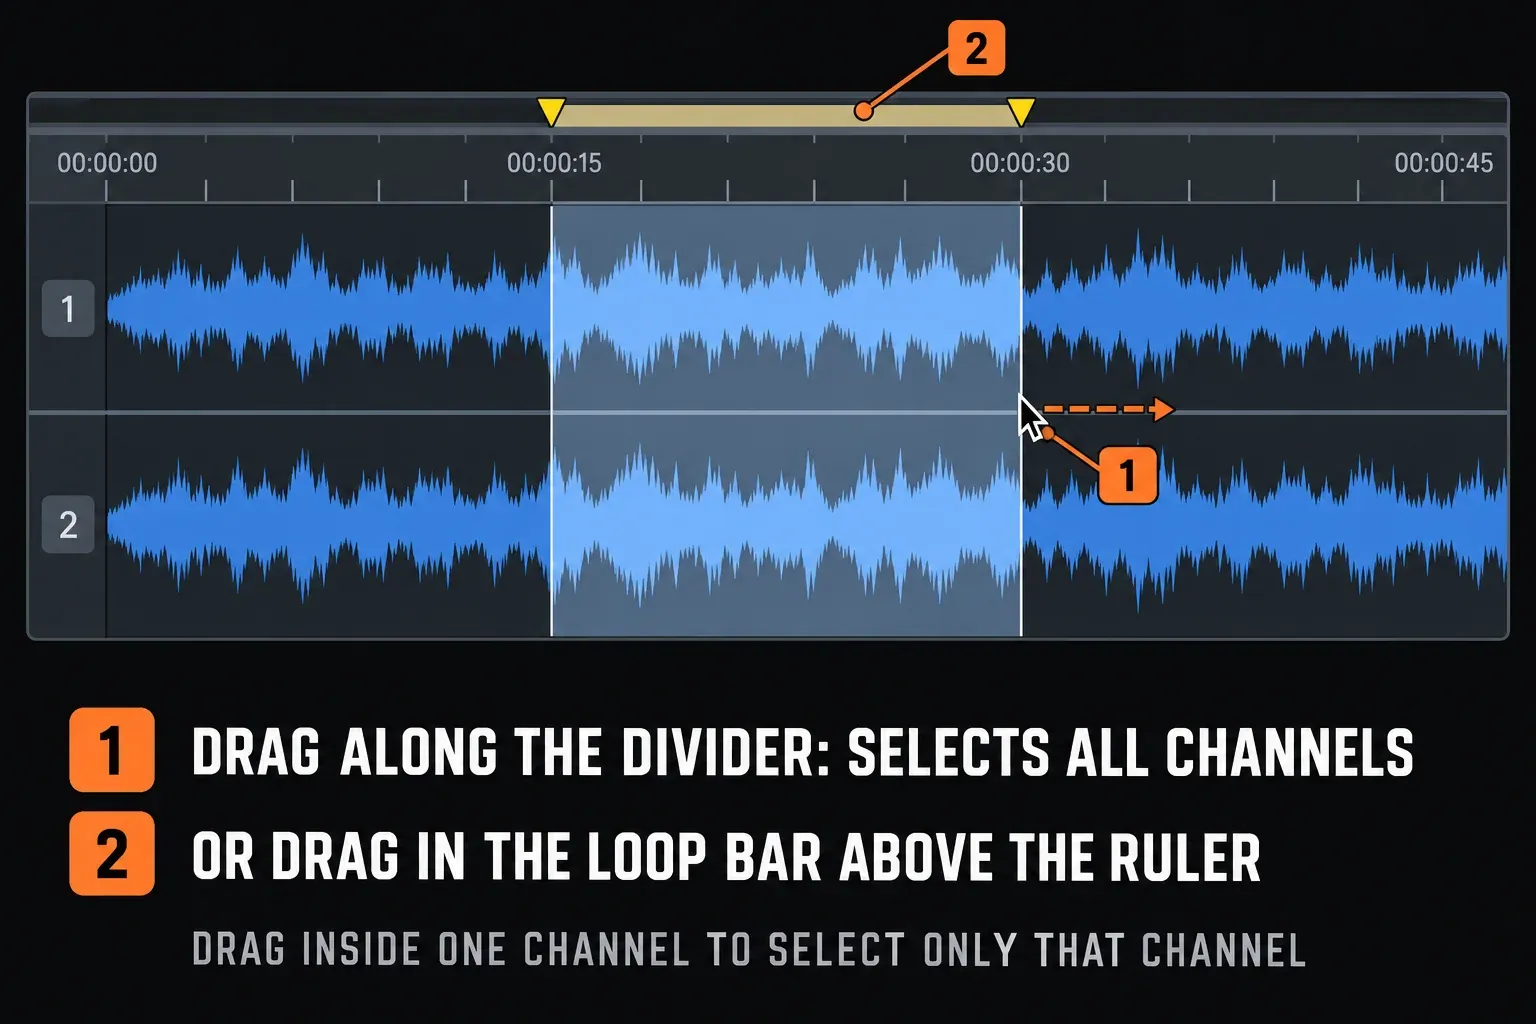
Click and drag across the waveform to select a range. The selected region highlights, and the status bar shows exactly how long it is. With waveform focus, Ctrl+A selects all data. For a shorter stereo edit, drag along the divider between channels or the loop bar above the ruler to include all channels. Check the highlighted channels before applying a process.
Snapping has two parts. Check Options > Snapping > Enable first, then Crossings for automatic zero-crossing snapping. F8 and Ctrl+B toggle those respective states, so pressing them when they're already enabled turns them off. A boundary at zero amplitude reduces the risk of a click, but it doesn't prove the edit is clean. Zoom in and listen across both sides of the join. The current snapping documentation is the controlling reference when an older tutorial assigns these shortcuts differently.
How to Cut, Copy, Paste, and Trim Audio
With a selection active, Ctrl+X cuts it to the clipboard and removes it from the file. Ctrl+C copies it without removing anything. Ctrl+V pastes clipboard contents at your current cursor position. Use these commands with waveform focus in normal editing mode, not Treat as Cutlist. Listen across the boundary afterward. Audio joins can click even when the intended range was selected.
With waveform focus and Treat as Cutlist off, Delete removes the selected audio without putting it on the clipboard, which matters if you're just trimming unwanted silence or noise rather than moving that audio somewhere else. The cutting and trimming guide goes further into precise editing, including Ctrl+T to trim everything outside your selection in one step.
How to Add a Fade In or Fade Out
Select the region and channels you want to fade. Without a selection, the fade affects the entire file. For a custom shape, choose Process > Fade > Graphic, then drag the envelope points. Double-click to add a point, and right-click a segment to choose its curve. For a simple linear edge, Process > Fade > Fade In or Process > Fade > Fade Out is quicker. Preview the boundary where the dialog allows it, then listen across the fade before saving.
How to Preview and Apply Effects
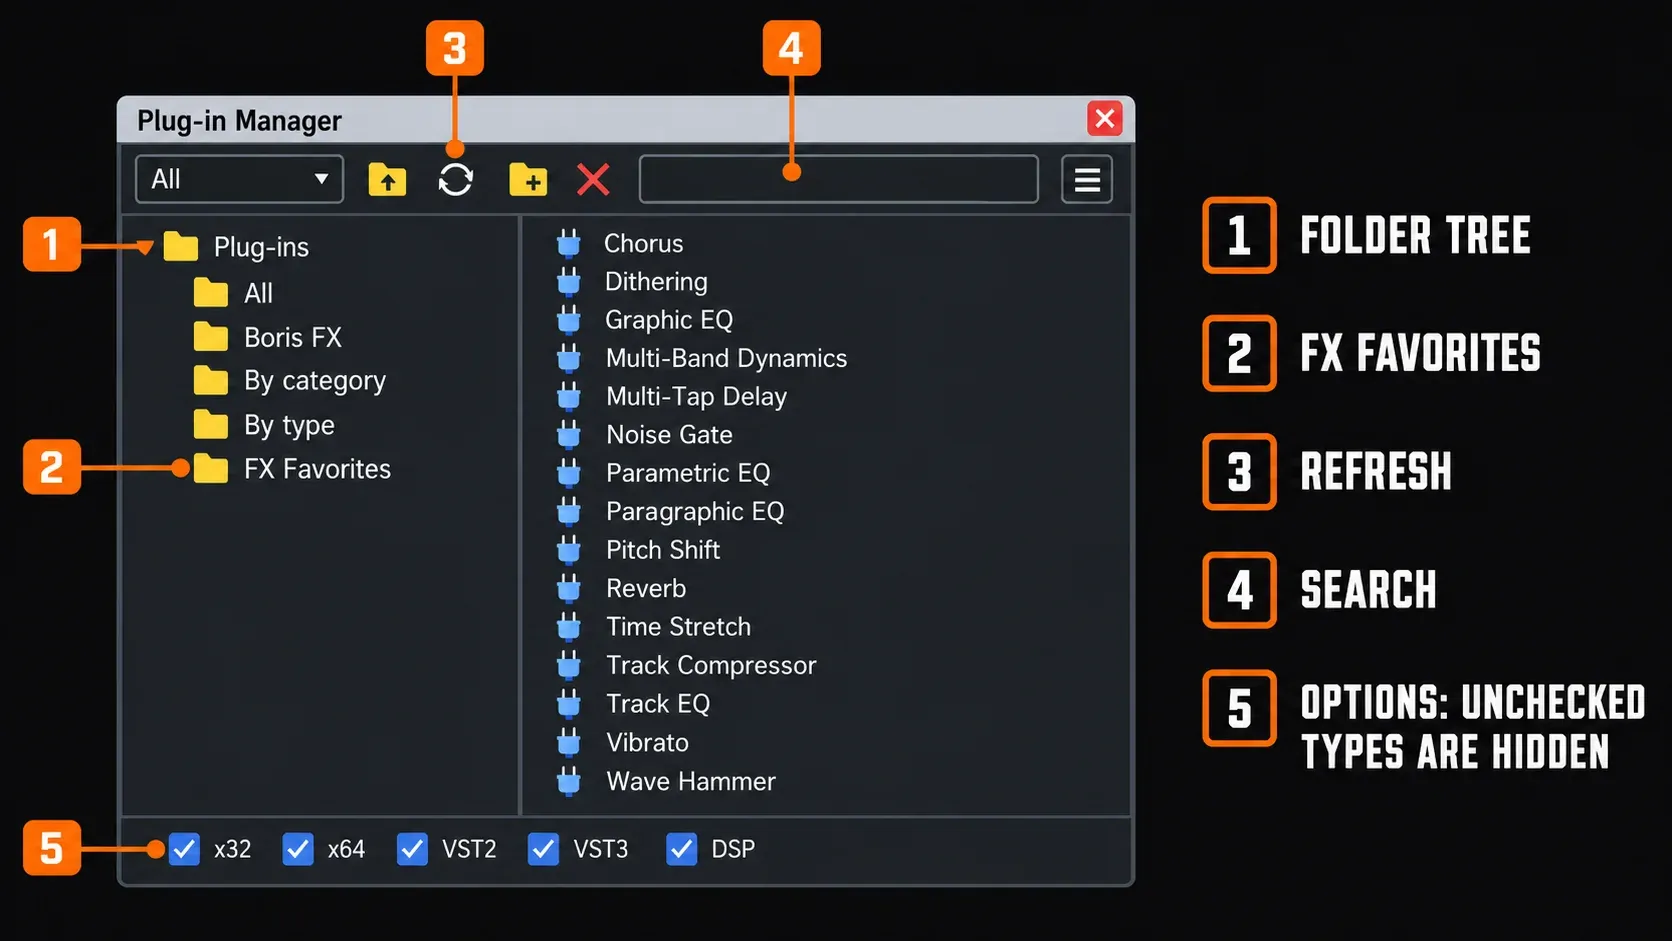
Processing is organized across the Process, Effects, and FX Plug-Ins menus. FX Favorites is a folder in the Plug-In Manager, not a separate top-level processing menu. Its contents appear in the lower part of the FX Plug-Ins menu. With waveform focus, select the intended range and channels, or press Ctrl+A when the whole file needs the same change. An empty selection can process the entire file, so check the range before clicking OK.
I wouldn't commit a setting just because the processed signal is louder. Where the dialog provides Preview, Bypass or A/B, adjust one control at a time and compare at similar output level. Some built-in processes and third-party plug-ins expose different controls, so treat Preview and Bypass as conditional rather than universal buttons. Click OK in the processing dialog only when the level-matched comparison is better for the job. The separate real-time View > Plug-In Chain has no OK-to-apply or Process button. It renders on audio save or project render.
Start with the effects you'll need first. The EQ guide covers frequency correction. The noise reduction guide covers cleaning up a hum or hiss. The reverb guide covers adding space to a dry recording. You don't need to learn all of these before your first export. Pick the one your specific file needs.
How to Undo Edits and Protect the Original
Ctrl+Z undoes the last action and Ctrl+Shift+Z redoes it. Open View > Undo/Redo History to review earlier operations. For ordinary files, Undo past Save must be enabled in General preferences to retain history after saving, and that history ends when you close the data window or exit. Save a project if you need undoable work after reopening.
For editable work, select File > Save As and choose Sound Forge Pro Project File (*.frg). Retain both the FRG and the generated [filename]_frg folder, because that folder contains media and temporary edit data. Deleting it breaks the project. Keep the untouched source too, then use File > Render As for a separate finished audio file. Merely selecting the Event tool doesn't preserve the session in a plain WAV.
How to Check Levels and Normalize When Needed
Process → Normalize → Peak level applies constant gain toward a sample-peak target. Average RMS can use dynamic compression, and Loudness mode has dynamic limiting controls, so don't assume every Normalize setting preserves the same dynamics. Choose the mode from the delivery requirement. The normalization guide explains the differences.
With waveform focus, select the complete file and all intended channels, then open Tools > Statistics for the peak and integrated-loudness measurements. Check the analysis scope, minimum/maximum sample values and maximum true peak before choosing a target. A peak reading alone does not diagnose audible clipping. Normalization changes overall level based on a peak or loudness target, but it doesn't repair audio that's already clipped, since that distortion is baked into the waveform itself. If the measured level meets the delivery requirement, I'd skip normalizing. If you used the real-time View > Plug-In Chain, first save or render a high-precision lossless processed copy and reopen it without applying the same chain again. Measure and normalize that processed audio, not the unchanged data beneath a live preview. If you're exporting MP3, don't normalize to 0 dBFS merely because the control allows it. Current Boris FX Normalize help warns that compressed encoding can clip peaks at or near 0 dB and gives -0.9 dB peak as a starting point. Treat that as general headroom rather than a universal delivery specification, then reopen and measure the encoded file.
The Statistics measurement walkthrough explains the selection, channels and reported units. For a file-level delivery target, don't substitute a short loud passage for a complete-program scan.
How to Export WAV or MP3
For a regular audio file, use File > Save As. Choose an uncompressed PCM or float WAV template that preserves the required sample rate, channel count and working precision for another editing pass. MP3-to-WAV doesn't restore audio discarded by MP3 encoding. I'd choose MP3 when a smaller delivery copy matters, then set the bitrate and metadata deliberately. WAV is a container and can also carry non-PCM formats, so the template matters. The Microsoft WAVE format structure is the technical reason the word WAV alone doesn't guarantee uncompressed audio. Keep the output name distinct from the working file, and use the Sound Forge MP3 export guide for encoder and metadata choices.
If you're working inside a Sound Forge project instead of a single audio file, Save As saves the project itself, not a finished media file. Use File, Render As to generate the actual WAV, MP3, or other output file from that project.
If you need to convert a whole folder of files at once instead of exporting one at a time, that's a different workflow. The file conversion guide and the batch processing guide cover that directly.
Your First Sound Forge Project: Complete Workflow
Use this seven-step order for the first pass. It keeps each decision audible and gives you a clear rollback point before processing becomes complicated.
- Make a separate untouched source copy, open the working copy with File > Open, select all intended channels and listen from beginning to end once.
- Zoom to the edit and inspect Options > Snapping > Enable and Crossings. Use F8 or Ctrl+B only when the corresponding state needs changing, then select the intended range.
- With waveform focus and Treat as Cutlist off, use Delete to remove the range or Ctrl+T Trim/Crop to keep it. Listen across the join.
- Select the exact edge and channels before adding a fade. Use Process > Fade > Fade In or Fade Out for a linear edge, or Graphic for a custom curve; listen across the result.
- Apply only the processing the file needs, using Preview or Bypass where available and comparing at similar loudness.
- Commit any real-time chain to a separate high-precision lossless copy and reopen it without duplicate effects. Select the complete processed file and all intended channels, measure peak and loudness, and normalize only when the delivery requirement calls for it.
- Use Save As for a regular file or Render As for a Sound Forge project, then reopen the delivery copy and verify format, duration, peaks and playback.
The same sequence works for podcast cleanup, voice-memo repair and quick music edits. Only the processing choices and delivery target change.
Frequently Asked Questions
Is Sound Forge 2026 the same as Sound Forge Pro?
Sound Forge 2026 is the current Boris FX version of the audio editor previously marketed as Sound Forge Pro. Boris FX acquired the software from MAGIX on March 30, 2026, and now sells it in Sound Forge and Sound Forge Plus editions. Older Sound Forge Pro versions have different licensing, support and included effects; compatibility depends on the version and operating system.
Can I still follow this tutorial in an older Sound Forge Pro version or Sound Forge Audio Studio?
The same open, select, edit and export sequence is a useful starting point, but exact controls and advanced features differ by version and edition. Some advanced processing, restoration, plug-in, and workflow features may not be available in Sound Forge Audio Studio, since its feature set has varied between generations. If a specific menu or effect doesn't match what you see, check which edition and version you're running.
Does Sound Forge have a free trial?
Yes. Boris FX offers a full-featured 15-day trial of Sound Forge. The full review and the pricing guide cover what's included and how the trial compares to a paid license.
Is Sound Forge a DAW or an audio editor?
Sound Forge is a single-file audio editor, not a full DAW. It's built for editing, restoring, and mastering one audio file at a time rather than arranging and mixing a multitrack production. For multitrack arrangement or MIDI sequencing, use a separate DAW; this does not mean Sound Forge has no MIDI-related functions.
Can Sound Forge edit multiple tracks at once?
Not as a DAW-style multitrack session. Sound Forge can record and handle multiple channels into a single file, but it doesn't provide the track-based arrangement, mixing, and automation environment a DAW does. For that kind of work, pair Sound Forge with a DAW rather than expecting it to replace one.
Should I export from Sound Forge as WAV or MP3?
Choose an uncompressed PCM or float WAV template when you need a lossless archive or expect another editing pass. Choose MP3 when file size and easy delivery matter more than lossless quality. Leave peak headroom before MP3 encoding instead of normalizing directly to 0 dB.
Can I use Sound Forge on a Mac?
There is no current native macOS edition. Sound Forge 2026 lists Windows 11 as its supported system; running Windows on Mac hardware is a separate compatibility question. The Sound Forge for Mac guide covers the history of the discontinued Mac version and what to run instead if you're on Apple hardware.
Does Sound Forge edit audio destructively?
Applied processing changes ordinary audio data. For a persistent editable session, save a Sound Forge Pro Project File (*.frg), retain its companion [filename]_frg folder and keep the untouched recording. Event editing alone does not make a rendered WAV an editable project. Use Render As to create the delivery from that project.
Repeat the seven-step loop on the next real file, then open a specialist guide only for the problem you can actually hear: remove background noise without hollowing out the voice, choose the right normalization mode, or verify an MP3 delivery copy.