Sound Forge Pro has one of the deeper keyboard shortcut systems of any audio editor — partly because so many of its operations are designed to run without breaking playback. The M key drops a marker while audio is playing. J, K, and L scrub at different speeds without stopping. The 0–9 keys jump to numbered markers instantly. Learning these is what separates an hour-long vinyl restoration session from a two-hour one.
Part of the Sound Forge Pro 2026 Guide — start there if you're new to the editor.
This guide is part of the Sound Forge Pro Core Editing hub. Start there if you need the full record → edit → normalize → export workflow, plus batch conversion, sample-rate conversion and no-sound/input fixes.
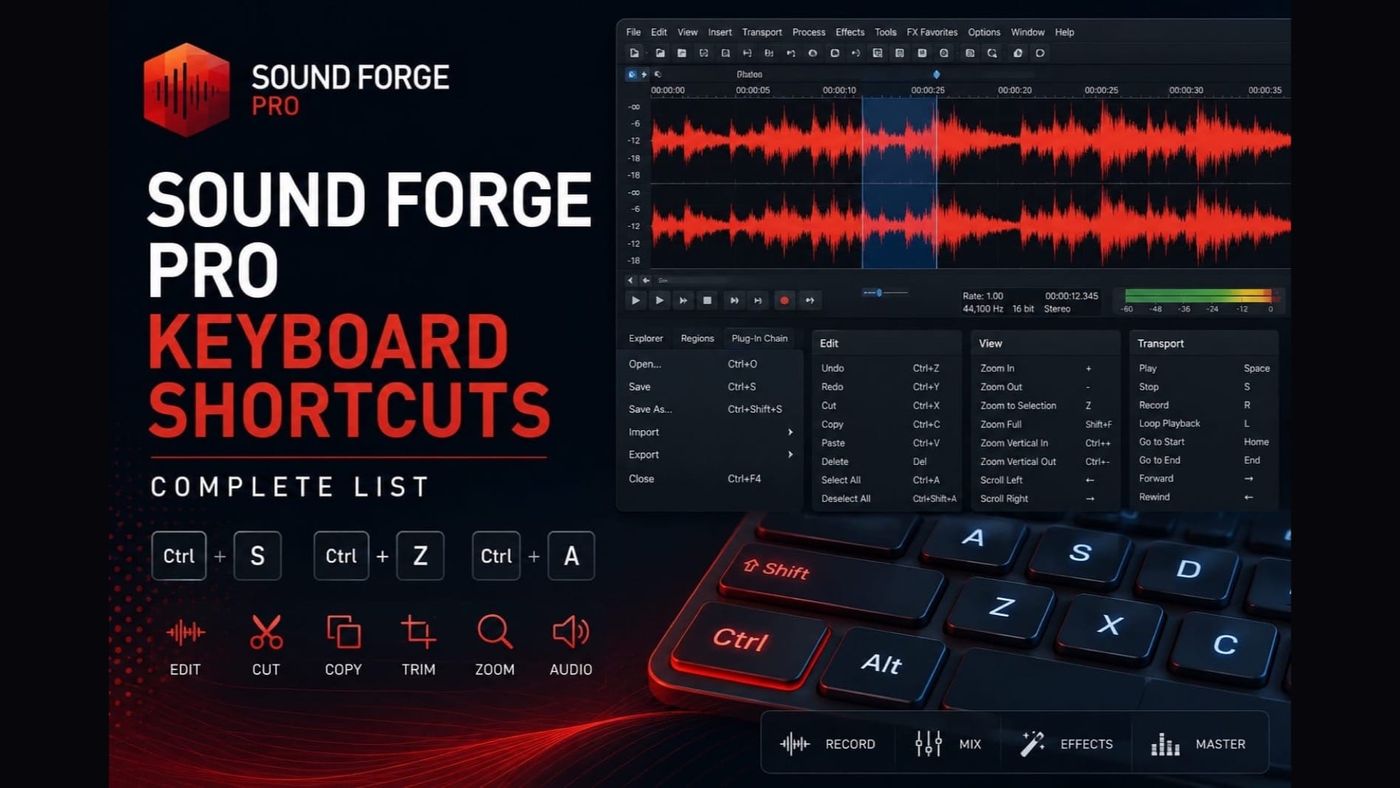
The shortcuts below are based on the default Sound Forge Pro keyboard map and the long-standing Sound Forge Pro shortcut set. Core commands have remained broadly stable across versions, but you should always confirm your installed version via Help → Keyboard Shortcuts, especially if you have customized your keyboard map. Where a shortcut differs between older Sony-era references and newer Sound Forge Pro manuals, it is noted. To customize shortcuts: Options → Customize Keyboard.
Playback and Transport
These are the shortcuts you use most. The playback set is worth committing to muscle memory first — everything else builds around it.
| Shortcut | Action |
|---|---|
| Space or F12 | Play / Stop |
| Shift+Space or Shift+F12 | Play All (plays entire file regardless of selection) |
| Enter or Ctrl+F12 | Play / Pause (leaves cursor at paused position) |
| Esc | Stop all actions including playback |
| Ctrl+R | Record (opens Record dialog or starts recording if armed) |
| J | Scrub backward (slow) |
| K | Scrub at normal speed |
| L | Scrub forward (fast) |
| X | Cycle through play modes: Normal → Plug-In Chainer → Sample → Cutlist |
| Q | Toggle looped playback on/off |
| F6 | Toggle playback scrolling on/off |
The J/K/L scrub set is underused. J and L scrub at progressively faster speeds the more times you press them — hold L for a few seconds and playback accelerates. Useful when scanning a long file for a specific sound without zooming in. I use J/K/L constantly during vinyl restoration sessions to locate click events without stopping and repositioning the cursor manually.
Navigation — Moving the Cursor
| Shortcut | Action |
|---|---|
| Home | Go to the first sample visible in the waveform display, or to the beginning of the current selection |
| End | Go to the last sample visible in the waveform display, or to the end of the current selection |
| Ctrl+Home | Go to the beginning of the file |
| Ctrl+End | Go to the end of the file |
| Left Arrow | Move the cursor one screen pixel left |
| Right Arrow | Move the cursor one screen pixel right |
| Ctrl+Alt+Left Arrow | Move the cursor one sample left |
| Ctrl+Alt+Right Arrow | Move the cursor one sample right |
| Numeric keypad − | Go to the previous sample |
| Numeric keypad + | Go to the next sample |
| Ctrl+Numeric keypad − | Move 10 samples backward |
| Ctrl+Numeric keypad + | Move 10 samples forward |
| Alt+Left Arrow | Move one video frame left (only when data window contains video) |
| Alt+Right Arrow | Move one video frame right (only when data window contains video) |
| 0–9 (number row, not numeric keypad) | Jump cursor to the corresponding numbered marker, or select the corresponding region |
| Ctrl+G | Open the Go To dialog |
| F5 | Set focus to the Selection Start field in the status bar |
The 0–9 marker jump is what makes the M key worthwhile. Drop markers during a first-pass listen, then use the number row — not the numeric keypad — to jump back to numbered markers during editing. On a 47-minute narration session, that combination turns a continuous listen-and-edit workflow into something closer to a database operation: mark problems at full speed, then address each one in order.
Zoom
| Shortcut | Action |
|---|---|
| Up Arrow or Mouse wheel up | Zoom in (increase time magnification) |
| Down Arrow or Mouse wheel down | Zoom out (decrease time magnification) |
| Shift+Up Arrow | Zoom in vertically (increase level magnification) |
| Shift+Down Arrow | Zoom out vertically (decrease level magnification) |
| Ctrl+Up Arrow | Zoom to selection (if selection active); otherwise Zoom In Full |
| Ctrl+Down Arrow | Zoom normal (returns to default zoom ratio set in Preferences) |
| 1 (numeric keypad) | Display custom zoom ratio 1 |
| 2 (numeric keypad) | Display custom zoom ratio 2 |
| Ctrl+Shift+Number (1–8) | Save current view to cell number 1–8 |
| Ctrl+Number (1–8) | Restore saved view from cell number 1–8 |
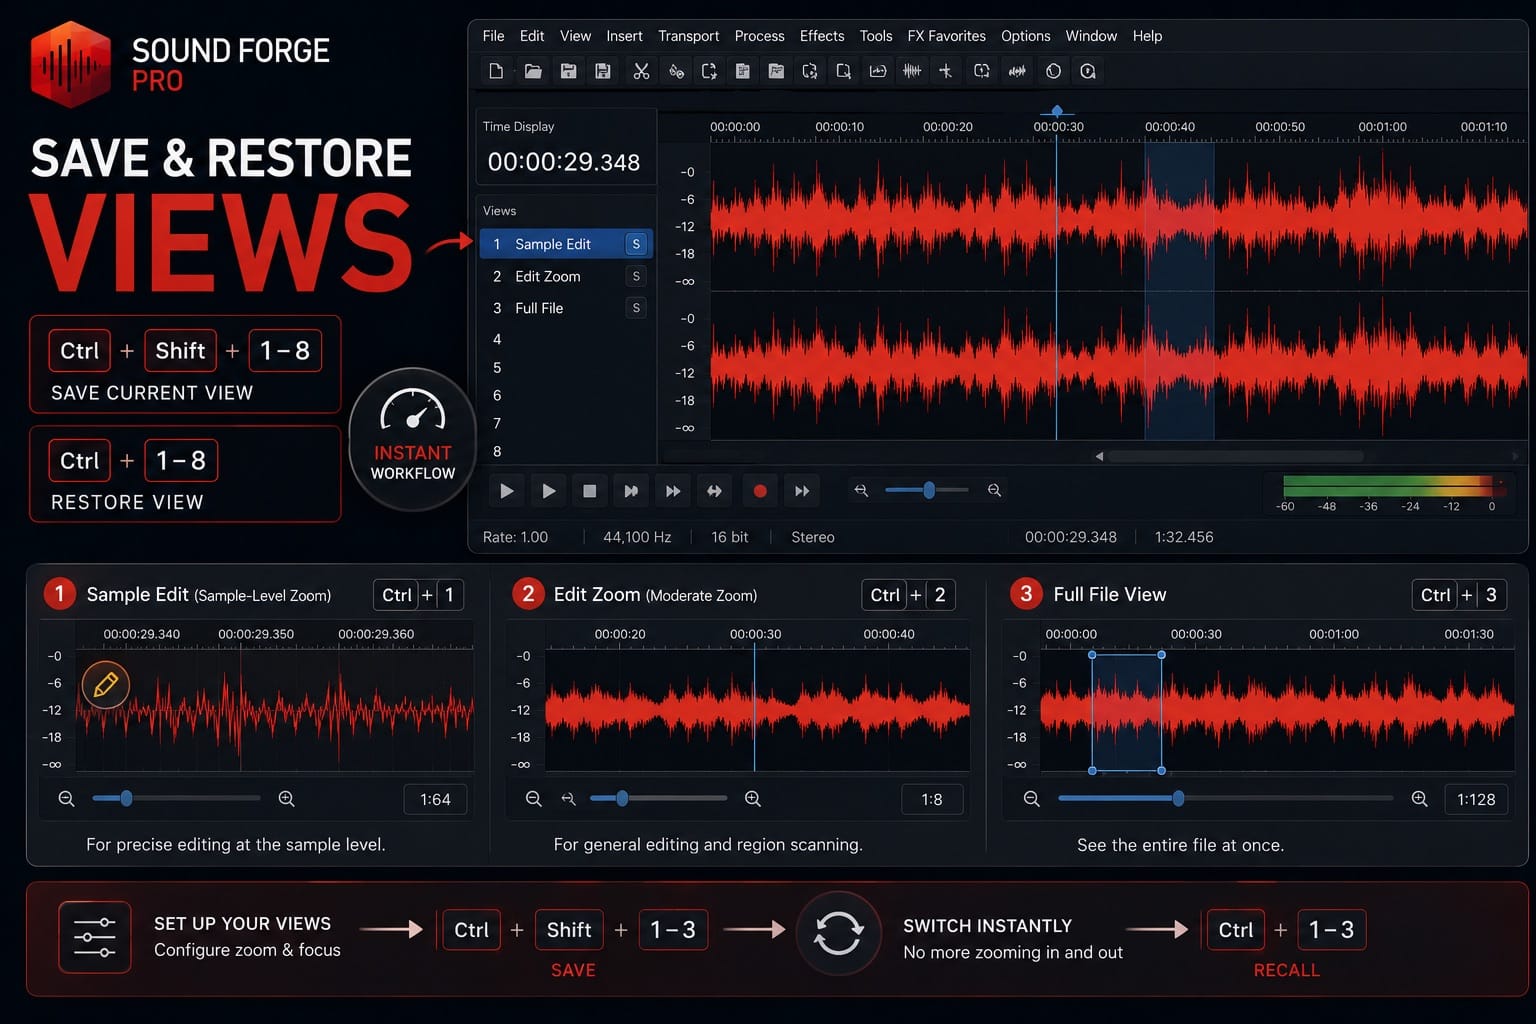
The view save/restore pair (Ctrl+Shift+1–8 to save, Ctrl+1–8 to recall) is something most users discover late. Set up a view at sample-level zoom for pencil editing, a second at moderate zoom for region scanning, and a third at full-file view — then flip between them instantly instead of scrolling in and out. I keep view 1 set to sample-level zoom, view 2 at a moderate editing zoom, and view 3 at full-file view. Switching between them is fast enough that it changes how I structure editing sessions.
Selection
| Shortcut | Action |
|---|---|
| Ctrl+A | Select All |
| Shift+Home | Extend selection from cursor to the first visible sample or selection boundary |
| Shift+End | Extend selection from cursor to the last visible sample or selection boundary |
| Shift+Left Arrow | Extend selection to the previous screen pixel |
| Shift+Right Arrow | Extend selection to the next screen pixel |
| Shift+Numeric keypad − | Extend selection to the previous sample |
| Shift+Numeric keypad + | Extend selection to the next sample |
| Ctrl+Shift+Numeric keypad − | Extend selection 10 samples backward |
| Ctrl+Shift+Numeric keypad + | Extend selection 10 samples forward |
| Z | Snap the current selection to the next zero crossing |
| Shift+Z | Snap the selection edge to the next zero crossing |
| Ctrl+B | Toggle snap to zero crossings |
| S or / | Toggle between last selection and cursor position |
| Double-click waveform | Select entire file |
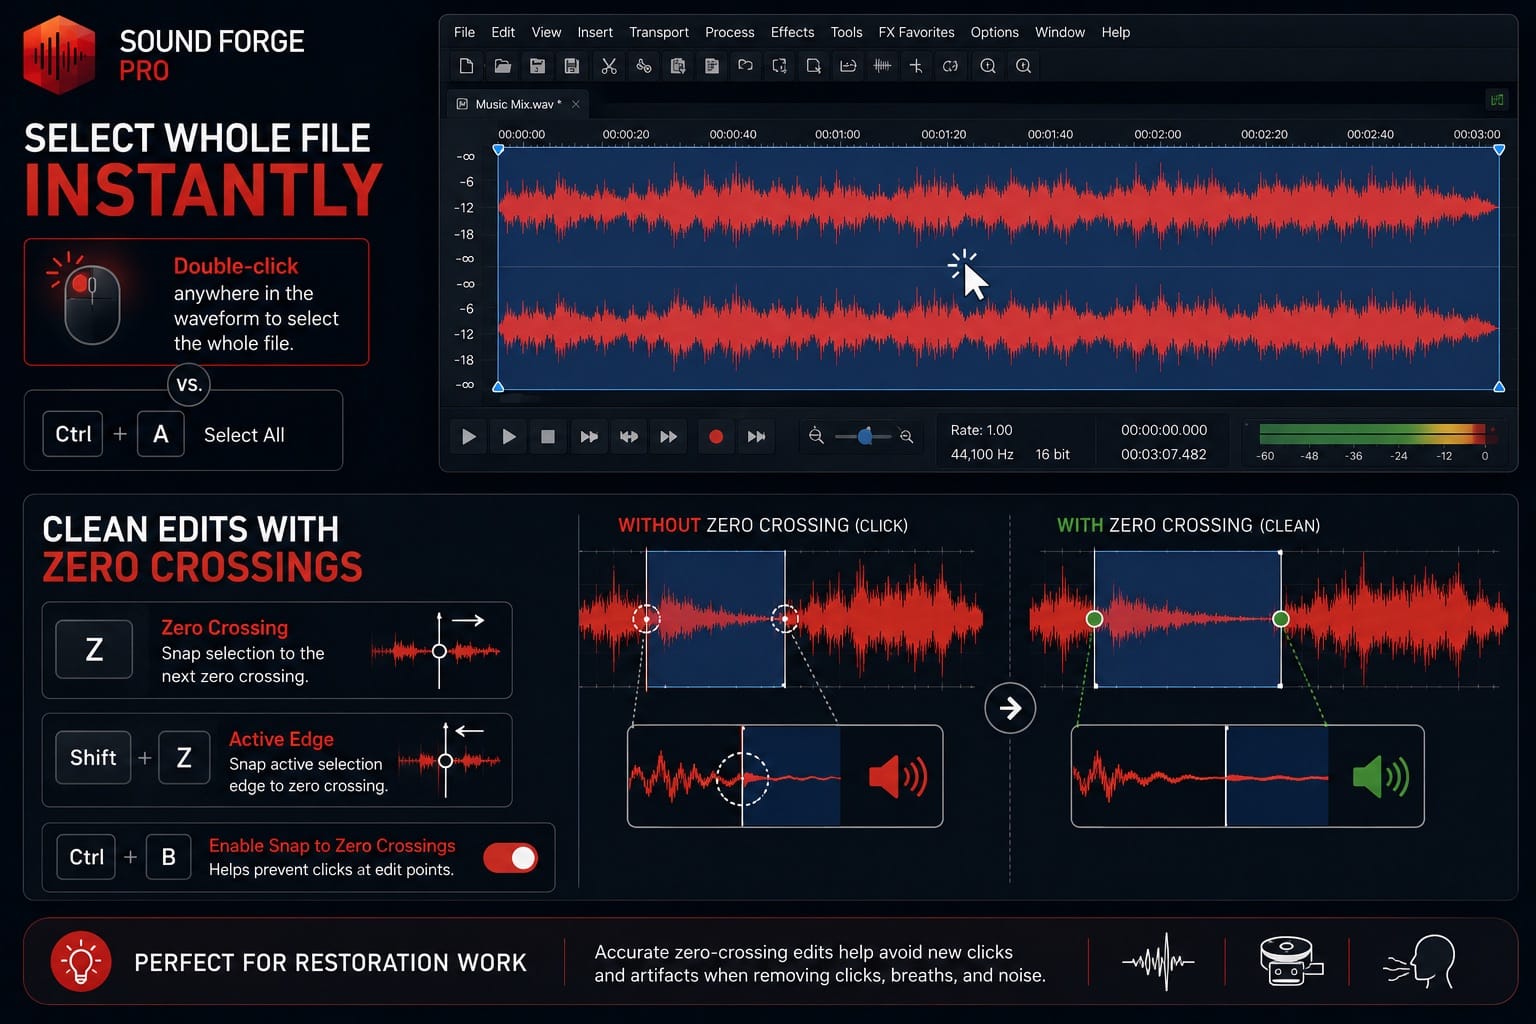
Double-click anywhere in the waveform to select the whole file — faster than Ctrl+A when you have both hands on the mouse. I switch between the two depending on whether I'm in a mouse-heavy or keyboard-heavy part of the session.
Use Z and Shift+Z for zero-crossing cleanup. Z snaps the current selection to the next zero crossing; Shift+Z snaps the active selection edge. Keep Ctrl+B enabled when doing lots of small edits, because snap-to-zero-crossings helps prevent clicks at edit points. This matters most in restoration work, where tiny edits around clicks, breaths, and tape noise can create new artifacts if the edit does not land cleanly.
Editing
| Shortcut | Action |
|---|---|
| Ctrl+Z | Undo |
| Ctrl+Shift+Z | Redo |
| Ctrl+C | Copy selection to clipboard |
| Ctrl+X | Cut selection to clipboard |
| Ctrl+V | Paste clipboard contents into the active window |
| Delete | Delete (clear) selected data without placing it on clipboard |
| Ctrl+T | Trim: deletes everything outside the current selection |
| S (Event tool active) | Split event at cursor position |
| Ctrl+Alt+T (Event tool active) | Split selected events at region boundaries |
| Ctrl+D | Select the normal edit tool |
| Ctrl+M | Mix clipboard contents with the active data window |
| Ctrl+E | Paste clipboard contents into a new data window |
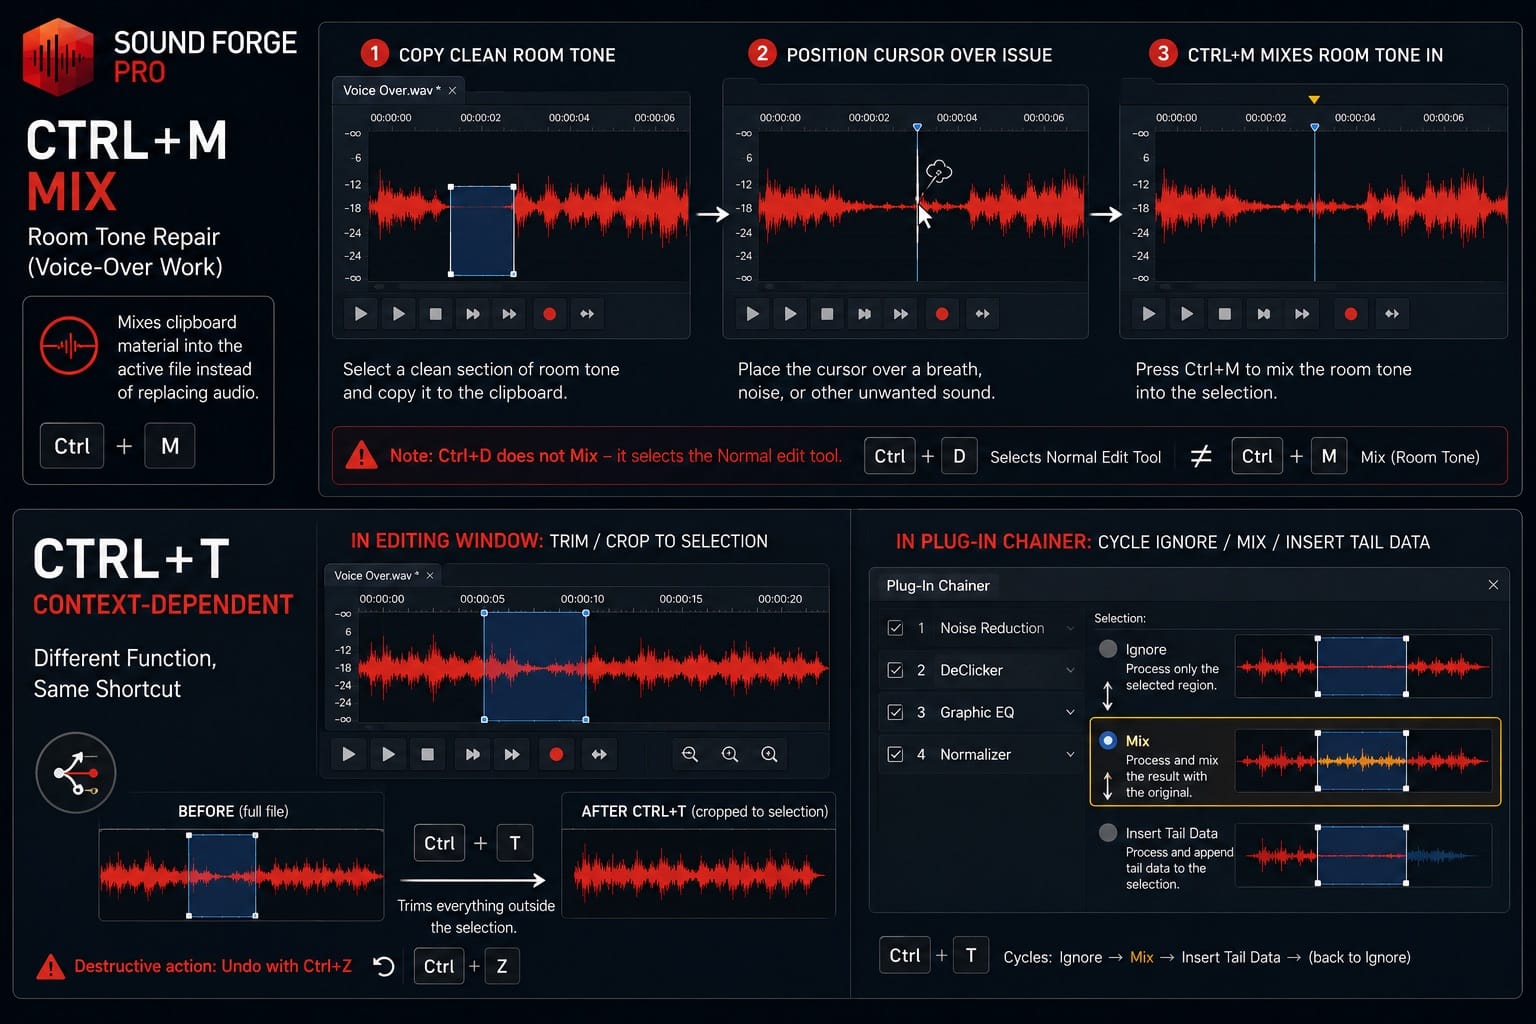
Ctrl+M, not Ctrl+D, is the shortcut to remember for room tone repair in voice-over work. Copy a clean section of room tone, position the cursor over the breath or noise, and Ctrl+M mixes the clipboard material into the active file instead of simply replacing the surrounding audio. Ctrl+D is not Mix — it selects the normal edit tool.
Ctrl+T is context-dependent. In the main editing window, it trims or crops the file to the current selection. In the Plug-In Chainer, Ctrl+T cycles the Ignore / Mix / Insert Tail Data options. In normal editing, Ctrl+T is still the fastest way to isolate a selected section: everything outside the selection is removed in one command. It's destructive, so Ctrl+Z undoes it.
Markers and Regions
| Shortcut | Action |
|---|---|
| M | Place a marker at the current cursor position (works during playback) |
| R | Place a region at the current selection |
| Ctrl+Alt+R (Event tool) | Place a region at current selection |
| F8 | Enable/disable snapping |
| Ctrl+B | Toggle snap to zero crossings |
| Z | Snap selection to next zero crossing |
| Shift+Z | Snap selection edge to next zero crossing |
| Ctrl+F8 | Toggle auto snap to grid |
| Shift+F8 | Toggle auto snap to markers |
| Ctrl+Shift+F8 | Toggle auto snap to event edges |
| Alt+L | Create a loop from the current selection |
| Alt+Shift+L | Create a loop from current selection without opening Sampler Loops dialog |
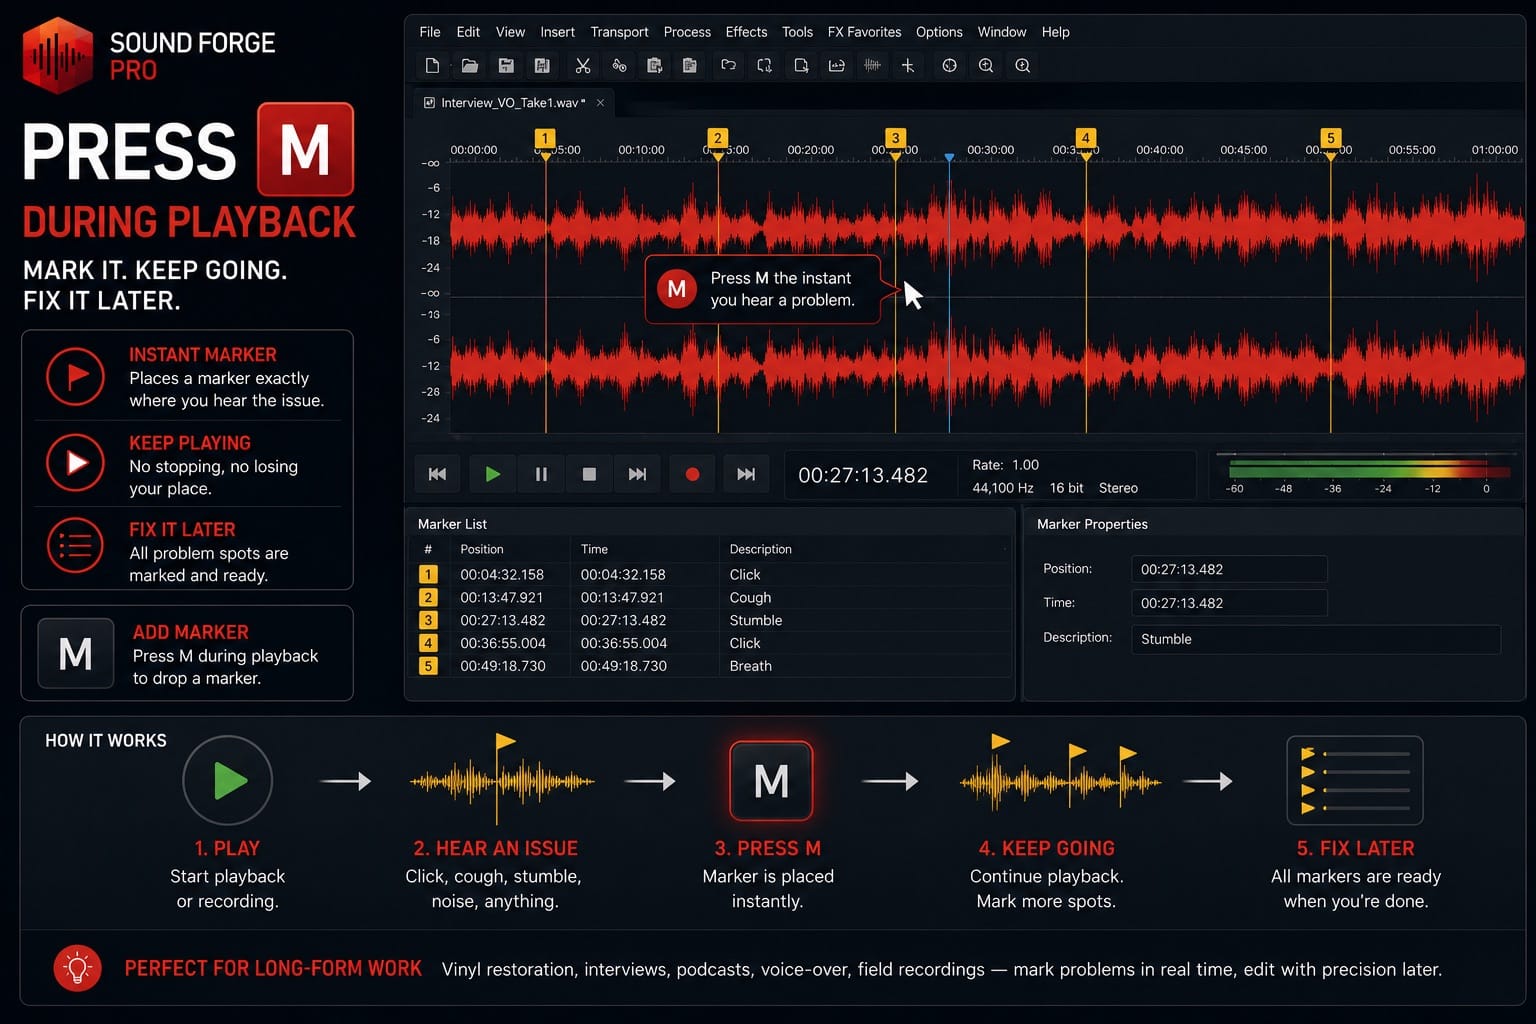
M during playback is probably the most important single shortcut for long-form work. Press it the instant you hear a problem — a click, a cough, a stumble — and keep the recording or playback running. The marker lands at that exact moment. No stopping, no losing your place, no mental note that fades by the time you've stopped and rewound. On vinyl sessions I press M every time I hear a click I want to address manually. On voice-over sessions I press it every time the talent stumbles. The markers are there when the pass is done.
Recording
| Shortcut | Action |
|---|---|
| Ctrl+R | Start recording (from cursor position in Manual mode) |
| Esc | Stop recording |
| M | Place a marker at current position during recording (same key as during playback) |
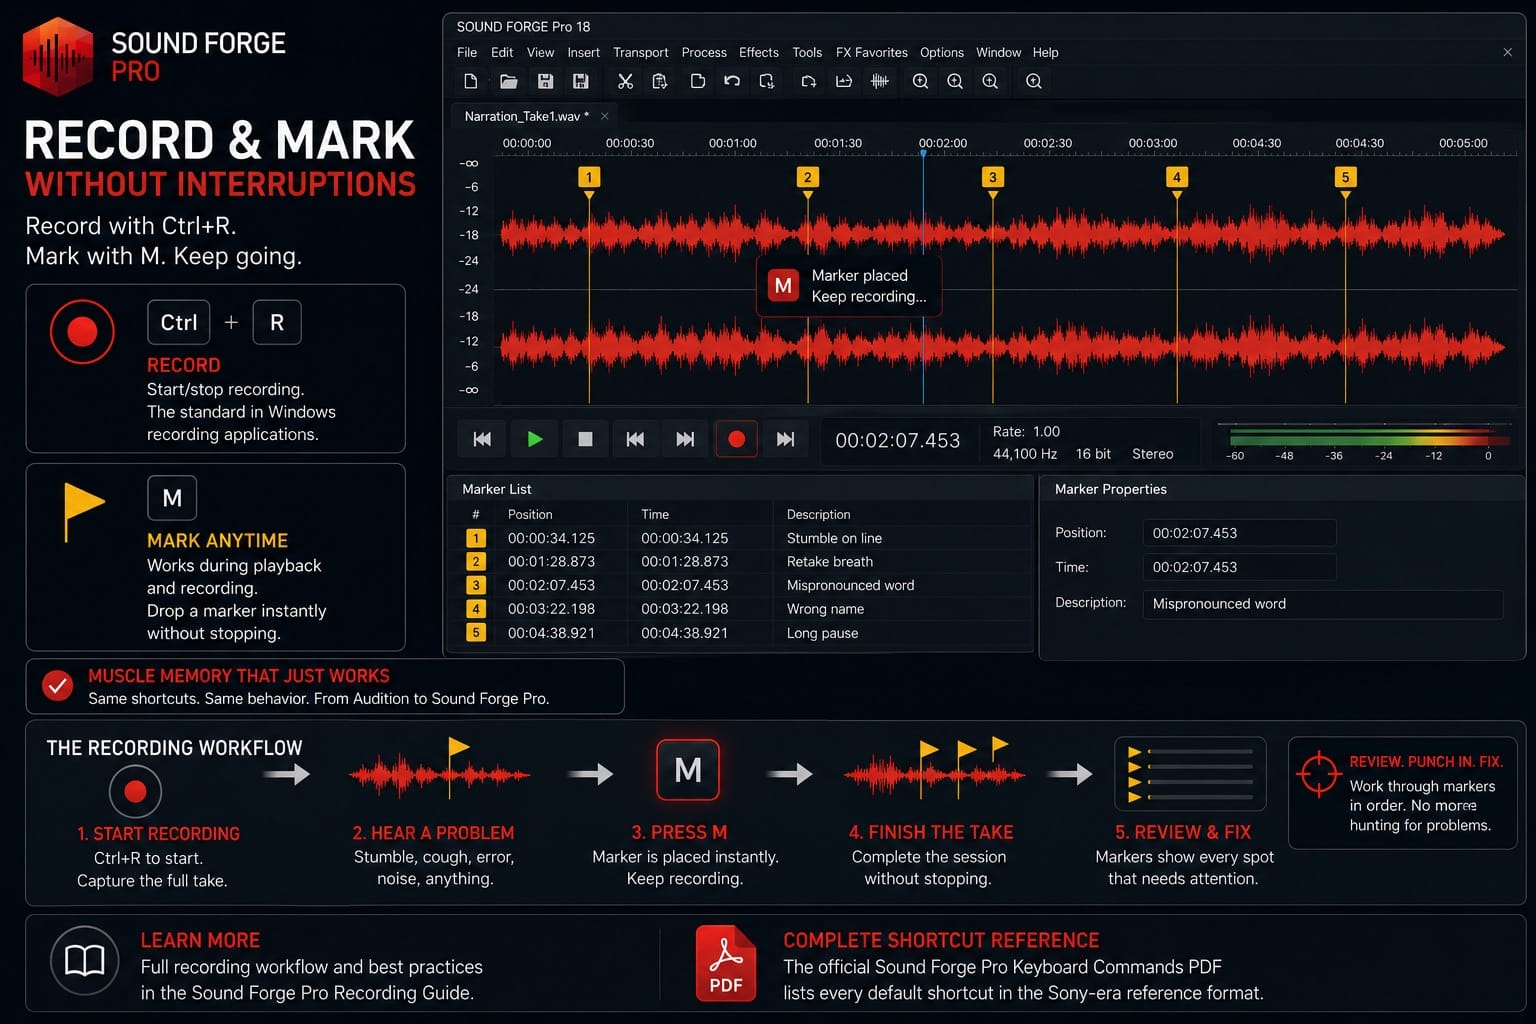
Ctrl+R as the record shortcut is consistent with how most Windows recording applications work — same key, same behavior. Coming from Audition or Reaper, the muscle memory transfers immediately.
M works during recording as well as playback. If you're recording a narration session and stumble on a line, press M and keep recording. The marker lands at the mistake without interrupting the take. At the end of the session you have a complete recording with markers at every retake point — review, punch in, and fix in order without scrubbing through the whole file to find problem spots. The full recording workflow is in the recording guide. The official Sound Forge Pro keyboard commands PDF lists every default shortcut in the Sony-era reference format.
File Operations
Most file-operation shortcuts follow standard Windows conventions, but always check Help → Keyboard Shortcuts for your installed Sound Forge version if a command behaves differently. Ctrl+T is context-dependent: in the main editing window it trims or crops to the current selection; in the Plug-In Chainer it cycles Ignore / Mix / Insert Tail Data options.
| Shortcut | Action |
|---|---|
| Ctrl+N | New file |
| Ctrl+O | Open file |
| Ctrl+S | Save |
| Ctrl+Shift+S | Save As (verify in Help → Keyboard Shortcuts for your installed version) |
| Ctrl+W | Close active file |
| Ctrl+P | Print (verify in Help → Keyboard Shortcuts; Ctrl+P is also used in the Plug-In Chainer for Preview) |
Window and Panel Focus
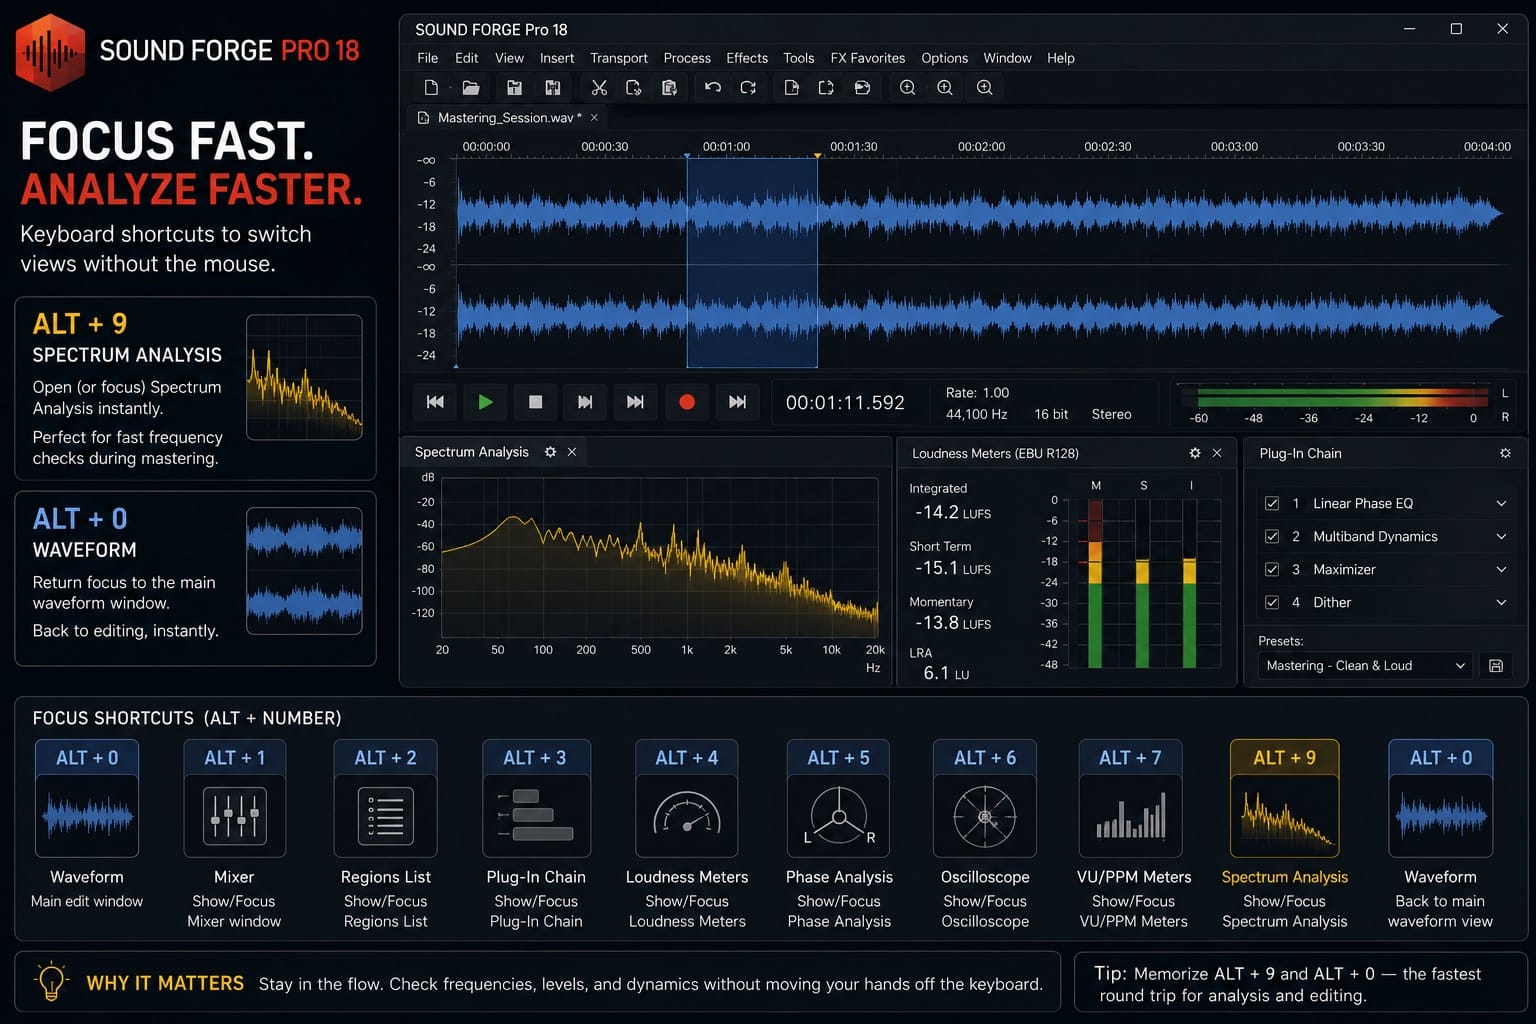
Alt+9 (Spectrum Analysis) is the one I reach for most during mastering sessions — it's faster than navigating View → Spectrum Analysis when I need a quick frequency check on a selection mid-session. Alt+0 to snap focus back to the waveform is the return trip.
These shortcuts set focus to specific panels without using the mouse — useful when toggling between the waveform display and a meter or the Spectrum Analysis window during a session.
| Shortcut | Panel |
|---|---|
| Alt+0 | Waveform display (active data window) |
| Alt+1 | Explorer |
| Alt+2 or Alt+Enter | File Properties |
| Alt+4 | Time Display |
| Alt+5 | Channel Meters |
| Alt+6 | Loudness Meters |
| Alt+8 | Undo/Redo History |
| Alt+9 | Spectrum Analysis |
| Ctrl+Alt+0 | Plug-In Chainer |
| Ctrl+Alt+1 | Plug-In Manager |
| Ctrl+Alt+3 | Script Editor |
| Ctrl+Alt+5 | Record Options |
| Ctrl+Alt+M, 0 | Regions List |
| Shift+F4 | Tile data windows vertically |
| Shift+F5 | Cascade data windows |
| Ctrl+F5 | Restore active data window |
| Ctrl+Alt+D, then 0–9 | Save current window layout to slot 0–9 |
| Alt+Shift+D, then 0–9 | Restore saved window layout from slot 0–9 |
Plug-In Chainer Shortcuts
These shortcuts work when the Plug-In Chainer window has focus. Open the Chainer first (Ctrl+Alt+0), then use these to work through the chain without reaching for the mouse.
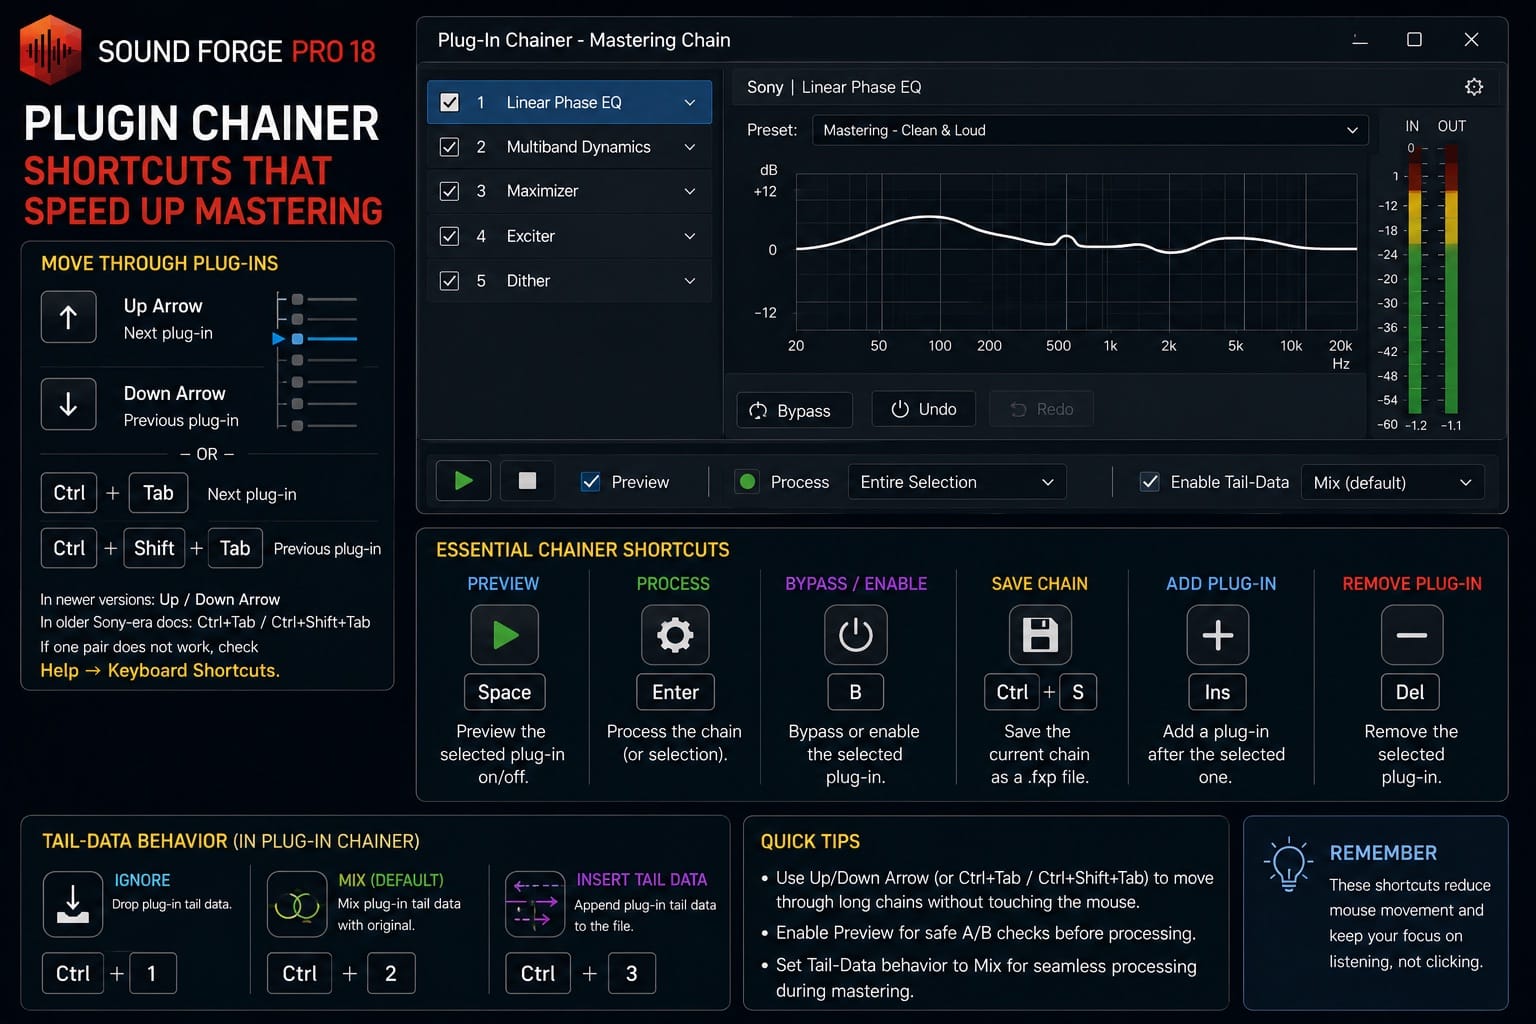
| Shortcut | Action |
|---|---|
| Ctrl+P | Preview |
| Ctrl+Shift+P | Process the current selection through the chain |
| Ctrl+B | Bypass the selected plug-in |
| Ctrl+Shift+B | Bypass the entire plug-in chain |
| Ctrl+S | Save the chain preset |
| Ctrl+T | Toggle Ignore / Mix / Insert Tail Data options |
| Ctrl+E | Add plug-ins to the chain |
| Ctrl+Delete | Remove selected plug-ins |
| Down Arrow | Select the next plug-in in the chain (newer versions) |
| Up Arrow | Select the previous plug-in in the chain (newer versions) |
| Ctrl+Tab | Select the next plug-in (older Sony-era shortcut lists) |
| Ctrl+Shift+Tab | Select the previous plug-in (older Sony-era shortcut lists) |
| Ctrl+D | Show the plug-in window |
| Ctrl+H | Show or hide effect automation parameters |
In newer Sound Forge Pro documentation, Up Arrow and Down Arrow move through plug-ins in the chain. Older Sony-era shortcut PDFs list Ctrl+Tab and Ctrl+Shift+Tab for the same next / previous plug-in workflow. If one pair does not work in your installed version, check Help → Keyboard Shortcuts inside Sound Forge Pro. The rest of the Chainer shortcuts — preview, process, bypass, save chain, add/remove plug-ins, and toggle tail-data behavior — are the ones worth memorizing for mastering sessions.
The Plug-In Chainer shortcuts and workflow are covered in detail in the Plug-In Chainer guide.
Snapping and Tool Modes
Ctrl+B (snap to zero crossings) is the one snapping shortcut worth keeping on. For vinyl and tape restoration work where you're making lots of small edits, snapping to zero crossings prevents click artifacts at edit points without having to manually find them every time.
| Shortcut | Action |
|---|---|
| F8 | Enable/disable snapping globally |
| Ctrl+F8 | Toggle snap to grid |
| Shift+F8 | Toggle snap to markers |
| Ctrl+Shift+F8 | Toggle snap to event edges |
| Ctrl+B | Toggle snap to zero crossings |
| V | Insert/show/hide volume envelope |
| Shift+V | Insert/remove volume envelope |
| P | Insert/show/hide pan envelope |
| Shift+P | Insert/remove pan envelope |
How to Customize Keyboard Shortcuts
Every shortcut in Sound Forge Pro is reassignable. Go to Options → Customize Keyboard. The dialog shows the current keyboard map and a list of all available commands organized by category. Select a command, click in the shortcut field, and press the new key combination. Click Assign.
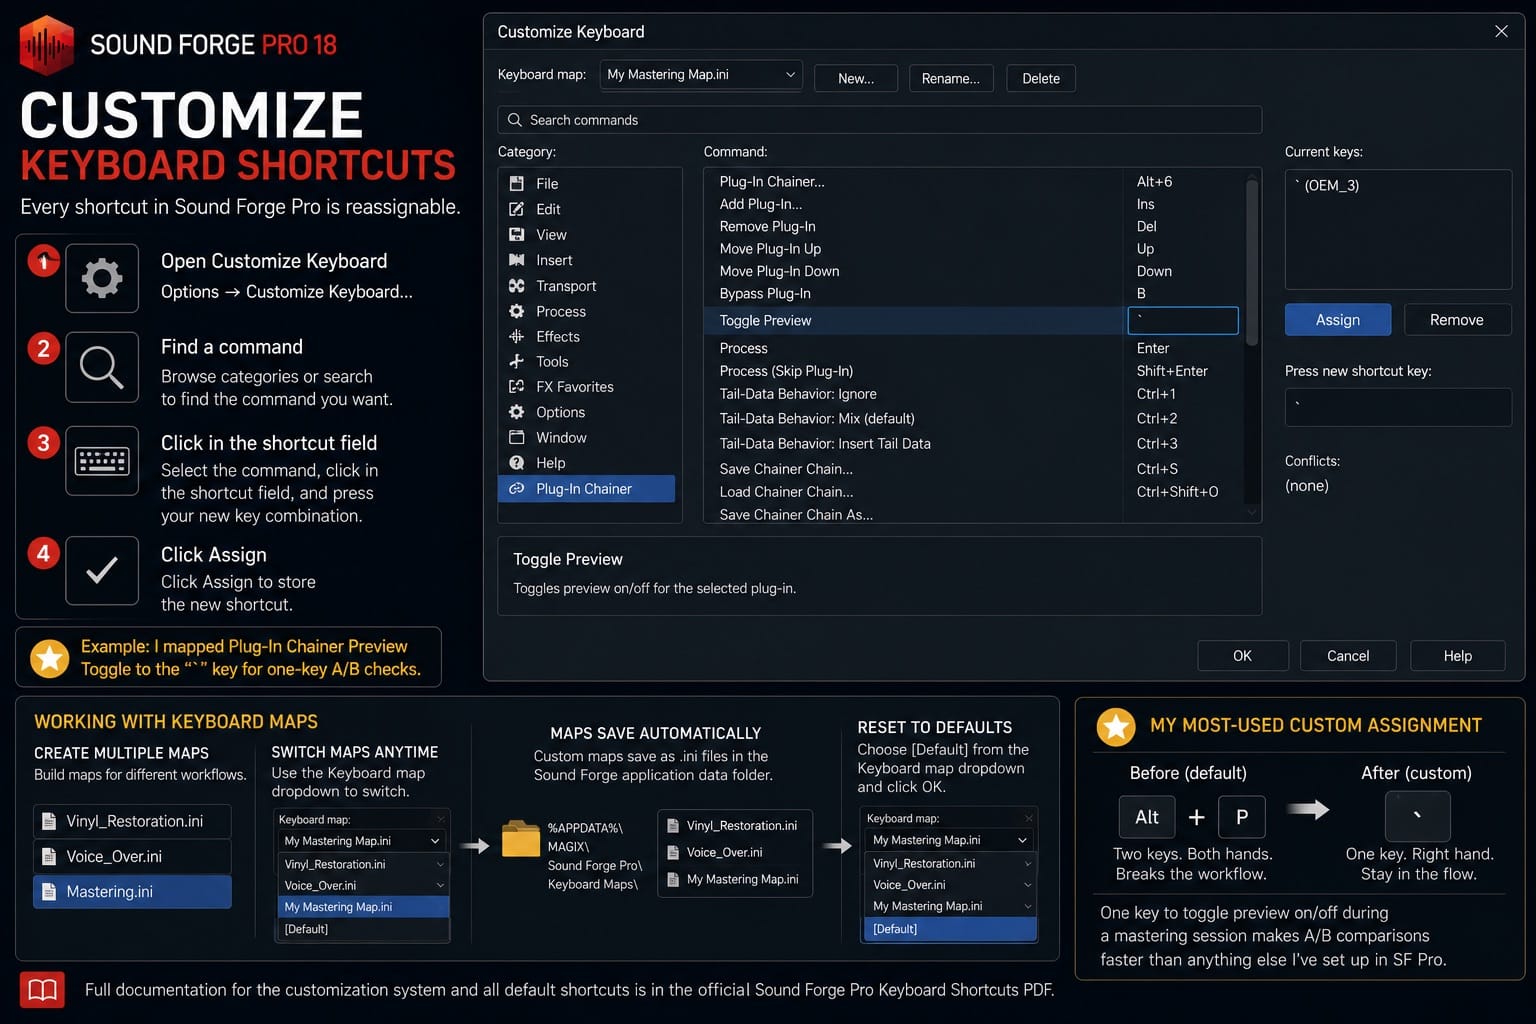
Custom keyboard maps save as .ini files in the Sound Forge application data folder. You can create multiple maps for different workflows — one optimized for vinyl restoration, one for voice-over, one for mastering — and switch between them from the Keyboard map dropdown in the Customize Keyboard dialog without restarting the application.
To reset to defaults: choose [Default] from the Keyboard map dropdown and click OK. Full documentation for the customization system is in the MAGIX-era keyboard shortcuts manual.
My most-used custom assignment: I mapped the Plug-In Chainer preview toggle to a single key near the home position — the stock shortcut requires two hands and interrupts the monitoring workflow. One key to toggle preview on/off during a mastering session makes A/B comparisons faster than anything else I've set up in SF Pro.
Frequently Asked Questions
What is the shortcut to start recording in Sound Forge Pro?
Ctrl+R starts recording from the cursor position when the Record dialog is configured in Manual mode. If the Record dialog isn't already configured, Ctrl+R opens it. Stop recording with Esc or by clicking Stop. Press M during recording to drop markers at specific points — mistakes, retake cues, or section boundaries — without interrupting the take. The full recording setup is in the recording guide.
What does the M key do in Sound Forge Pro?
M places a marker at the current cursor position during playback or recording without stopping. This is its main use: marking problem points in real time during a first-pass listen of a long file, then returning to each marked position with the 0–9 number keys to address them. Marker placement happens at the exact moment M is pressed — no pause, no position drift from stopping and restarting.
How do I zoom to my selection in Sound Forge Pro?
Ctrl+Up Arrow zooms to fit the current selection in the data window. If no selection is active, it zooms to maximum magnification (Zoom In Full). Ctrl+Down Arrow returns to the default zoom ratio. Up Arrow / Down Arrow (or mouse wheel) zoom in and out incrementally. Custom zoom ratios can be saved to keys 1 and 2 on the numeric keypad via Preferences → Display.
How do I jump to a specific marker in Sound Forge Pro?
Press the corresponding number key, 0–9 on the number row, not the numeric keypad, to jump the cursor directly to that numbered marker or to select the corresponding region. For marker-heavy sessions, use M during playback to place markers in real time, then use the number row to jump back to them during editing.
Can I customize keyboard shortcuts in Sound Forge Pro?
Yes — every shortcut is reassignable. Go to Options → Customize Keyboard. Select any command from the list, press the new key combination in the shortcut field, and click Assign. Custom maps save as .ini files and can be named and recalled from the same dialog. To restore defaults, select [Default] from the Keyboard map dropdown and click OK.
What are the shortcuts for the Plug-In Chainer in Sound Forge Pro?
With the Plug-In Chainer window in focus, Ctrl+P previews the chain, Ctrl+Shift+P processes the current selection, Ctrl+B bypasses the selected plug-in, Ctrl+Shift+B bypasses the whole chain, Ctrl+S saves the chain preset, Ctrl+T cycles Ignore / Mix / Insert Tail Data, Ctrl+E adds plug-ins, and Ctrl+Delete removes selected plug-ins. In newer versions, Up Arrow and Down Arrow select previous / next plug-ins. Older Sony-era shortcut lists use Ctrl+Shift+Tab and Ctrl+Tab for previous / next plug-in. Open the Chainer with Ctrl+Alt+0.