How to Use the Equalizer in Sound Forge Pro

Sound Forge Pro has three built-in EQ plugins — Graphic, Paragraphic, and Parametric — all under Process → EQ. The Paragraphic EQ is the one worth learning in depth. It combines the visual response curve of a graphic EQ with the full parameter control of a parametric EQ: adjustable frequency, adjustable gain, adjustable Q for every band. It's the EQ that shows up in every mastering and restoration session I do in Sound Forge.
Quick answer: Process → EQ → Paragraphic EQ. Add bands, set filter type (bell, shelf, high-pass, low-pass), adjust frequency and gain, preview with Bypass to compare, apply. The rest explains what each control does and when to reach for which EQ type.
Graphic EQ, Paragraphic EQ, Parametric EQ — What's the Difference
All three live under Process → EQ, and all three can also be accessed via FX Favorites for faster workflow. The difference matters before you commit to which one to open.
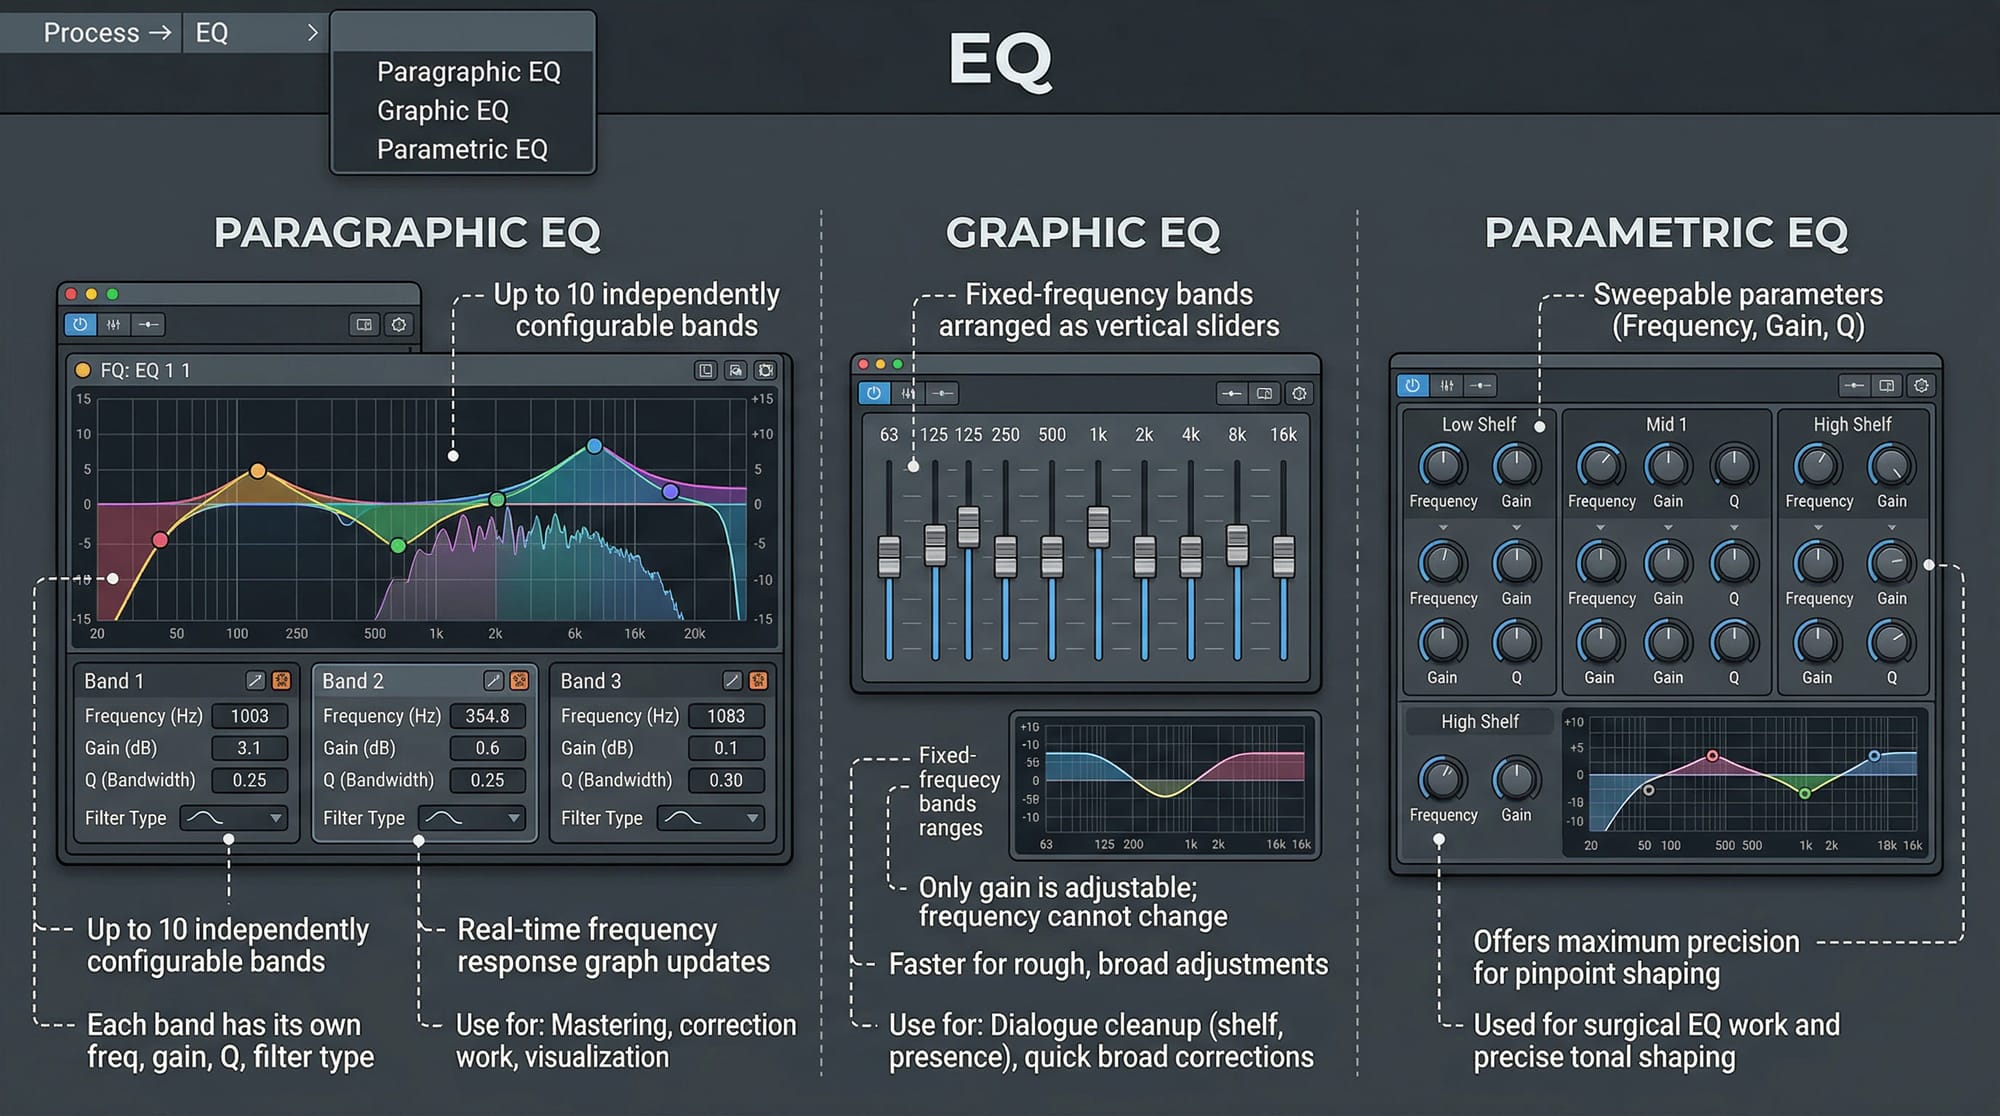
Paragraphic EQ — up to ten independently configurable bands (the exact count may vary by version). Each band has its own frequency, gain (dB), Q (bandwidth), and filter type. A frequency response graph updates in real time as you adjust settings. This is the one to use for mastering, correction work, and any situation where you need to see what you're doing. The graph shows the combined effect of all active bands, which is how you catch interactions between adjacent filters before they become audible problems.
Graphic EQ — fixed-frequency bands arranged as vertical sliders. Faster to use for rough adjustments but less precise — you can't change the center frequency of any band, only the gain. Useful for quick broad corrections where the exact frequency doesn't need to be pinpointed. On dialogue cleanup where I need to roll off a shelf and add a little presence, the Graphic EQ gets it done in 30 seconds without touching a single number. For anything more precise, I close it and open Paragraphic.
Parametric EQ — fewer bands than the Paragraphic, numeric-only interface with no visual curve. The oldest of the three. Most people prefer the Paragraphic EQ over this one because the visual feedback is useful, but Parametric EQ exists for users who prefer typing exact values without a graphical interface in the way.
I use the Parametric EQ occasionally when I already know the exact frequency and gain from a previous session and just want to enter the numbers directly — no graph needed when the values are already written in my session notes.
Ozone Elements (bundled with Sound Forge Pro) also has an EQ module, accessible through the Plug-In Chainer. The Ozone EQ supports linear phase mode, which the native EQs don't — relevant for mastering where phase shifts from minimum-phase EQ can affect transient clarity at high boost/cut amounts. For surgical corrections of 3 dB or less, the difference is inaudible. For heavy EQ work on final masters — where a +5 dB boost at 12 kHz is actually going on a release — Ozone Elements is worth loading instead of the native Paragraphic. The phase coherence at extreme settings is audibly cleaner.
Opening the Paragraphic EQ and Adding Bands
Go to Process → EQ → Paragraphic EQ. The window opens with a frequency response graph at the top and band controls below. By default it opens with a flat response — no bands active.

Click the checkbox next to Band 1 to enable it. Controls appear for that band: Frequency (Hz), Gain (dB), and depending on the filter type, a Q (bandwidth) control. The band's effect appears immediately in the frequency response graph.
Add more bands by enabling Band 2, Band 3, and so on — up to ten bands total. The graph shows each band's contribution in a different color and the combined response as the white or highlighted line. This combined curve is what matters: a bell boost at 200 Hz and a shelf cut below 250 Hz can interact in ways that aren't obvious until you see the curve.
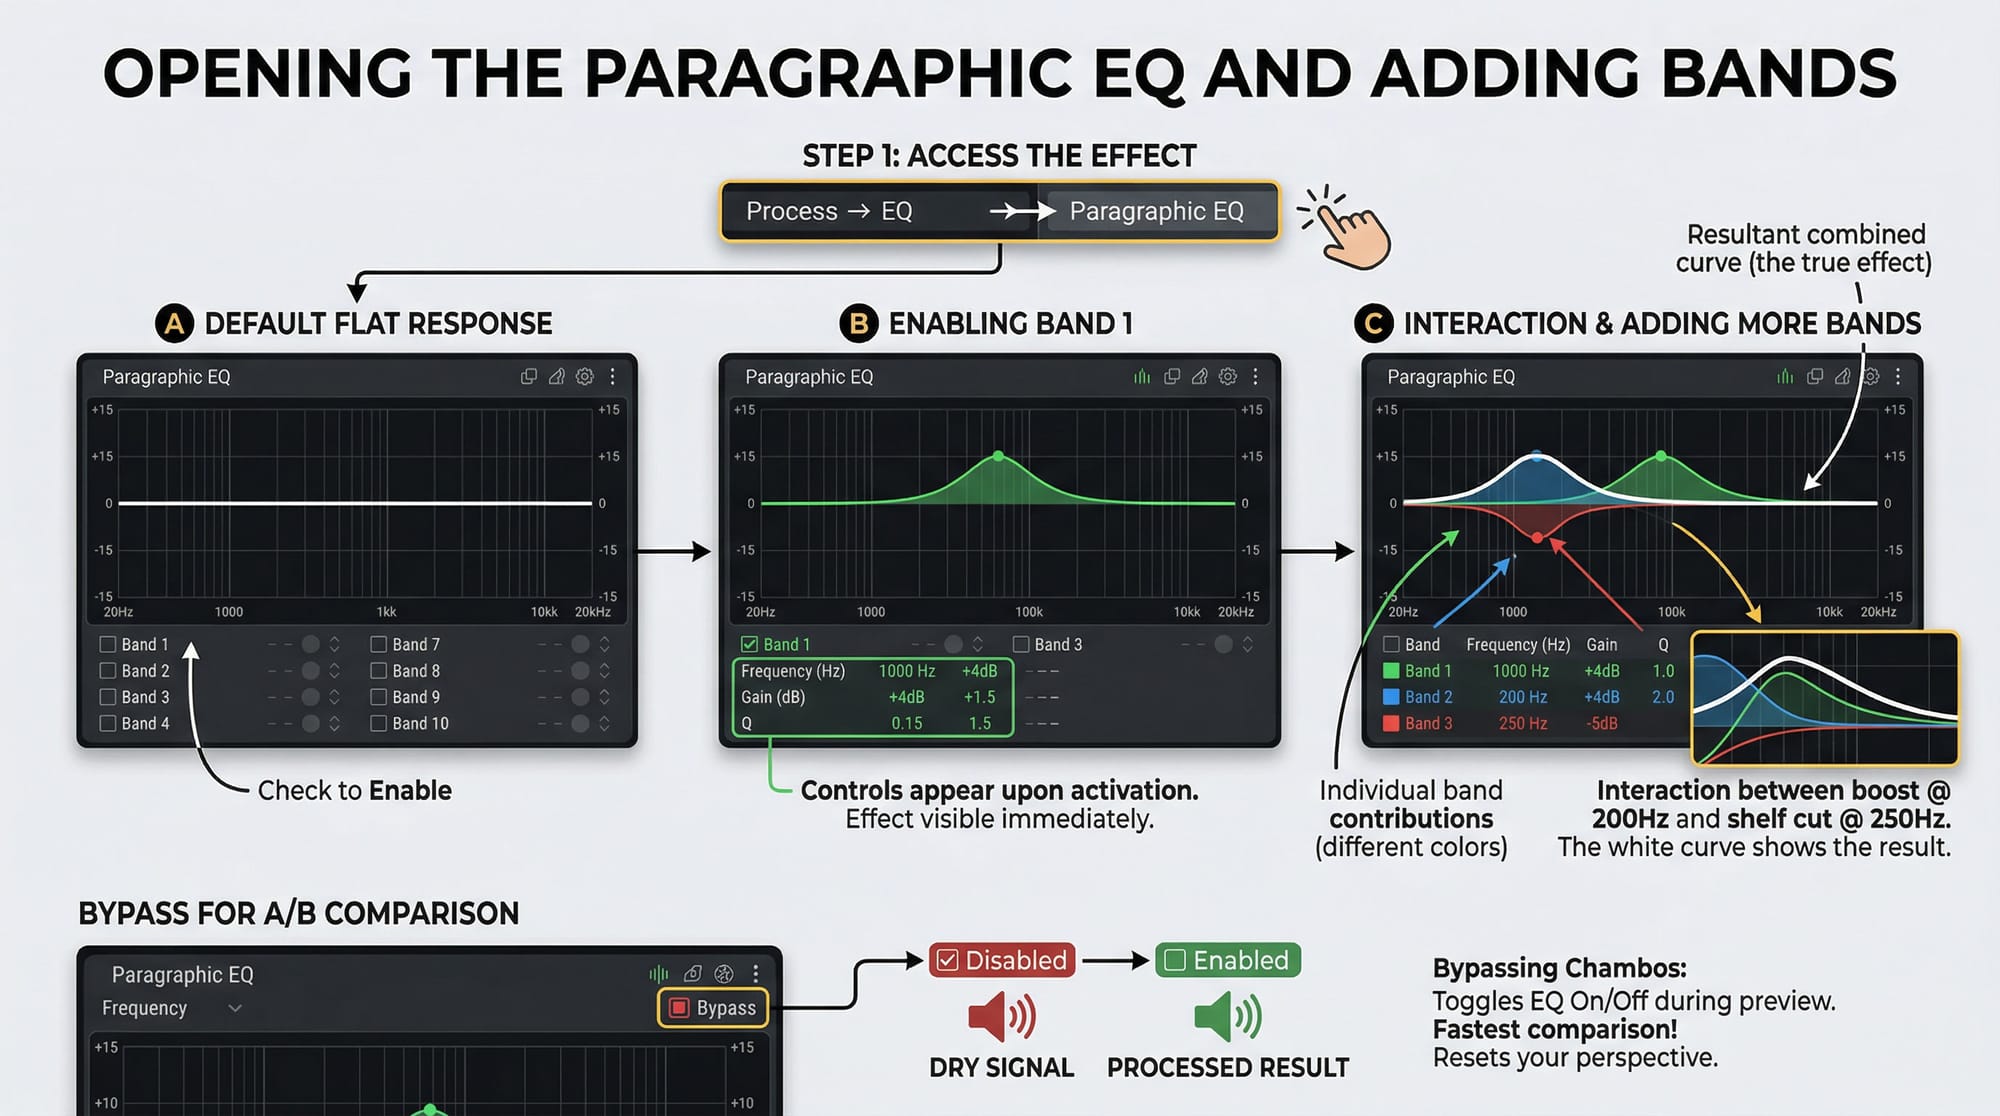
Enable Bypass at the bottom of the window to toggle the EQ on and off during preview. This is the fastest A/B comparison — click Bypass, listen to the dry signal, click Bypass again, hear the processed result. I keep the Bypass checkbox visible whenever I'm working through EQ decisions because the ear calibrates to the processed version quickly and A/B resets your perspective. Practical filter presets for common restoration tasks in Sound Forge are collected in the Digital FAQ Sound Forge restoration guide.
Filter Types: What Each One Does
Each band in the Paragraphic EQ has a filter type dropdown. Choosing the wrong type for the job is the most common EQ mistake in Sound Forge — using a bell where a shelf would work better, or using a shelf where a high-pass is needed.
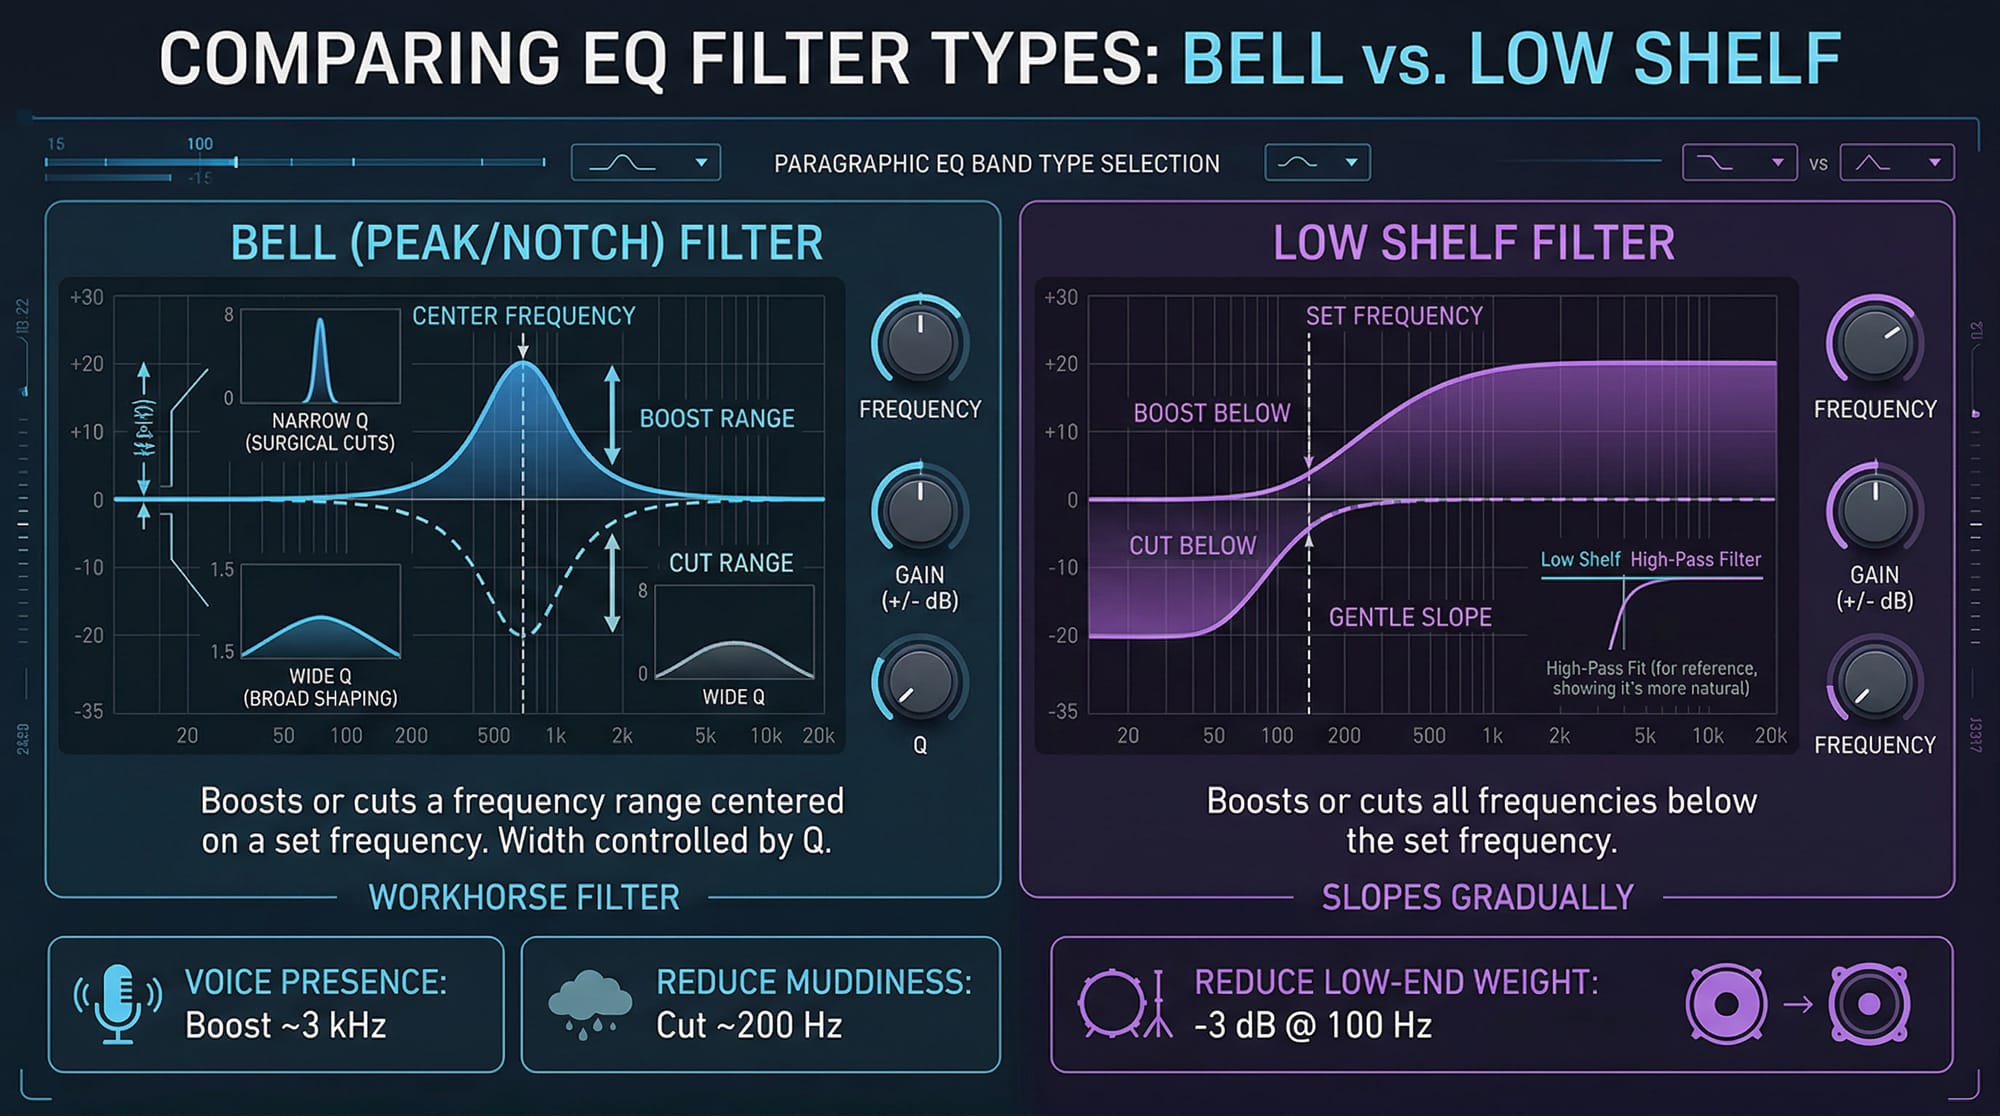
Bell (Peak/Notch) — boosts or cuts a frequency range centered on the frequency you set. Width is controlled by Q. This is the workhorse filter: boost at 3 kHz to add vocal presence, cut at 200 Hz to reduce muddiness. Narrow Q (high value, around 4–8) for surgical cuts; wide Q (low value, around 0.5–1.5) for broad tonal shaping.
Bell filters cover the majority of EQ moves in mastering and restoration work. I reach for them first in almost every session — identify the frequency, set the gain, adjust Q until it sounds right, move on.
Low Shelf — boosts or cuts all frequencies below the set frequency with a gentle slope. Set to 100 Hz at -3 dB to take weight out of a heavy low end. The shelf slopes gradually rather than cutting abruptly, which sounds more natural on musical material than a high-pass filter for most corrections.
High Shelf — same as Low Shelf but for the high end. A +2 dB high shelf above 8 kHz adds air to a dull recording without affecting the midrange. A -3 dB high shelf above 10 kHz pulls back harsh digital brightness. On a cassette transfer I worked on last autumn, a -2.5 dB high shelf above 9 kHz removed tape hiss without touching the program material — a shelf was the right call there because a low-pass would have taken the top end of the cymbals with it.
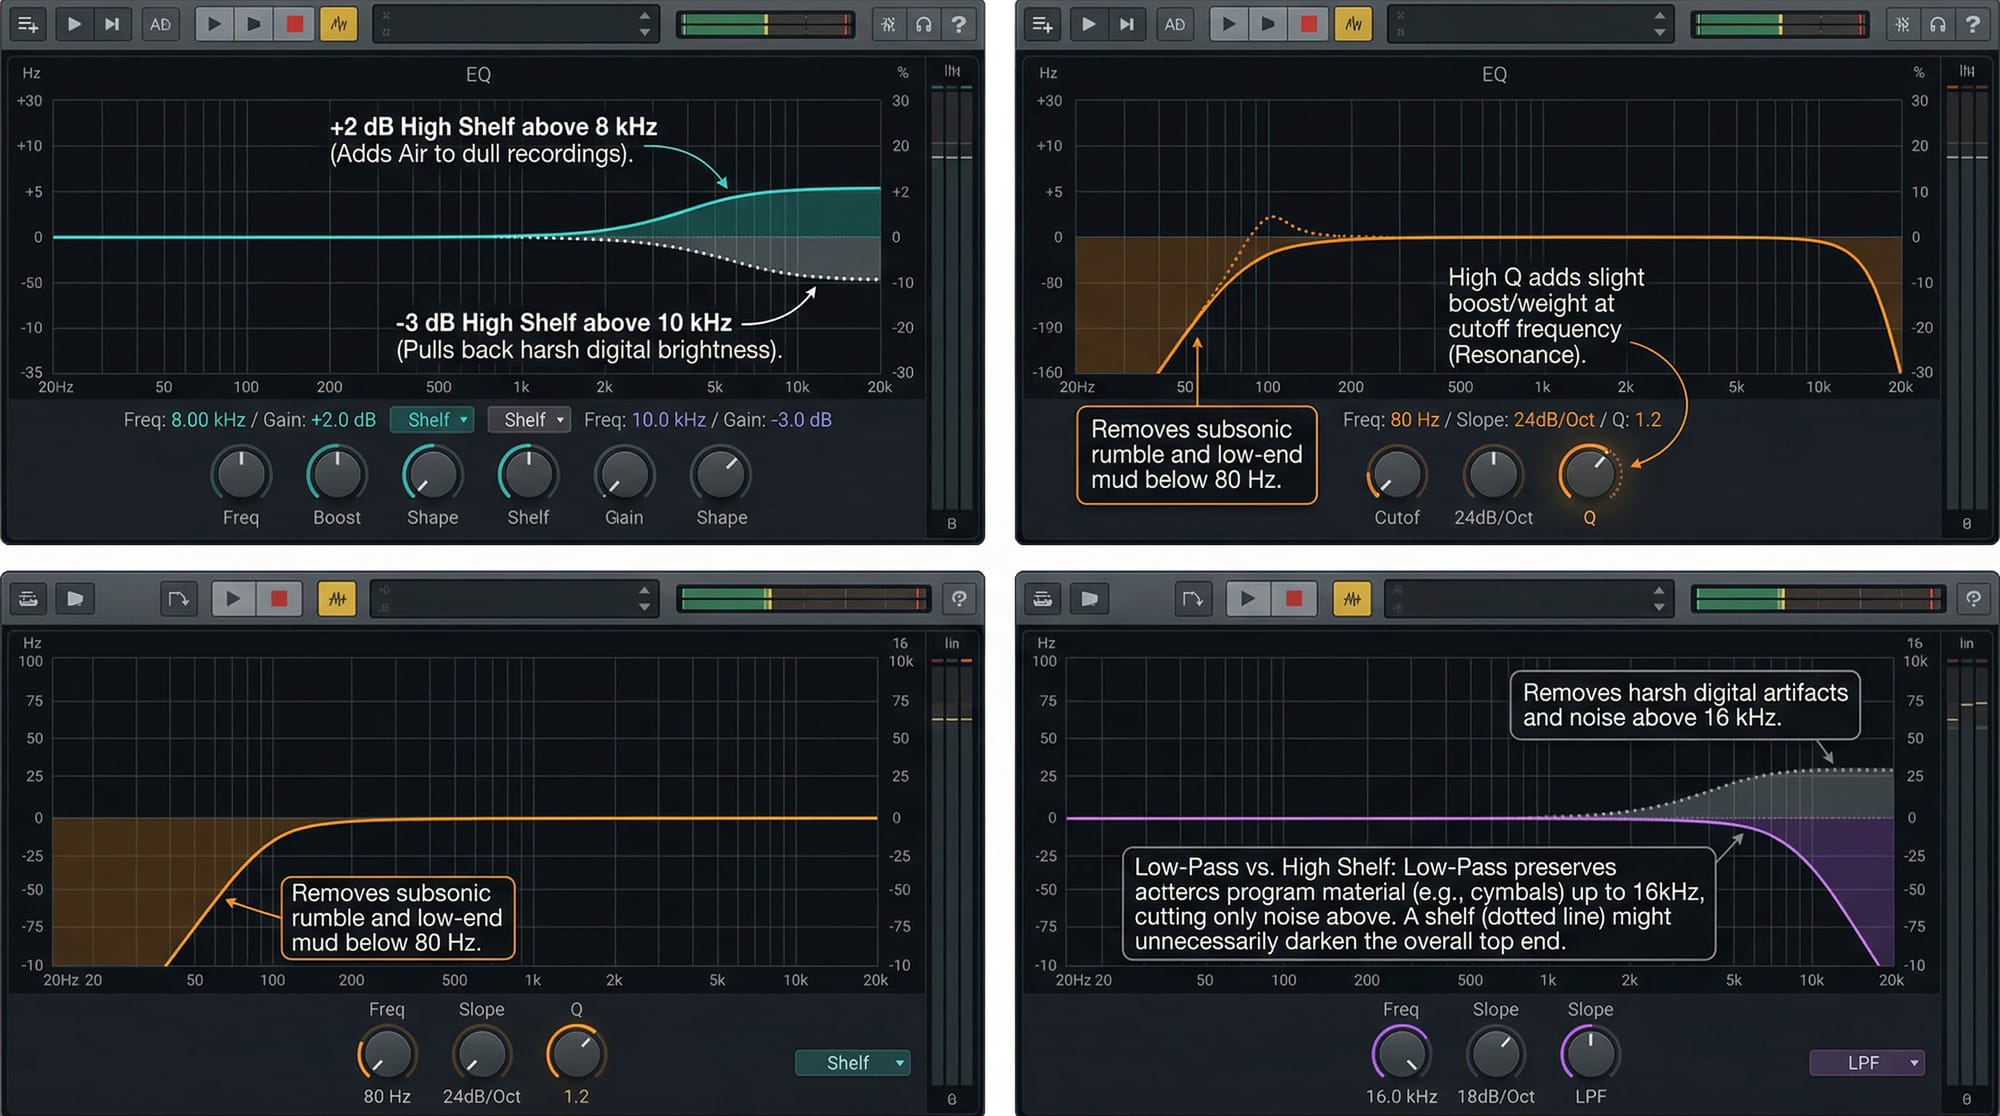
High-Pass (Low Cut) — removes everything below the set frequency with a steeper slope than a shelf. At 80 Hz it eliminates rumble and subsonic content without affecting bass. The Q controls the slope steepness and the resonance at the cutoff — a high Q value produces a slight boost at the cutoff point before it rolls off, which can add weight at exactly the cutoff frequency if you want it.
Low-Pass (High Cut) — removes everything above the set frequency. At 16 kHz it removes harsh digital artifacts from degraded recordings. Less commonly needed than a high-pass for most mastering work, but useful for noise reduction when noise lives entirely in the high end and a shelf would affect too much program material.
A confusion that comes up regularly on forums: Low Shelf and High-Pass are not the same thing, even though both affect low frequencies. A Low Shelf changes the gain of low frequencies while leaving them audible. A High-Pass removes them. At extreme settings both produce similar results, but at -3 dB vs a 12 dB/octave slope they do very different things to the audio.
The Q Control: Broad or Narrow
Q is the bandwidth control for bell filters and the slope/resonance control for high-pass and low-pass filters. For bell EQ, Q determines how many octaves around your center frequency are affected by the boost or cut.
A Q of 0.7 affects roughly two octaves around the center frequency — broad, musical, good for tonal shaping. A Q of 4.0 affects about a third of an octave — narrow, surgical, good for notching out a specific resonance or hum frequency. A Q of 8.0 or higher is essentially a notch filter: it removes a very specific frequency with minimal effect on the neighbors.
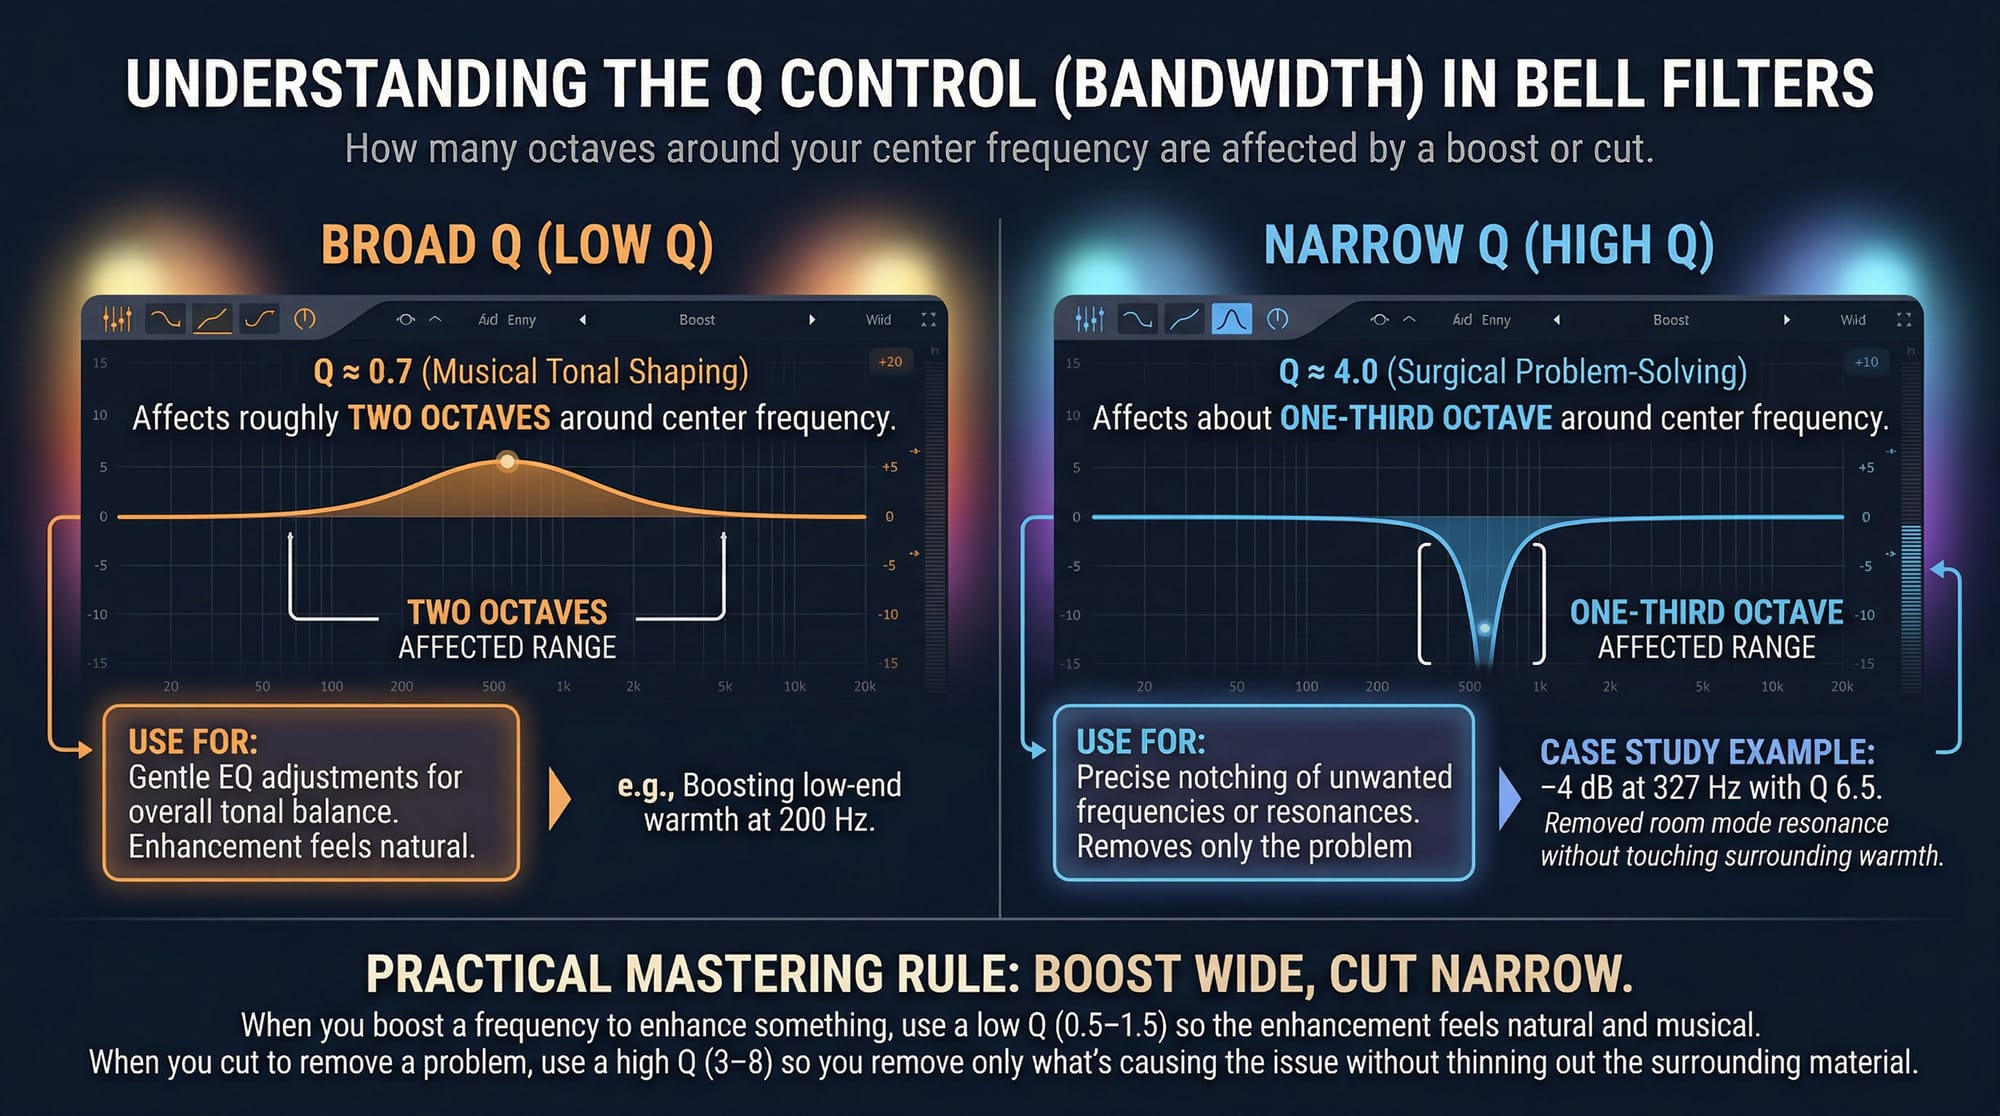
The practical rule from mastering practice: boost wide, cut narrow. When you boost a frequency to enhance something, use a low Q (0.5–1.5) so the enhancement feels natural and musical. When you cut to remove a problem, use a high Q (3–8) so you remove only what's causing the issue without thinning out the surrounding material.
On a mastering session for a single last year, the vocalist's recording had a sharp resonance at 327 Hz — a room mode from a parallel-walled home studio. At Q 6.5 and -4 dB, the notch removed the resonance completely without touching the warmth on either side. The same cut at Q 1.0 would have removed 300–400 Hz broadly and made the vocal sound thin.
Applying EQ to a Selection or the Whole File
Sound Forge Pro is a destructive editor. EQ applied from Process → EQ modifies the file permanently — make sure you have a backup or use Ctrl+Z immediately if you don't like the result.
For the entire file: Ctrl+A to select all, then open the EQ. For a specific section: drag a selection, then open the EQ. The EQ applies only to the selected region. This matters when you're working on a file that has sections with different frequency problems — a dialogue recording where one speaker is brighter than another, or a vinyl transfer where the EQ of the first track differs from the second.
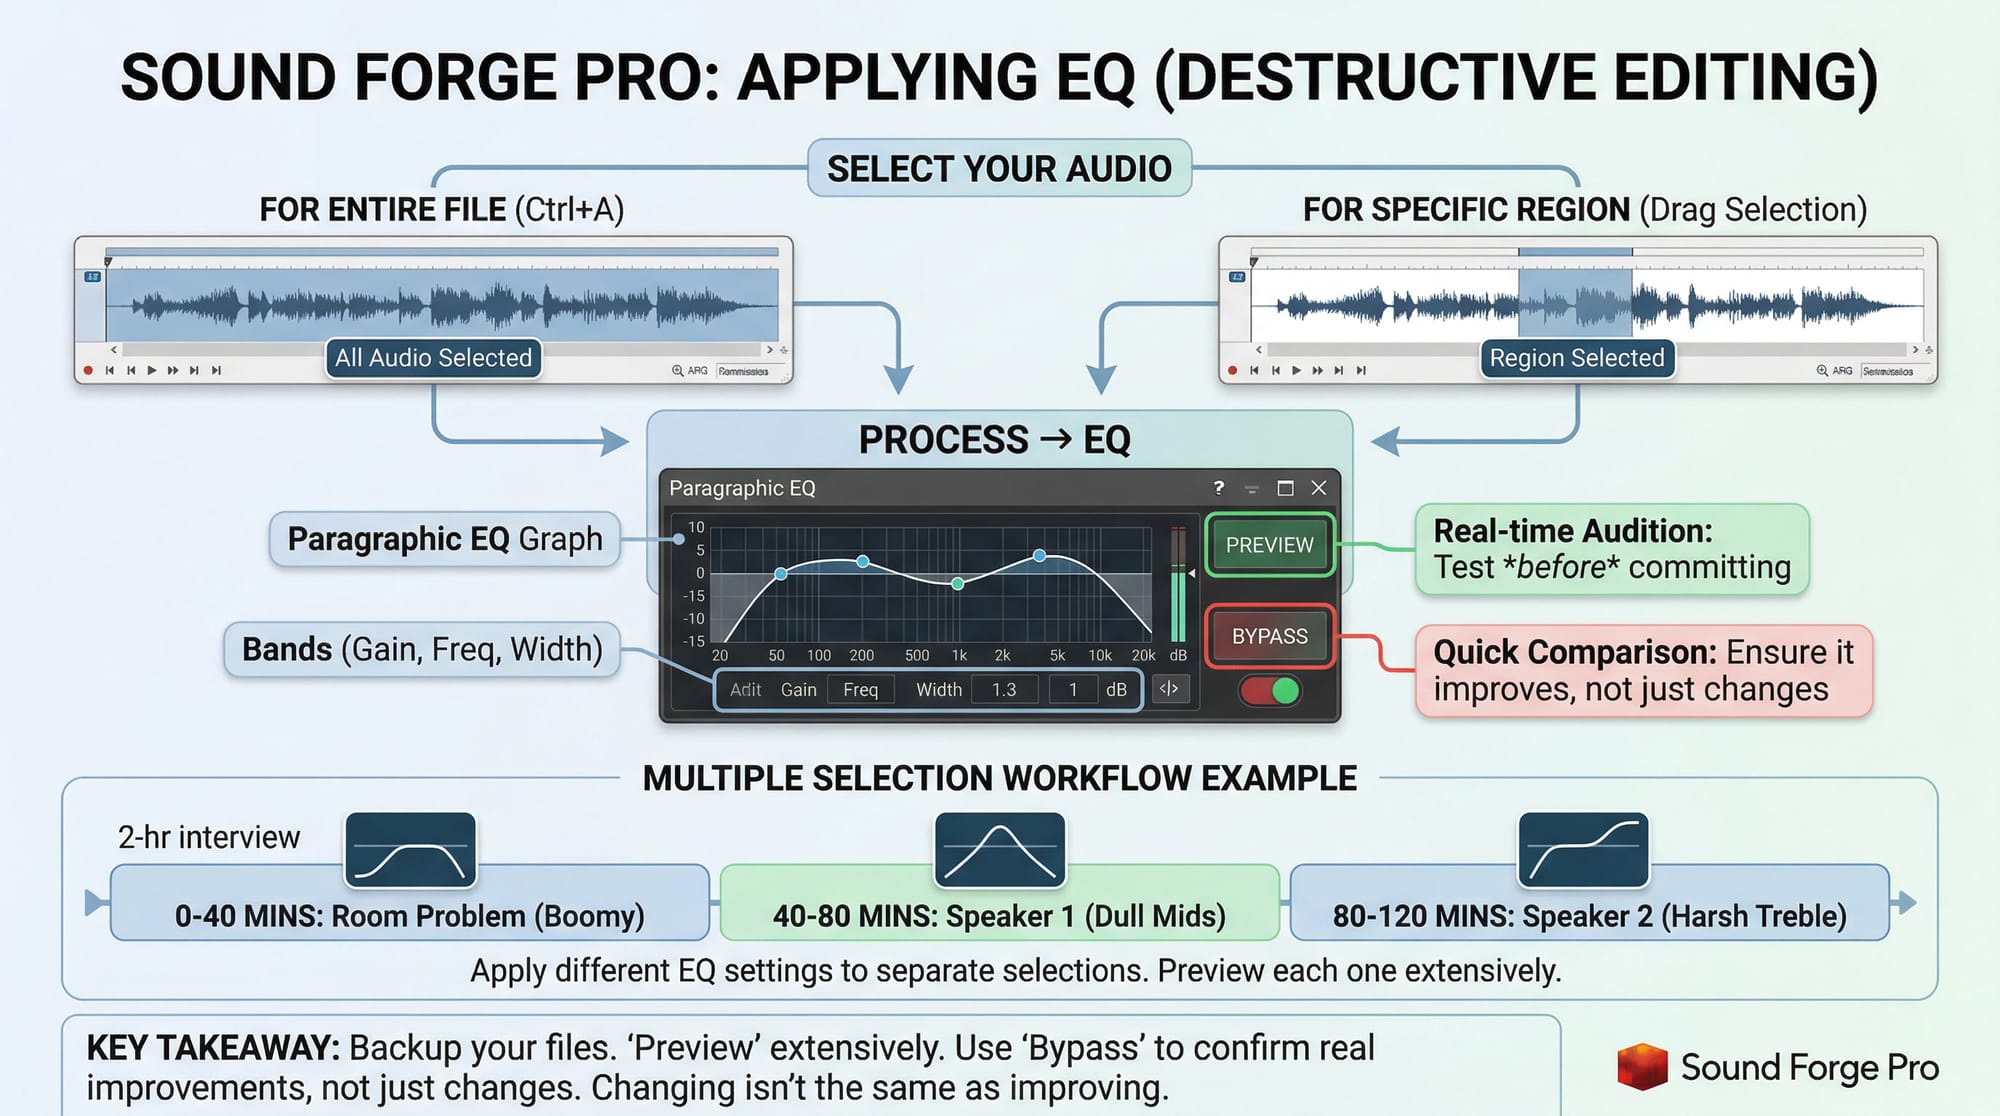
Preview extensively before applying. The Preview button in the Paragraphic EQ window plays your audio through the EQ settings in real time without committing. Use the Bypass toggle during preview to confirm the EQ is actually improving the sound and not just changing it. Changing isn't the same as improving — the ear adapts to any EQ curve after a few seconds, which is why Bypass comparison is the reliable check.
On a two-hour interview recording I processed last spring, I applied different EQ curves to three separate sections — the first 40 minutes had a room problem the other two didn't. Selecting each section individually and applying section-specific EQ was the only way to handle it cleanly without averaging a compromise EQ across the whole file.
EQ and Clipping: The Problem Nobody Warns You About
Boosting frequencies with EQ increases the peak level of the file. A file that's already close to 0 dBFS before EQ can clip after a +3 dB boost even if the boost sounds subtle. Sound Forge Pro's meters show the result in real time during preview — watch the peak meters while previewing EQ, not just the waveform display.
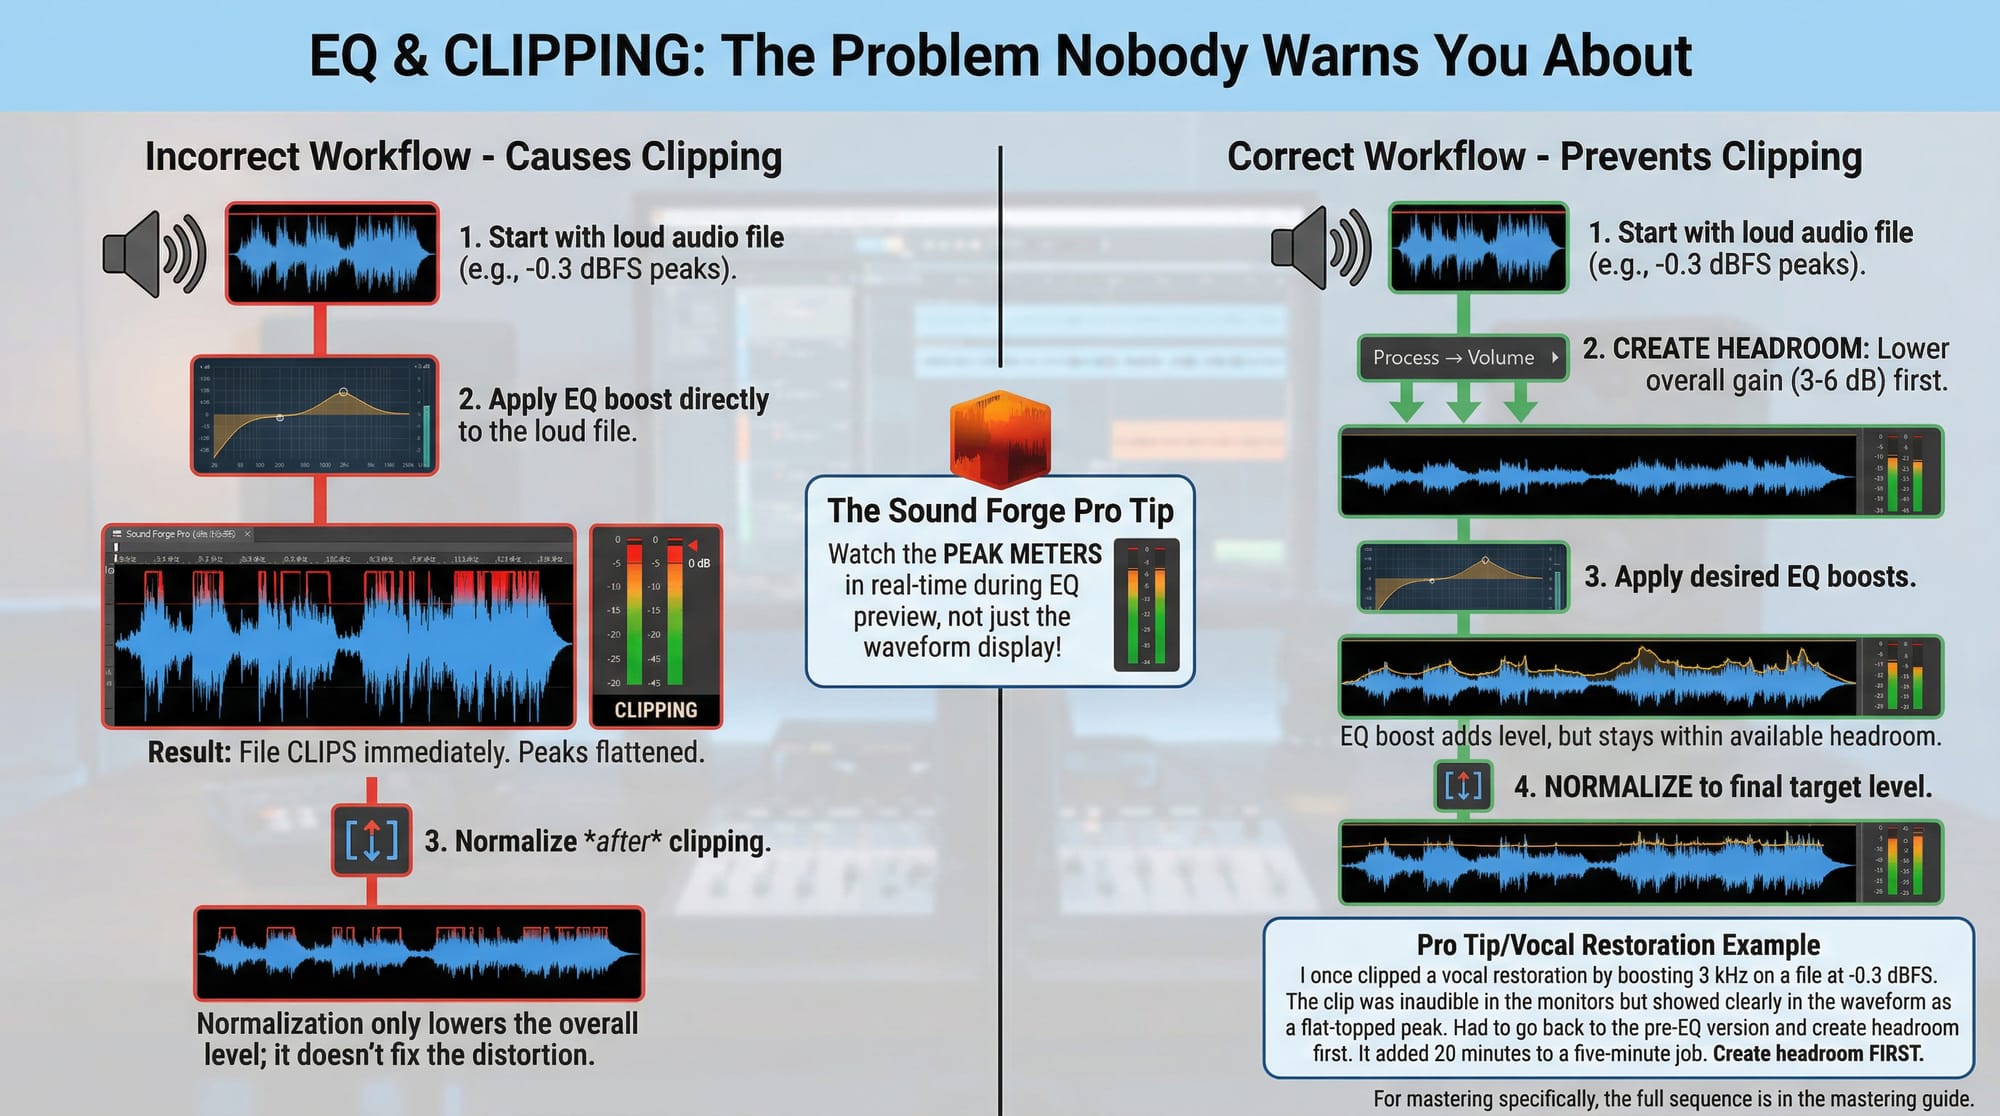
If the meters are hitting red during EQ preview, lower the overall gain first using Process → Volume to bring the file down 3–6 dB of headroom before EQing, then normalize after EQ is applied. Adding EQ to an already-maxed file then normalizing after does nothing — the normalization only raises or lowers the overall level, it doesn't undo the clipping that happened at the peaks. The correct order is: create headroom, apply EQ, then bring back to target level.
I clipped a vocal restoration once by boosting 3 kHz on a file sitting at -0.3 dBFS. The clip was inaudible in the monitors but showed up clearly in the waveform as a flat-topped peak. Had to go back to the pre-EQ version and create headroom first. It added 20 minutes to a job that should have taken five.
For mastering specifically, the full sequence is in the mastering guide. EQ comes first in the chain, before compression and loudness normalization, for exactly this reason — you want to address frequency balance on a signal with room to move.
Using EQ with the Spectrum Analysis Tool
The Paragraphic EQ is most precise when you combine it with View → Spectrum Analysis. Take a snapshot of the file's frequency content before opening the EQ, then use what you see to inform where to place bands rather than hunting by ear alone.
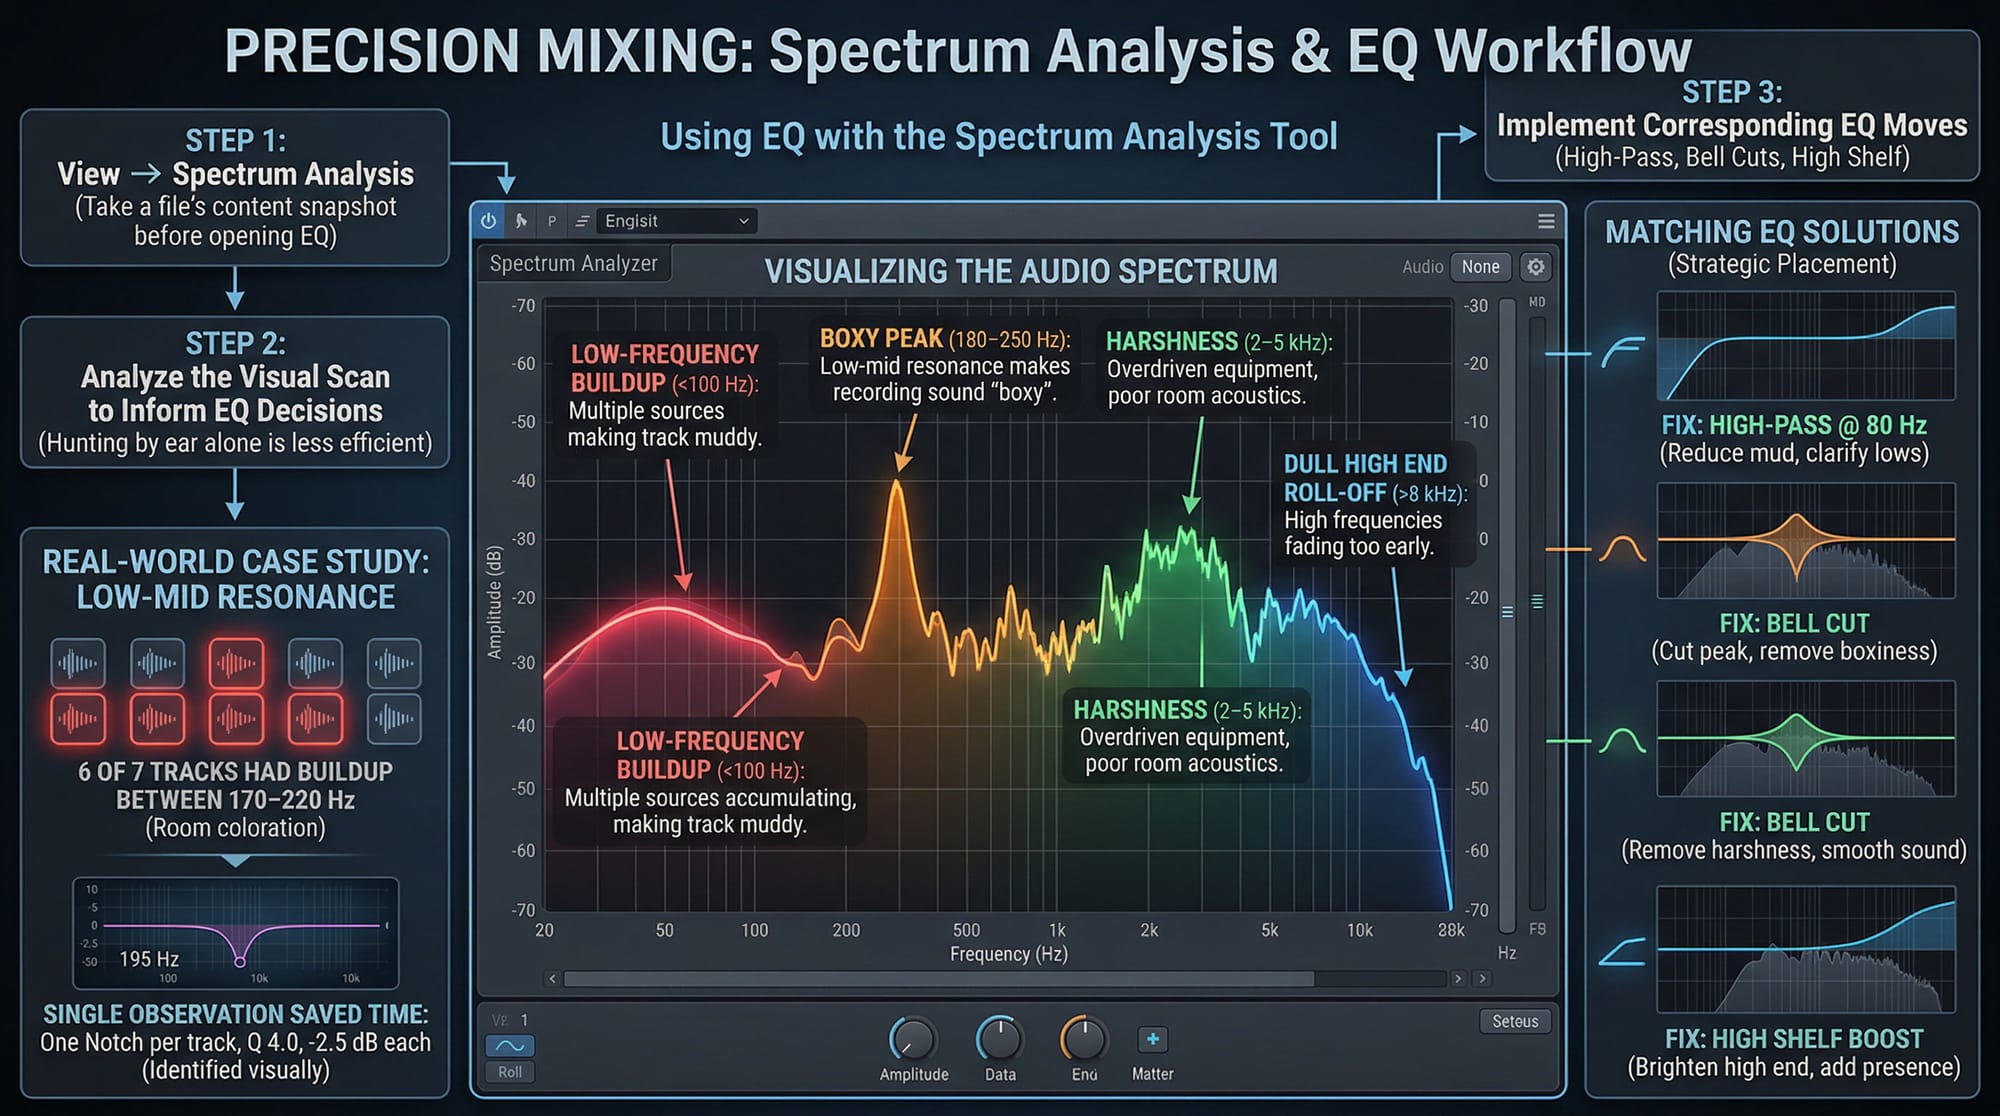
Last spring I ran Spectrum Analysis on 7 tracks before touching EQ on any of them. Six of the seven had the same buildup between 170–220 Hz — the room the producer mixed in had a low-mid resonance that colored everything. One notch per track, Q 4.0, -2.5 dB each. That single observation saved significant time because without the spectrum scan I'd have been guessing frequency by ear. Common things the spectrum shows that inform EQ decisions: a low-frequency buildup below 100 Hz from multiple sources accumulating; a peak in the 180–250 Hz range that makes the recording sound boxy; harshness in the 2–5 kHz range from overdriven equipment or poorly tuned rooms; a dull high end that rolls off too early above 8 kHz. Each of those has a corresponding EQ move — high-pass at 80 Hz, bell cut at the peak frequency, bell cut at the harshness frequency, high shelf boost above 8 kHz. Full workflow for using the spectrum tool is in the Spectrum Analysis guide.
Frequently Asked Questions
Where is the EQ in Sound Forge Pro?
Process → EQ. The submenu has three options: Graphic EQ, Paragraphic EQ, and Parametric EQ. All three are also accessible through FX Favorites. The Paragraphic EQ is the most flexible — it has up to ten independently configurable bands with frequency, gain, Q, and filter type controls for each, plus a real-time frequency response graph.
What is the difference between Graphic EQ, Paragraphic EQ, and Parametric EQ in Sound Forge Pro?
Graphic EQ has fixed-frequency bands you can only boost or cut — fast but imprecise. Parametric EQ has fully adjustable bands but no visual curve display. Paragraphic EQ combines both: adjustable frequency, gain, Q, and filter type for each band, plus a visual frequency response graph. For most work in Sound Forge Pro, Paragraphic EQ is the right choice.
How do I add a high-pass filter in Sound Forge Pro?
Process → EQ → Paragraphic EQ. Enable Band 1. Change the filter type dropdown to High-Pass. Set the frequency — 80 Hz to remove subsonic rumble and low-frequency noise, 120 Hz for vocals where chest resonance is excessive. Adjust the Q for the slope steepness. Preview, then apply. A Low Shelf filter is an alternative that's less aggressive — it reduces rather than removes frequencies below the set point.
What Q value should I use in Sound Forge Pro's Paragraphic EQ?
For broad tonal shaping (adding warmth, removing harshness generally): Q 0.5–1.5. For specific frequency corrections (removing a resonance, notching out hum): Q 3–8. For a very narrow notch (eliminating a specific frequency while leaving neighbors intact): Q 8–12 or higher. The standard practice is to boost wide and cut narrow — use low Q for boosts, high Q for cuts.
How do I apply EQ without clipping in Sound Forge Pro?
Watch the peak meters during preview — any red means the boosted output is clipping. If boosting causes clipping, use Process → Volume to reduce the file level by 3–6 dB before applying EQ, then normalize after. Alternatively, apply the EQ as a cut-only pass first to remove problem frequencies, then add a small output gain in the EQ dialog if needed. Clipping introduced during EQ cannot be fixed by normalization afterward.
Can I use VST EQ plugins in Sound Forge Pro?
Yes — any installed VST2 or VST3 EQ plugin works through the Plug-In Chainer (View → Plug-In Chainer or FX Favorites → Apply Plug-In Chain). Popular choices that Sound Forge Pro users reach for include Ozone's EQ module (bundled with Sound Forge Pro Suite), FabFilter Pro-Q, and free options like TDR Nova. The Plug-In Chainer applies the EQ destructively to the selected audio the same way the native EQs do. The noise reduction guide covers how EQ fits alongside noise reduction in a restoration workflow.
Should I use EQ before or after noise reduction in Sound Forge Pro?
Noise reduction first, then EQ. NR algorithms work better on an un-equalized signal because the noise print is taken from the original frequency balance. EQing first changes the frequency content, which can make the noise print inaccurate and cause artifacts. Apply NR to address broadband noise or hum, then use EQ to correct the frequency balance of the clean signal. The official Sound Forge EQ documentation covers all three EQ types in detail.