How to Convert Audio Files in Sound Forge Pro


Converting a single file to a different format takes about ten seconds in Sound Forge Pro — File → Save As, pick the format, set the parameters, done. Converting a folder of files without opening them individually takes a couple of minutes using the Batch Converter. Both paths go through the same underlying export engine, which handles WAV, FLAC, MP3, AIFF, OGG, WMA, AAC, MP4, and a few dozen other formats. The only thing worth knowing before you start is which approach to use and what the settings in the Save As dialog actually do.
Quick answer: File → Save As → select format from the dropdown → click Custom to set bit depth, sample rate, bit rate → Save. For multiple files: Tools → Batch Converter. The rest explains format settings, what to avoid with lossy re-encoding, and where the Batch Converter fits.
Converting a Single File: File → Save As
Open the file. Go to File → Save As. The Save As dialog has three fields that matter for conversion: the Save as type dropdown (format), the Template dropdown (preset parameter combinations), and the Custom button (manual parameter control).
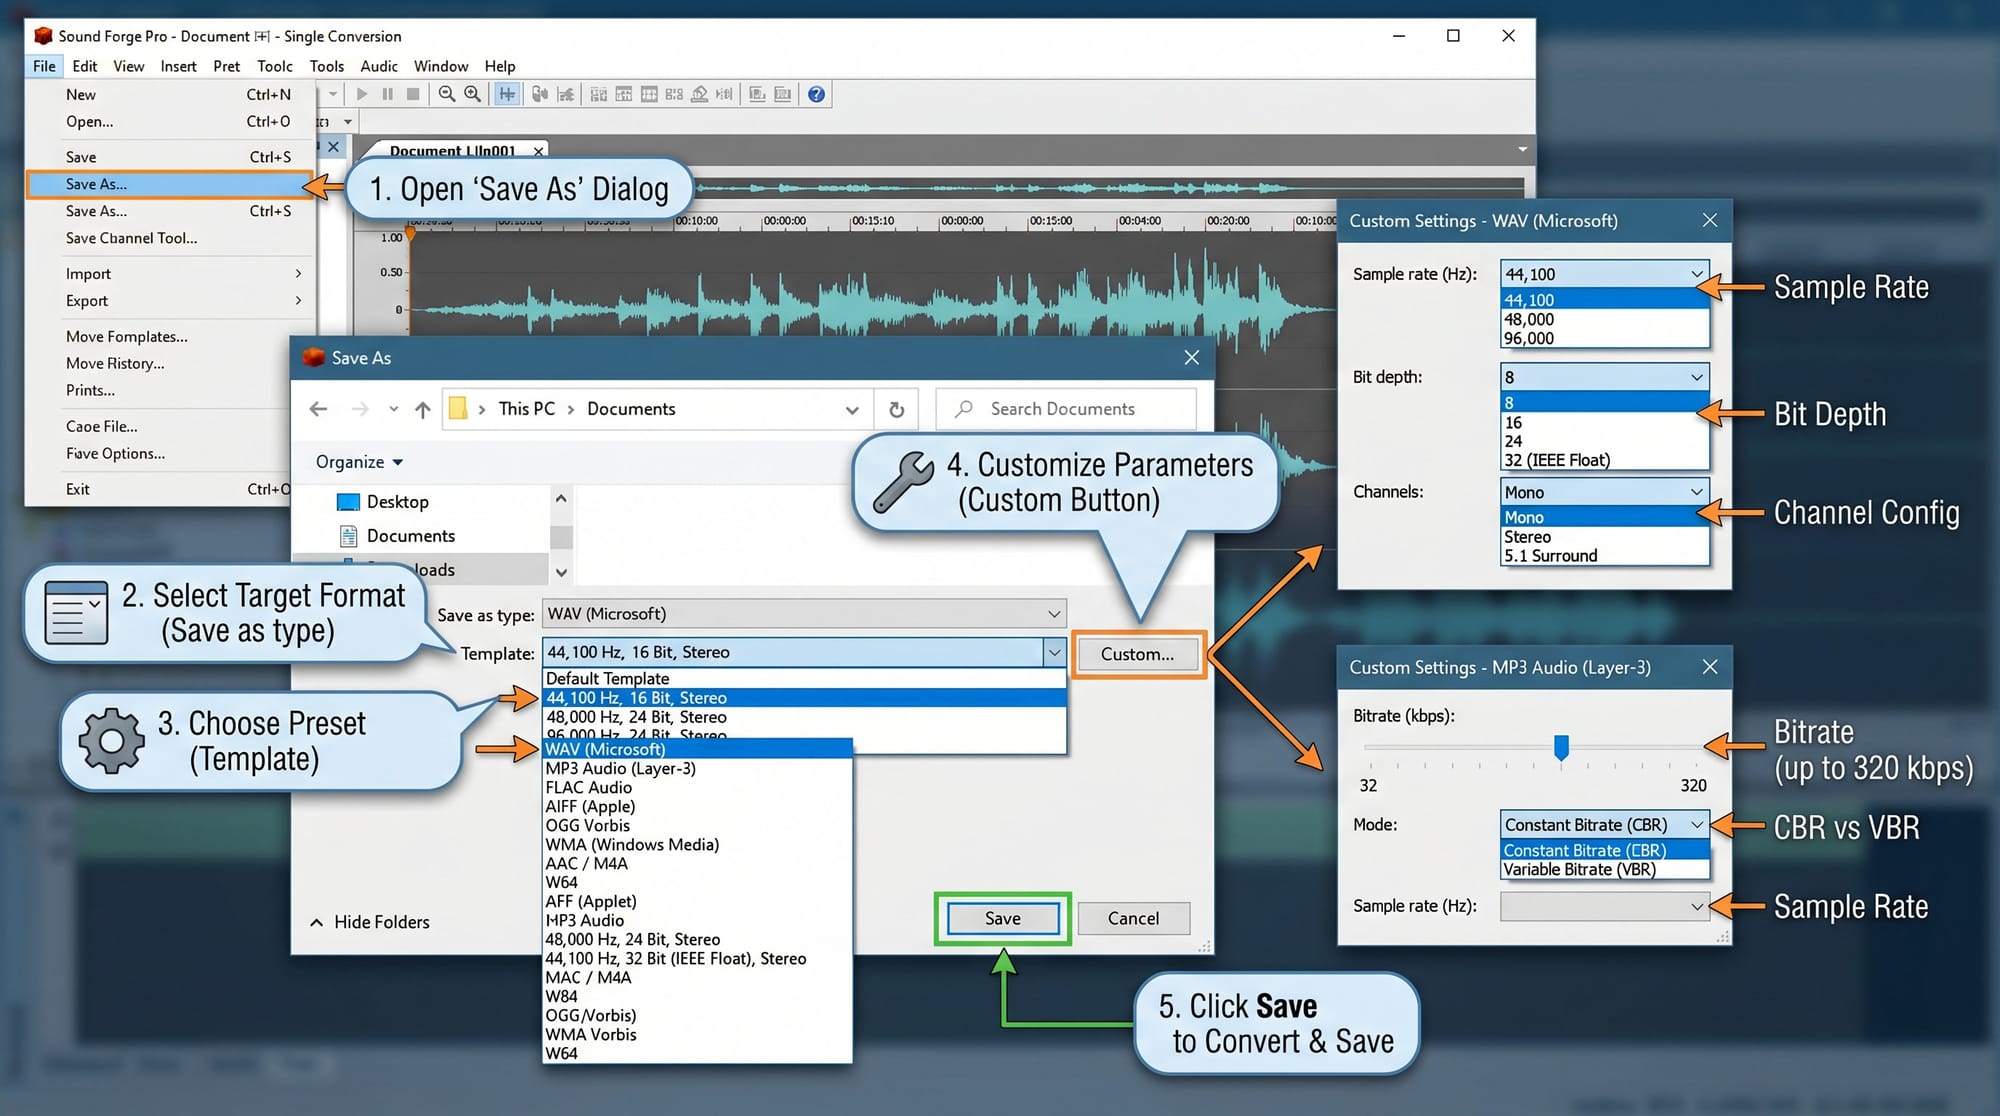
Select the target format from Save as type. The format list includes everything Sound Forge Pro supports — WAV, MP3, FLAC, AIFF, OGG Vorbis, WMA, AAC/M4A, W64, and more. Once you pick a format, the Template dropdown populates with presets for that format. For WAV it shows options like "44,100 Hz, 16 Bit, Stereo" and "48,000 Hz, 24 Bit, Stereo". For MP3 it shows bitrate presets.
If a preset matches what you need, select it and Save. If you need custom parameters, click Custom. The Custom dialog for WAV lets you set sample rate, bit depth, and channel configuration. The Custom dialog for MP3 lets you set bitrate (up to 320 kbps), CBR vs VBR, and sample rate. Set what you need, click OK, then Save.
The file saves to the location you specify. The original file stays open in Sound Forge — Save As creates a new file, it doesn't overwrite the source. I use a naming convention for converted files: original name plus the format suffix before the extension, like "mix_v3_flac.flac" and "mix_v3_mp3.mp3" from the same WAV source. Sounds pedantic until you're looking at a folder of 40 deliverables three months later. If you want to overwrite, use File → Save, but be aware that saving a lossy file (MP3, OGG) with File → Save re-encodes it through Sound Forge's encoder, which may change the bitrate unless you set it explicitly in preferences first.
Supported Formats: What Sound Forge Pro Can Read and Write
Sound Forge Pro reads and writes a broader format list than most dedicated audio editors. The official Sound Forge Pro features page lists the full format support. The formats you'll actually use for conversion work:
WAV — the default for everything in the internal workflow. Uncompressed PCM, up to 32 channels, up to 64-bit/768 kHz depending on version. No quality loss. No encoding decisions beyond bit depth and sample rate. Always work in WAV until you're ready to produce a final deliverable in a lossy format.
FLAC — lossless compression. Smaller than WAV, identical audio quality. The right format for archiving and for delivering to clients or services that accept lossless. Sound Forge Pro exports FLAC up to 24-bit. If you need FLAC at 32-bit float, export WAV and convert externally — the FLAC spec supports it but the SF Pro encoder doesn't go there.
MP3 — lossy. Up to 320 kbps CBR at 44.1 kHz stereo. The Fraunhofer encoder in Sound Forge Pro has a quirk worth knowing: mono encoding above 128 kbps isn't supported. If you need 320 kbps mono (relevant for spoken word where mono doubles the effective resolution), export WAV and encode with a standalone tool like WinLAME.
AIFF — Apple's uncompressed format. Functionally equivalent to WAV for audio data, different container. Use it when delivering to Pro Tools users or Apple-ecosystem workflows that expect AIFF.

OGG Vorbis, WMA, and AAC/M4A round out the lossy options. OGG is for open-source and Linux delivery targets, WMA for legacy Windows media contexts, AAC/M4A for Apple devices and streaming services. All are available in Save As, and none of them belong in your project until the final delivery step.
I keep the full format list mentally sorted into two categories: lossless sources to work in (WAV, FLAC, AIFF, W64) and delivery formats to export to last (MP3, OGG, WMA, AAC). Once audio goes lossy it doesn't come back, so the only time you should be in a lossy format during an active project is when the source material came in as lossy and you're editing it before re-delivery — and in that case, use the proxy setting described below.
The Re-encoding Problem: What Not to Do with Lossy Files
Re-encoding a lossy file to another lossy format degrades the audio quality every time. MP3 → MP3 via Sound Forge means decoding the original to PCM internally, processing it, then encoding back to MP3. The second encoding pass introduces another generation of compression artifacts on top of the first. The difference is often subtle at 320 kbps but audible at 128 kbps, and it compounds with each re-encode.
The practical rule documented across magix.info and Gearspace threads — including a specific magix.info thread on the 256 kbps re-encoding bug — is to work in PCM for the entire project. If a client sends you an MP3, convert it to WAV immediately on import, do all editing in WAV, and produce the final deliverable as whatever format they need. The one extra step saves audio quality.
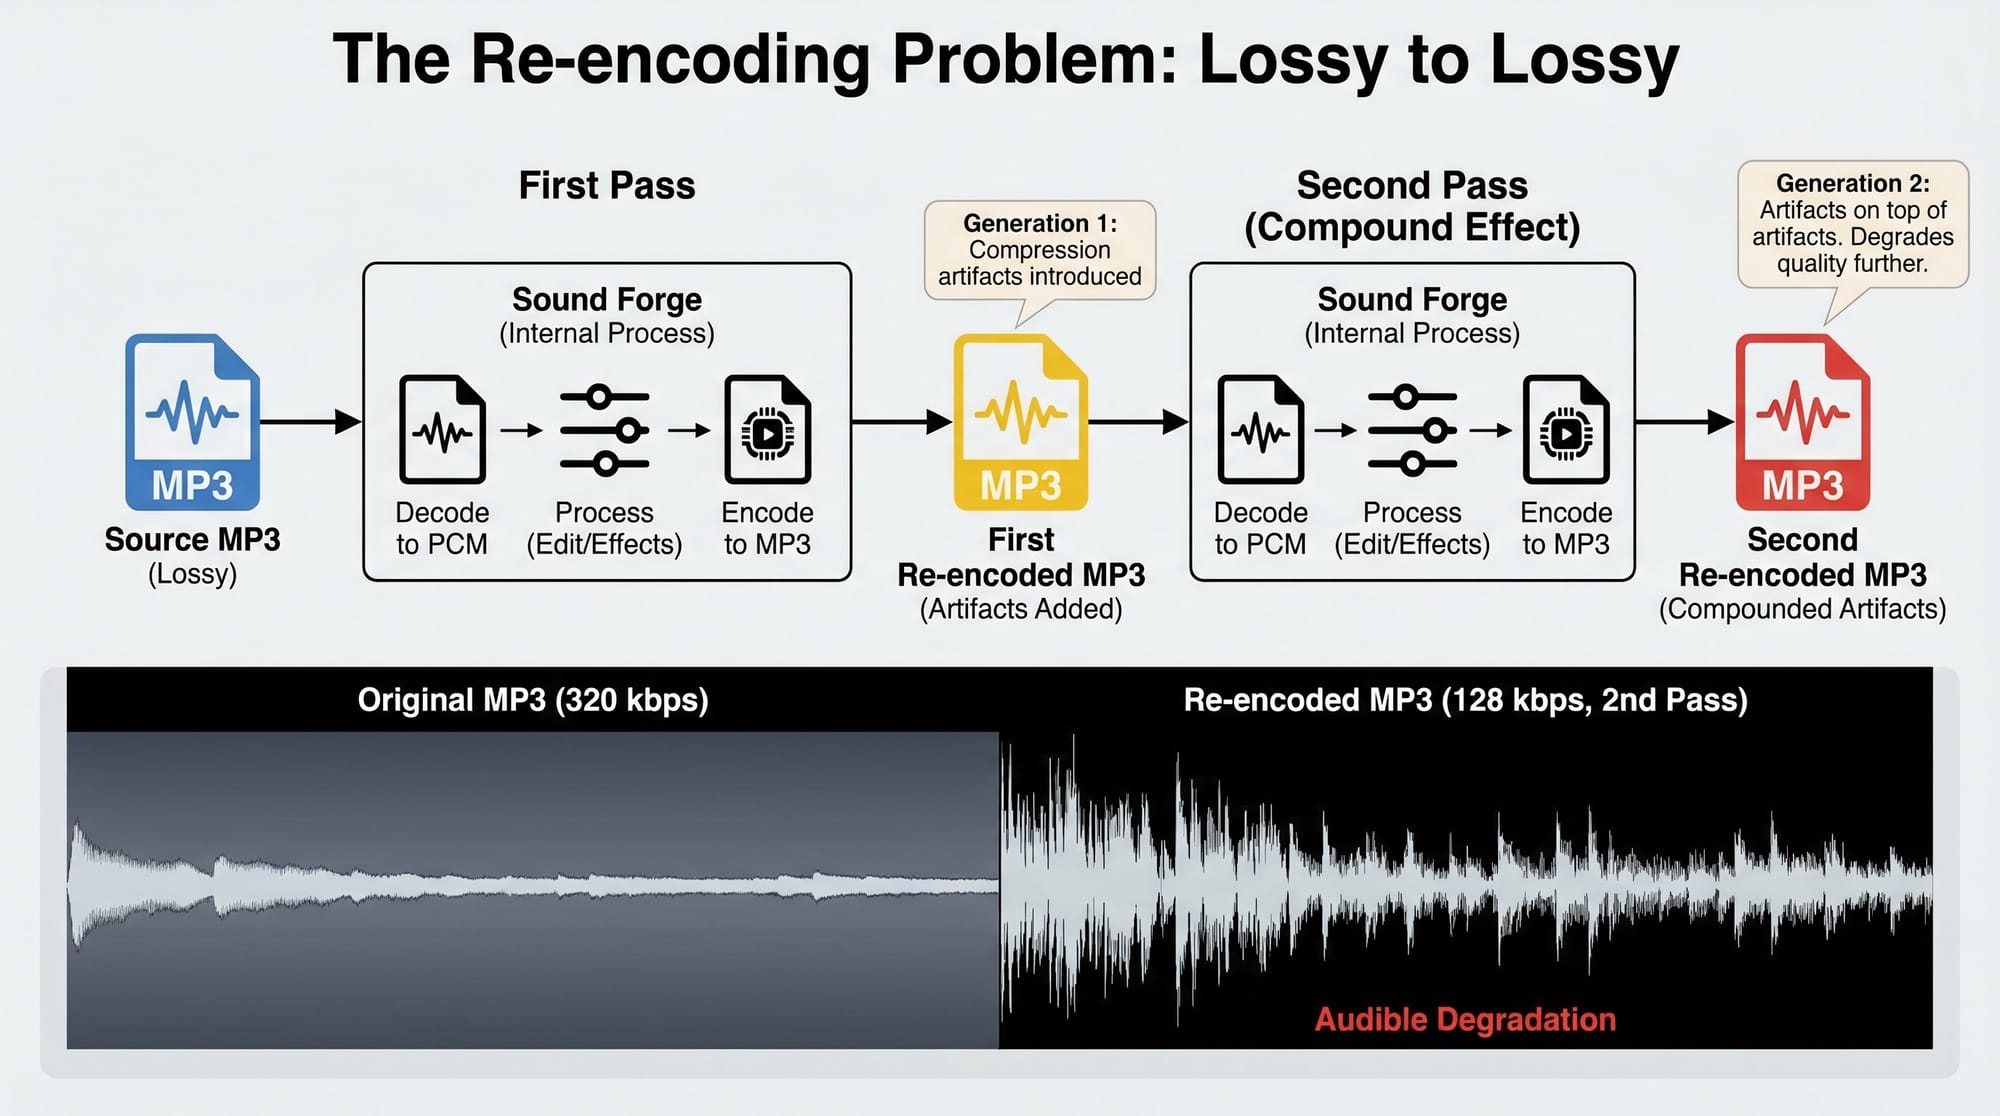
If you're editing MP3 files and can't avoid working with the lossy source, enable Options → Preferences → General → Always proxy compressed formats. This creates a temporary PCM mirror of any lossy file you open, so Sound Forge is actually processing the PCM copy. It prevents the accumulation of re-encoding artifacts during editing. Enable it and leave it on.
I found this out on a podcast client's files — they sent 128 kbps MP3s, I edited and exported as MP3 without the proxy setting, and the result was noticeably worse than the source on close listening. Once I switched to the PCM proxy workflow and exported to MP3 only at the end, the quality held.
One specific version note from forum threads: Sound Forge Pro versions 10 through 14 had a bug where using File → Save (not Save As) on an MP3 would re-encode it at 256 kbps regardless of the original bitrate. SF Pro 15 and 16 fixed this. If you're on an older version, always use Save As with explicit parameters rather than Save for any MP3 work.
Converting Multiple Files: The Batch Converter
The Batch Converter converts any number of files to a target format without opening each one individually. Go to Tools → Batch Converter. The window has three main sections: the file list on the left, output settings in the middle, and the Run Job button.
Add files by clicking Add Files or drag them from Windows Explorer directly into the file list. You can mix formats in the source list — WAV, AIFF, MP3, FLAC, whatever you have. The Batch Converter converts all of them to the target format you specify in Output settings.
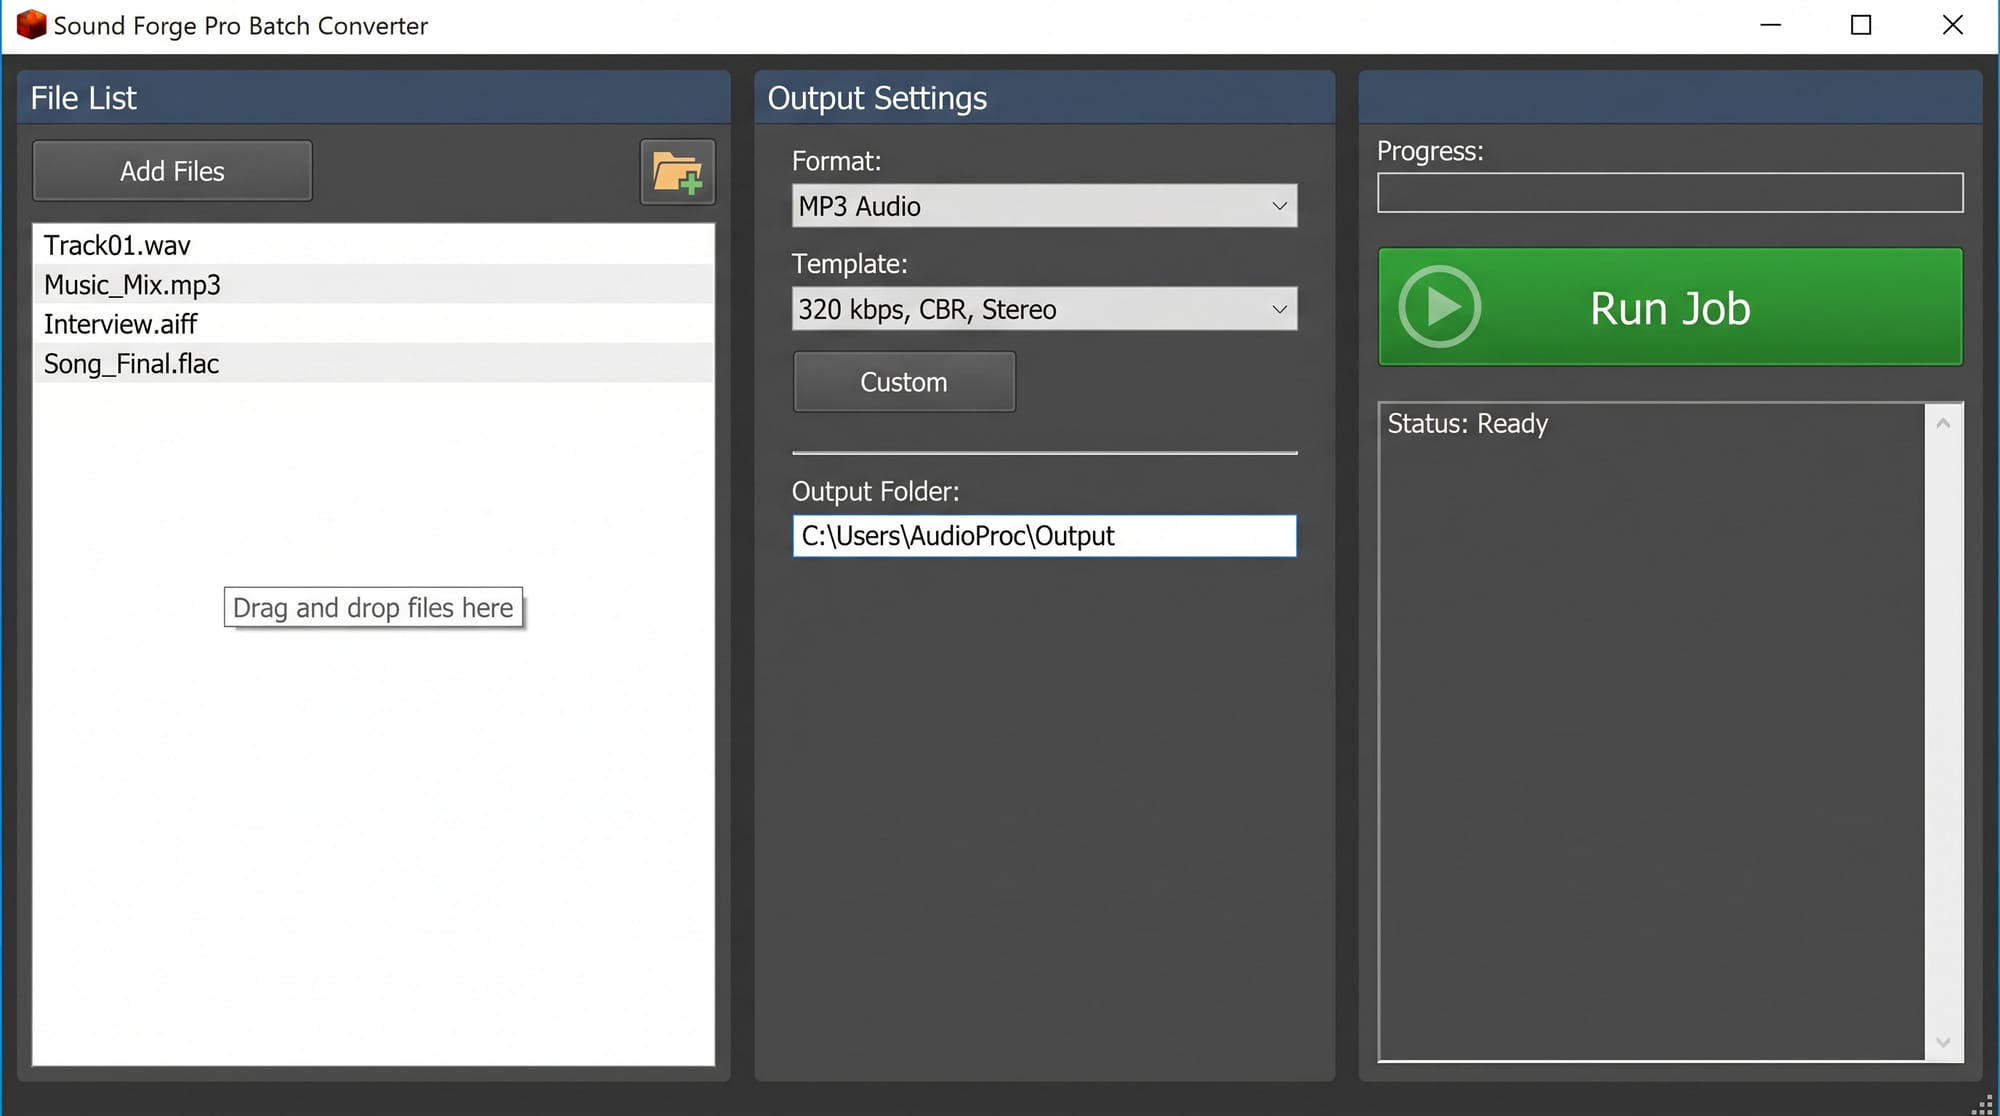
In Output settings, choose the target format and configure parameters the same way as Save As — select a template or click Custom to set specifics. Set the Output folder. Then click Run Job.
One setting that prevents most Batch Converter issues with lossy source files: go to Options → Preferences → General and enable Always proxy compressed formats before running a batch job on MP3 or AAC files. Without it, some compressed files produce intermittent errors or silence during batch conversion — a known behavior documented in multiple magix.info support threads.
I use the Batch Converter constantly for delivery prep — a session that produces 8 stems at 96k/24-bit WAV needs to go to the client as 44.1k/24-bit FLAC and as 44.1k/16-bit WAV for different uses. Add all 8 stems, set the output, run twice with different settings. The full Batch Converter workflow including advanced options is in the batch processing guide.
Converting Without Opening: Instant Actions and Context Menu
Sound Forge Pro 15 and later added Instant Actions and a Windows context menu integration that lets you convert files without opening them in the editor at all. Right-click any audio file in Windows Explorer, and if the context menu integration is active, you'll see Sound Forge options including format conversion tasks.
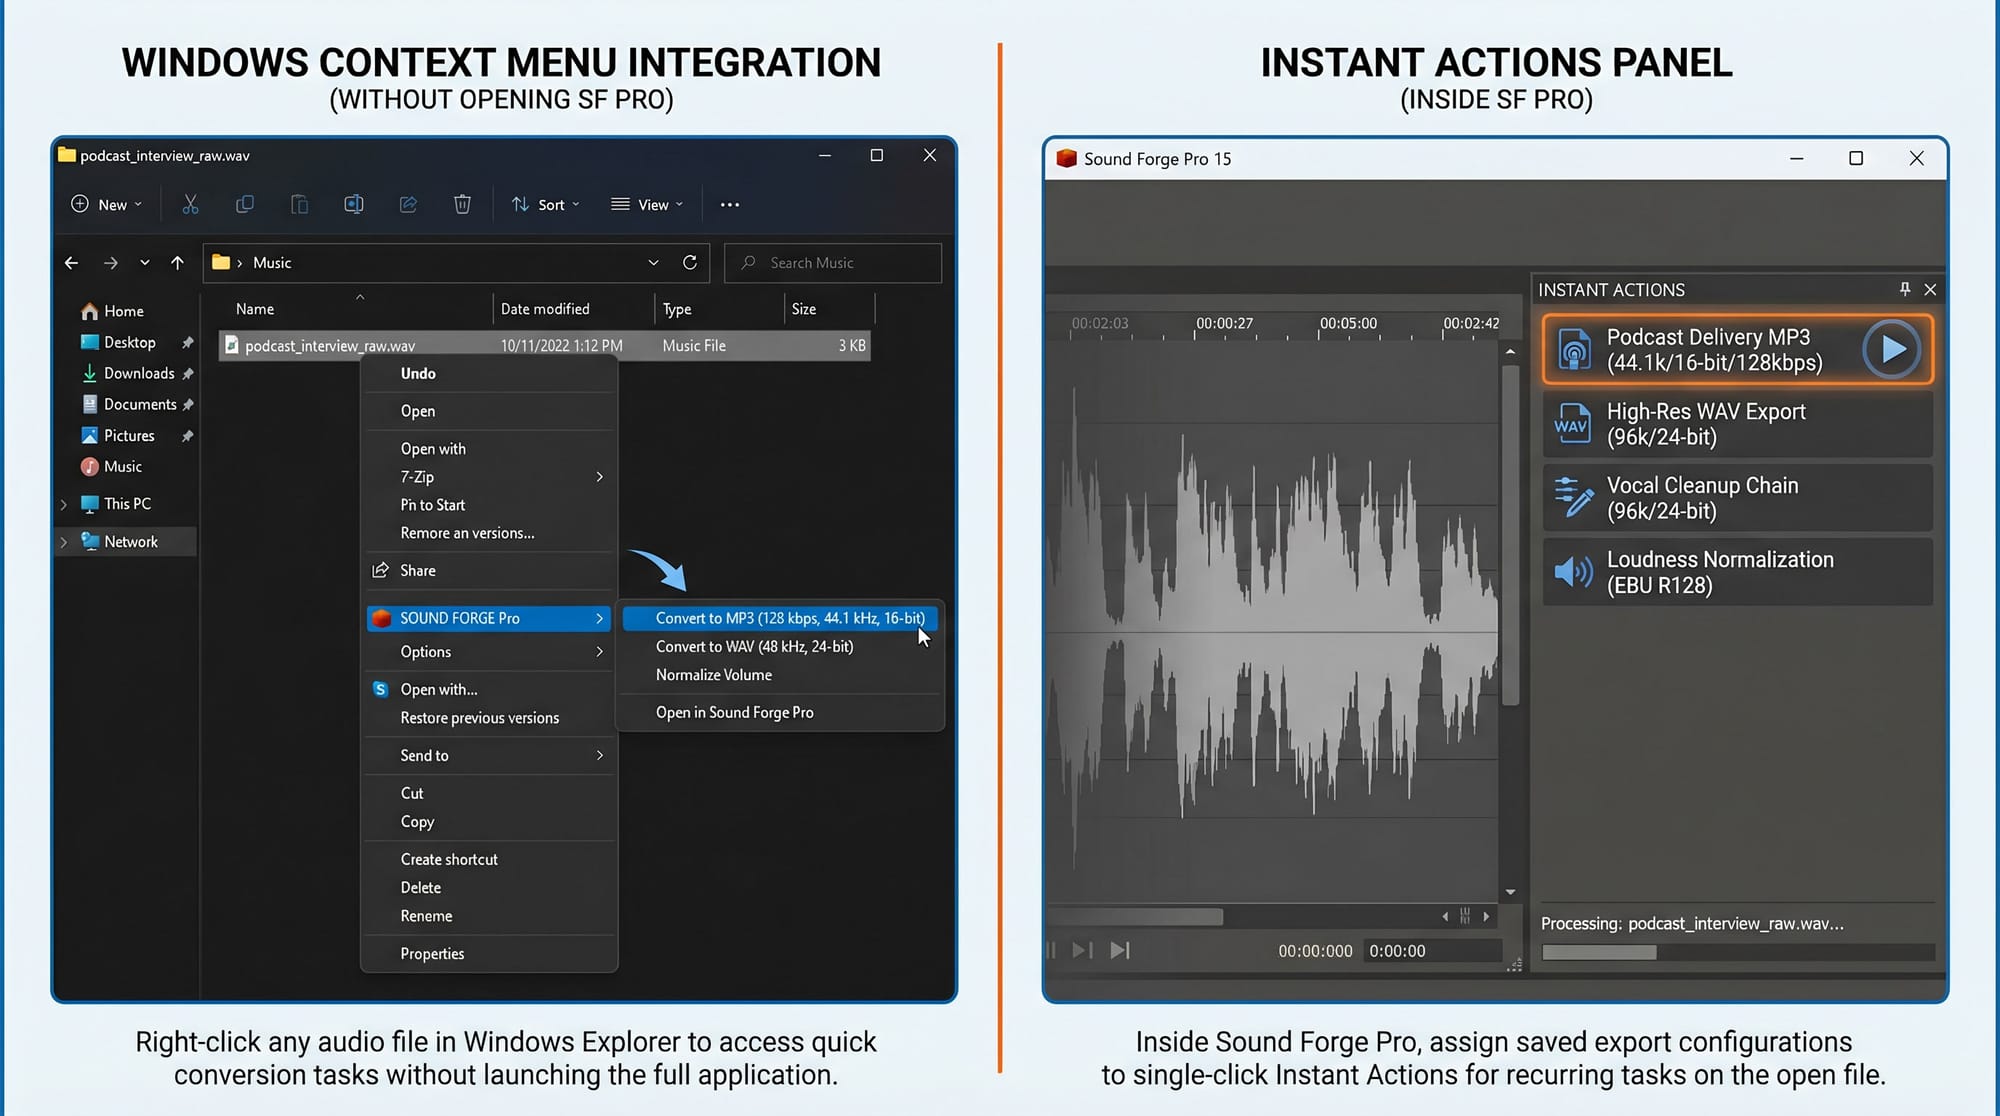
Instant Actions (accessible inside SF Pro from the dedicated panel) let you assign saved export configurations — a specific format, sample rate, and bit depth combination — to a one-click action. The action applies to whichever file is currently open or selected. For repeat conversion tasks I handle every week — delivering podcast edits as 44.1k/16-bit MP3 at 128 kbps — I keep an Instant Action configured for that spec. Takes one click instead of navigating Save As every time.
The context menu is the right tool when you’re working in Windows Explorer and don’t want to open Sound Forge just to convert a single file. Instant Actions work best for recurring tasks inside SF Pro — the one-click setup pays for itself after about the third time you run the same conversion. The Batch Converter handles anything involving more than a handful of files regardless of where they live.
Setting Sample Rate and Bit Depth During Conversion
When you Save As to a different format, Sound Forge Pro lets you also change the sample rate and bit depth in the same step. In the Custom dialog for WAV, FLAC, or AIFF, the sample rate and bit depth dropdowns are right there. Set them to what the target requires and Sound Forge applies the conversion during export.
This is cleaner than running Process → Resample first and then exporting, because it avoids creating an intermediate file at the converted rate. The source stays at its native rate, the export file is at the target rate. For most format conversion work, this is the right approach.
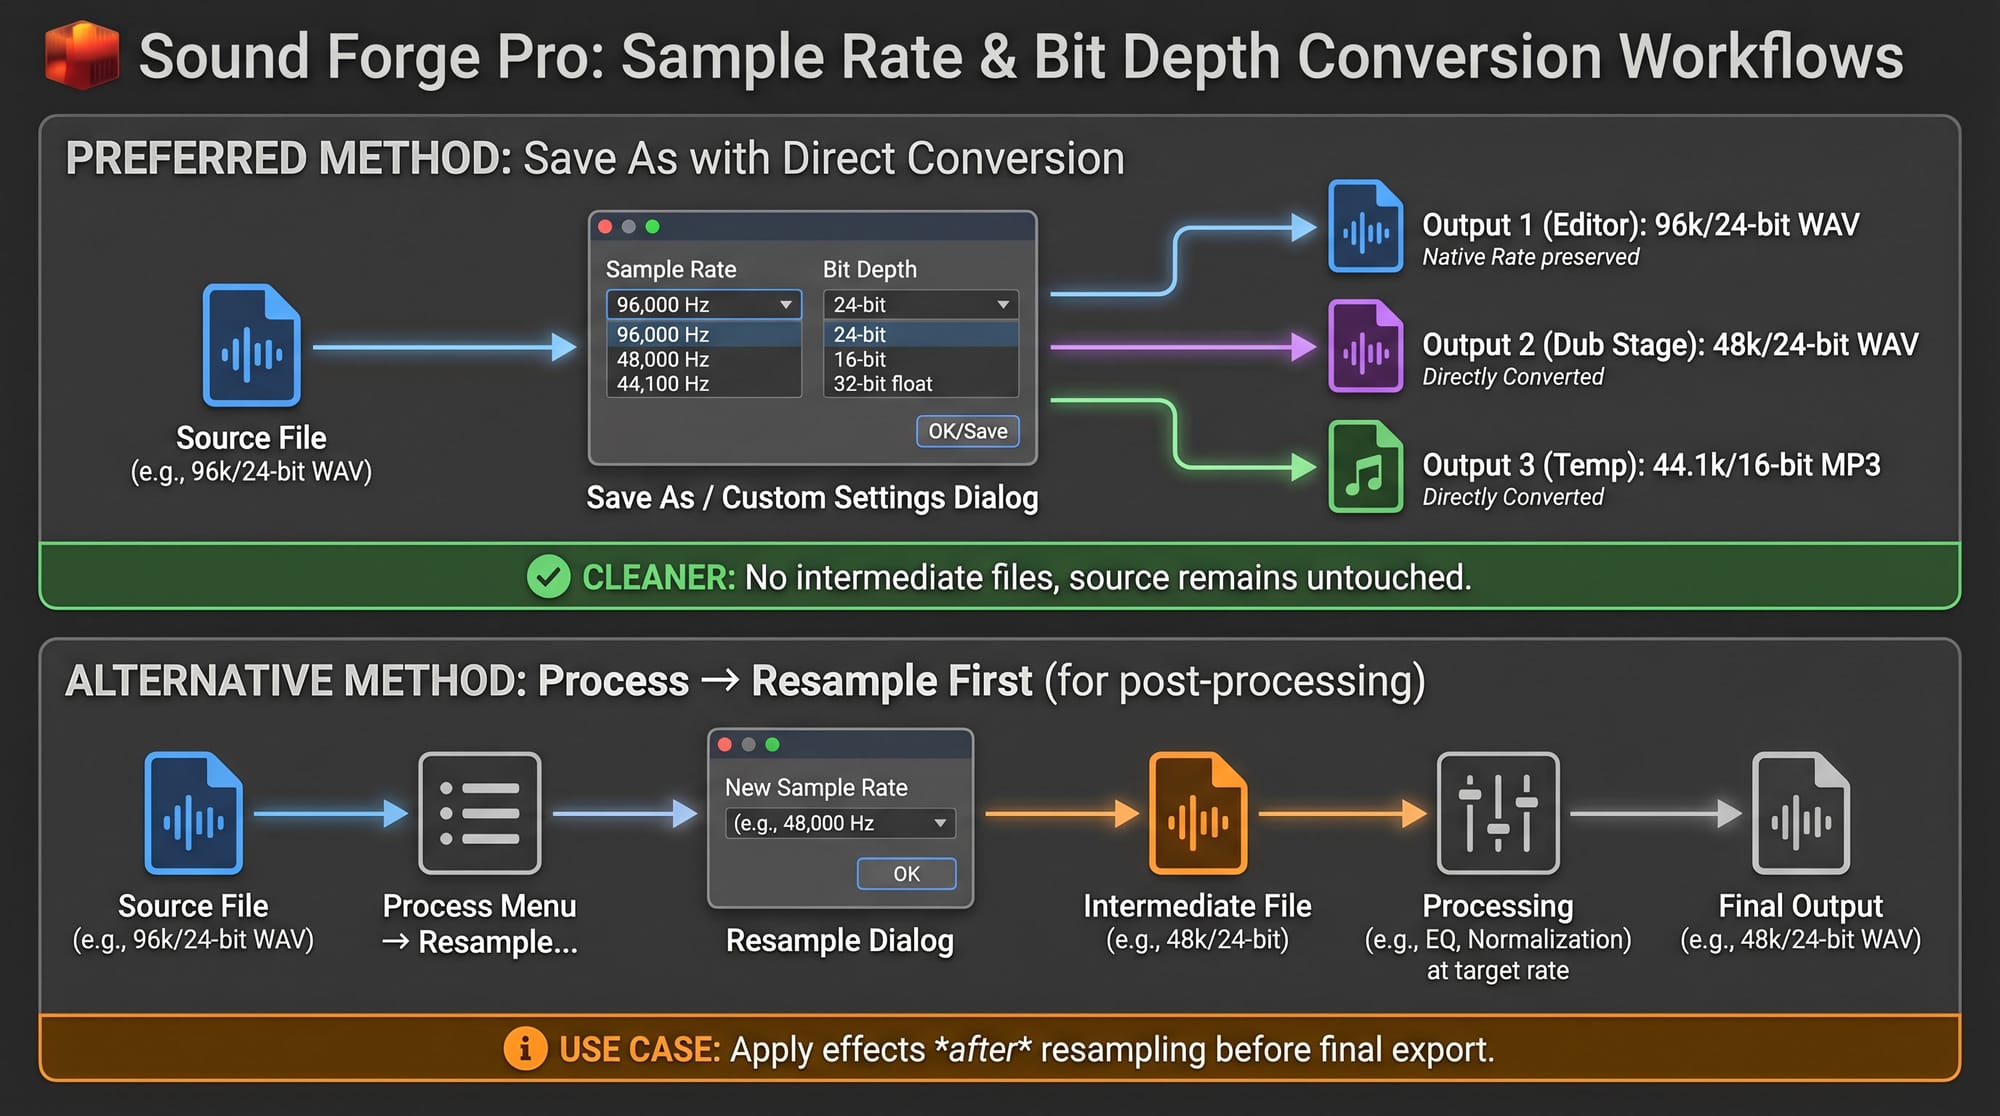
Last month I delivered a film score cue that needed three versions: 96k/24-bit WAV for the editor, 48k/24-bit WAV for the dub stage, and 44.1k/16-bit MP3 for the temp. Three Save As passes from the same source file, different format and rate settings each time. The source never got touched.
The one case where you'd resample first and then export is when you want to apply processing after the sample rate change — EQ or normalization at the target rate before the final export. The full sample rate conversion workflow, including when to use iZotope 64-Bit SRC for quality-critical conversions, is in the sample rate guide. For MP3 specifically, the detailed bit rate and encoder settings are in the MP3 export guide.
Frequently Asked Questions
How do I convert WAV to MP3 in Sound Forge Pro?
File → Save As → select "MP3 Audio" from the Save as type dropdown → click Custom to set bitrate (up to 320 kbps CBR) and sample rate → Save. The file saves as MP3 at your chosen settings. The original WAV stays open in Sound Forge unless you close it. For detailed MP3 encoder settings including CBR vs VBR and metadata handling, see the MP3 export guide.
How do I convert WAV to FLAC in Sound Forge Pro?
File → Save As → select "FLAC Audio" from the format dropdown → choose a template or click Custom to set bit depth (up to 24-bit) and sample rate → Save. FLAC is lossless, so the conversion preserves all audio quality from the source WAV. Sound Forge Pro's FLAC encoder supports up to 24-bit. If you need 32-bit float FLAC, export as WAV and convert externally.
How do I convert multiple audio files at once in Sound Forge Pro?
Tools → Batch Converter. Add files via Add Files or drag them into the file list. Set the output format and parameters in Output settings. Set the destination folder. Click Run Job. If any source files are MP3 or AAC, first enable "Always proxy compressed formats" in Options → Preferences → General — this prevents intermittent errors on lossy source files. The complete Batch Converter workflow is in the batch processing guide.
What audio formats does Sound Forge Pro support?
Sound Forge Pro reads and writes: WAV, AIFF, FLAC, MP3, OGG Vorbis, WMA, AAC/M4A, MP4, W64 (Sony Wave 64), CAF, AMR, SDII, and several legacy formats including PCA, SFA, and RAW. The full format list varies slightly by version. WAV, FLAC, AIFF, MP3, and OGG cover the vast majority of real-world conversion needs.
Can Sound Forge Pro convert MP3 to MP3 without quality loss?
No — any re-encode of a lossy format introduces a new generation of compression artifacts. The only way to edit an MP3 without additional quality loss is to enable "Always proxy compressed formats" in Options → Preferences → General, which creates a PCM working copy for editing, and then save back to MP3 only once when editing is done. Even then, re-encoding happens on export. If you need to change the bitrate of an MP3, the quality loss is unavoidable — convert to WAV, do your edits, export to MP3 at the end.
How do I change the format when exporting in Sound Forge Pro?
File → Save As → change the "Save as type" dropdown to your target format. Each format has its own parameter options — click Custom to access them. You can also change sample rate, bit depth, and channel configuration in the same dialog. The conversion happens during export and the source file in the editor stays unchanged at its original format and settings.