How to Use the Plug-In Chainer in Sound Forge Pro

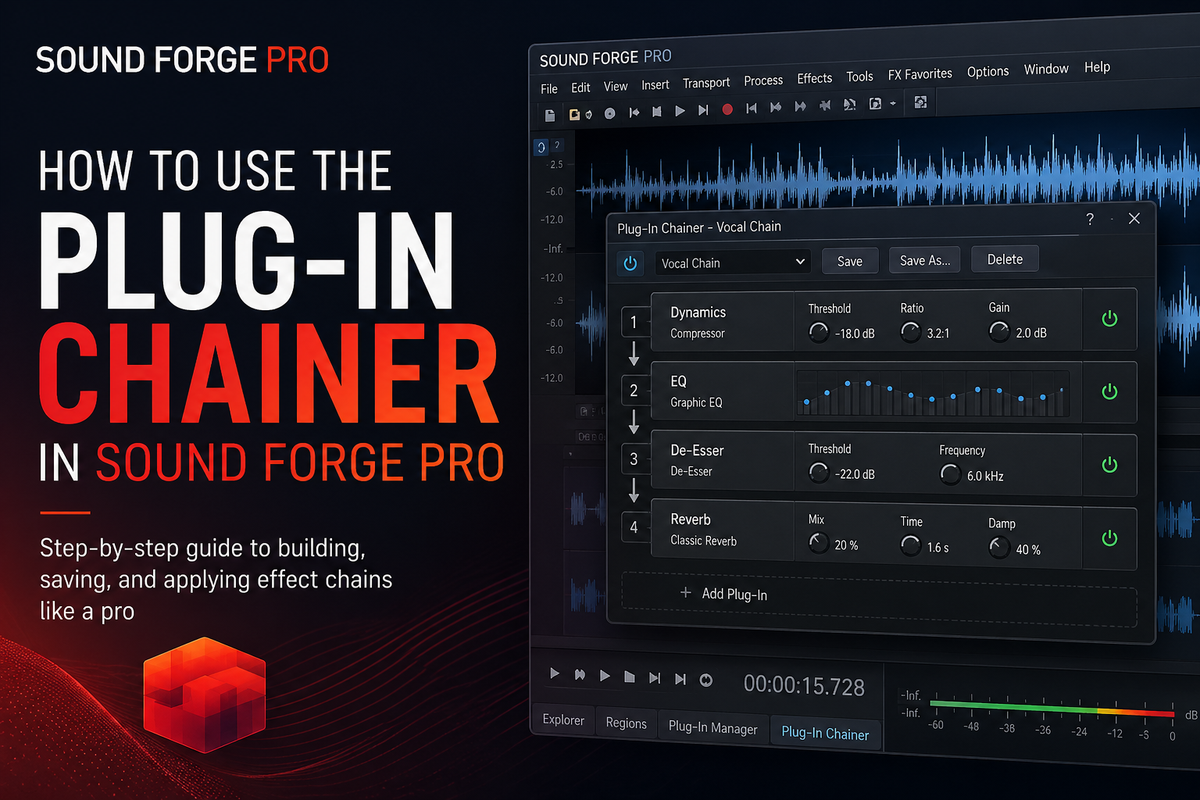
The Plug-In Chainer in Sound Forge Pro is where you stack multiple effects in sequence and apply them to audio in a single pass. EQ into compression into limiting, or noise reduction into declicker into normalisation — you set the chain, preview it, and apply it either destructively to the current file or non-destructively as a project that renders to a new file on Save As. The catch that trips up new users: there are two different ways to invoke the Chainer and they behave differently. Knowing which to use and when is the whole job.
Quick answer: For destructive processing — FX Favorites → Apply Plug-In Chain → add plugins → OK. For non-destructive previewing with the ability to adjust before committing — View → Plug-In Chainer → build chain → Preview → then File → Save As to render. The rest explains the controls, how to manage plugin order, how to save presets, and what to check when effects don't seem to apply.
Two Ways to Open the Plug-In Chainer
Sound Forge Pro has had two distinct Chainer interfaces since version 11 changed the original design. Understanding the difference saves time every session. The official Plug-In Chainer documentation covers every control in detail.
FX Favorites → Apply Plug-In Chain is the destructive path. This opens a dialog where you build or load a chain and click OK to apply it permanently to the selected audio region. The waveform updates immediately. Ctrl+Z undoes it. This is the path most engineers use for routine processing — it's the equivalent of the legacy chainer from SF Pro 10 and earlier that many users still prefer. Automation envelopes don't work here, but everything else does.
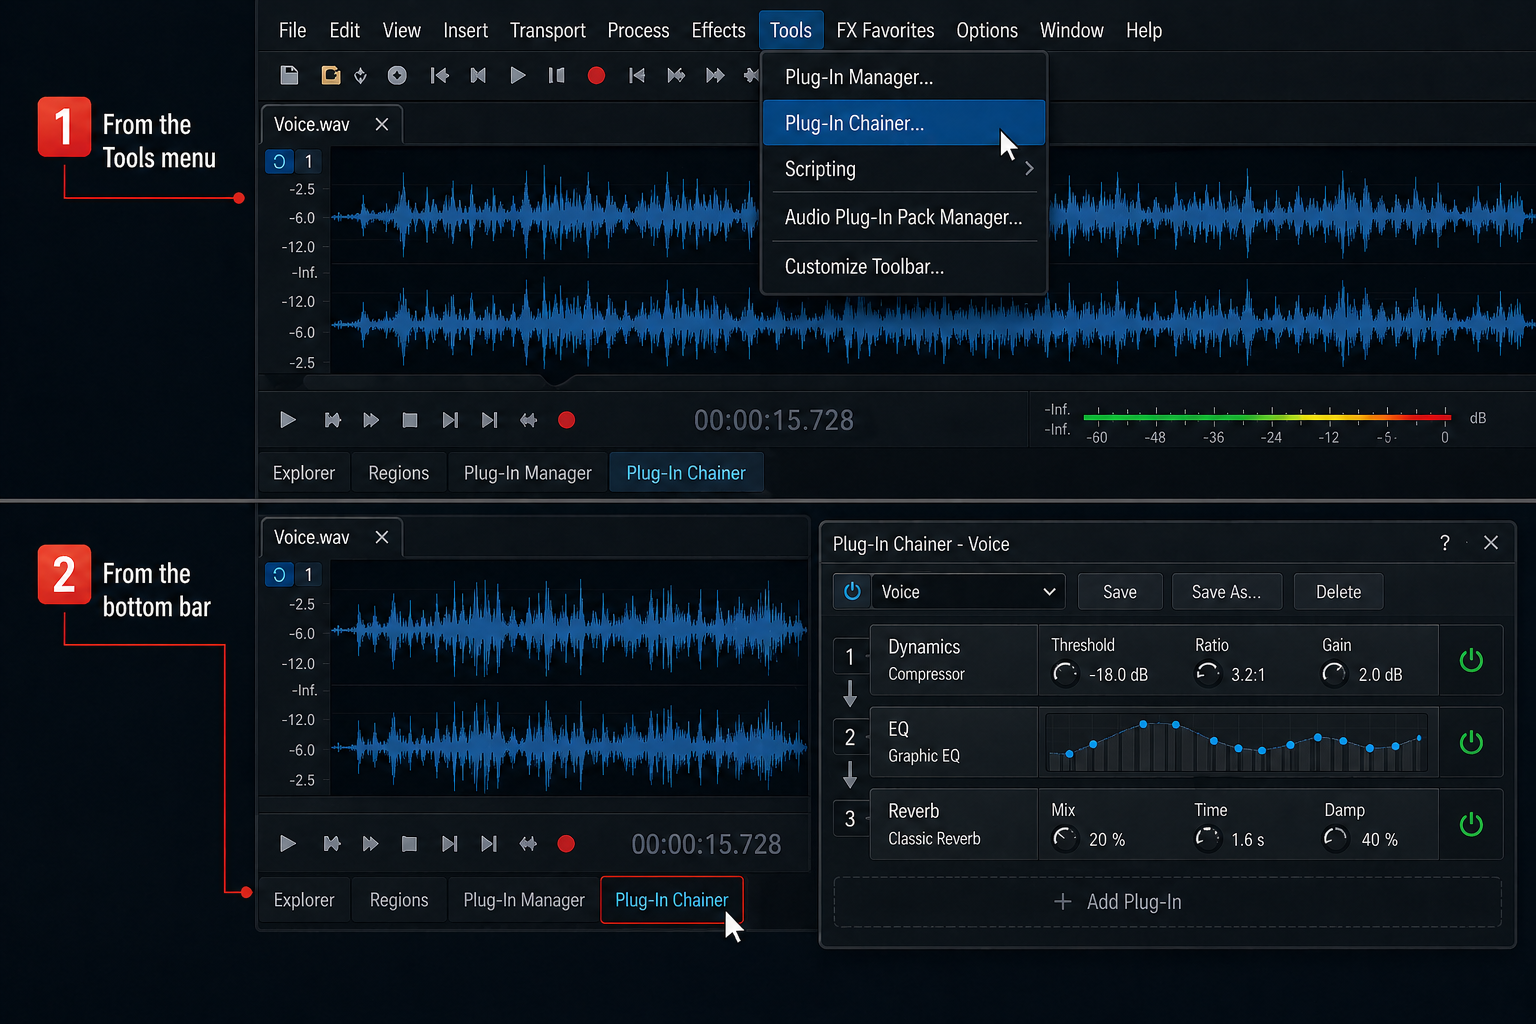
View → Plug-In Chainer opens the non-destructive timeline Chainer. The chain stays attached to the file and processes in real time during playback without touching the source. To render it to a permanent file, use File → Save As — the export creates a new processed file. This mode supports automation envelopes on plugin parameters. It's the right path when you want to audition a mastering chain across a long file before committing, or when you need parameter automation.
The distinction between the two paths caused me real confusion when I first upgraded from SF Pro 10. I built a chain in the View menu Chainer, clicked away expecting the waveform to update, and nothing happened. Turned out I needed FX Favorites to apply it destructively — two minutes wasted reading forum posts to figure out something that should be documented more clearly.
A third shortcut: the small green icon in the bottom-left corner of each file's data window opens the Plug-In Chainer for that specific file directly. On older SF Pro versions this is the quickest access point without navigating menus.
Building a Chain: Adding and Ordering Plugins
In FX Favorites → Apply Plug-In Chain, click the Add button. The Plug-In Chooser window lists every VST, VST3, and DirectX plugin installed on your system. Select plugins and click Add — they appear in the chain in the order you added them. Click OK in the Chooser to return to the Chainer with your selections loaded.
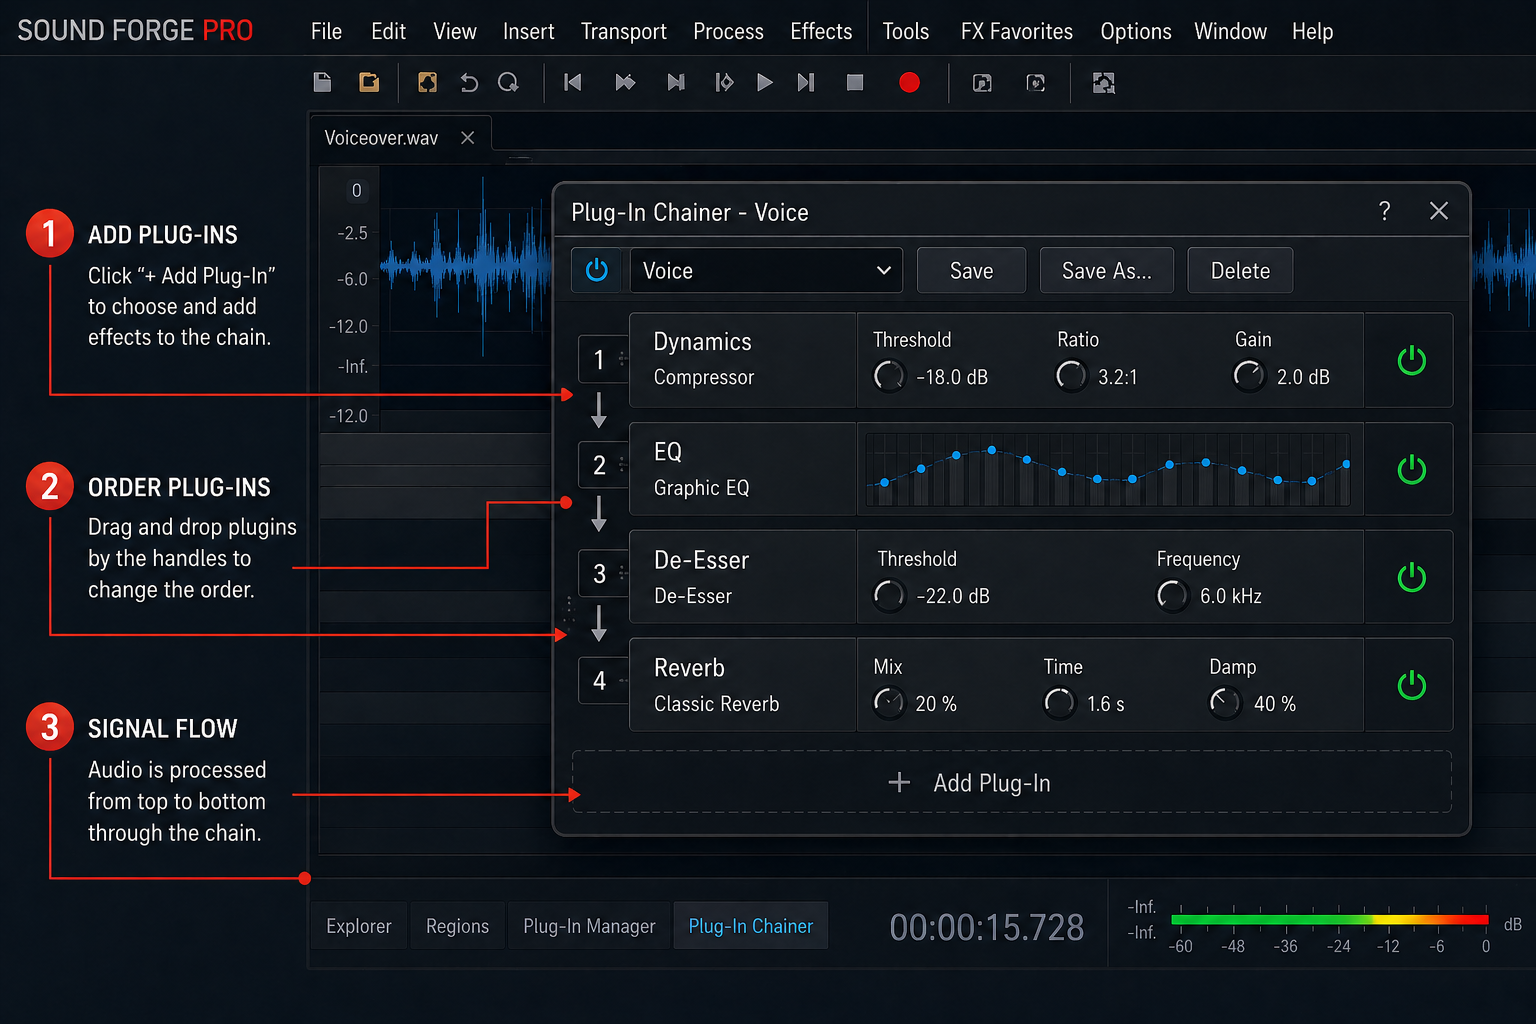
Reorder plugins by dragging them left or right, or using the Shift Plug-In Left and Shift Plug-In Right buttons. The order matters a lot. Signal flows through the chain from left to right: the first plugin processes the raw audio, the second processes what the first produced, and so on. A compressor before a limiter behaves differently from a limiter before a compressor. For restoration work, noise reduction and click removal belong early in the chain — running them after EQ or saturation means they're working on a signal that's already been altered.
You can also drag plugins directly from the View → Plug-In Manager into the Plug-In Chainer window. The Plug-In Manager shows all installed effects in a tree view. Open any folder, find the plugin, drag it to the Chainer. This is faster than clicking through the Chooser when you know what you're looking for.
I keep a restoration chain saved as "NR → DeClick → DeClip" that I load on every vinyl transfer. Adding those three from the Chooser one by one takes about 40 seconds. Loading the saved preset takes one click. After a few sessions building repeat chains, saving them pays back the time quickly.
Bypass, Preview, and Pre-Roll
Click Preview in the Chainer window to hear the chain processing audio in real time before applying it. This runs through the entire effects chain on playback without touching the file — the most important step before clicking OK on anything destructive.

The Bypass button mutes the entire chain during preview so you hear the dry signal. Toggle it while playing to A/B the processed and unprocessed audio. You can also bypass individual plugins by unchecking the checkbox next to each one — useful for isolating which plugin in a chain is causing a problem, or for temporarily removing one step from the processing order without deleting it from the chain.
Pre-Roll and Post-Roll are underused. When enabled, they play a few seconds of audio before and after the current selection so you can hear the transition from unprocessed to processed audio. On a restoration session where you're treating a specific section of a longer file, pre/post roll tells you immediately whether the treatment sounds abrupt at the edit points or blends naturally. Set the duration in preferences — I use 2 seconds pre-roll on restoration passes and 3 seconds on mastering chains where the onset of compression or limiting can sound jarring.
Tail Data: Handling Reverb and Delay
Plugins that produce a tail — reverb, delay, any time-based effect — create audio that extends past the end of the selected region. The Plug-In Chainer offers two modes for handling this.
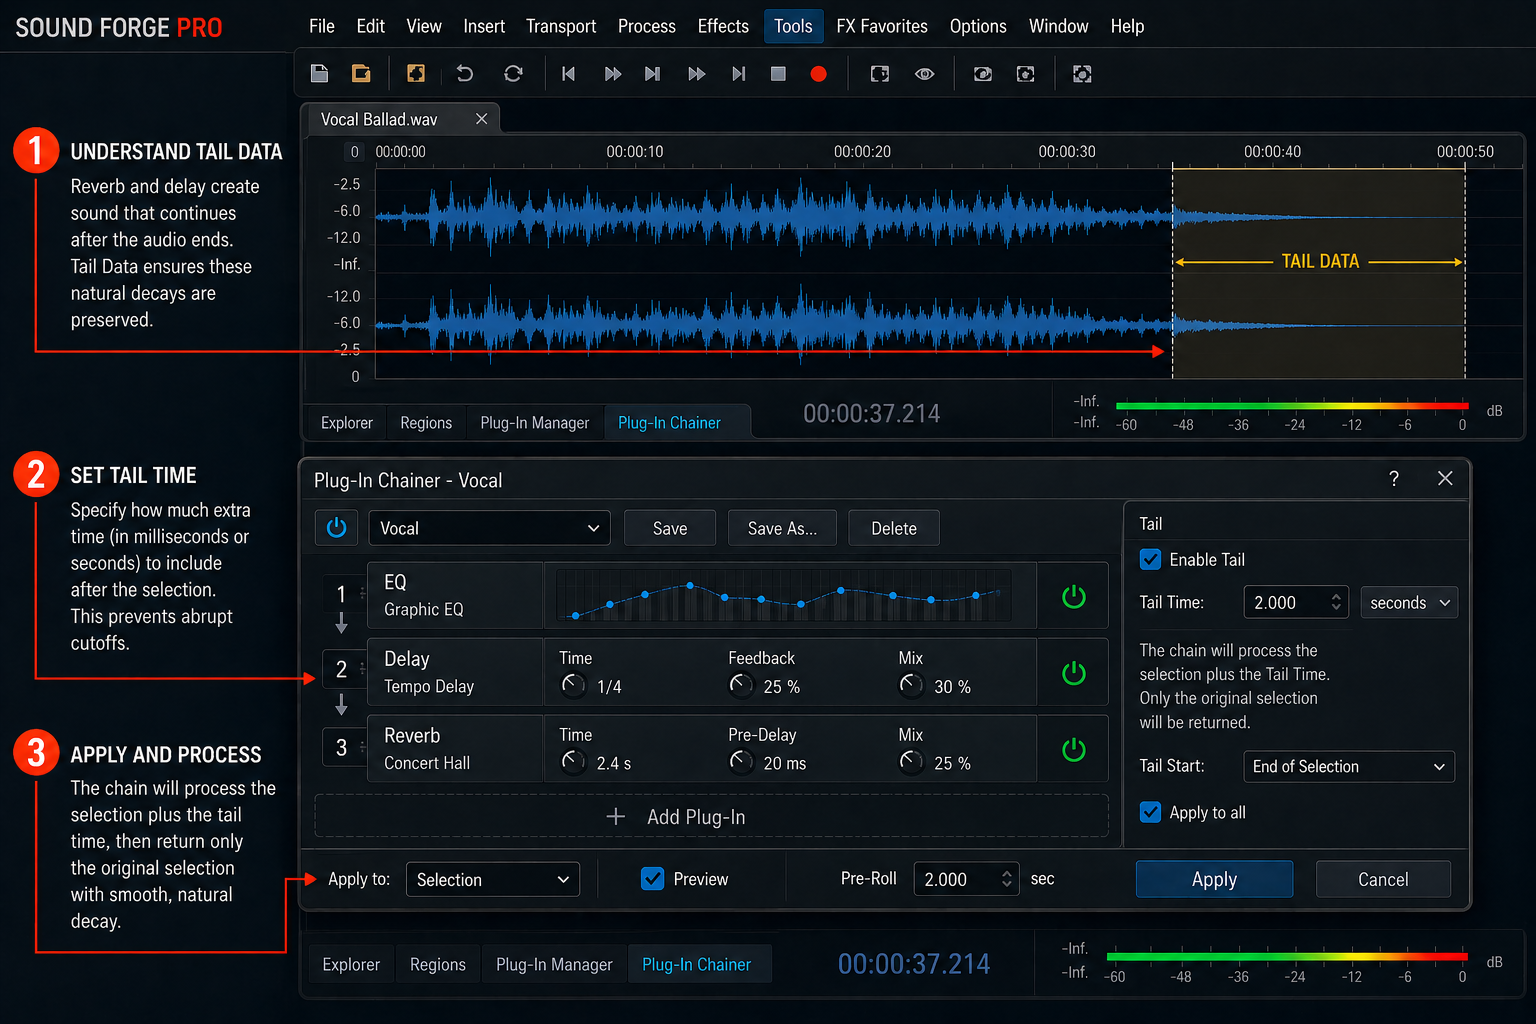
Ignore Tail Data cuts off the tail at the end of the selection. The reverb or delay gets truncated at the exact point your selection ends. Use this when the tail would bleed into silence or a different section that shouldn't carry the effect.
Process Tail Data renders the tail into the file past the end of the selection. The reverb decay plays out naturally before the file returns to dry. Use this for music where a truncated reverb tail sounds obviously cut — the end of a vocal phrase, the release of a piano chord.
On a spoken word recording where I added a subtle room reverb to a dry studio voice, Ignore Tail was correct — the tail would have bled into the next sentence's silence and sounded like a room that kept echoing between words. On a music track, Process Tail preserved the natural decay of the reverb without the clipped-off quality that always sounds like a mistake.
Saving and Loading Chain Presets
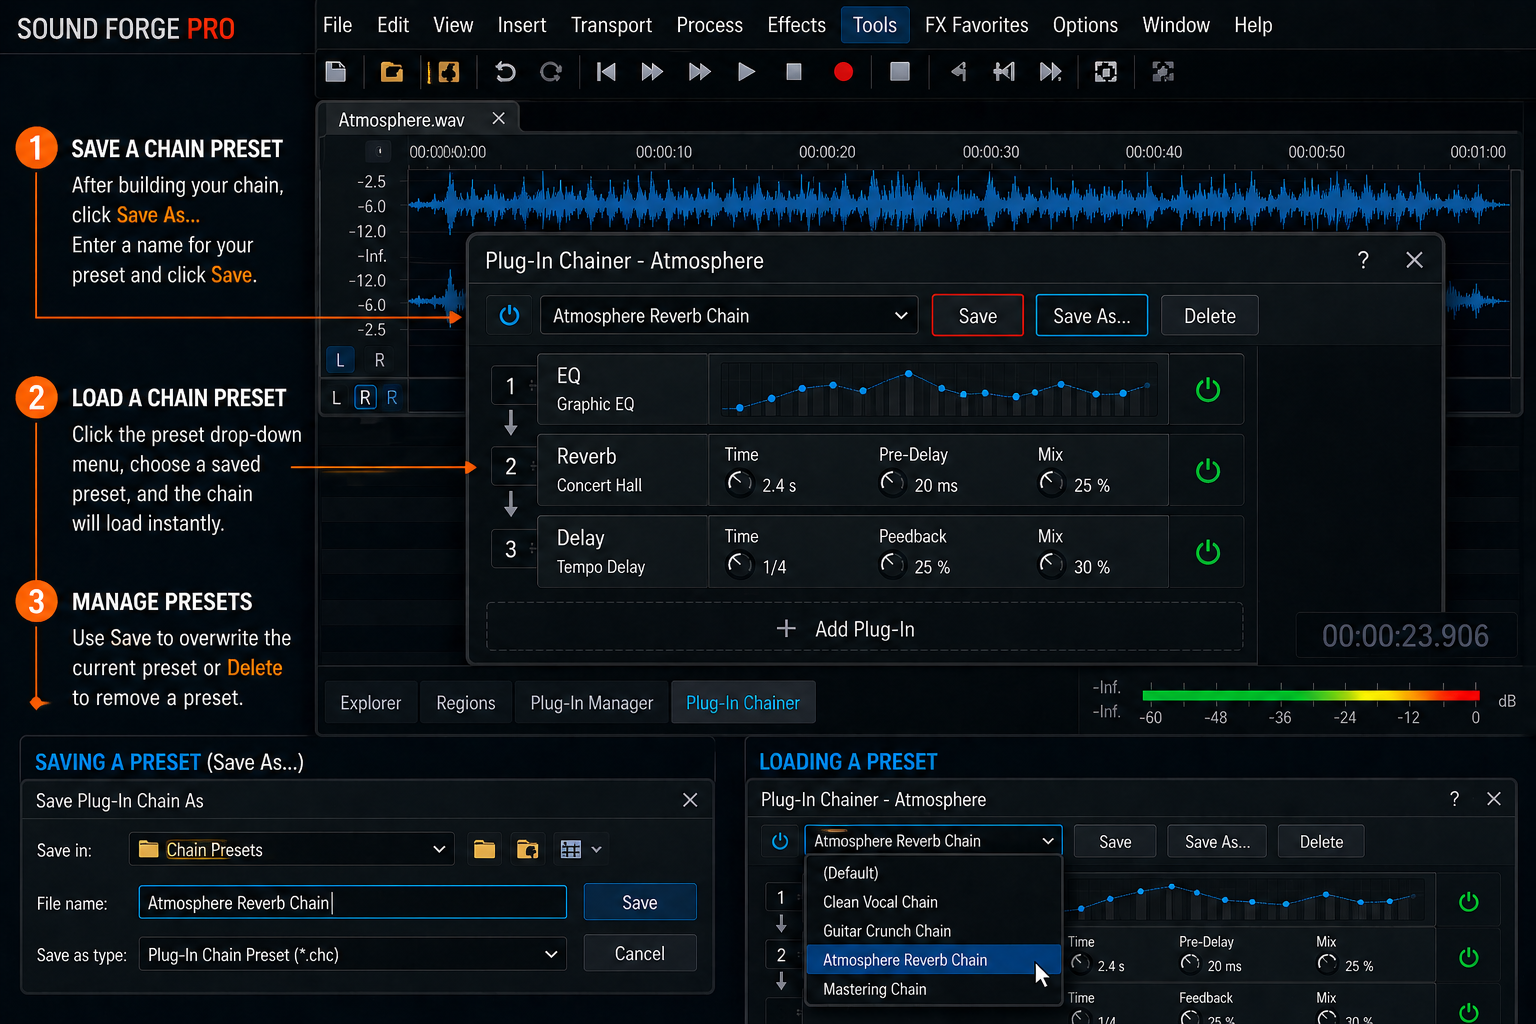
Build a chain you want to keep. In the Chainer window, type a name in the Chain field and click the Save (floppy disk) icon. The preset saves and appears in the Chain dropdown for future sessions. Load it by opening the dropdown and selecting it — all plugins reload with their saved settings.
VST plugins have two additional save options: Save VST Preset As saves an individual plugin's settings as a .fxp file. Save VST Bank As saves all presets for that plugin as a .fxb file. Both are useful for transferring plugin settings between projects or computers, or for backing up a configuration before an update changes default values.
I have about twelve saved presets at this point — vinyl restoration, VO cleanup, mastering chains for different delivery targets. Loading one versus building from scratch probably saves me 5 minutes per session on repeat project types. The naming matters: "VO-podcast-128kbps" tells me more than "chain1".
One thing that doesn't save with chain presets: automation envelope points. If you've drawn parameter automation on a plugin inside the timeline Chainer, those envelopes exist only in the current project file. Save the project as a .frg Sound Forge project file to preserve them — not as a WAV or other audio format, which bakes down the processed audio and discards the automation data.
Plug-In Order for Common Workflows
Order in the chain is a processing decision, not just a preference. I got it wrong on a vocal restoration job once — ran EQ first to cut some boxy resonance at 280 Hz, then ran NR-2.0. The noise print I had captured before the EQ no longer matched the post-EQ signal, and the NR left artifacts at exactly the frequencies I had cut. Flipped the order, problem gone.
Here's how I structure common workflows now.
For vinyl and tape restoration: DeClicker first, DeCrackler second, Noise Reduction third. The automatic tools work better on a signal without prior EQ or saturation coloring the noise profile. After the restoration passes, EQ and normalisation go at the end. The full restoration workflow fits into the mastering sequence covered in the mastering guide.
For voice-over and podcast: Noise reduction or RX De-noise first, EQ second (remove low rumble and resonance before dynamic processing), compression third, limiter last. Running compression before EQ means the compressor is reacting to a frequency balance that hasn't been corrected yet — low-end buildup can cause the compressor to pump on bass frequencies rather than program dynamics.
For mastering chains: EQ for frequency correction, then compression, then limiting, then normalisation or loudness metering. Dithering — if you're going from 32-bit float to 16-bit for CD — goes last. The EQ guide covers the frequency correction step, including when to apply the Paragraphic EQ as a standalone process versus inside the Chainer.
Troubleshooting: Effects Not Applying
The most common support question on magix.info about the Chainer is some version of "I applied the chain and nothing happened." I've made that mistake myself twice in the first month after upgrading to SF Pro 11 from 10. The wrong mode, both times.
The most common reason effects don't apply in the Plug-In Chainer is using the wrong mode. If you built a chain in the View → Plug-In Chainer window and clicked away expecting it to apply destructively, it didn't — that mode is non-destructive and requires a Save As to render. For destructive application, use FX Favorites → Apply Plug-In Chain, not the View menu path.
If you used the right path and the waveform still didn't change, check three things in order. First, confirm no plugin in the chain is bypassed — either the global Bypass button or a per-plugin checkbox could be preventing the signal from passing through. Second, check the wet/dry settings inside the plugin itself. The default in Sound Forge is Wet: 0.00 dB, Dry: Infinite — meaning 100% wet output. If a plugin has its own wet/dry mix control set to all-dry, you'll hear and see no difference after processing. Third, check that your selection covered the right region — if the selection was empty or in a silent section, the waveform won't visibly change even though the process ran.
VST plugin compatibility is worth checking separately. SF Pro 16 and 17 had display issues with 32-bit VST2 plugins. SF Pro 18 resolved most of these. VST3 plugins work in SF Pro 18. If a plugin appears in the Plug-In Manager but crashes on load inside the Chainer, check whether it's a 32-bit VST2 — the magix.info troubleshooting thread documents the specific fixes including rescan, cache clear, and plugin isolation steps.
Frequently Asked Questions
Where is the Plug-In Chainer in Sound Forge Pro?
Two paths: View → Plug-In Chainer opens the non-destructive timeline Chainer, which stays attached to the file and renders on Save As. FX Favorites → Apply Plug-In Chain opens the destructive version that applies the chain directly to the selected audio when you click OK. A third shortcut is the small green icon in the bottom-left corner of each file's data window — clicking it opens the Chainer for that file. Most users doing routine processing use the FX Favorites path, as it's the closest equivalent to the legacy Chainer from SF Pro 10 and earlier.
How do I add VST plugins to the Plug-In Chainer in Sound Forge Pro?
Open FX Favorites → Apply Plug-In Chain. Click Add to open the Plug-In Chooser, which lists all installed VST, VST3, and DirectX plugins. Select the plugins you want and click Add — they appear in the chain in the order you selected them. Alternatively, open View → Plug-In Manager and drag a plugin from the tree view directly into the Chainer window. Both methods work identically once plugins are in the chain.
How do I save a plugin chain preset in Sound Forge Pro?
Build your chain in the Plug-In Chainer. Type a name in the Chain field and click the Save (floppy disk) icon. The preset saves and appears in the Chain dropdown for future sessions. To save an individual VST plugin's settings, use Save VST Preset As to create a .fxp file. To save all presets for a VST plugin, use Save VST Bank As to create a .fxb file. Note that automation envelope points are not saved with chain presets — save the project as a .frg file to preserve automation data.
What's the difference between destructive and non-destructive Plug-In Chainer in Sound Forge Pro?
The FX Favorites → Apply Plug-In Chain path processes audio destructively — it modifies the selected audio immediately and the waveform updates on screen. Ctrl+Z undoes it. The View → Plug-In Chainer path is non-destructive — the chain plays through on preview without touching the file. To commit the processed result, use File → Save As to render a new file. Only the non-destructive path supports parameter automation envelopes on plugins. For most routine processing, the FX Favorites path is faster.
Why isn't my plugin chain applying in Sound Forge Pro?
Three things to check: (1) Make sure you used FX Favorites → Apply Plug-In Chain rather than View → Plug-In Chainer — the latter requires a Save As to render. (2) Check that no plugin is bypassed, either globally via the Bypass button or individually via per-plugin checkboxes. (3) Check the wet/dry settings inside each plugin — if a plugin's internal mix is set to dry, no processing will be audible or visible in the waveform. A plugin-specific wet/dry control set to 0% wet will make the chain appear to do nothing even when everything else is configured correctly.
Does plugin order matter in the Sound Forge Pro Plug-In Chainer?
Yes — signal flows left to right through the chain, so each plugin receives the output of the previous one. For restoration work, noise reduction and click removal should come before EQ or saturation — running them after means they're processing an already-colored signal with a noise profile that no longer matches the original. For mastering chains, standard order is EQ → compression → limiting → normalisation, with dithering last if you're reducing bit depth. Reorder by dragging plugins left or right in the Chainer window.
Can I use the Plug-In Chainer for non-destructive mastering in Sound Forge Pro?
Yes — open View → Plug-In Chainer, build your chain, and use Preview to audition the full processing on the file in real time. When you're satisfied, File → Save As renders the processed audio to a new file, leaving the source unchanged. Save the project as a .frg Sound Forge project file first if you want to preserve the chain settings and any automation data for future adjustment. The full mastering workflow including chain order and export steps is in the mastering guide. Details on NR-2.0 in the chain are in the noise reduction guide.