

Quick answer: normalize audio only after you know which number the delivery actually controls. Use Peak level for a sample-peak ceiling, Average RMS level when a client or legacy workflow specifies RMS, and Loudness for an integrated LUFS target with a true-peak limit. In Sound Forge Pro 2026, select the finished file or region, choose Process → Normalize, set the mode-specific target, preview, apply, then verify both the processed source and the exported file with Tools → Statistics.
Basic gain-only normalization moves the whole selection up or down by one amount. It won't balance a whisper against a shout, remove room noise or repair clipping. Sound Forge's Normalize dialog also offers optional dynamics processing, and picking that changes more than gain. Decide whether the recording needs a level adjustment or real repair before you apply anything.
The detailed steps below use Sound Forge Pro 2026 on Windows. You don't have to buy it just to normalize a file; the short Audacity workflow below covers a free alternative. In either editor, pick the measurement your destination specifies, then check the exported file itself. The waveform on screen isn't enough.
Decide Why the Audio Is Too Quiet
Play the entire deliverable before changing its level. A file can be quiet for several different reasons, and only some are solved by one constant gain change.
| What you hear or measure | Likely problem | Will normalization fix it? |
|---|---|---|
| Whole file is consistently low | Correct balance, enough peak headroom, wrong final gain | Usually; choose the measurement required by delivery |
| One transient is near 0 dBFS, speech is still quiet | High crest factor or an isolated peak | No; peak normalization has almost no room to work |
| One speaker changes level sentence to sentence | Performance, mic distance, automation or dynamics | No; edit gain and/or compress before final normalization |
| File meets LUFS but clips after MP3/AAC export | True-peak or codec headroom problem | Not by loudness target alone; lower the ceiling or change dynamics |
| Noise becomes obvious when level rises | Poor signal-to-noise ratio | No; normalization raises wanted signal and noise together |
| Several songs have the same peak but different volume | Different density and integrated loudness | Use loudness measurement, while preserving intentional sequence |
If the waveform is already clipped, turning it down makes the flat-topped distortion quieter but won't rebuild the missing shape. Use the clipped-audio repair workflow before the final level pass. If hiss or hum is the real limit, clean it up first with the noise-removal guide. Normalization comes once the source is technically and editorially ready.
Choose Peak, RMS or LUFS by the Delivery Requirement
The three modes don't measure the same thing, and matching their numbers doesn't make their results equivalent.
| Mode | What controls the gain | Best use | Main failure |
|---|---|---|---|
| Peak · dBFS | Largest selected sample magnitude | Technical ceiling, headroom, sample assets, pre-encode safety | One short transient can leave the rest perceptually quiet |
| Average RMS · dB RMS | Average energy under the scan settings | Client/legacy RMS specification, some audiobook and asset workflows | Not LUFS; aggressive targets need a clipping policy |
| Loudness · LUFS + dBTP | Integrated program loudness and true peak | Podcast, broadcast and platform-oriented program delivery | A target can require more gain than peak headroom allows; check the gain and headroom |
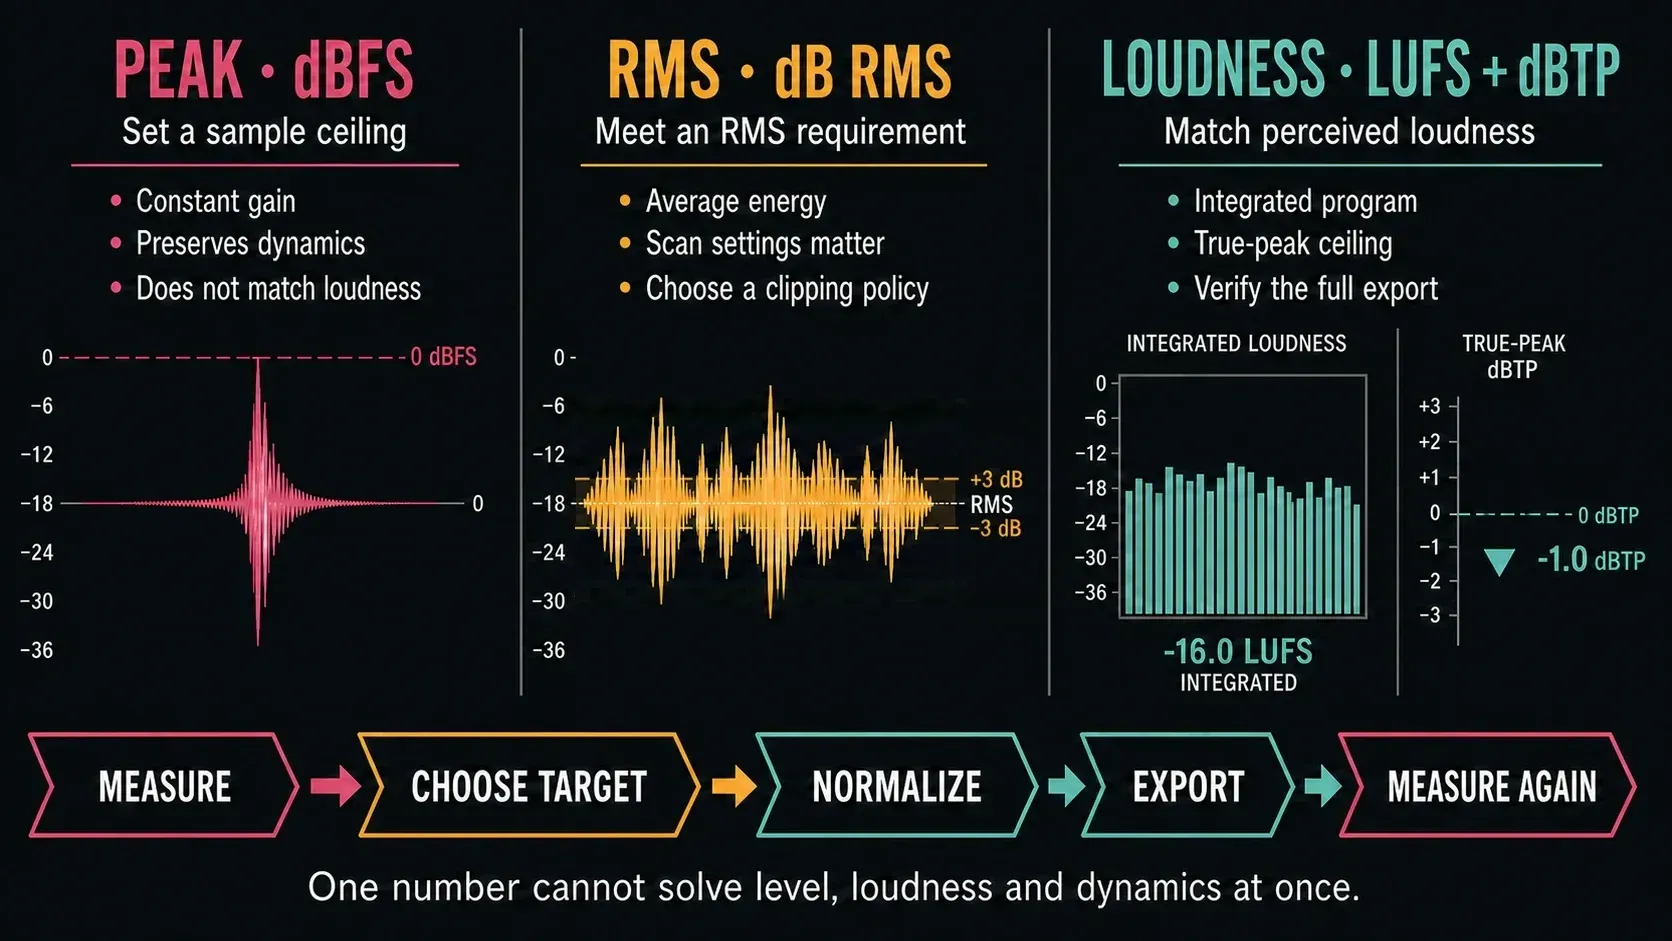
My rule is simple: use the meter named in the brief. “Maximum peak -3 dBFS” calls for a peak decision, and “Between -23 and -18 dB RMS” calls for RMS measurement. “-16 LUFS integrated, maximum -1 dBTP” means loudness plus true-peak verification. If the brief only says “normalize the volume,” ask what destination and measurement it means.
Measure the Finished Selection Before Processing
Work on a copy and measure exactly the selection you plan to deliver. Include any intentional room tone at the start and end, and don't measure only the loudest sentence as if it were the whole program. Keep the same selection for the before-and-after comparison.
Sound Forge's current Statistics documentation separates sample peak from oversampled true peak and reports integrated LUFS, loudness range, maximum short-term loudness and maximum momentary loudness. Short-term uses three-second windows; momentary uses 400 milliseconds. That matters because a file can pass an integrated target and still contain an uncomfortable short section.
Copy the Statistics cells to a QA note before processing. A simple before/after record prevents the common mistake of remembering a sample peak as a true peak or comparing RMS from one selection with LUFS from another. The Sound Forge Statistics guide shows how to read those fields when you need more detail.
Normalize Audio in Sound Forge Pro 2026
- Identify the delivery measurement. Determine whether the destination specifies sample peak, RMS or integrated LUFS plus true peak.
- Finish level-changing processing. Complete edits, restoration, EQ and dynamics before the final normalization pass.
- Measure the complete selection. Select the complete deliverable, use Tools → Statistics, and record sample peak, true peak, RMS and integrated loudness as required.
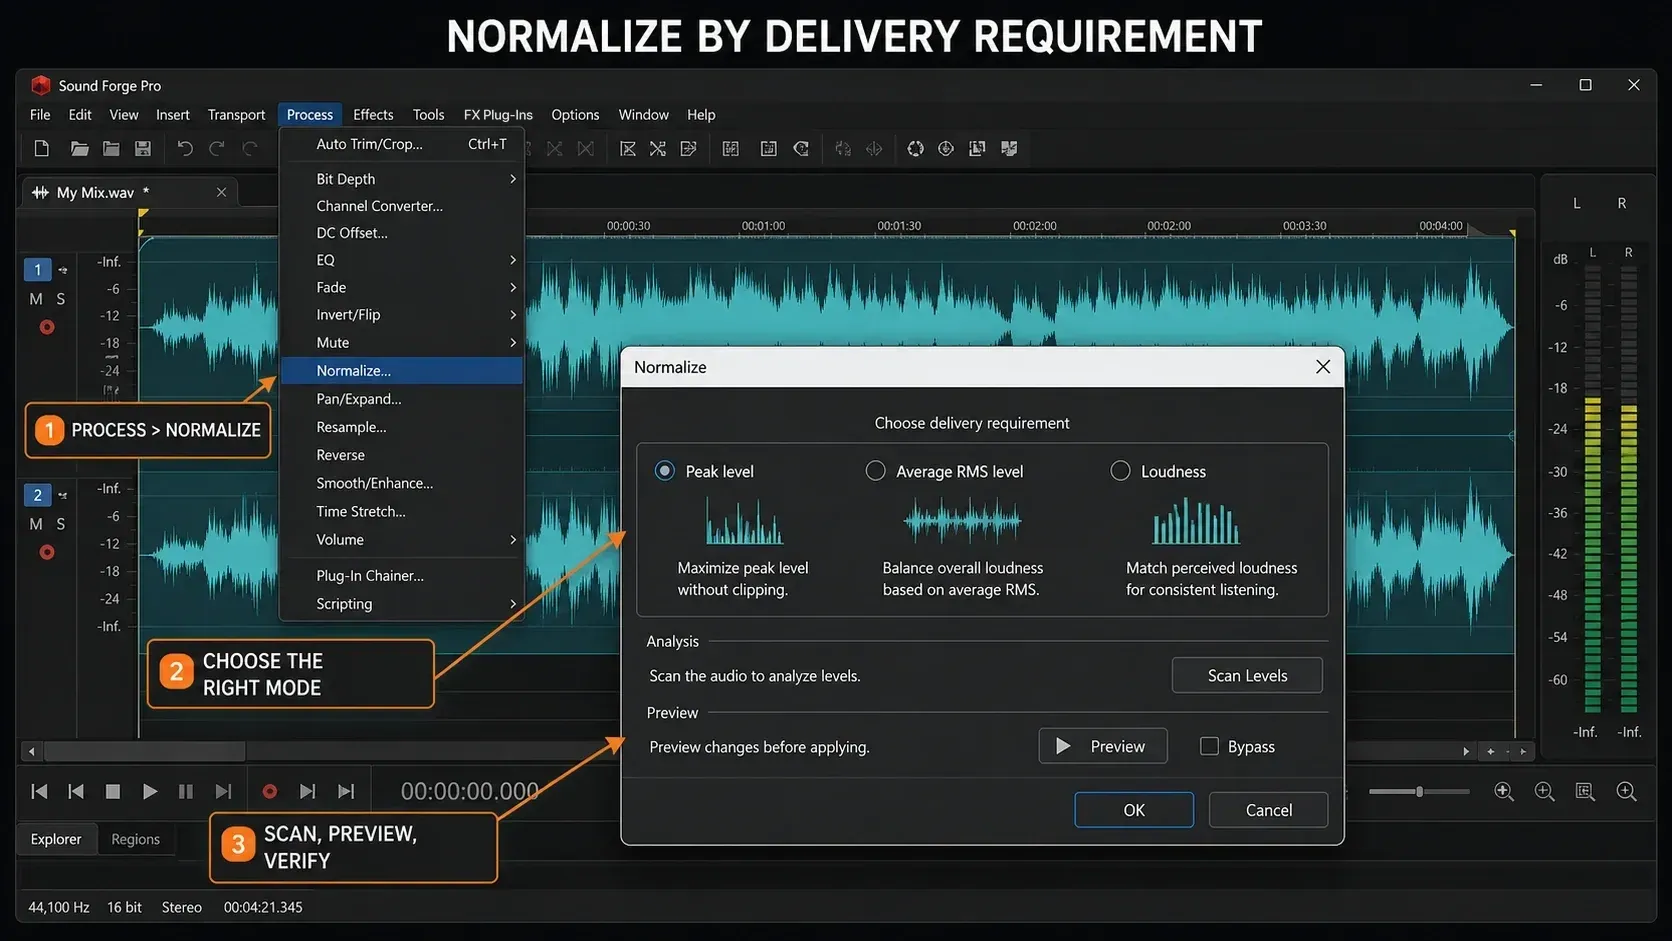
- Open Normalize. Choose Process → Normalize and select Peak level, Average RMS level or Loudness.
- Set the mode-specific target. For Peak or RMS, click Scan Levels before setting the target; choose an explicit RMS clipping policy if needed. For Loudness, set the normalization standard, integrated target, tolerance and maximum true peak.
- Preview and apply. Audition quiet, loud and transition sections as well as the opening, then apply the process.
- Verify the processed source. Run Tools → Statistics again on the same complete selection.
- Export and measure again. Reopen the actual deliverable and verify loudness, true peak, format and audible quality.
For Peak/RMS previews, Boris FX notes that the whole file must be scanned even when previewing a small selection; allow the scan to finish. Scan Levels stores the current Peak and RMS values, so you can audition several Normalize to values without rescanning an unchanged source. The 2026 help also documents Use current scan level for deliberately applying a stored level from one selection to another. That's a controlled matching tool; it isn't permission to reuse stale measurements after the source or selection changes.
Normalize Audio for Free in Audacity
Select the audio, then use Effect → Volume and compression → Normalize for a sample-peak target. Enter the peak amplitude your brief allows. Check Remove DC offset separately: it recenters the waveform rather than simply changing gain. Leave independent stereo-channel normalization off when you want to preserve the existing left/right balance.
For an RMS or LUFS target, use Loudness Normalization in the same menu instead. Choose the measurement and the target, and keep independent stereo normalization off so the balance survives. For mono, set Treat mono as dual mono to match the intended playback and final meter configuration, since comparing compensated dual-mono and single-channel readings can open up a gap of roughly 3 LU. Apply, export a new file, then measure the result. Hitting a LUFS number doesn't guarantee a true-peak ceiling on its own, so if the projected peaks are too high, lower the gain or make a separate limiting decision.
Use Peak Normalization for a Ceiling, Not Equal Loudness
Peak normalization finds the largest sample magnitude in the selection and applies one constant gain change so that sample reaches the target. If the highest peak is -7 dBFS and the target is -1 dBFS, the process adds 6 dB to every sample. The difference between quiet and loud passages stays the same.
For selected multichannel audio, Sound Forge finds the largest sample magnitude among the selected channels and applies the same gain to all of them. That preserves the channel relationship. Selecting only one channel changes only that channel, which can be useful for a repair but is dangerous if done accidentally on a finished stereo file.
The official Sound Forge 2026 Normalize help warns that peaks near 0 dB can clip during conversion to a compressed format and gives -0.9 dB as a starting point. I'd treat it as exactly that, a starting point rather than a universal delivery ceiling. A client may require -3 dBFS sample peak, a streaming master may be checked in dBTP, and a game pipeline may define different limits by asset class.
Use RMS Normalization Only with an RMS Brief
Average RMS normalization measures average signal energy and applies gain toward the requested RMS value. It earns its place when a delivery system, audiobook workflow or older asset specification explicitly uses dB RMS. It isn't an older spelling of LUFS, though, and shouldn't be substituted for a loudness target.
Sound Forge exposes scan controls because the result depends on what the scan includes:
- Ignore below removes material below a threshold from the RMS calculation. Set too low, long silence pulls the average down; set too high, the scan may exclude nearly everything.
- Attack time controls how quickly the scan responds to transient peaks.
- Release time controls how long transient material remains part of the calculation as it decays.
- Use equal loudness contour compensates for reduced hearing sensitivity at very low and high frequencies.
The Boris FX documentation explicitly warns that RMS normalization above -6 dB can compromise sound quality. A 0 dB RMS target corresponds to the apparent loudness of a maximum-amplitude square wave; it isn't the benign equivalent of normalizing a peak to 0 dBFS.
If the requested RMS gain would exceed full scale, choose what happens rather than accepting a hidden compromise. In the If clipping occurs menu, Sound Forge offers Apply dynamic compression, Normalize peak value to 0 dB, Ignore (saturate) and Stop processing. The first changes dynamics, the second misses the RMS target, the third clips, and the fourth stops. For a controlled delivery, I'd choose Stop processing as the safest diagnostic default until you decide which trade-off the brief permits.
Use LUFS Normalization for Program Loudness
Loudness normalization targets perceived program level rather than the single highest sample. In Sound Forge Pro 2026, choose Loudness and then the current EBU R128 or ITU-R BS.1770/1771 option exposed by the dialog. The norm supplies integrated program loudness, tolerance and maximum true peak.
Integrated LUFS is measured across the program; it answers “how loud is this whole deliverable?” True peak estimates peaks between stored samples; use that measurement to decide how much playback/encoding headroom remains. You need both, because a file can be exactly -16 LUFS and still exceed a -1 dBTP ceiling. One number can't satisfy two independent constraints when the source is too dynamic.
Limit dynamics to turns on loudness-range processing, and most files don't need it. The right loudness range depends on the listening environment and the brief. Sound Forge notes that LRA adjustment isn't available for files shorter than 30 seconds; for those it instead keeps maximum short-term loudness no higher than the integrated target plus 5 LU. That 30-second software rule is separate from the EBU measurement guidance, where R128 doesn't recommend LRA for programs under one minute because there are too few short-term values.
If you want to watch the reading accumulate in real time, the Sound Forge Loudness Meters guide explains momentary, short-term, integrated and range displays. For final compliance, measure the complete rendered program rather than stopping when a convenient section looks right.
Use Current Delivery Targets, Not a Universal LUFS Number
The following examples show why the destination comes first. Follow the current contract, broadcaster, distributor or platform page for the specific delivery.
| Destination example | Loudness or level | Peak requirement | What to remember |
|---|---|---|---|
| Spotify music · Normal playback | -14 LUFS integrated target | Below -1 dBTP; Spotify advises below -2 dBTP for masters louder than -14 LUFS | Normalization is applied at playback and can vary by device/settings |
| Apple Podcasts | Around -16 dB LKFS, ±1 dB | True peak no higher than -1 dB FS | Apple cites ITU-R BS.1770-5 and recommends preconditioning before encoding |
| EBU R128 file program | -23 LUFS, ±0.2 LU for QC | Maximum -1 dBTP for linear production audio | Broadcast target; not a generic podcast or music preset |
| ACX audiobook | -23 to -18 dB RMS | Peaks no higher than -3 dB | Noise floor must also be no higher than -60 dB RMS; normalization alone cannot fix noise |
Spotify's current loudness guidance says its Normal playback setting adjusts tracks to -14 LUFS under ITU 1770 and recommends below -1 dBTP, or below -2 dBTP when the master is louder than -14 LUFS. It also says its web player and some third-party devices do not use normalization. Apple Podcasts recommends about -16 dB LKFS with ±1 dB tolerance and a true peak no higher than -1 dB FS in its current audio requirements. The current EBU R128 recommendation specifies -23 LUFS for file-based program loudness.
These are different delivery systems rather than competing answers to one question. A publisher may set its own production target, but the deliverable must still meet the actual destination's requirements, and an audiobook RMS requirement can't be safely converted into a guessed LUFS number. For spoken-word production around this final measurement, use the Sound Forge podcast workflow for the editing, cleanup and mastering decisions that normalization can't make.
Calculate Whether Constant Gain Can Reach the Target
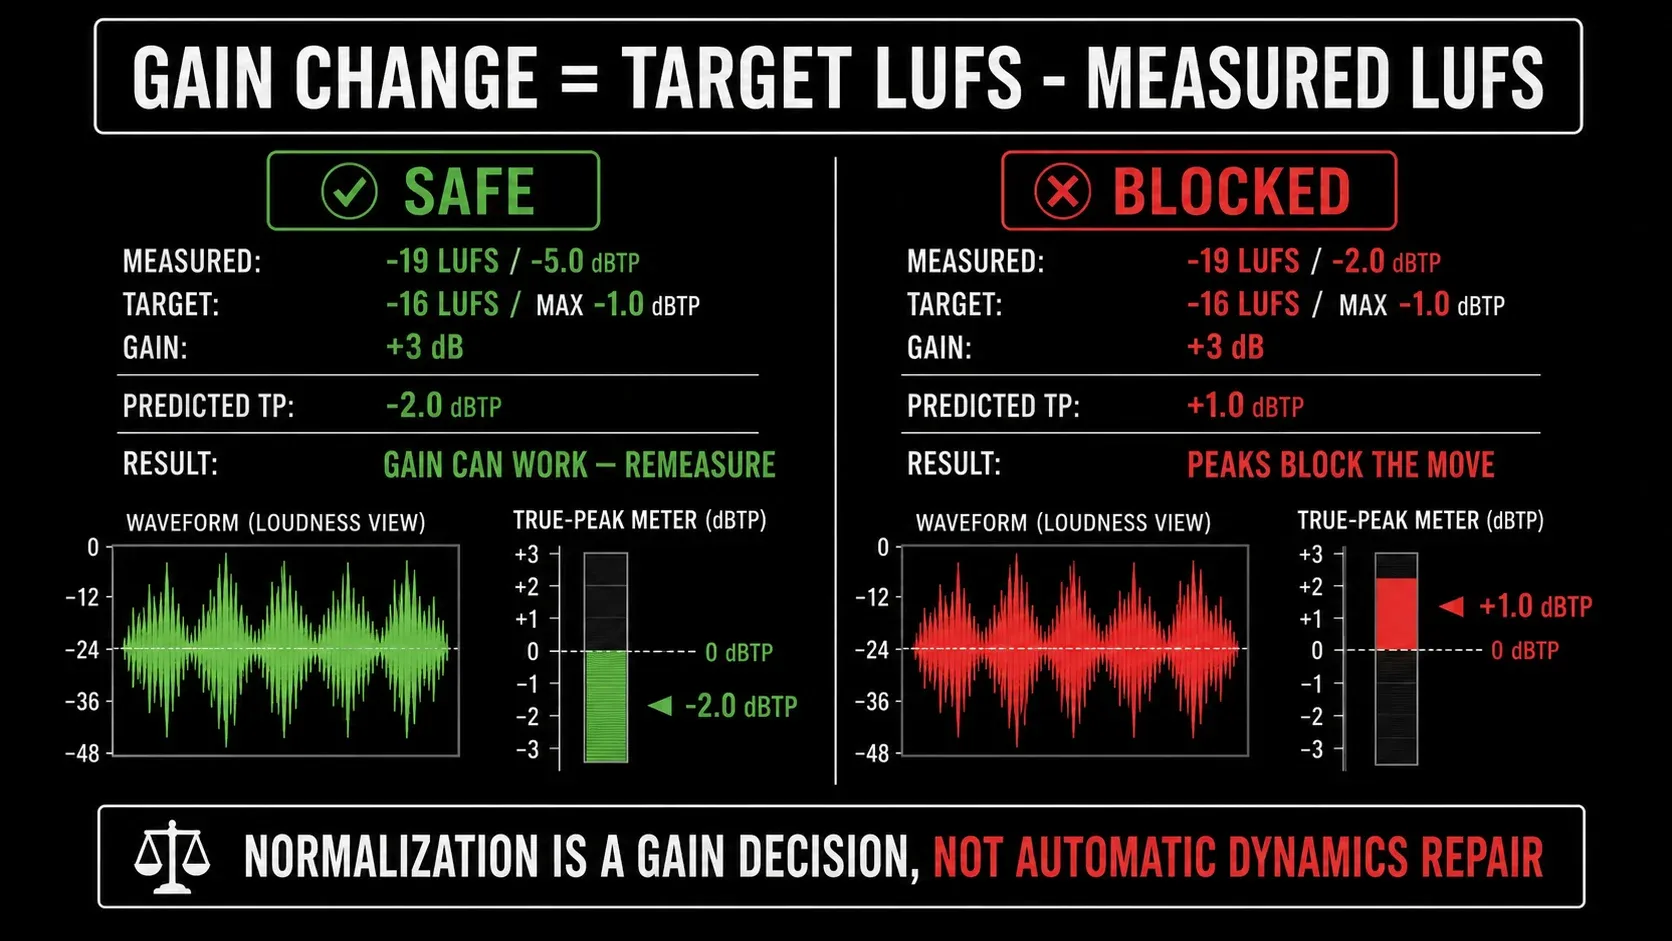
Before applying a custom LUFS target, estimate the required gain:
Required gain = target integrated loudness − measured integrated loudness.
Gain and headroom check
Will constant gain fit the peak ceiling?
Enter complete-file readings from Sound Forge Statistics, or measure the finished file in the free LUFS meter. This calculator predicts a constant gain move; it doesn't upload or normalize audio.
The target lands exactly on the selected true-peak ceiling. Remeasure the rendered file.
A projection isn't final QC. Codecs, processing order and render settings can all shift the measured result.
Say Statistics reports -20 LUFS integrated and -5 dBTP. A -16 LUFS target needs roughly +4 dB, which puts the estimated new true peak at -1 dBTP, so constant gain has just enough headroom for a -1 dBTP ceiling. If the measured true peak were -3 dBTP, the same +4 dB move would land around +1 dBTP, and constant gain couldn't meet both targets. Treat the loudness subtraction as a projection: material near the measurement gate can nudge the integrated result, so the new scan is what decides.
That conflict isn't a software bug. The audio needs a different dynamics decision: edit an isolated peak, revise compression, use an approved true-peak limiter, accept a quieter integrated value or change the delivery target if the brief permits it. Then measure the whole file again. The Wave Hammer guide covers limiting as a separate mastering process; don't hide it inside the word “normalize.”
Hear What a Constant 6 dB Normalization Move Changes
These players use the same 64.3-second speech recording, encoded separately as mono 44.1 kHz, 128 kb/s MP3s. The controlled source-level difference was 6.0 dB. Separate lossy encodes don't stay exact sample-for-sample scaled copies after decoding, so compare the rounded measurements and the change you hear. These are controlled gain examples. They weren't exported from Sound Forge and don't benchmark the application.
| File | Integrated | True peak | LRA |
|---|---|---|---|
| Before | -30.0 LUFS | -9.8 dBTP | 7.3 LU |
| After | -24.0 LUFS | -3.8 dBTP | 7.3 LU |
Measurements in the retained September 5, 2026 record with FFmpeg 8.1.2 loudnorm and ebur128 agree on rounded integrated loudness and true peak. The table's 7.3 LU loudness range comes from ebur128 for both files, while loudnorm reported 6.9 LU for both. Neither analysis shows a change in range at its displayed precision. The after file is deliberately not labeled podcast-ready, because -24.0 LUFS doesn't meet every delivery target.
The reading is “Epitaph on a Sailor” by Robert Duncan Milne, read by Claudia Caldi for LibriVox Short Story Collection Vol. 106. LibriVox's public-domain policy identifies its recordings as public domain in the United States. Check the status in your country before reusing a recording elsewhere.
Normalize Near the End of the Signal Chain
Put final normalization after cleanup, EQ and any compression or limiting you actually need, then export and measure again. You don't need every processor, so skip whatever the recording doesn't call for.
EQ can create new peaks, compression changes crest factor, and noise reduction can change measured energy. Lossy encoding can create inter-sample overs on top of that. Any of those after normalization can invalidate the reading that came before it.
There's one legitimate exception: early normalization used deliberately as gain staging before a plug-in. That's an input-level adjustment rather than final delivery compliance, so run a separate final normalization and verification pass after the processing chain. The mastering workflow keeps those two decisions separate.
Batch-Normalize Only Compatible Files
Peak-normalizing a folder gives each file a shared peak ceiling; it doesn't give the folder shared loudness. LUFS-normalizing every file independently can erase intentional relationships between album tracks, episode segments or game assets. Group files by role and destination before running an automated job.
- Podcast episodes: normalize whole finished episodes to the publisher's program spec, and leave individual sentences and stems alone.
- Voice-over pickups: match microphone, room, speaker role and dynamics before one RMS or LUFS rule.
- Music albums: protect intended track-to-track relationships; platform album normalization may preserve them.
- Game/UI sounds: separate one-shots, loops, ambience and dialogue; judge short one-shots by their intended playback context, listening and peak limits rather than one integrated LUFS target.
- Archive derivatives: leave preservation masters un-normalized unless the archive policy explicitly calls for a changed derivative.
Use Tools → Batch Converter only after two representative files pass. The batch-processing guide covers source grouping, ordered effects, templates, safe destinations, pilot runs and output sampling.
Verify the Export as Well as the Editable Source
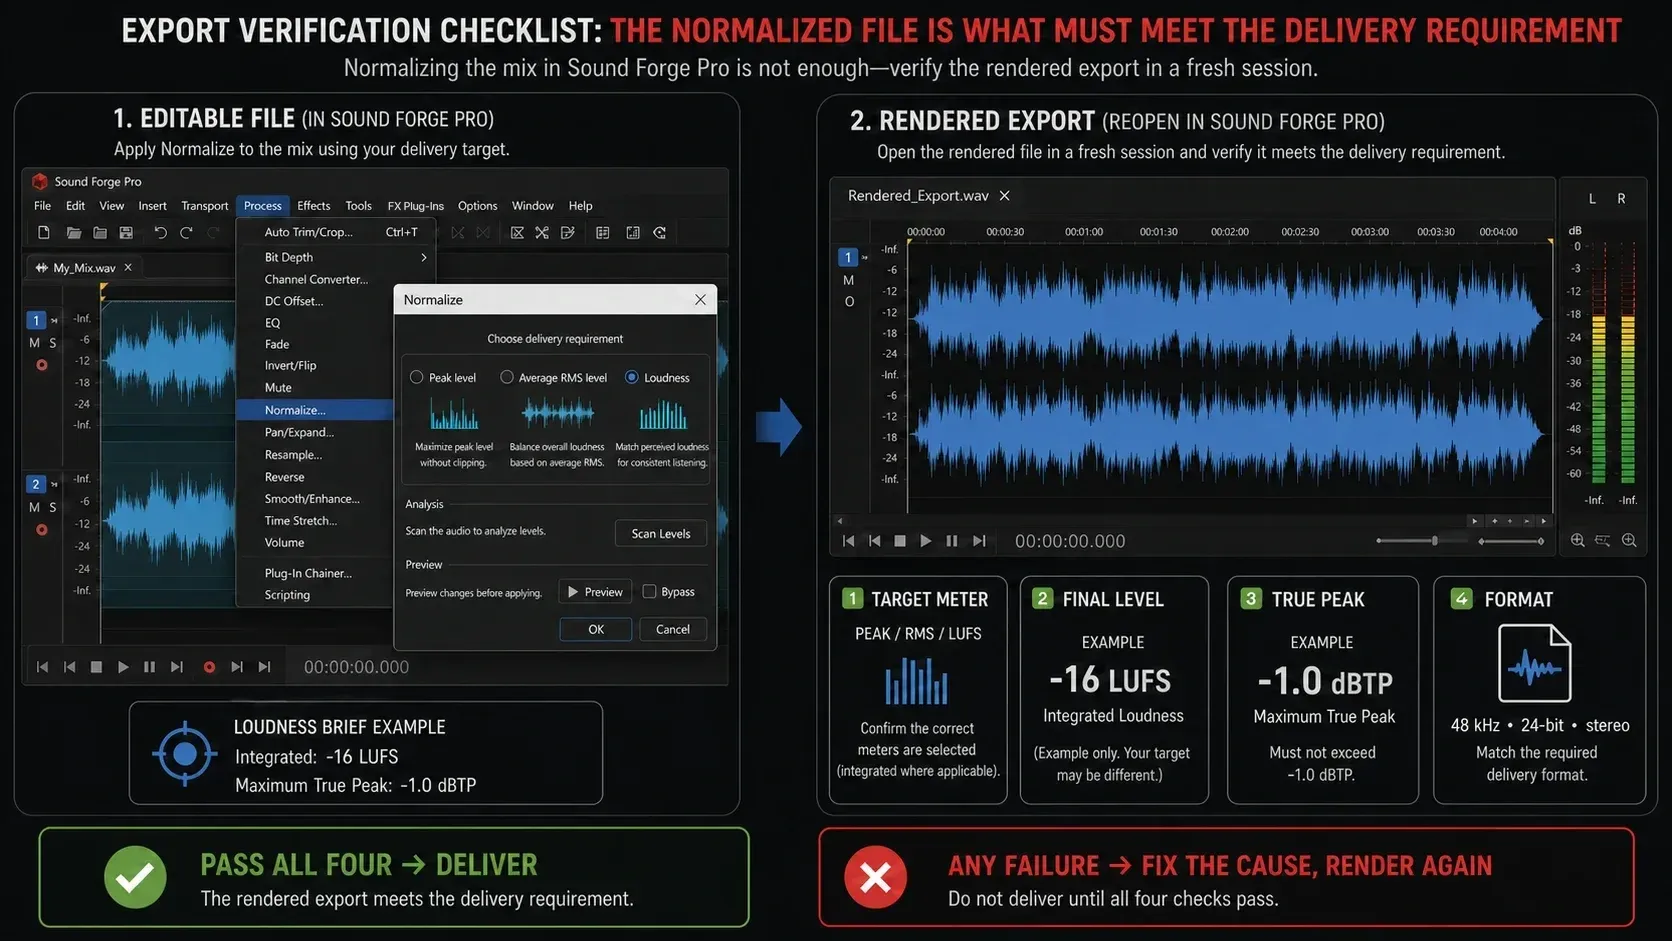
- Save or render to a new destination; keep the approved source intact.
- Reopen the actual WAV, FLAC, MP3 or AAC deliverable.
- Select the complete program and run Tools → Statistics.
- Compare integrated loudness, true peak, sample peak and RMS with the brief.
- Confirm duration, channels, sample rate, bit depth/bitrate and metadata.
- Listen to the quietest passage, loudest passage, strongest transient and ending.
- Check that no fade, tail or final word was truncated.
- Record the measured result with the filename and export preset.
For MP3 delivery, follow the MP3 export and verification workflow, and measure the editable source and the finished MP3 separately. If the delivery also drops bit depth, apply the Sound Forge bit-depth and dither workflow before the final measurement. A clean reading on the source doesn't guarantee a clean delivery file.
Troubleshoot the Result Before Repeating the Process
- It is still quiet after peak normalization: a transient already controls the ceiling. Fix dynamics or use the required loudness workflow.
- The noise floor became distracting: gain raised noise with the signal. Return to restoration or a better source.
- Sound Forge stops during RMS normalization: the target requires clipping under the selected policy. Lower the target or make a deliberate dynamics decision.
- The RMS result changes between scans: verify selection, Ignore below, Attack, Release and equal-loudness contour.
- LUFS is correct but true peak fails: reduce the required gain, control peaks with an approved limiter or accept a lower loudness if allowed.
- Integrated loudness will not settle: measure the full program from start to finish. Short loops and partial playback don't represent the deliverable.
- The MP3 exceeds the source peak: lower the pre-encode gain or peak ceiling to leave more headroom, encode again, and measure the new file. Moving a ceiling from -1 to -2 dBTP, for example, adds 1 dB of headroom, though it still can't guarantee every encoder will stay under the final limit.
- Left/right balance changed: check whether only one channel was selected before normalization.
Audio Normalization FAQ
How do I normalize audio in Sound Forge Pro?
Select the finished file or region and choose Process → Normalize. For Peak or Average RMS, use Scan Levels and set the target, with an explicit clipping policy for RMS. For Loudness, set the standard, integrated target, tolerance and true-peak limit. Preview, apply, then check both the processed selection and the exported file with Tools → Statistics.
What level should I normalize audio to?
Use the current delivery specification. A peak ceiling, RMS range and integrated LUFS target are different requirements. There is no universal setting for music, podcast, voice-over, audiobook, broadcast and game audio.
What is the difference between peak, RMS and LUFS normalization?
Peak normalization follows the largest sample magnitude. RMS normalization follows average signal energy under chosen scan settings. LUFS normalization follows perceived program loudness and is paired with a true-peak limit. The three modes can produce different gain changes from the same file.
Does normalization compress audio?
Basic peak or loudness gain normalization is a constant level change and preserves internal dynamics. Dynamics change if you enable RMS clipping compression, loudness-range limiting or a separate compressor/limiter to meet a target that constant gain cannot reach.
Should I normalize before or after compression?
For final delivery, compress first, normalize near the end and verify after export. Early normalization can be used deliberately for plug-in gain staging, but it does not replace the final compliance pass.
Should I normalize every file to -1 dB?
No. -1 dBFS is a common conservative sample-peak choice, and -1 dBTP appears in several delivery recommendations, but they are not the same measurement. Use the unit and ceiling in the actual brief.
Can Sound Forge normalize multiple audio files?
Yes, through Tools → Batch Converter. Group only files with the same role and delivery rule, test typical and stress files first, write to a new folder and verify representative outputs. Never assume a shared peak makes files equally loud.
Can normalization fix clipping or background noise?
No. Lowering clipped audio keeps the distortion; raising quiet audio raises its noise floor. Repair clipping and noise before the final level pass, then normalize and measure again.