

Quick answer: to batch process audio files safely, group only files that share the same delivery requirement, test the full chain on representative sources, and write every result to a new folder. In Sound Forge Pro 2026, choose Tools → Batch Converter, add files, build the ordered Processing list, add one or more Renderer/Template outputs, set metadata and naming rules, then run a small pilot before the full job.
The dangerous part isn't finding the Run Job button. It's assuming that “all WAVs in this folder” are one valid batch. A folder can mix mono and stereo, 44.1 and 48 kHz, clean and clipped files, speech and music, mastered and unmastered levels. One preset can process every file successfully and still produce the wrong result.
This guide covers bulk audio processing on Windows: a batch can combine format conversion, normalization, VST/effect processing, metadata, naming and output QA. It follows the current Boris FX Sound Forge Pro 2026 help. If you only need a one-off format change, the single-file conversion guide is faster. Use Batch Converter when the same verified rule genuinely belongs on multiple files.
Decide Whether the Files Belong in One Batch
A good batch has a shared source class, process and destination. “All dialogue pickups from one microphone for the same episode” is a useful group. “Everything the client sent” is not. Separate files when their target format, channel layout, loudness standard, repair need or creative treatment differs.
| Source set | Usually safe to batch | Split before processing |
|---|---|---|
| Podcast or voice-over | Same mic/room, same episode role, same delivery spec | Host, remote guest, ads and archival inserts with different noise or dynamics |
| Game/UI assets | Same asset class, channel count, loudness rule and engine format | Loops, one-shots, ambience, dialogue and music |
| Sample library | Same source session and intended peak/headroom policy | Drums, sustained instruments and already mastered loops |
| Archive conversion | Verified lossless derivatives with no creative processing | Items needing different rate policies, restoration, speed or channel correction |
| Music delivery | Alternate formats from approved masters | Unmastered mixes, instrumentals and masters with different loudness decisions |
Batch processing is strongest when it repeats a decision you've already made, and weak when every file needs a separate diagnosis. Click repair, noise profiles, de-clipping, trimming and creative EQ often vary by source. A converter can run them automatically; that doesn't make the judgment transferable.
Audit the Input Set Before Opening Batch Converter
Create an inventory before processing. Use file properties or a media inspector for codec, sample rate, sample type and channels; use audio measurements for peak, loudness and silence. No single measurement tells you whether a file also has the right metadata or destination format.
- Format and codec: WAV, FLAC, MP3, AAC or another container/codec.
- Sample rate: record each source rate. A mixed-rate set can use a verified source-preserving template, or one deliberate target rate; split the job if those policies differ.
- Bit depth: note integer versus 32-bit float and whether a reduction will require dither.
- Channels: mono, stereo or multichannel; a stereo template can silently create waste or routing mistakes for mono assets.
- Duration and silence: unusually short, long or silent files can expose a wrong selection or broken source.
- Peak, loudness and true peak: identify outliers before normalization. The Statistics guide covers measurement; the loudness-meter guide covers integrated LUFS and true peak.
- Metadata and names: check whether existing title, artist, track, BWF or project fields must survive.
Move questionable files into a review group instead of making the main preset more complicated. A simple job applied to a clean set is easier to test, rerun and explain than one giant preset full of exceptions.
Choose Two Representative Test Files
One test file proves only that one file worked. Use a pair:
- Typical file: normal duration, level, tone and metadata for the group.
- Stress file: loudest peak, quietest useful signal, longest duration, densest transients or most complicated metadata in the group.
If the files are speech, include both sustained vowels and consonant-heavy sections. For music or samples, include a clean transient and a dense passage. If the source set mixes rates, include a representative file from each rate that the job will handle; do not resample a file merely to create a test case. Two files are a starting point, not a ceiling. Add tests for other channel layouts or metadata requirements. Each output must meet the specification without unwanted changes; a format-only conversion need not sound different.
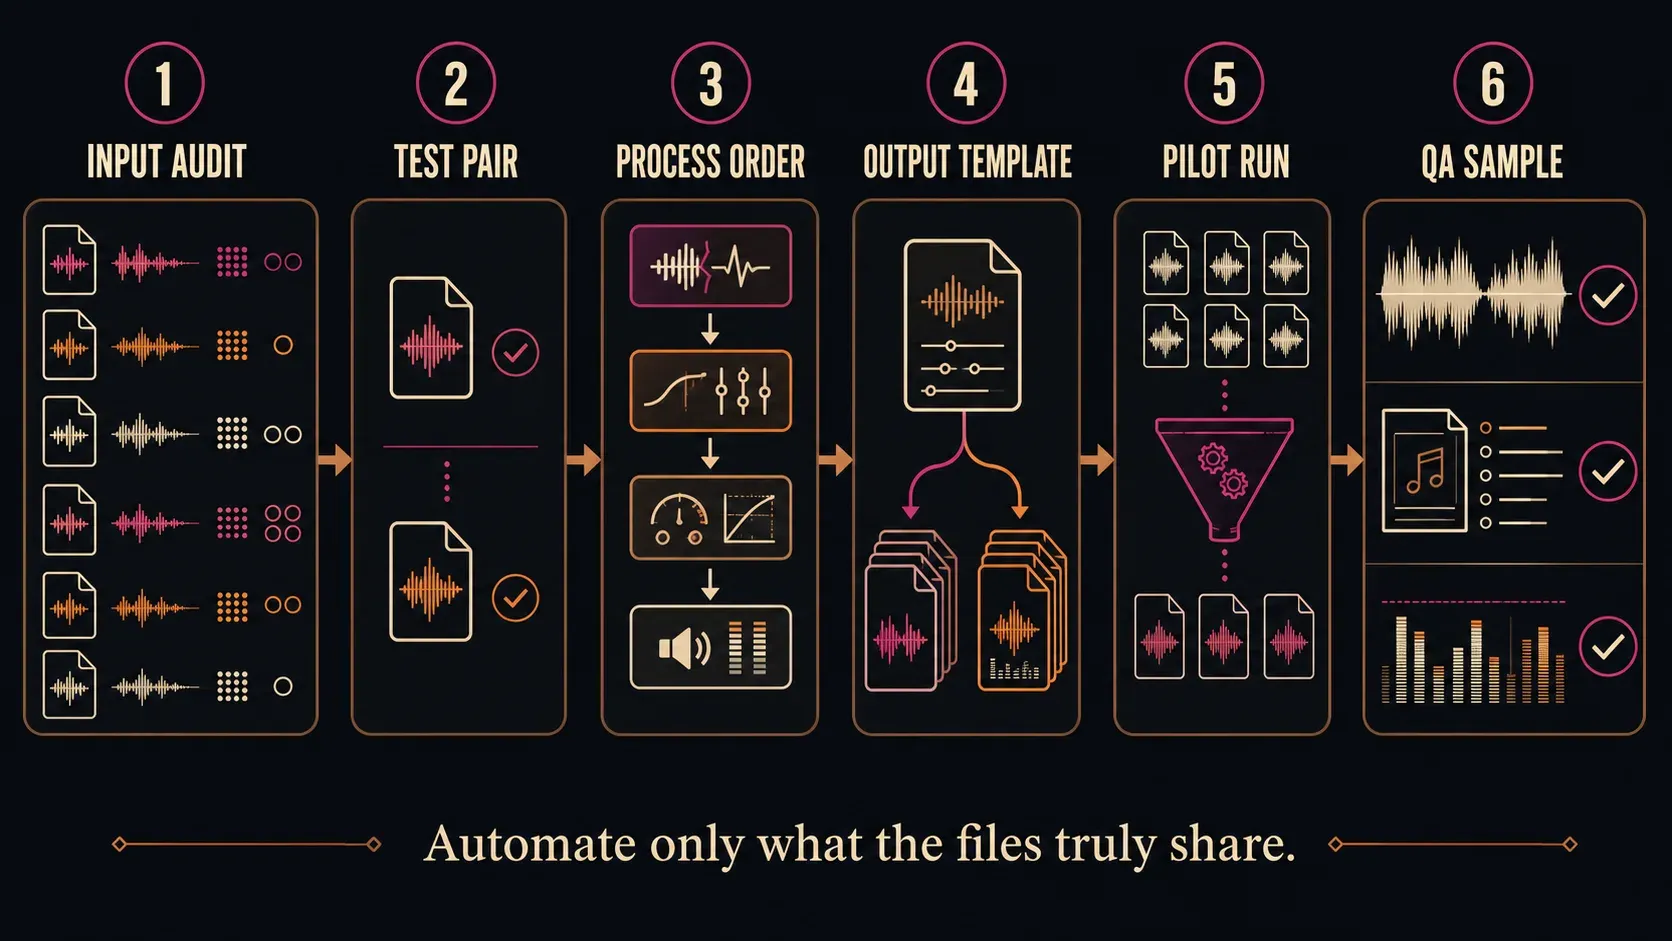
Batch Process Audio in Sound Forge Pro: 9-Step Safe Workflow
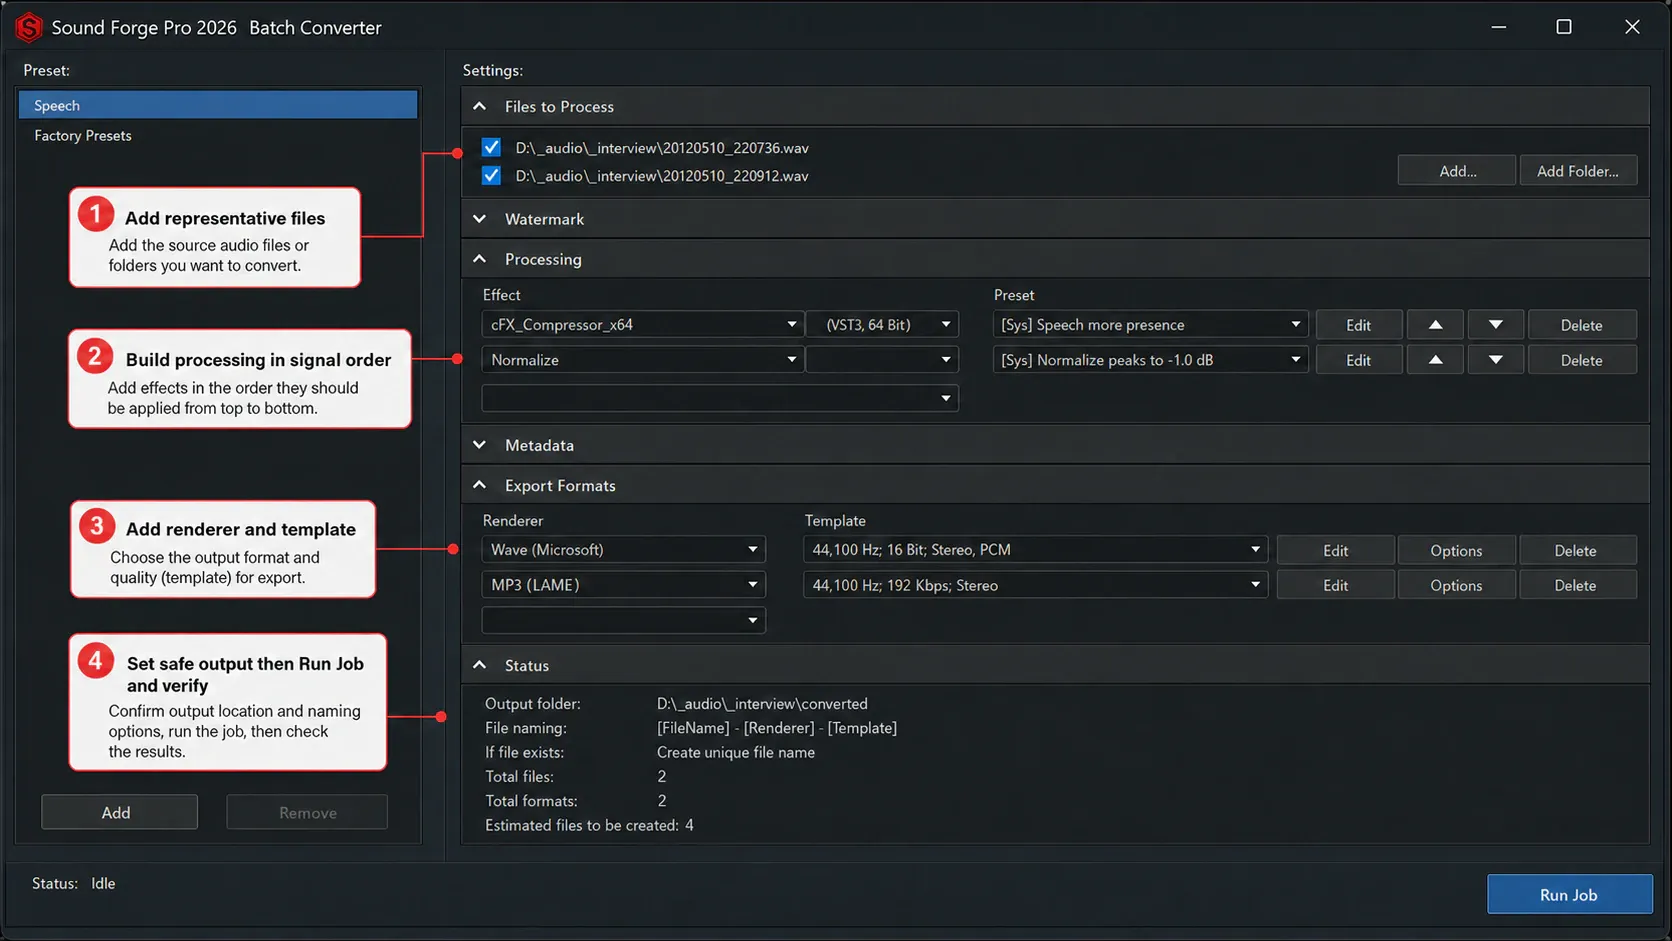
- Audit the source set. Group files that can use the same processing and output policy; verify any mixed formats, rates or channels in the pilot.
- Choose a representative pair. Start with one typical file and one stress file; include additional files for other rates, channel layouts or metadata requirements.
- Open Batch Converter. Choose Tools → Batch Converter and remove any automatically included open files that do not belong.
- Add and count the inputs. Use Add or Add Folder, then compare the displayed count with the inventory; Add Folder does not recurse.
- Build the processing order. Add Effect and Preset pairs in signal order and test every plug-in on the representative pair.
- Choose output templates. Add one or more Renderer and Template rows for the required formats.
- Set safe output rules. Choose a new destination, source-subfolder behavior, metadata and collision-safe naming.
- Run and inspect the pilot. Uncheck every file outside the pilot selection before Run Job. Verify format, channels, duration, levels, sound, metadata and names before reselecting the full set.
- Run and sample the full batch. Compare expected counts, inspect every warning and check risk-based outputs from every source class and renderer.
Treat the visual above as a workflow mockup, not a pixel-exact screen capture; follow the labels in the current application and Sound Forge Pro 2026 Batch Converter help. The help confirms that Add Folder includes only the selected folder's contents. Preserve source subfolders affects the output layout later; it does not discover nested input files.
Count before and after: 80 checked inputs and two outputs per input should produce 160 audio files only if every render succeeds and every destination name is unique. Count audio outputs separately from logs or sidecar files. Investigate missing or extra files before delivery.
Build the Processing List in Signal Order
Under Processing, selecting an Effect adds it to the end of the list. Choose its Preset next. Use Edit to adjust supported settings and Move Up/Move Down to change order. The order is the signal path: the first item changes what the next item receives.
| Stage | Typical purpose | Why it belongs here | Batch caution |
|---|---|---|---|
| Repair/correction | DC offset, verified hum/notch, isolated technical cleanup | Dynamics and level changes can exaggerate defects | Noise profiles and click damage rarely match every file |
| Corrective EQ/filter | Known high-pass, resonant cut or tonal correction | Feeds cleaner energy into dynamics | Do not high-pass music, speech and effects at one arbitrary frequency |
| Dynamics | Compression, limiting or expansion | Changes crest factor and later loudness | Long-term loudness can match while short files react very differently |
| Final level | Peak or loudness normalization | Measures the processed signal | Use the actual delivery target; protect true-peak headroom |
| Render conversion | Sample rate, bit depth, channels, codec | Creates the destination file after processing | Plan dither at final integer quantization; avoid repeated lossy encoding |
This is a starting logic, not a universal mastering chain. Some processes deliberately change order. The important part is to know why. Build and audition complicated chains first in the Plug-In Chainer, then save only settings that remain stable in offline processing.
VST batch processing needs an additional test. Confirm that the plug-in appears, that the intended preset loads and that a representative offline render completes correctly. If a processor is missing, use the VST discovery and Plug-In Manager checks before adding it to the job.
Batch-Normalize Audio to the Right Measurement
If the brief says “batch normalize audio,” clarify whether it means equal peak ceilings or comparable perceived loudness before choosing the process.
Peak normalization and loudness normalization solve different problems. Peak mode gives each file the same highest sample value, which doesn't make speech, music or sound effects equally loud. Loudness mode measures programme energy over time, but its target still belongs to a delivery specification rather than to Sound Forge itself.
The AES loudness normalization overview describes normalization as matching file-based content to a target loudness and explicitly recognizes batch use. That doesn't make −14 LUFS a universal setting. Podcasts, broadcast, streaming masters, game assets, voice assistants and internal review files can require different integrated loudness, true-peak and channel rules.
- Use peak normalization when the specification is about maximum sample peak and perceived consistency is not the goal.
- Use loudness normalization when comparable perceived level is required across like-for-like programme files.
- Don’t normalize an album track-by-track when intentional level relationships should survive.
- Don’t force very short effects or one-word files through a long-form integrated-loudness rule without testing how the meter behaves.
- Measure true peak after lossy encoding when the destination imposes a ceiling.
The Normalize guide separates Peak, RMS and Loudness modes. Constant-gain normalization does not compress the dynamics. Sound Forge's Loudness dialog also offers optional dynamic limiting, while RMS mode has clipping-response options. Check those settings explicitly: enabling dynamics processing can change the sound, even when the measured level meets the target. See the Normalize controls and short-file warning: dynamic-range adjustment is unavailable for files under 30 seconds. Test short assets separately instead of copying long-programme settings.
Treat Metadata and Watermark as Batch-Wide Edits
Metadata fields entered in Batch Converter apply to the outputs in the job. With Overwrite off, existing destination values are preserved; keywords are appended. With Overwrite on, existing values are replaced, and a blank batch field can erase the existing value. The official help also warns that a metadata type unsupported by the output format is ignored.
That makes shared metadata suitable for publisher, copyright, project, album or common comment fields. It is unsafe for track title, episode number, scene, speaker or asset ID unless every file really shares the value. Preserve a metadata sample before and after the pilot: MP3 ID3, FLAC Vorbis comments, RIFF INFO and BWF fields do not expose identical field sets.
The Watermark section mixes a selected audio file into every output. That's audio processing rather than a hidden ownership tag. Check start time, duration, channel layout and level against the shortest and quietest source. An audible ident that fits a two-minute preview can cover most of a half-second UI sound.
Add One or More Output Formats
Under Export Formats, choose a Renderer and output template. Add another renderer when the same approved source needs more than one delivery: for example, 24-bit WAV masters plus MP3 review copies. Sound Forge can create multiple output formats in one job.
Default Template is intended to keep source attributes where the renderer supports them. It cannot make an incompatible codec preserve every rate, sample type or channel layout; FLAC, for example, does not accept floating-point samples. Verify a representative export before using it for the full batch. Choose or build a specific template when every output must share a codec, rate, depth or channel layout. The FLAC format FAQ explains the integer-sample limitation; it is not something a Sound Forge preset can override.
- WAV/PCM: suitable for lossless masters, interchange and further processing.
- FLAC: lossless compression of supported integer PCM for storage or compatible delivery. Keep a floating-point master in its original format; converting it to integer PCM for FLAC must not be assumed to preserve every float sample.
- MP3: listening or platform derivatives; make them from the approved lossless source, not from an older lossy file.
- Mono/stereo conversion: use an explicit channel rule and audition phase/level. The Channel Converter guide covers downmix decisions.
- Sample-rate conversion: choose the destination requirement once. The sample-rate guide separates resampling from a header-only playback-rate change.
- Bit-depth reduction: consider dither at the final quantization into an integer output, including after floating-point processing. The bit-depth and dither guide covers 24-to-16-bit delivery.
The current Custom File Templates help says built-in templates cannot be edited. Create a named custom template instead. Custom .sft2 rendering templates live under the user's AppData/Roaming/BorisFX/Render Templates tree and can be copied to another account or workstation; version them with the delivery specification so “Podcast MP3” does not silently change meaning.
Choose a Safe Output Folder and Naming Rule
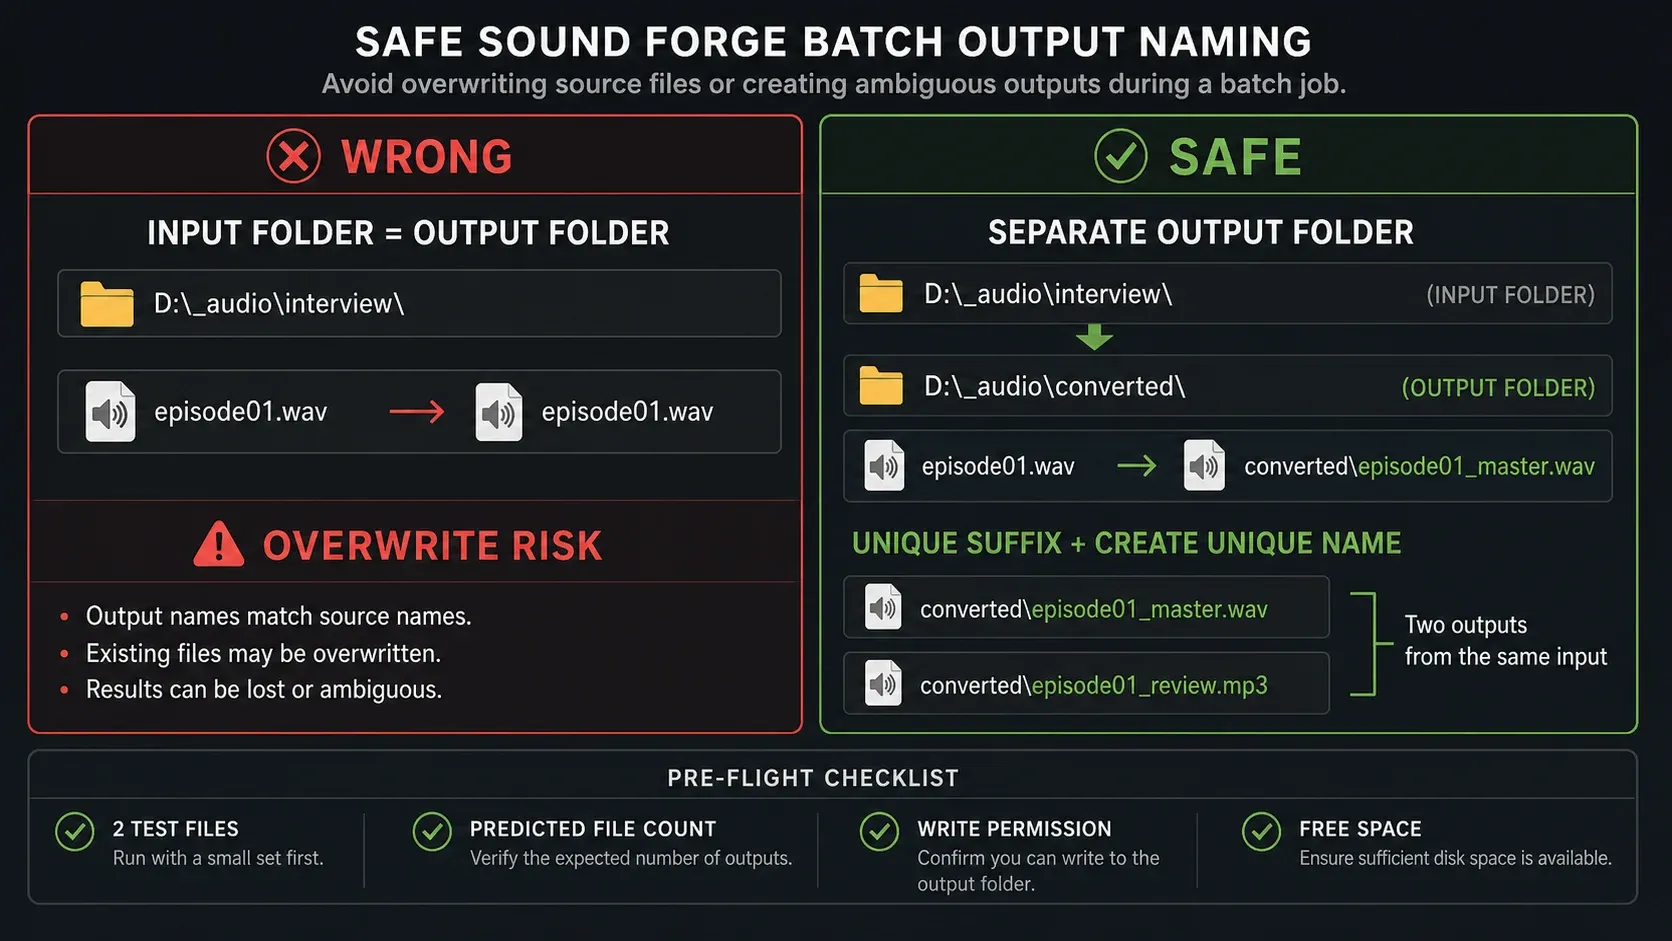
Open Options for export location and file naming. The safest first run is a new, empty destination outside the source tree. Avoid Same as source until collision behavior and filenames have been proven on copies.
| Option | Useful for | Risk to check |
|---|---|---|
| Save files to | Clean delivery root and easy rollback | Wrong drive, permissions or stale files from a previous run |
| Preserve source subfolders | Mirroring an already audited input tree | It preserves output structure; it does not add nested inputs |
| Same as source name | One renderer in a separate folder | Collisions when several renderers share an extension or destination |
| Append to name | Review suffixes such as -preview or -48k | Duplicate suffixes after reruns and downstream naming limits |
Before Run Job, write the expected naming example in plain text: DoorSlam_07.wav → DoorSlam_07-preview.mp3. Check case, spaces, Unicode characters, duplicate basenames from different folders and maximum path length. If the destination already contains files, move it aside or use a new run folder so the output count remains meaningful.
Run a Pilot Before the Full Folder
- Include only the typical and stress files, plus any additional files needed to cover other source properties.
- Run the complete processing and every output renderer.
- Re-open the outputs in a fresh Sound Forge window or another trusted player.
- Compare duration, sample rate, bit depth, channels and metadata with the specification.
- Measure peak, loudness and true peak where required.
- Listen to the start, loudest passage, quietest useful passage and end.
- Check for clipped peaks, truncated tails, missing channels, unexpected noise or non-silent tails, codec artifacts and wrong filenames.
- Only then restore the full file list and run the job.
A progress bar proves the application finished; it says nothing about whether the output is correct. Keep the source inventory and expected output count beside the job. If one renderer fails, do not assume the other outputs are safe; inspect the status and rerun only after identifying whether the problem was a file, plug-in, template, path or storage issue.
Sample the Full Batch After It Finishes
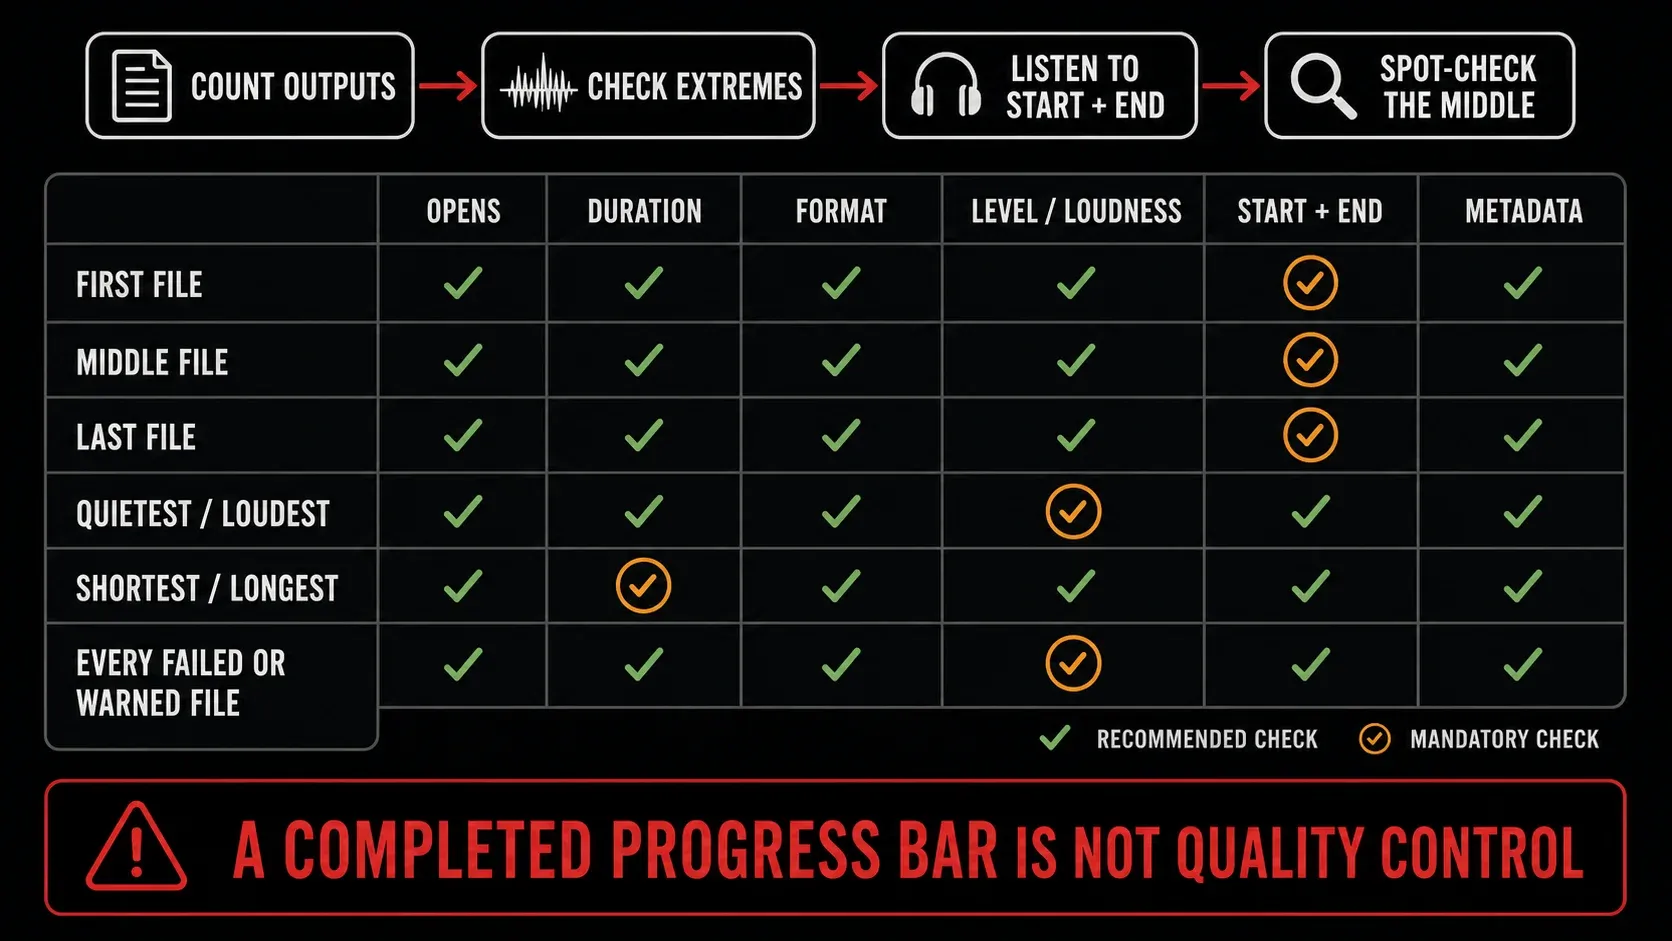
For a small job, inspect every output. For a large job, use a documented, risk-based sample. The orange “mandatory” marks in the diagram above mean higher-risk checks in this editorial workflow; they are not an official Sound Forge rule or a universal QA standard.
- first and last file alphabetically;
- shortest and longest duration;
- quietest and loudest source from the audit;
- at least one file from each source subfolder or content class;
- every error, warning or unexpected file-size outlier;
- one output from each Renderer/Template combination.
Then compare total input count, renderer count and output count, and scan for zero-byte files, duplicate names, missing extensions and outputs with suspiciously small or large sizes. Spot-check metadata in the destination application as well as in Sound Forge. For lossy delivery, audition transients and high-frequency material, because codec artifacts can pass a peak or loudness test; that listening pass is part of quality control.
Keep a record of the job status, preset name, template name, Sound Forge version and date with the delivery. A repeatable batch is valuable only when another run can reproduce the same choices.
Save and Maintain Batch Presets
Use Add in the preset pane after the pilot passes. Give the preset a purpose and revision, not a vague name: VO_review_MP3_48k_v3 tells you more than Speech. Folders can group presets by client, destination or workflow.
Batch presets are not edited in place. Before changing one, record its settings and destination so the original job remains recoverable. Load it, make the changes, then use Add to save a new, clearly named revision. Keep the old revision until the replacement passes its pilot; the help's delete-and-recreate procedure is not a reason to discard your only record of a working job.
A tested preset can be exposed as an Instant Action or under Sound Forge Pro 2026 Custom Actions in the Windows Explorer context menu. This is useful for mature, low-risk jobs such as approved review-copy conversion. Never expose an overwrite-capable or creative processing job until its destination and collision behavior are impossible to misunderstand.
Use Separate Jobs for Different Delivery Scenarios
WAV to MP3 review copies
Start from approved lossless masters. Clear the Processing list and disable Watermark, including any settings inherited from a loaded preset. Add an MP3 renderer/template, preserve names in a separate review folder, and copy only shared metadata. Don’t add normalization merely because the file format changes. The MP3 export guide covers bitrate and metadata decisions without assuming one universal setting.
Voice-over or podcast pickups
Group by microphone, room, speaker role and destination, then test noise and dynamics on the noisiest/quietest file plus the loudest performance. Normalize to the actual programme or asset specification, and keep editorial trims and content-dependent noise repair out of the batch unless every boundary has been reviewed.
Game and interface assets
Split mono, stereo, loops and one-shots. Confirm engine sample rate, bit depth, channel policy, loop metadata and naming limits. A tiny UI click and a long ambience shouldn't share a loudness or trimming assumption just because both are WAV files.
Archive derivatives
Keep preservation masters untouched. For a conversion-only job, clear Processing and disable Watermark before creating access FLAC or listening copies, preserve source subfolders only after verifying the tree, and compare metadata before and after.
A whole-file checksum checks whether a file has changed; a WAV and its FLAC derivative need not have the same checksum. For a lossless-conversion check, compare decoded PCM using the same sample representation, channel layout and rate.
Don’t run denoise, normalization or channel conversion unless the derivative policy explicitly requires it. Float peaks above 0 dBFS need level correction before integer export to avoid clipping. Sound Devices' float-to-24-bit workflow illustrates why this conversion requires a level decision; do not assume Sound Forge performs the same automatic correction.
Troubleshoot a Failed or Wrong Batch
- Expected files are missing: Add Folder does not recurse. Add each folder deliberately or prepare an audited flat set.
- Extra files appear: open Sound Forge data windows were included automatically, or an old destination was not emptied.
- VST is missing or fails: verify plug-in scan, architecture, license and preset in a normal file first.
- Output format is wrong: check Renderer and Template separately; Default Template still depends on the renderer supporting the source properties.
- Metadata disappeared: the target format may not support the field, or Overwrite/blank fields replaced it.
- Names collide: use a clean destination, suffix or preserved source-folder structure.
- Files sound inconsistent after peak normalization: peak level is not perceived loudness; regroup and choose the correct measurement.
- A job does not start: confirm which files are checked and which output templates are configured, then record any error shown. Diagnose that message; do not assume every failure has the same cause.
When to Use Sound Forge, Audacity or a Script
Sound Forge fits Windows audio batch processing when you want an inspectable GUI, ordered effects, renderer templates, multiple formats, metadata, naming rules and reusable Explorer actions. Use it after the same chain has passed representative offline renders and listening checks.
For a free fixed-command workflow, Audacity 3.x provides Macros. The Audacity 4.0 release notes list Macro Manager and the scripting pipe as unavailable, so do not move an established macro workflow to 4.0 without verifying it. For recursive discovery, conditional rules, machine-readable logs or server work, consider FFmpeg with a shell script or a dedicated pipeline. Source protection, path quoting, codec availability and output QA still need explicit design.
Batch Audio Processing FAQ
Where is Batch Converter in Sound Forge Pro 2026?
Choose Tools → Batch Converter. The current dialog contains Files to Process, Processing, Metadata, Watermark, Export Formats, output Options, preset management, Status and Run Job.
How do I batch-convert WAV files to MP3?
Clear the Processing list and disable Watermark first, including settings inherited from a loaded preset. Add the approved WAV sources, an MP3 Renderer and verified Template, then a separate output folder and naming rule. Leave only the pilot files checked for the first run. Inspect their outputs before selecting the full batch.
Can Sound Forge batch-normalize multiple files?
Yes. Add the appropriate Normalize process/preset to the ordered Processing list. Choose Peak or Loudness according to the delivery specification, test unlike files separately and verify true peak after lossy encoding when required.
Can one batch create WAV and MP3 files?
Yes. Add multiple Renderer/Template rows under Export Formats. Confirm the expected output count and make sure naming and destination rules cannot cause collisions.
Does Add Folder include subfolders?
No. Sound Forge 2026 documentation says Add Folder adds only the selected folder's contents. Preserve source subfolders mirrors output structure for files already in the job; it does not discover nested inputs.
How do I process files without changing their sample rate or channels?
Use Default Template only when the selected renderer supports the source attributes. Verify the sample rate, sample type and channel count in a pilot output; unsupported combinations cannot be preserved by choosing a default.
Can I edit an existing Batch Converter preset?
Not in place. Record the original settings, load the preset, make the changes and use Add to save a separately named revision. Keep the old revision until the new job passes its pilot.
How many batch outputs should I quality-check?
Inspect every file in a small job. For a large job, document a risk-based sample that includes duration and level extremes, first and last files, every warning or outlier, each source class or folder, and every Renderer/Template combination.
Documentation checked September 9, 2026. This is a source-verified workflow, not a report of an in-app batch-processing test.