
Quick answer: for steady hiss, fan noise or HVAC wash, select a passage that contains only the unwanted sound, open Tools → Noise Reduction, capture the noiseprint, then preview a passage containing wanted audio and toggle Bypass to compare it with the original. Before applying, turn Bypass and any residual-output option off. Stop when the noise no longer distracts. If speech turns metallic, watery or dull, or the ambience starts pumping, reduce the processing.
This is a Windows workflow. Boris FX documents the current tool families online, but the detailed controls of the classic NR-2.0 plug-in still live in the ? help inside the installed dialog. Follow the seven-step sequence below only when your dialog shows the named controls.
This guide covers steady broadband background noise in the Sound Forge audio-restoration path. A gate, a hum filter, click repair and source separation solve different problems. Treating every defect with the same denoiser is how a usable recording becomes thin and artificial.
Identify the noise before processing
The current Sound Forge 2026 product page highlights a restoration family including DeHisser, DeClicker/DeCrackler and DeClipper. The specific tool matters more than the broad “Noise Reduction” marketing heading. Start with what the defect does over time, then choose the process.
- Steady fan, HVAC or room wash: use broadband Noise Reduction when you can capture a representative noise-only passage.
- Regular low-level white noise: compare broadband reduction with DeHisser. The current DeHisser help names microphones, preamps and transformers as typical sources.
- Clicks and crackle: use Click and Crackle Removal or DeClicker/DeCrackler. A stationary noise profile is a poor description of a one-off impulse.
- Flattened clipped peaks: try Clipped Peak Restoration or DeClipper on a copy. Those tools estimate damaged peaks, which a noiseprint can't rebuild. The clipped-audio workflow explains the limits before you commit a repair.
- A stable electrical tone: inspect the actual fundamental and harmonics before applying a narrow correction. Continue with the dedicated hiss-and-hum diagnosis guide.
- Music or another voice under speech: that's an overlapping-source problem. Classic broadband noise reduction can't reliably isolate changing program material, so compare noise-reduction software by workflow instead of forcing the noiseprint.
A noise gate isn't broadband reduction. The current Noise Gate help says it removes signals below a threshold in silent breaks. Noise that sits under speech stays audible, and a poorly set gate can make the floor disappear and return at every phrase. Use the Sound Forge Noise Gate workflow when pause attenuation is the actual job.
Where Noise Reduction lives in Sound Forge 2026
Open Tools → Noise Reduction for the classic restoration plug-in, or use its button on the Tools toolbar. The current Sound Forge 2026 Tools toolbar help lists Noise Reduction separately from Click and Crackle Removal, Clipped Peak Restoration and Audio Restoration.
The current Repairing Glitches, Clicks, and Noise help places the newer Sequoia DeHisser, DeClicker/DeCrackler and DeClipper effects under Effects. Its references to bundled RX plug-ins and a Pro Suite/SpectraLayers package say nothing reliable about your current entitlement. Packaging needs its own check: the live Sound Forge purchase matrix doesn't name an RX edition, an RX module or SpectraLayers. Check the license and installer for your exact purchase before following an RX or SpectraLayers tutorial; this workflow needs neither package.
Sound Forge 11 and Audio Studio 12.5 tutorials describe different dialogs. Don't assume those labels, or a MAGIX-era Pro 18 bundle, carry over to a Boris FX 2026 purchase. Use the ? button in the plug-in you actually opened for its control definitions.
Capture a clean noiseprint in seven steps
A noiseprint is a frequency profile of the unwanted sound. It's useful when the noise is reasonably steady and the sample contains no wanted audio. Take enough noise to represent the passage you'll process, without padding the selection with the end of a word, a breath, a cymbal tail or a transient. Listen to the selection on its own first. The Audacity manual explains the same profile principle: unwanted-only material and representative noise statistics matter, and looping a tiny sample adds no information. Its numeric limits aren't NR-2.0 settings, though.
- Keep an untouched source. Work on a separate PCM or float copy. Keep the capture sample rate while testing and avoid repeated MP3 encoding; never overwrite the only recording.
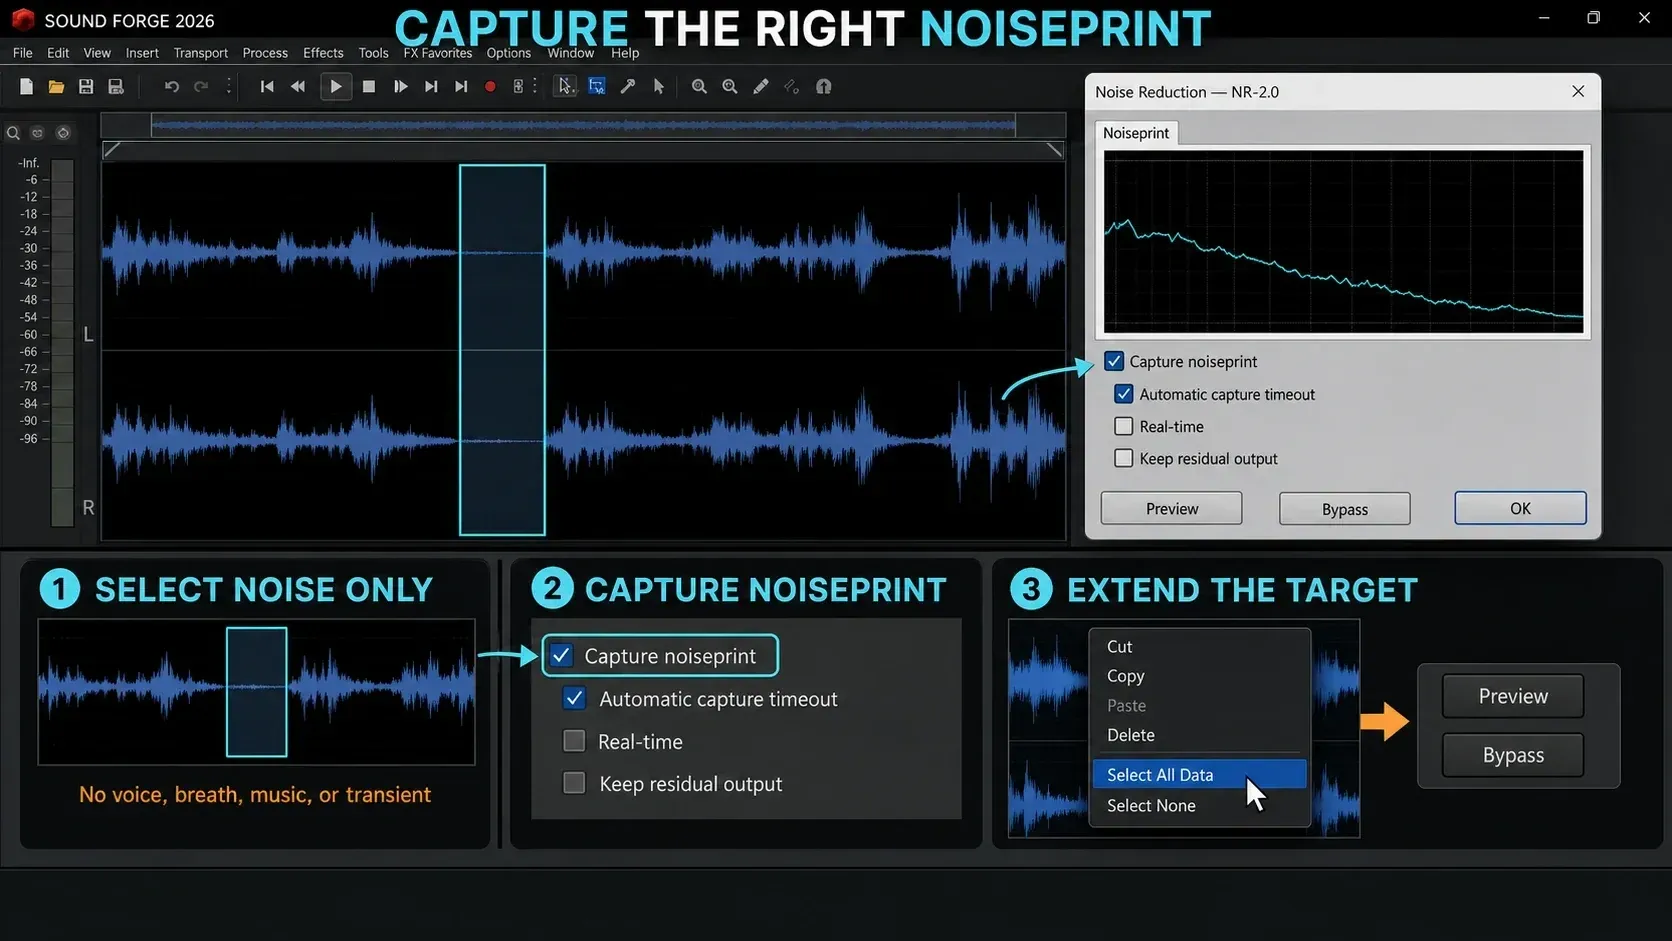
- Select noise only. Listen to a representative pause with no wanted speech, breath, music or transient. Keep the same source and recording conditions as the passage you want to repair.
- Open the classic tool. Choose Tools → Noise Reduction. Continue only if the installed dialog shows the Noiseprint controls described here.
- Capture the noiseprint. Enable Capture noiseprint and preview the noise-only selection. Confirm that a profile was captured before moving to wanted audio; do not keep learning from speech.
- Choose the processing target. Stop preview, retain the captured profile and select the intended time range and channels. Use the dialog’s selection controls or its supported data-window selection; use Select All only when the same noise profile suits the whole file.
- Preview a difficult passage. Listen with the processing active, then toggle Bypass for the original. Check quiet consonants, a note ending, a pause and a louder section at similar listening levels.
- Compare and apply conservatively. Check the removed signal if available, then turn residual output and Bypass off. Apply only when the normal output preserves wanted detail. Save a new file and listen again; undo a rendered test before processing an overlapping larger region.
The current processing-dialog help separates Preview from OK and describes time/channel selection controls. A Sound Forge 11 capture walkthrough documents the classic Capture noiseprint sequence and the older Select All Data command. That's version-labeled evidence and doesn't confirm every 2026 plug-in dialog. If your controls differ, use its ? help and check that changing the target didn't throw away the profile.
Do not copy an NR-2.0 mode recipe
For the reduction types available in your installed NR-2.0 build, read its ? help and audition each available choice against the same stress-test passage.
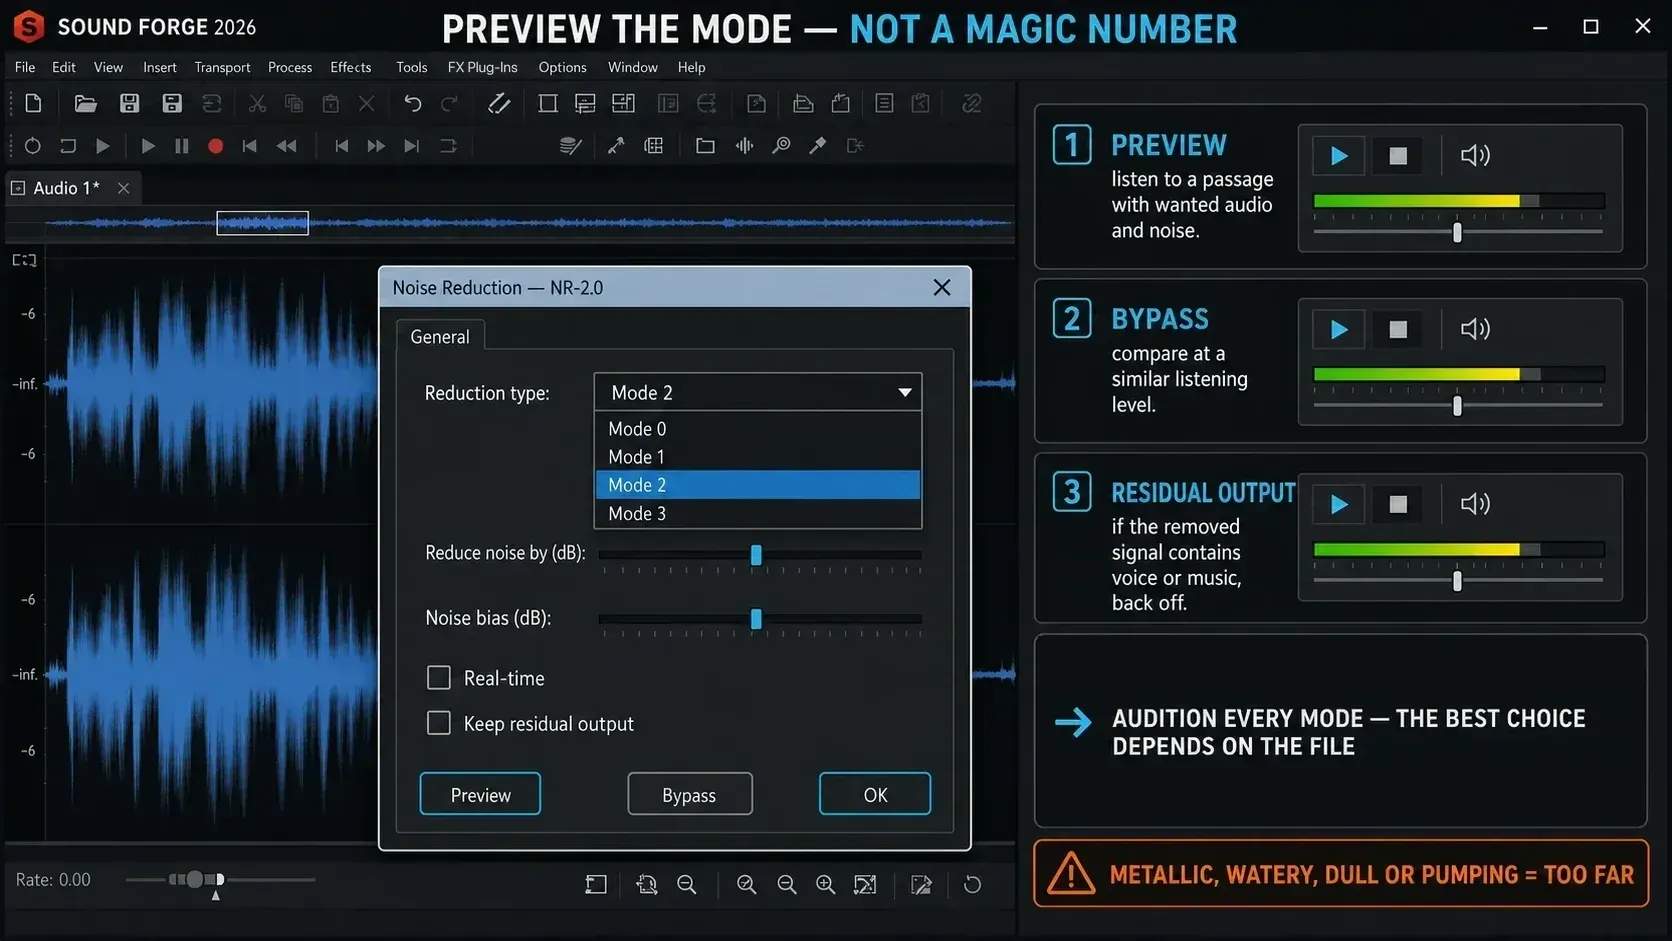
There is no universal reduction amount. I'd use the lowest processing that makes the noise stop competing with the content. A number that works on a clean voice-over can damage a cassette transfer; a setting that works on constant fan wash can pump when an air conditioner cycles.
If the classic dialog includes Keep residual output, use it to hear what would be removed. Recognizable words, notes or wanted ambience in there are a warning sign. They're never a reason to approve the residue as the finished file. Turn the option off and judge the normal processed output, backing off or recapturing the profile if speech, attacks or fades sound damaged. Don't copy values shown in the diagrams as presets: your file and your installed controls decide the settings.
Match the repair to the defect
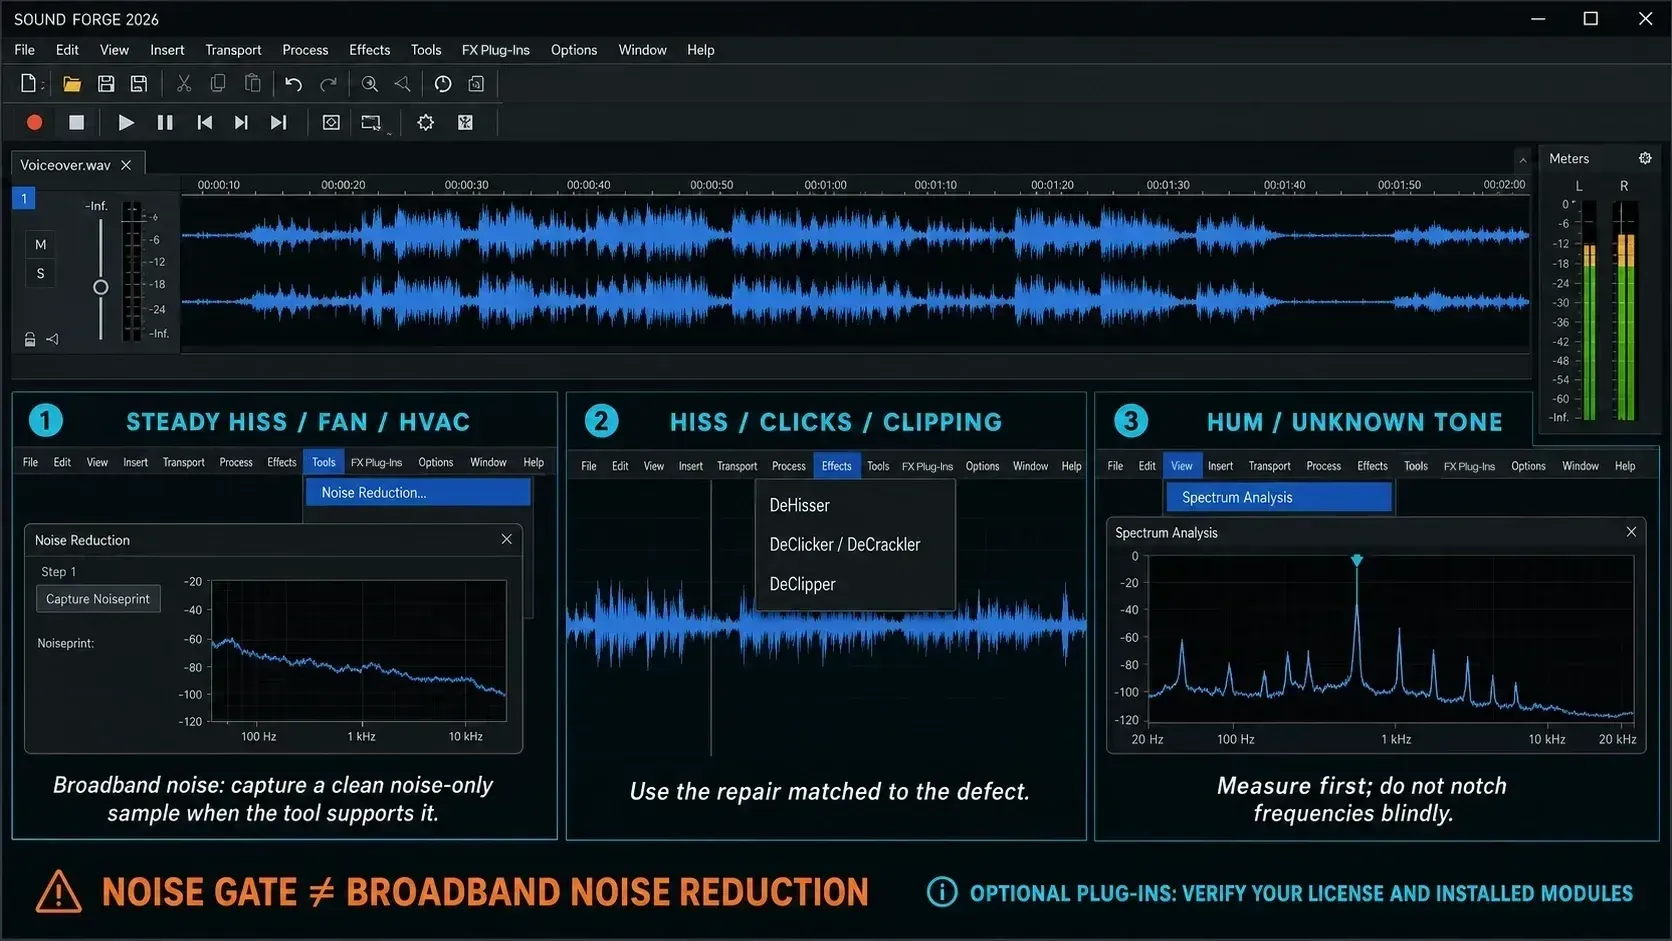
Room tone, HVAC and fan wash: capture one clean profile and preview a conservative broadband pass. If the noise changes after a microphone move or an HVAC state change, use separate selections with representative profiles where you can. Preview across each boundary so the noise floor doesn't jump; a shorter selection on its own won't fix a missing profile.
Tape or preamp hiss: compare Noise Reduction with DeHisser. Listen to sibilants, cymbals, string texture and ambience. A little stable hiss is usually less distracting than metallic “musical noise” that follows every word or note.
Mains hum: inspect the recording instead of notching a memorized list. The power system tells you where to look, but the file tells you which fundamental and harmonics are actually there. Open View → Spectrum Analysis. Use the Sound Forge Spectrum Analysis workflow before the narrow correction.
Clicks and crackles: use the dedicated click tools. For a single glitch, I'd try a local repair first so unrelated audio doesn't go through processing it never needed. The click-and-pop guide covers automatic and manual verification.
What if there is no clean noise-only passage?
Check the head, tail and pauses between phrases at high zoom before giving up. If every quiet area contains wanted sound, don't teach the classic plug-in a contaminated profile and hope a stronger setting will repair the mistake.
- Use smaller regions only when you can get a valid profile for each. A smaller selection can't conjure noise-only material out of nothing.
- Try DeHisser for regular low-level white noise, using the controls documented for your installed build. Follow the DeHisser control and residue checks instead of the classic noiseprint sequence above.
- For changing noise, consider a licensed adaptive denoiser. The RX 12 Spectral De-noise manual, for example, describes Adaptive mode and lists the module under Standard/Advanced, not Elements. It can be demanding on CPU and memory. Treat it as an optional alternative: confirm a compatible RX license and installation before using it.
- For isolated events or overlapping music, consider spectral repair or source separation. If the wanted sound is buried in noise, accept a partial improvement or re-record when possible; no process guarantees clean separation.
For a new recording, capture room tone before people move, the HVAC changes state or the microphone position shifts. The Sound Forge recording guide covers input, monitoring and headroom checks that prevent avoidable noise at source.
If Tools → Noise Reduction is missing
The current purchase matrix lists Broadband noise reduction in its Features section, while the current help places the classic commands under Tools. If your application doesn't match that documentation, collect evidence before changing the installation.
- Record the exact product name, edition and build shown by the application.
- Check both the Tools menu and the Tools toolbar for Noise Reduction.
- Note which restoration effects appear under Effects and which licensed modules appear under FX Plug-In.
- Capture a screenshot of the missing command and the visible restoration list.
- Send those details to Boris FX support or compare them with your account and installer.
Do not try to fix a 2026 packaging mismatch by downloading an old standalone NR-2.0 binary, changing hidden settings or following an administrator-mode recipe written for Sound Forge 11. Those moves can create a second compatibility problem and still won't explain why the current command is missing.
If you have a valid noise-only sample and need a free fallback, the current Audacity Noise Reduction workflow separates Get noise profile from applying the filter to the target. Work on a copy and bring the cleaned PCM file back into Sound Forge. It's a different application, so don't look for it as a menu path inside Sound Forge.
Artifact check: know when to stop
- Metallic or watery speech: these artifacts show up when reduction removes wanted detail or can't follow the noise. Compare Bypass, lower the amount and, if needed, try a cleaner profile.
- Dull music or softened consonants: listen to residual output when available. Wanted high-frequency detail in the residue is a reason to check the normal output for damage, then ease the processing if necessary.
- Pumping or breathing: changing noise, excessive reduction or an unsuitable profile can produce this behavior. Compare a lighter setting; use separate regions when the noise changes.
- Silent holes between phrases: check whether a gate is also active. A gate can close abruptly and reopen under the next word.
The finish line isn't digital silence; it's a recording in which the noise no longer competes with the content. I'd leave stable room tone alone, since it is often less distracting than processing that announces itself on every breath.
Repair before final loudness
Keep the original, try repairing major clicks or clipped peaks where needed, reduce measured hum and steady noise, and only then set final peak or loudness targets. That's a starting order; you don't have to run every process. Undo any trial that makes a later repair harder. The current Normalize documentation describes gain applied to reach a target level. A constant gain adjustment raises wanted audio and the remaining noise together, so their ratio stays the same. If the selected normalization mode also limits or compresses peaks, judge those dynamics separately.
Preview the full chain before rendering. A denoiser, EQ and limiter can each sound acceptable alone but become too aggressive together. Keep the cleaned lossless master separate from the original and from the MP3 delivery copy. Listen to the complete export, including region boundaries and fades. If you need final level adjustment, the normalization guide separates constant gain from dynamics processing.
Frequently Asked Questions
Where is Noise Reduction in Sound Forge 2026?
Open Tools → Noise Reduction or use the Noise Reduction button on the Tools toolbar. Current help places Sequoia DeHisser, DeClicker/DeCrackler and DeClipper under Effects, while licensed third-party modules appear through FX Plug-In.
How do I capture a noiseprint in Sound Forge?
Select noise-only audio, open the classic Noise Reduction dialog and capture its profile with Capture noiseprint and Preview. Retain that profile, choose the intended time range and channels, then compare processed audio with Bypass. Turn residual output and Bypass off before applying. If your dialog differs, follow its ? help.
What is the best Sound Forge noise-reduction setting?
There is no universal setting. Use the lowest reduction that makes the noise stop distracting without changing wanted detail. The current Boris FX pages checked here do not define the reduction types in every legacy build. Use the installed plug-in help, compare the same test passage and avoid copying pictured values as presets.
Why does noise reduction make a voice sound underwater?
An unsuitable profile, excessive reduction or changing noise can produce watery speech. Compare Bypass, lower the amount and try a cleaner sample or separate regions. Recognizable speech in residual output is a warning to check whether useful detail is being removed.
Why is Tools → Noise Reduction missing?
Record the exact product, edition and build, then check the Tools menu, Tools toolbar, Effects and FX Plug-In lists. The current purchase matrix lists broadband noise reduction, but legacy and Audio Studio interfaces differ. Send the mismatch and screenshots to Boris FX support instead of installing an old NR-2.0 binary blindly.
Should I remove background noise before normalizing?
As a default, repair and reduce noise before final loudness work, while keeping the untouched source. Constant gain alone can come before or after denoising if the profile and processing settings match the resulting signal; it raises wanted audio and noise together. Limiting or compression changes dynamics, so audition that stage separately.
Can Sound Forge remove background music from speech?
Classic broadband noise reduction cannot reliably separate changing music from overlapping speech. That job needs source separation or spectral editing, and the result depends on the source and the licensed tool you use.
What should I use for clicks, hum or clipping?
Use Click and Crackle Removal or DeClicker/DeCrackler for clicks, Spectrum Analysis before a narrow hum correction, and Clipped Peak Restoration or DeClipper for clipping. These are different defects from steady broadband background noise.