
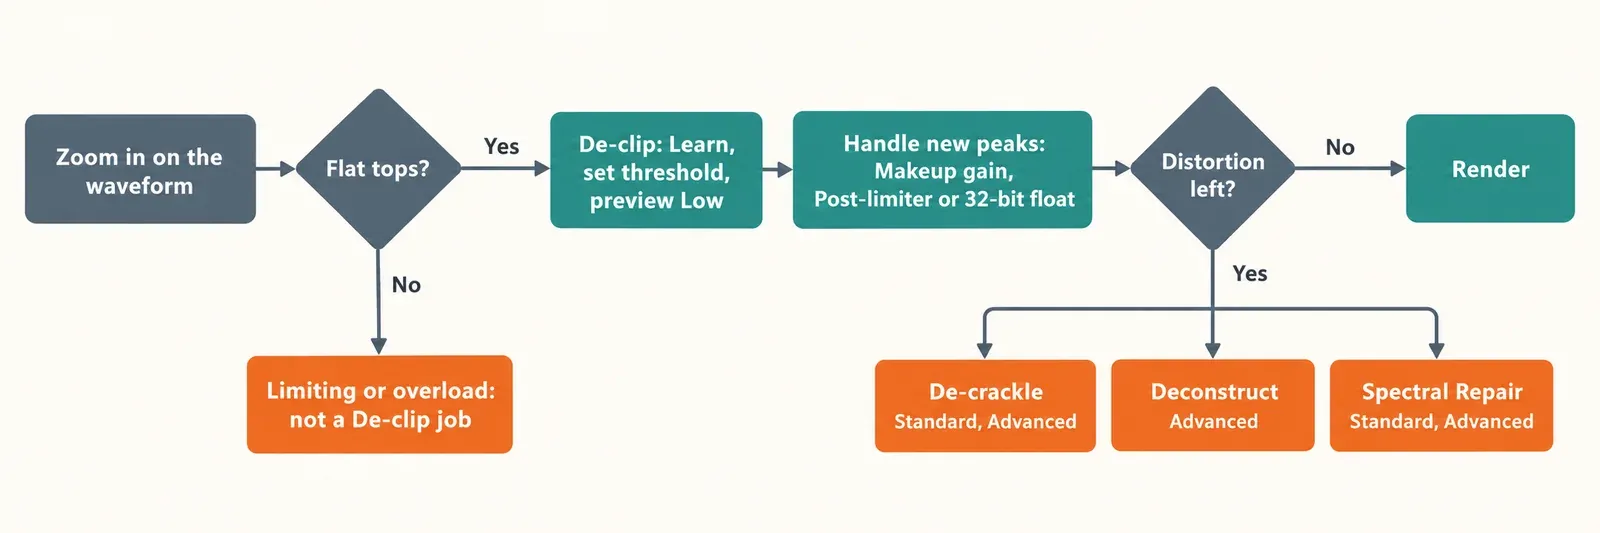
To fix clipped audio in iZotope RX 12, select the flat-topped passage, open De-clip, press Learn for a starting threshold, pull each threshold just under its flat shelf, preview at Low quality, and decide where the rebuilt peaks will go before you render. De-clip is in every edition: a plug-in only in RX Elements, and both an Audio Editor module and a plug-in in Standard and Advanced. That last decision matters because the repaired peaks end up taller than the level where the old ones were cut off.
Open De-clip only after you have zoomed in and seen flat tops. iZotope's De-clip documentation keeps the job narrow: clipping from overdriven A/D converters or over-saturated tape, in single-pass recordings such as concerts and interviews. The module takes whatever crosses the threshold and interpolates a rounder waveform from the samples that survived. No flat tops means nothing to interpolate, so another tool will serve you better. The wider iZotope RX section on this site covers those other repairs; this page stays on clipping.
Is it clipping, limiting or overload?
You diagnose clipping in the waveform, not the spectrogram. The RX 12 page on identifying audio problems describes it as squared-off, truncated sections, and warns that brickwall-limited audio can look squared off too when you are zoomed out. Zoom in until you can see single cycles before you decide.
| What you see zoomed in | Likely cause | What to use |
|---|---|---|
| Peaks cut flat at one level, on one or both halves of the waveform | Clipping from an overdriven converter or gain stage, or saturated tape | De-clip |
| A dense, loud waveform that is not perfectly square and lacks the noisy harmonics of clipping | Brickwall limiting on a mix, stem or master | Ozone 12 Unlimiter, not De-clip |
| Audible grit, but the peaks are still rounded | Distortion that happened before the recorder, such as an overloaded camera limiter | Spectral Repair in Replace mode (Standard and Advanced) or Deconstruct (Advanced); De-clip has no flat tops to rebuild |
The second row comes straight from iZotope's 2026 walkthrough on repairing a distorted audio track: De-clip is not intended for brickwall-limited audio, which does not square off the way clipping does or carry the same noisy harmonics, and the article points to the Unlimiter module in Ozone 12 instead. The third row is the case raised in a Gearspace thread on RX declipping: an overloaded camera limiter leaves you with a recording that never clipped, only a clean capture of a signal that was already distorted. For that kind of burr, the same iZotope walkthrough leaves De-clip aside and redraws the clashing overtones with Spectral Repair's Replace mode, interpolating from the audio on either side; it also suggests Deconstruct in a frequency-selective mode for simpler frequency-based distortion.
One disagreement is worth knowing before you start. The manual says De-clip repairs both digital and analog clipping. iZotope's 2026 vocal clean-up article is more cautious: it calls De-clip excellent on analog overloads and less effective on clipping that was pushed too hard in the box. I still try De-clip first on digital overs, but I expect less from it there and listen more critically. If you are not sure what kind of damage you have, the guide to finding the fault in distorted audio sorts the usual causes before you pick a repair.
Where De-clip lives in RX 12 Elements, Standard and Advanced
Every edition can de-clip. What changes is where you do it and which follow-up tools sit next to it. The RX 12 overview lists Elements as six DAW plug-ins (De-click, De-clip, De-hum, De-reverb, Repair Assistant and Voice De-noise) with no Audio Editor at all.
| Tool | Elements | Standard | Advanced |
|---|---|---|---|
| De-clip | Plug-in | Module and plug-in | Module and plug-in |
| Repair Assistant (has a De-Clip section) | Plug-in | Module and plug-in | Module and plug-in |
| Repair Assistant result opened as a Module Chain | Not included | Not included | Included |
| De-crackle | Not included | Module and plug-in | Module and plug-in |
| Spectral Repair | Not included | Module | Module |
| Deconstruct | Not included | Not included | Module |
| RX Connect | Not included | Plug-in | Plug-in |
On iZotope's US store on October 21, 2026, the RX 12 product page listed Elements at $99, Standard at $399 and Advanced at $1,399. Upgrades from Elements were $299 to Standard and $1,199 to Advanced, and a crossgrade to Standard from any paid iZotope product was $349.
Is De-clip in the free trial? Yes. iZotope Pro includes RX 12 Standard plus more than 100 plug-ins for $25 a month and starts with a free trial, and Standard carries both the De-clip module and the plug-in.
My picks follow the table. Elements is enough if clipping turns up now and then and you fix it inside a DAW. Standard is the sensible minimum for regular restoration, because De-crackle and Spectral Repair are where leftover distortion goes. Advanced earns its price for this job only if you need Deconstruct. The RX Elements vs Standard vs Advanced comparison covers the other differences, and the RX price, trial and license guide compares the trial and upgrade routes.
RX De-clip settings, control by control
The module and the plug-in share one compact panel. The middle column follows the RX 12 manual; the right column is how I'd set each control.
| Control | What it does | How I'd set it |
|---|---|---|
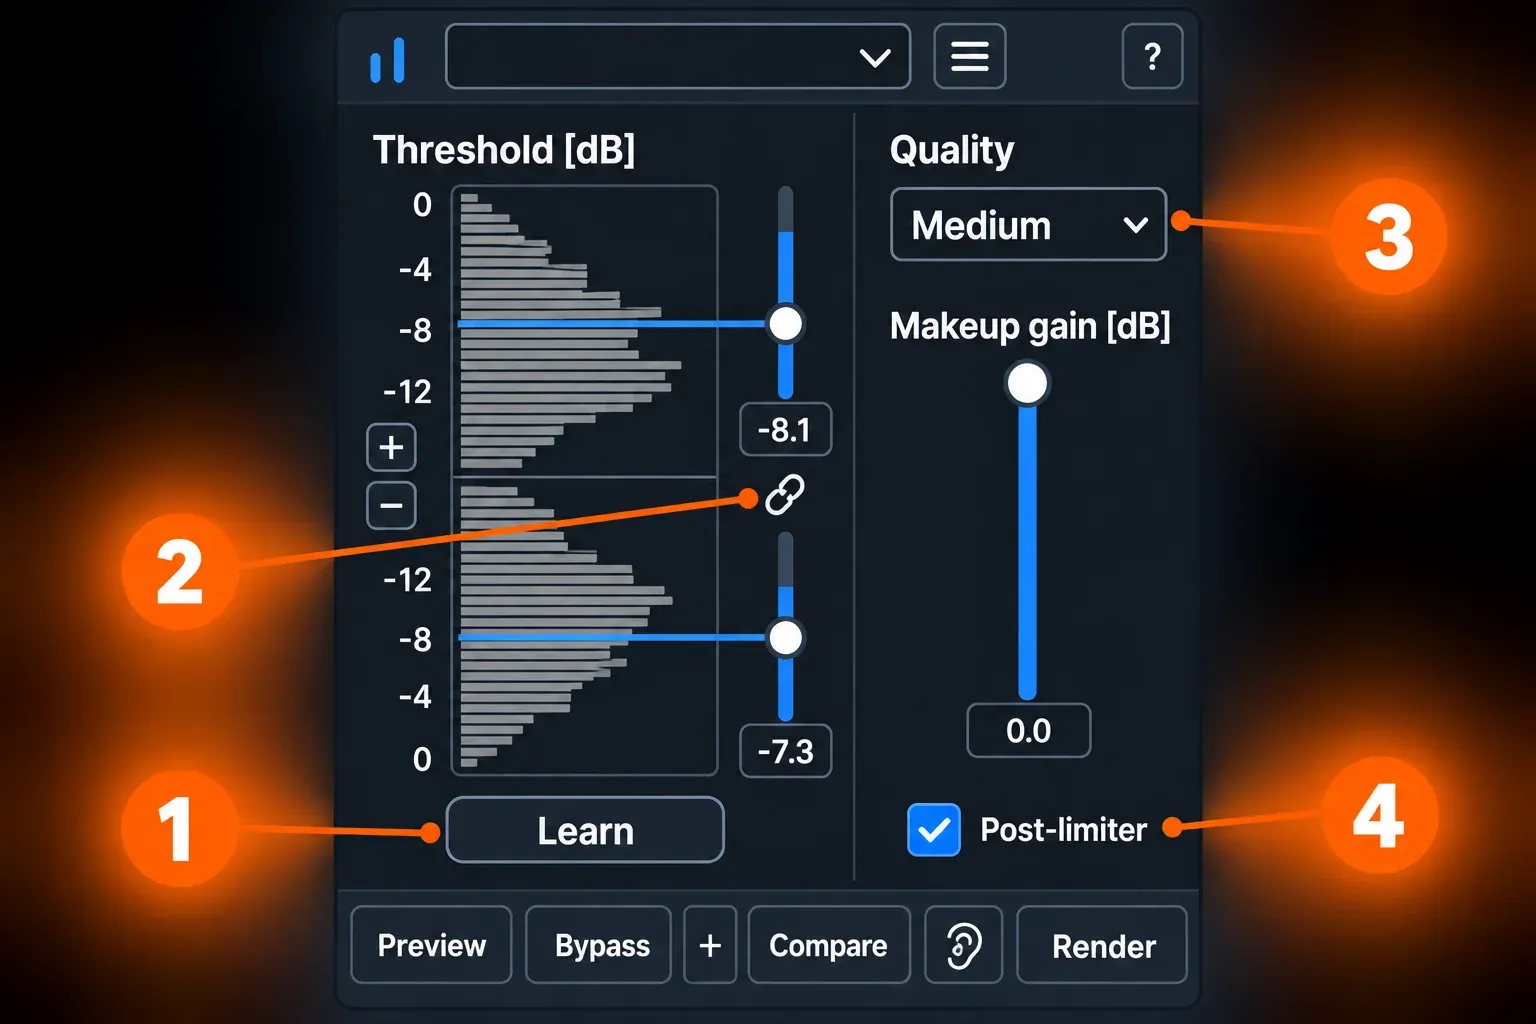
| Threshold histogram and its + and - buttons | In the Audio Editor the histogram describes the current selection, and clipping usually shows as a horizontal line across it; in the plug-in it is a real-time meter. The + and - buttons narrow or widen the slider range for finer steps. | Zoom in whenever the clip level sits well below 0 dB. |
| Threshold (upper and lower) | De-clip processes audio above this level and interpolates a rounder waveform there. | Just under the flat shelf, one side at a time. |
| Threshold Link (chain icon) and the lock box on the waveform | Switches between one shared threshold and separate positive and negative thresholds; the lock box does the same from the waveform display. | Unlinked whenever only one half of the waveform is flat. |
| Learn | Calculates a suggested threshold from the selection. The manual text calls this control Suggest; the RX 12 panel labels it Learn. | Always my starting point, never my final setting. |
| Quality | Low, Medium and High. High is slow but can do better; Low often gives great results. | Preview Low first and move up only for passages that still sound rough. |
| Makeup gain | Changes output level so the result does not clip again and matches the untouched audio around the selection. | Down by whatever keeps the rebuilt peaks below 0 dBFS in a fixed-point file. |
| Post-limiter | Applies a true peak limiter after processing so the result does not exceed 0 dBFS. | A safety net, not my first fix. |
| Compare | Lets you try several quality modes and preview the results. | Low against High on the same selection, at matched level. |
If the Audio Editor is new to you, the RX 12 tutorial for beginners shows how to make selections and open modules; the rest of this page assumes you can do both.
Setting the De-clip threshold from the histogram
The manual's rule fits in one line: set the threshold just under the level where the signal clips. Getting there takes five steps.
- Select only the clipped passage, with a little audio either side. In the Audio Editor the histogram now describes that selection rather than the whole file.
- Find the shelf. Clipping usually appears as a horizontal line across the histogram and as flat tops in the waveform.
- Press Learn. RX calculates a suggested threshold from the selection.
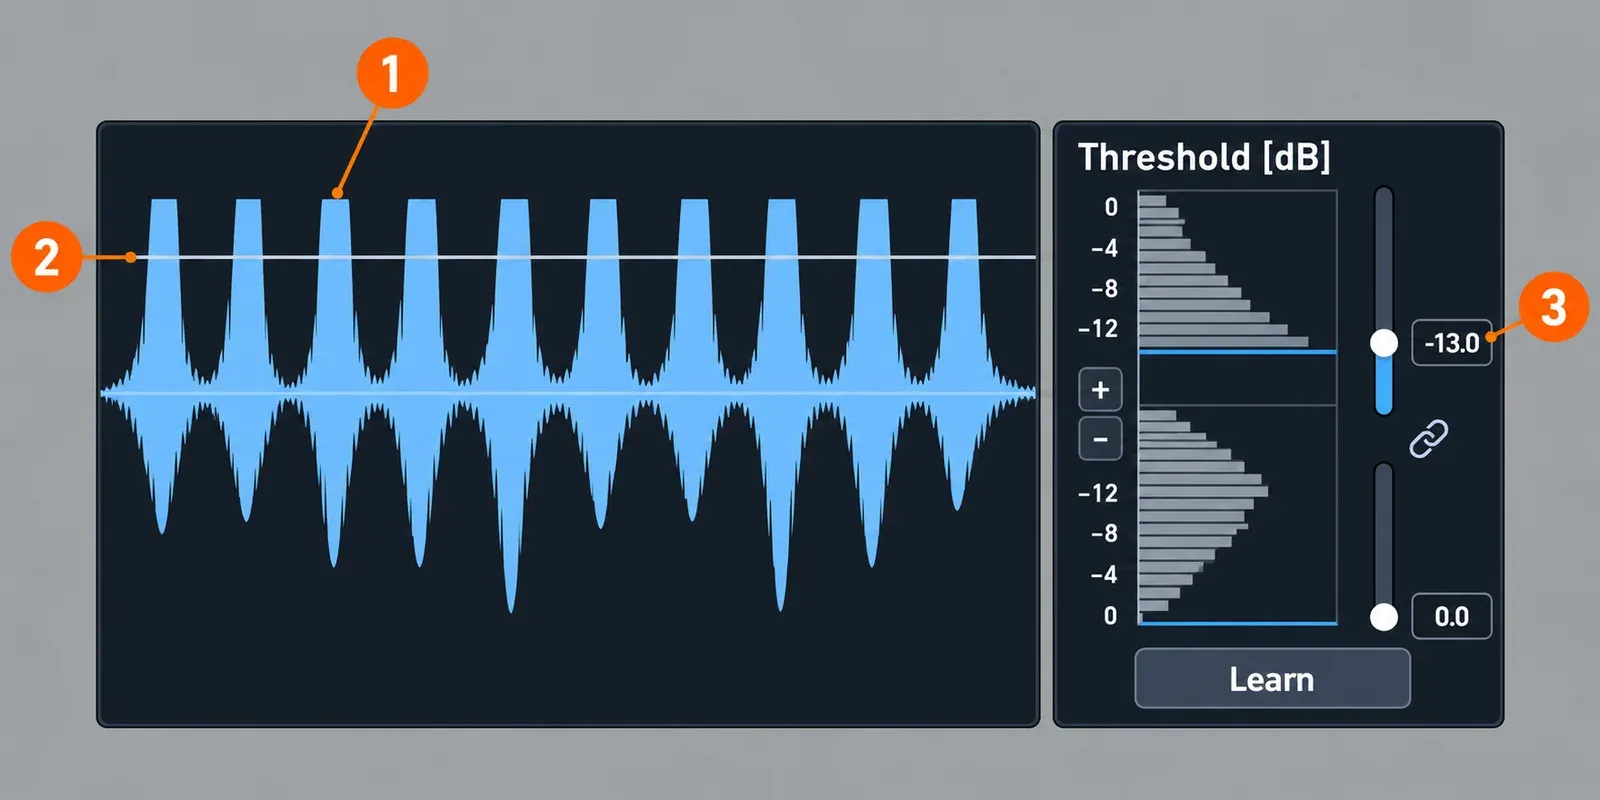
- Move each threshold a little below its clip level, toward the center line. The threshold shows as a blue line in the histogram and a gray line on the waveform, and the mouse wheel over the waveform's amplitude ruler moves it too. That overlay is on by default under View > Effect Overlay.
- Preview at Low quality and listen to the loudest syllables or hits. If the edges still crunch, lower the threshold slightly or step up to Medium or High with Compare.
Don't carry a threshold number from one file to the next. The shelf sits wherever the damage happened, and the manual ties the setting to that level, not to a preset.
When only one half is flat
Clipping is not always symmetrical. In the manual's own example the signal clips at about -13 dB on the positive side only, so the thresholds are unlinked and only the positive half above -13 dBFS is processed. Leave the clean half alone: pulling its threshold down would only hand De-clip audio that was never damaged.
Clipping that happened before a gain change
Sometimes the overs happened at the recording stage and the file was turned down afterwards, so the flat tops now sit far below 0 dB. iZotope's 2022 guide to fixing audio clipping notes that zooming the histogram lets the threshold reach -64 dB for exactly this case. Zoom in with the + button, then set the threshold against the shelf as usual.
Keep the rebuilt peaks from clipping again
This is the step most people skip. De-clip raises peak levels, because it redraws the tops that were cut off. If the file already sat close to 0 dBFS, the repair can push past it.
The RX 12 De-clip page gives three ways out. Makeup gain lowers the result so it does not clip again and matches the audio outside the selection. Post-limiter puts a true peak limiter after processing so nothing exceeds 0 dBFS. Or you leave both off and save as 32-bit float, which keeps peaks above 0 dBFS intact; they still clip when played through a D/A converter, and any format without that headroom clips them again.
| Where the repaired audio goes next | What to do |
|---|---|
| Another processing stage, saved as 32-bit float | Leave Post-limiter off, keep the rebuilt peaks, and set the final level later in the chain. |
| A finished 16-bit or 24-bit file | Lower Makeup gain until the peaks stay under 0 dBFS, with Post-limiter on as a backstop. |
| Back into a longer take with untouched audio around it | Use Makeup gain to match the surrounding level, then check the edit points by ear. |
iZotope's 2022 guide frames the same choice as two strategies: lower the level before de-clipping, or keep it and limit the new peaks. It adds that the limited version sounds better than the clipped original but may be somewhat compromised by the limiter. The 2026 walkthrough shows that trade-off on an actor's ADR line that clipped on the words "driver" and "not". Suggest followed by Render pushed the true peak past zero. The author made one version with the gain lowered by 10 dB and another with the built-in limiter set to -1, and after level matching heard the limited version as more aggressive, preferring to rebuild the peaks and handle loudness later.
I side with that preference. Rebuild first, then set the level with the tool built for it: normalizing in Sound Forge Pro for a simple level change, or a limiter chosen on purpose, as the compressor vs limiter guide explains. If delivery specs mention true peak, the explainer on true peak and inter-sample overs covers why the meter reading matters.
De-clip in a DAW and in Repair Assistant
The RX 12 plug-ins come in AU, AAX, AAX AudioSuite, VST3, AU ARA and VST3 ARA formats, all 64-bit only. iZotope's RX Elements page lists confirmed hosts including Logic Pro 12, Pro Tools 2026, Ableton Live 12, Cubase 15, Reaper 7, Audition 2026, Premiere Pro 2026 and DaVinci Resolve 19, on macOS 14.7, 15.8 and 26.x and on Windows 10 22H2 or Windows 11 24H2.
You can run De-clip in two ways. As a real-time insert, Low quality is the mode iZotope says was designed for use on an entire track. For one bad phrase I prefer offline processing on just that clip, so the rest of the track never passes through the repair. The 2026 walkthrough lists the routes: AudioSuite in Pro Tools, selection-based processing in Logic Pro and item-based rendering in Reaper. In Pro Tools, the RX Connect route ends with Send Back and then Render in the RX Connect AudioSuite window. RX Connect is a Standard and Advanced plug-in, so Elements owners use the De-clip plug-in directly. If you do keep De-clip on the channel strip, iZotope's 2022 guide suggests bouncing the repaired audio to a new track once you are happy, to save CPU.
Repair Assistant is the other route. It is a module in Standard and Advanced and a plug-in in all three editions. According to the Repair Assistant manual page, both its Voice and Music modes include a De-Clip section with Threshold, Output Gain and a true-peak Limiter switch, and the plug-in learns while the track plays. Two limits from the same page: in AudioSuite the clip must be longer than 7 seconds, or learning can run indefinitely and look like a hang (in AAX you can loop a shorter clip instead), and opening the suggestion as a Module Chain to adjust each step is Advanced only.
Production Expert's RX 11 review found Repair Assistant needed fewer tweaks than in earlier versions, with suggestions closer to what the reviewer would have set by hand. That was RX 11, but it fits the way I'd use the assistant: a quick first pass on a long take, with the De-clip module for any phrase that still needs work. If the plug-ins do not appear in your host at all, the guide to RX plug-ins not showing up works through the usual causes.
Test results: what published repairs and reviews show
No source publishes comparable numbers for De-clip, so this composite counts worked repairs and reviewer verdicts instead. It draws on 13 sources: seven from iZotope (two RX 12 manual pages and five blog walkthroughs from 2016 to 2026) and six independent ones (two product reviews, a sound-effects guide, a 2013 software comparison, a video and a forum thread).
| Finding | Sources | What it means for your repair |
|---|---|---|
| De-clip repaired or clearly improved the clipped material shown | 8 of 13 | Real flat-top damage is the job it does well. |
| Independent verdicts positive or ranking it as essential | 4 of 6 independent | The one independent caution concerned limiter overload, which is not clipping. |
| Leftover distortion sent to De-crackle, Deconstruct or Spectral Repair | 5 of 13 | Have a second tool ready for heavy damage. |
| Start from an automatic threshold, then adjust | 4 of 13 | Learn first, then your ears and the histogram. |
| Rebuilt peaks need gain reduction, a limiter or a float file | 3 of 13 | Decide on headroom before you render. |
| Preview Low quality first | 3 of 13 | Move up to High only where Low falls short. |
| De-clip left or introduced artifacts | 3 of 13 | Plan for a narrow second pass or another module. |
| Not every squared-off waveform is clipping | 3 of 13 | Zoom in and rule out limiting first. |
| Clipping repair goes first in the chain | 3 of 13 | De-clip before noise reduction. |
| Limiting the rebuilt peaks changes the sound | 2 of 13 | Compare at matched level before you settle on Post-limiter. |
| In-the-box digital clipping responds less well | 1 of the 3 that address it | Try it, but expect less on digital overs. |
| Repair Assistant lands close to manual settings | 1 of 13 (RX 11) | Fine as a first pass on long takes. |
The independent record is older and thinner than iZotope's own, so read it with its conditions. Jan Ozer's 2013 Streaming Media comparison of RX 3 and Adobe Audition found every tool did a good job on declipping, with RX easier to use and slightly greater dynamic range, but he was least confident about that round because the test file was synthetic. Creative Field Recording's RX 12 guide for sound effects puts De-clip on its short list of essential repair modules. MixingGPT's 2026 RX 12 review says De-clip can salvage an otherwise ruined recording and works from Elements up; that publisher sells its own AI plug-in, so it counts as one verdict and no more. The REAPER Blog's video on a slightly distorted voice recorded with too much gain shows De-Clip and De-Crackle used together, and the Gearspace caution is the camera-limiter case from the first section.
On iZotope's side, a 2016 post on fixing clipped vocals shows a documentary phone interview rescued with the plug-in; it names the discontinued RX Plug-in Pack, so ignore the product names. The later articles add repaired vocals, dialogue and a distorted guitar note.
My verdict: De-clip is the first tool I'd open for genuine flat-top clipping in any RX 12 edition, and the published record backs that for recordings you cannot repeat. Standard is the sensible minimum if clipping is a regular problem, because the follow-up tools live there. Advanced is worth it for this job only when you need Deconstruct. Handle the rebuilt peaks on purpose and keep Post-limiter as a backstop, since both iZotope sources that discuss a limited result flag a cost.
When distortion survives De-clip
Order matters here. iZotope's order-of-repair guidance tackles the deepest damage first and puts clipping at the top of its dialogue example, where de-clipping first made the voice much more intelligible before noise reduction. I'd keep that order: clipping, then crackle and spectral work, then noise.
- A second, narrower De-clip pass. In the 2026 walkthrough, a burr left on a distorted guitar note needed neither De-crackle nor Spectral Repair, only De-clip again on that spot: select it, Learn, run.
- De-crackle (Standard and Advanced). The 2022 guide sends leftover artifacts here, and the 2026 vocal article notes that many engineers find it more transparent than De-clip or De-click, at the cost of more fiddling.
- Deconstruct (Advanced). The same vocal article used it frequency-selectively to reduce distortion left after De-clip and to correct low-frequency artifacts De-clip had introduced. The manual suggests it for severe distortion, to pull out the noise components.
- Spectral Repair (Standard and Advanced). The manual's choice for damage you can see on the spectrogram: attenuate or replace those areas.
Noise reduction comes after the clipping repair; the guide to removing background noise in iZotope RX picks up from there. If the problem was brickwall limiting all along, De-clip is the wrong tool and Ozone 12's Unlimiter is the one iZotope recommends; the Ozone 12 review covers which edition includes it. Short ticks are a separate fault, which the Sound Forge guide to removing clicks and pops handles.
Sometimes the answer is a new take. If a passage still sounds broken after De-clip and one follow-up module, and the performer can record it again, ask for the retake. These tools exist for recordings you cannot repeat.
Sound Forge DeClipper and other declippers
Sound Forge Pro has its own route: Tools > Detect Clipping finds the overs, and Effects > DeClipper repairs them with threshold, length and type controls. If you edit in Sound Forge, the Sound Forge clipping guide walks through it and compares DeClipper with RX De-clip.
Outside the iZotope and Sound Forge pair, three options stand out:
- Acon Digital DeClip 2, part of its Restoration Suite, rebuilds peaks from analog or digital clipping with separately adjustable upper and lower thresholds, an optional threshold lock and level histograms, so the workflow will feel familiar after RX.
- CEDAR Declip 2 and SpectraLayers Pro. Production Expert's 2026 roundup of RX alternatives lists CEDAR Declip 2 at £238.80. It also covers SpectraLayers Pro, which includes Clip Repair and Voice De-Clip modules and whose modules the magazine often rates above their RX counterparts.
- CrumplePop ClipRemover from Boris FX uses AI to rebuild clipped areas inside editors such as Premiere, Pro Tools, Final Cut Pro, Logic and Resolve.
For a wider comparison, see the guides to the best iZotope RX alternatives and CrumplePop vs iZotope RX.