How to Remove Clicks and Pops in Sound Forge Pro

I transferred a box of 7-inch singles last autumn — about 40 records, varying condition, some with visible surface scratches. Sound Forge Pro's DeClicker handled the obvious vinyl click problems on most of them. Four required the manual pencil and Interpolate approach for clicks that sat too close to drum attacks for the automatic tool to distinguish reliably. The combination took less time than I expected and the results were clean enough to master directly.
Sound Forge Pro has three ways to remove clicks and pops: the DeClicker for isolated transient clicks, the DeCrackler for continuous low-level surface noise and crackle, and the manual method using the Pencil tool combined with Tools → Repair → Interpolate for individual clicks you can see in the waveform. Each handles a different type of problem.
DeClicker vs DeCrackler — Which to Use
Both tools live under Tools → Audio Restoration (or through FX Favorites). They target different problems and should often be used in sequence, not interchangeably.
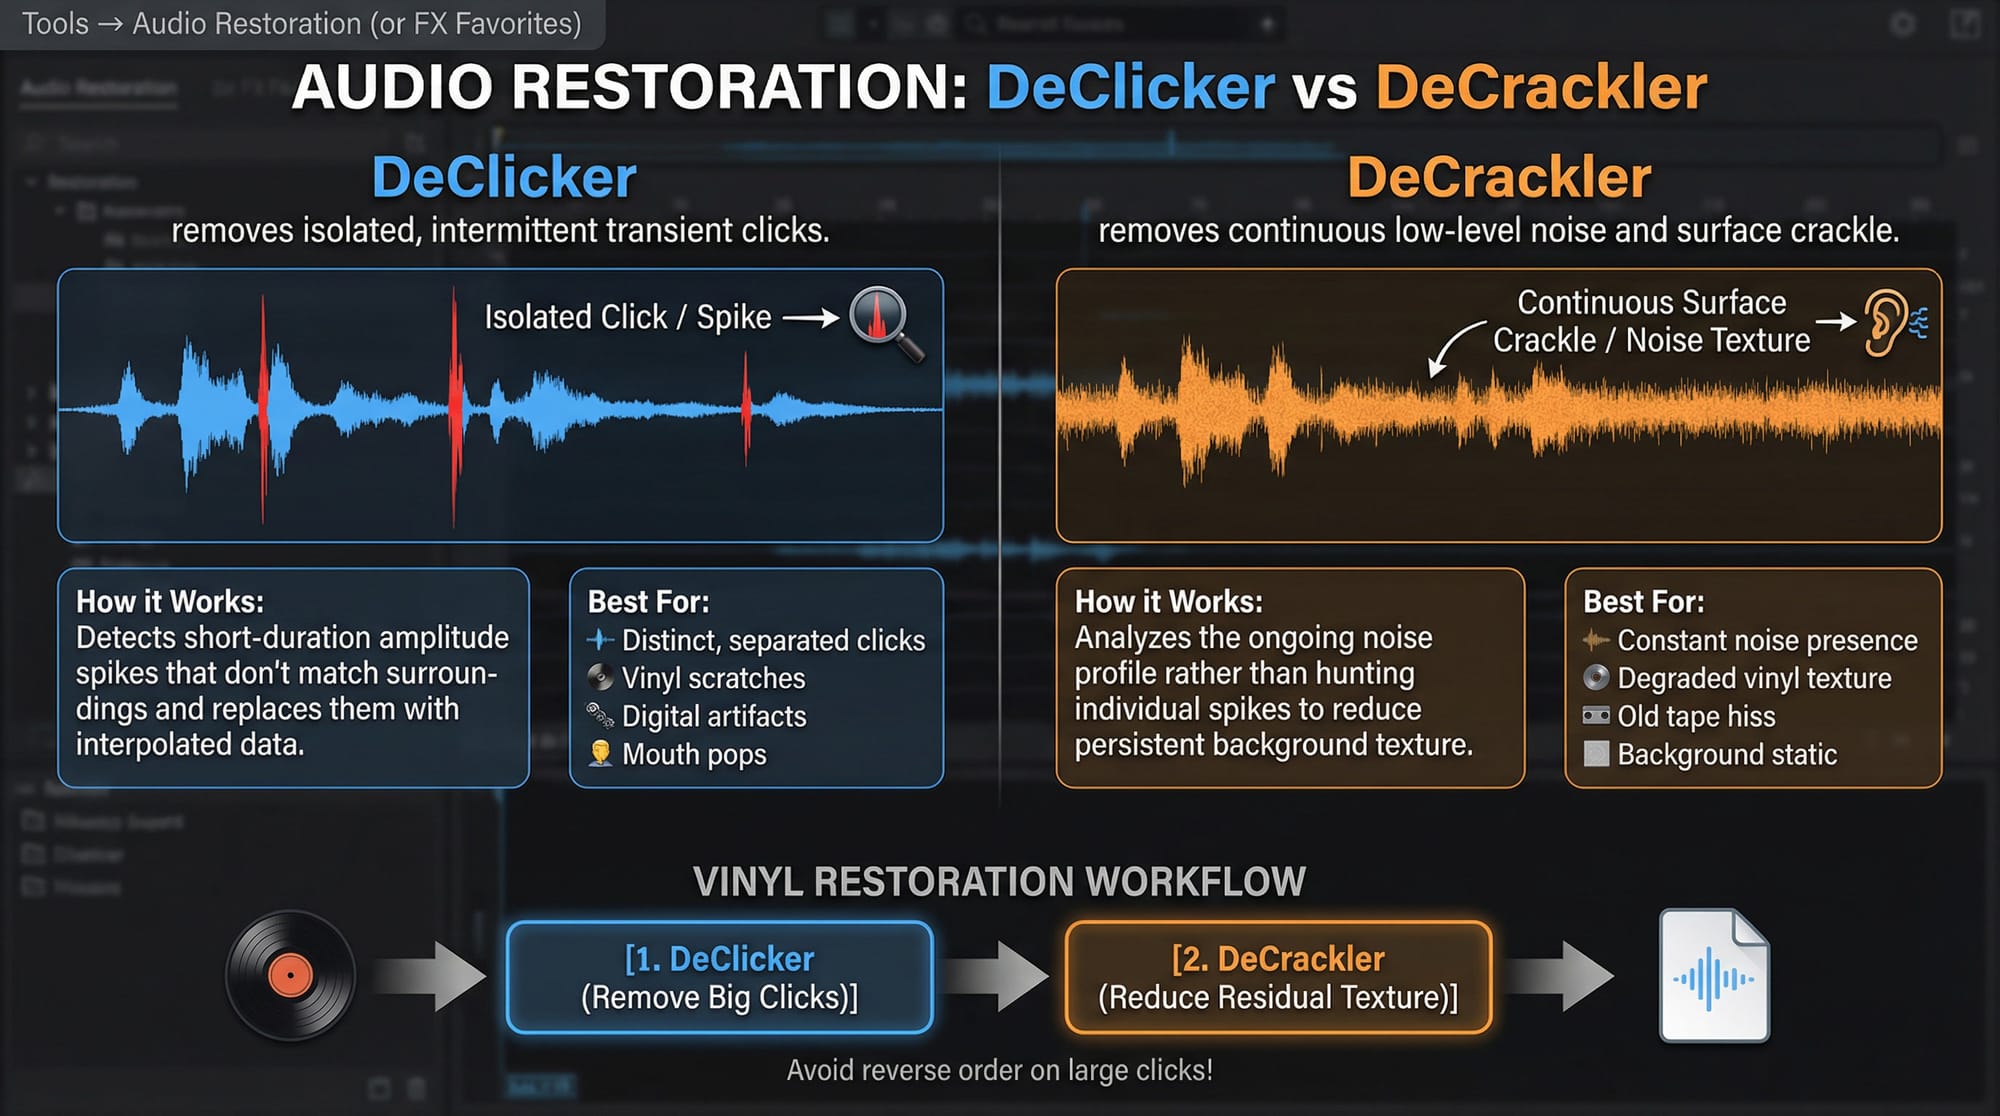
DeClicker — removes isolated, intermittent transient clicks. The sharp spike when a vinyl needle hits a scratch, a digital artifact, a mouth pop in a voice recording. It works by detecting short-duration amplitude spikes that don't match the surrounding audio and replacing them with interpolated data. Best for audio where the clicks are distinct and separated — you can hear each one individually.
DeCrackler — removes continuous low-level noise and surface crackle. The persistent texture of degraded vinyl, the fine crackle of old tape, background static with a specific character. It works differently from the DeClicker — it analyzes the ongoing noise profile rather than hunting individual spikes. Best for audio where the noise is a constant presence rather than discrete events.
For vinyl restoration, run DeClicker first to remove the big obvious clicks, then DeCrackler to reduce the residual surface texture. Running them in the opposite order — DeCrackler first on a file with large clicks — can produce audible artifacts because the DeCrackler algorithm is processing around those spikes rather than removing them cleanly. I made that mistake on a 1972 pressing early on: ran DeCrackler at full pass, wondered why it sounded smeared, realized the large scratches were still there underneath and had been processed rather than removed. DeClicker first, then DeCrackler — always.
Using the DeClicker: Settings and Workflow
Open Tools → Audio Restoration → Declicker/DeCrackler. The dialog shows a tabbed interface with separate controls for DeClicker and DeCrackler. Click the DeClicker tab.
The key control is Sensitivity — how aggressively the algorithm searches for clicks. Higher sensitivity catches more clicks but increases the risk of misidentifying transients in the program material as clicks. Percussive attacks, sharp consonants, brass stabs, any fast-onset sound can trigger a false positive at high sensitivity settings.
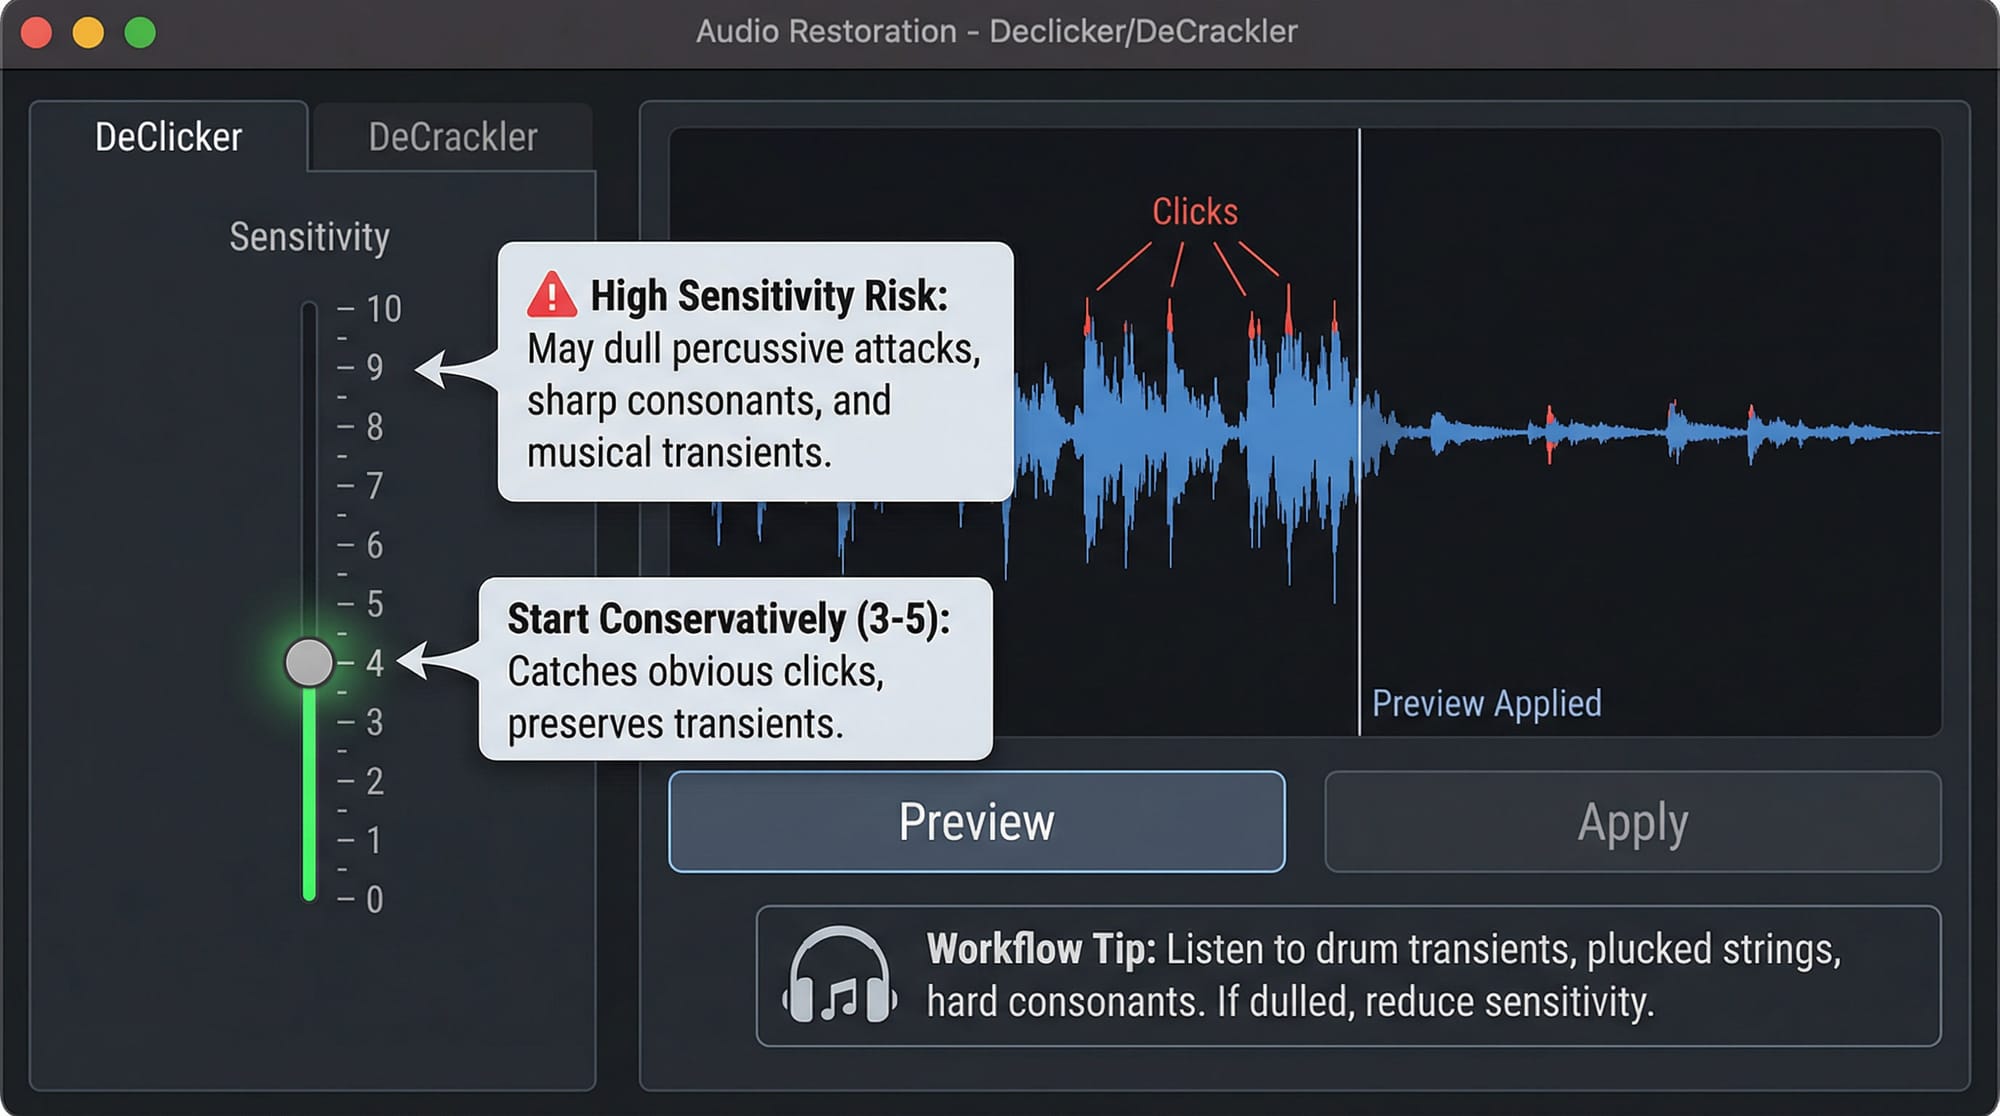
Start conservatively: sensitivity around 3–5 on a scale of 10. Preview the result. Listen specifically to drum transients, plucked strings, hard consonants — if these sound dulled or softened, the sensitivity is too high and the DeClicker is processing musical content as clicks. Back it down. For obvious vinyl surface damage, sensitivity 4–6 usually catches the audible clicks without dulling the program material.
On the 7-inch transfers I worked on last autumn, I set sensitivity to 4 as a starting point across all 40 tracks, previewed two representative ones — one with light damage, one with heavy — and adjusted from there. 38 of the 40 tracks needed no further per-track adjustment. The two exceptions both had dense damage on a section with prominent kick drum attacks, which needed manual treatment.
Using the DeCrackler: Reducing Surface Texture
On the DeCrackler tab, the main control is also a sensitivity or threshold slider. The DeCrackler works by comparing the current audio to a running model of the expected signal and attenuating anything that looks like crackle relative to that model.
The risk with the DeCrackler is different from the DeClicker. Pushed too hard, it doesn't dull transients — it adds a processed, smoothed quality to the audio that sounds artificial. The crackle is gone but so is some of the high-frequency texture that was present in the original recording. The effect is subtle at conservative settings and increasingly audible as you increase the strength.

For most vinyl restoration: apply at the lowest effective setting — enough to reduce the crackle to background noise level without making the recording sound processed. Preview, adjust, preview again. I check the result on headphones specifically because the DeCrackler's artifacts are more audible on closed-back monitoring than on speakers where room acoustics mask some of the high-frequency detail.
Both tools apply destructively when run from the dialog directly. If you want non-destructive preview and comparison, load them through the Plug-In Chainer. The mastering guide covers where DeClicker and DeCrackler fit in a full restoration and mastering chain.
The Manual Method: Pencil Tool and Interpolate
The automatic tools don't work on every click. Clicks that fall exactly on a drum attack, a brass transient, a plucked string — any sharp musical event — can't be distinguished from the program material by the algorithm alone. For those, manual removal is faster and cleaner than any automated approach.
Zoom in: in Sound Forge Pro, mouse wheel zooms the waveform horizontally. Zoom all the way in on the area containing the click until individual samples are visible. A click appears as a sharp vertical spike or a discontinuous line in the waveform — it stands out against the surrounding smooth curve.
The Pencil tool (press P) lets you draw directly over the spike to redraw the waveform smoothly. Works for very small clicks where you can see clearly what the waveform should look like on either side. Less reliable for larger spikes where you're guessing the correct waveform shape rather than having a reference.

Interpolate is more reliable. Select a small region covering just the click — as tight as possible, ideally just the damaged samples. Go to Tools → Repair → Interpolate. Sound Forge analyzes the audio immediately before and after the selection and synthesizes replacement samples that fit the surrounding context. The algorithm uses the real audio as a reference instead of a hand-drawn estimate, which produces cleaner results on any click above a few samples wide.
I use Interpolate over the pencil tool in almost every case now. On a recording with a click sitting exactly on the attack of a snare hit, I selected three samples covering the spike and ran Interpolate. The result was transparent — no audible discontinuity and no dulling of the snare attack. Pencil drawing on the same selection left a subtle smoothed quality that was audible at low monitoring levels.
iZotope RX Elements: When the Native Tools Aren't Enough
Sound Forge Pro bundles iZotope RX Elements, accessible through the Plug-In Chainer as a VST. RX Elements includes a DeClick function that operates differently from the native Sound Forge DeClicker — it uses iZotope's interpolation algorithms and tends to produce fewer artifacts on complex material at higher sensitivity settings.
The native Sound Forge DeClicker produces audible high-frequency damping when pushed hard on complex material — this comes up repeatedly in KVR and Gearspace threads, and the Gearspace discussion on click removal documents it in detail. RX Elements handles difficult material better, particularly dense percussive content where the native DeClicker tends to misfire.
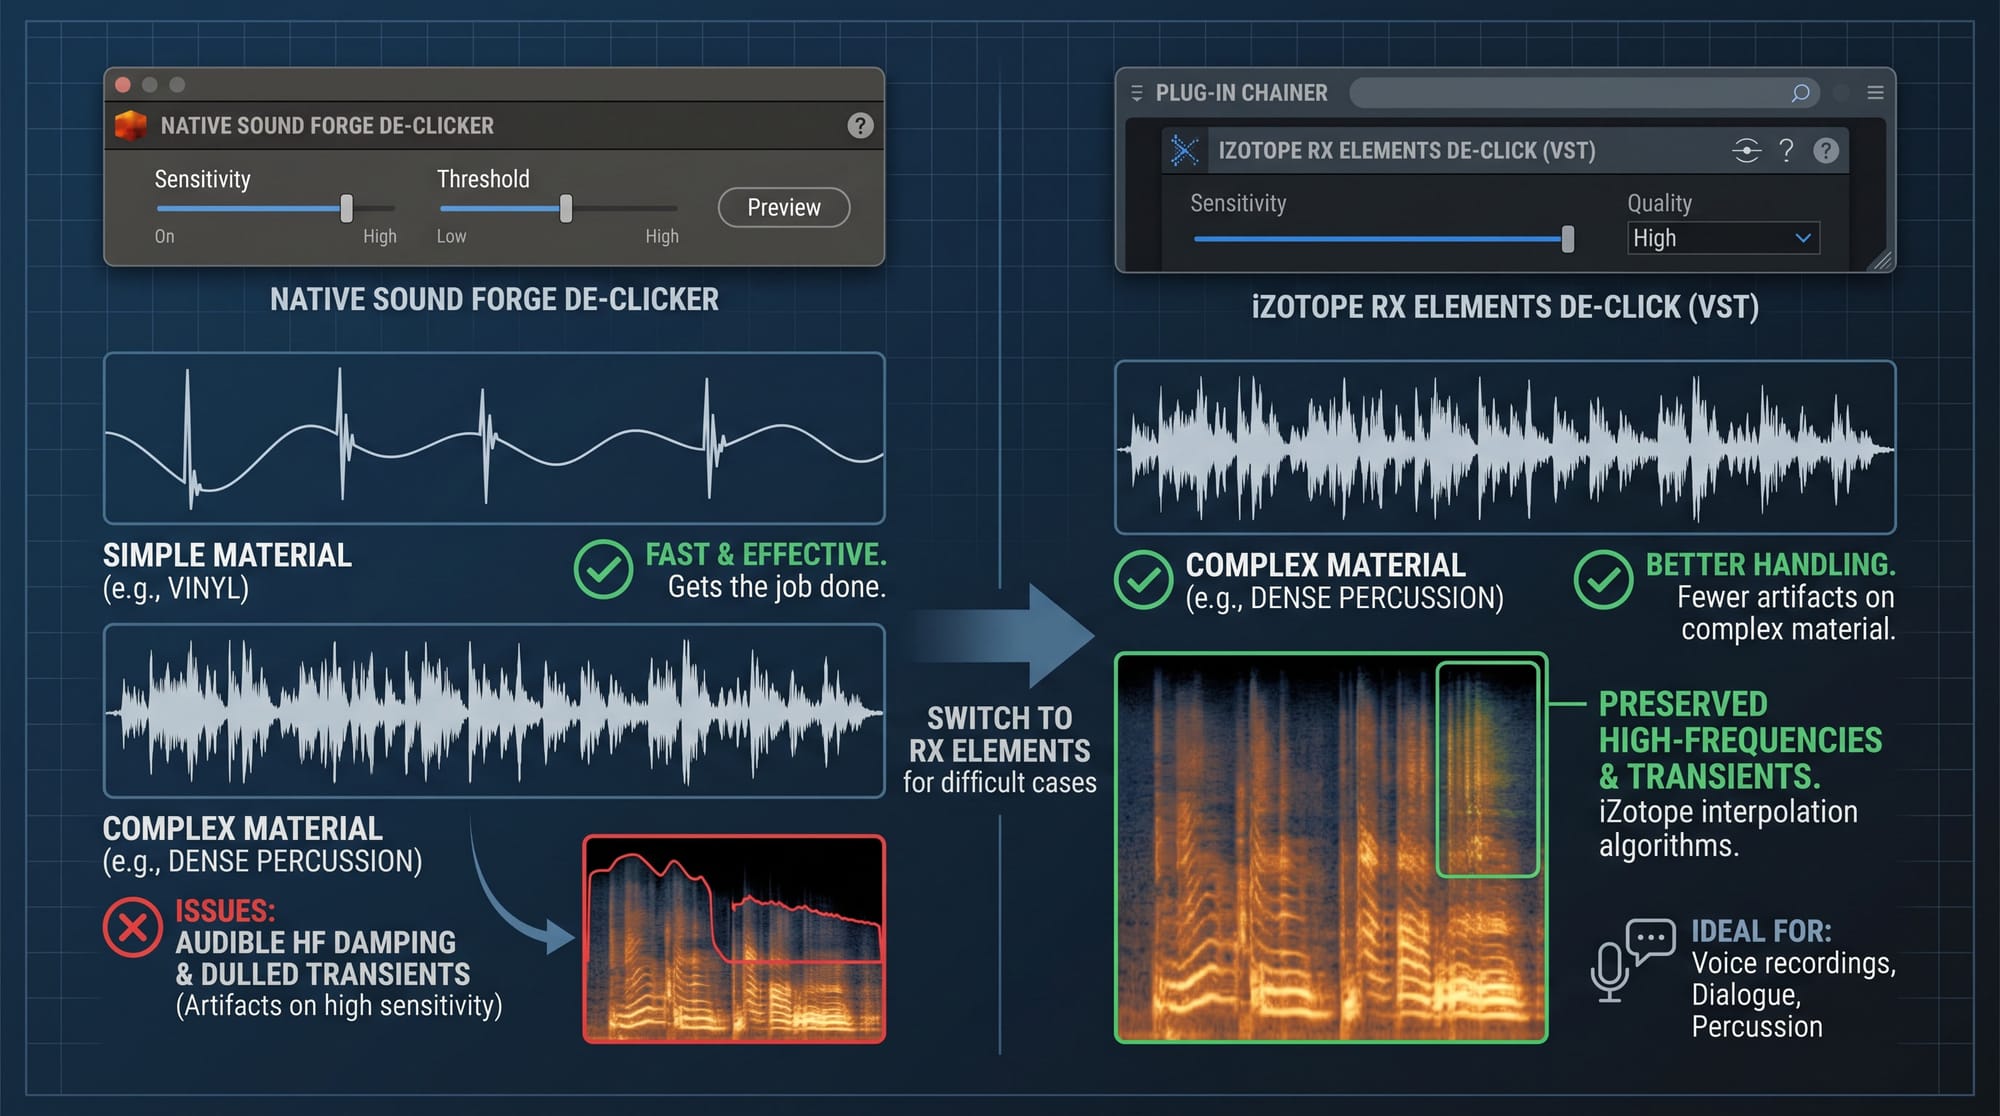
On straightforward vinyl click removal, the native DeClicker is fast and gets the job done. Once the material gets more complex — voice recordings with mouth clicks, dialogue with sharp consonants, percussion-heavy music where the native tool keeps dulling the transients — switch to RX Elements' DeClick. The iZotope algorithm handles those cases without the high-frequency damping.
I switched to RX Elements on a spoken word recording last spring — a 22-minute interview where the host had a consistent mouth click on hard consonants. The native DeClicker at sensitivity 5 was removing the clicks but softening the consonants noticeably. RX Elements' DeClick at medium sensitivity cleaned the same clicks without touching the speech character. The difference was audible on the first word.
Load RX Elements through the Plug-In Chainer, not from the Effects menu directly. The Plug-In Chainer lets you preview the result before applying destructively — critical for any restoration tool where the acceptable sensitivity level is something you need to hear rather than read off a number.
Finding Clicks Manually: What to Listen and Look For
Before running any automatic tool on an important file, it's worth doing one pass of manual identification. Play the file with the waveform visible and watch for vertical spikes that coincide with audible clicks. Zoom in on suspect areas. Clicks in the waveform look like discontinuities — a sudden sharp line that doesn't belong to the surrounding curve.
WaveColor (View → WaveColor) helps visually — sudden bursts of high-frequency energy from clicks appear as distinct color changes in the waveform display. This doesn't replace listening but speeds up the visual scan considerably, especially on long files like vinyl album sides where you're looking at 20 minutes of audio.
On a 44-minute rip of a double album I worked through last winter, I did the visual scan with WaveColor enabled before touching any automatic tool. Found 11 clearly visible spikes in the first 20 minutes. All 11 removed with Interpolate in about 8 minutes. The automatic DeClicker pass afterward caught 3 more that the visual scan missed — they were too small to register in the color display but audible on headphones.
For clicks that are audible but invisible in the waveform display, zoom in further. Very short clicks — one or two samples — don't register as a spike at standard zoom but become visible at maximum magnification. The rule on forums like Gearspace: if you hear it, you can find it — just zoom deeper. A single aberrant sample shows up clearly at 1:1 sample view. The official Sound Forge Audio Restoration documentation covers every parameter in the DeClicker and DeCrackler dialogs.
After restoration, run the result through the noise reduction workflow if there's also broadband hiss or hum — NR-2.0 runs after DeClicker/DeCrackler, not before. Then normalize, then master. The order matters because each step affects what the next one sees.
Frequently Asked Questions
Where is the DeClicker in Sound Forge Pro?
Tools → Audio Restoration → Declicker/DeCrackler. The dialog has separate tabs for DeClicker and DeCrackler. In older versions, it may appear directly in the Tools menu without the Audio Restoration submenu. It's also accessible through FX Favorites and loadable into the Plug-In Chainer for non-destructive preview.
What's the difference between DeClicker and DeCrackler in Sound Forge Pro?
DeClicker targets isolated transient spikes — individual clicks and pops, vinyl scratches, digital artifacts. DeCrackler targets continuous low-level surface noise — the persistent texture of degraded vinyl, fine crackle from old tape. For vinyl restoration, run DeClicker first then DeCrackler. For digital recording artifacts (single clicks from interface glitches), DeClicker alone is usually sufficient.
How do I remove a single click manually in Sound Forge Pro?
Zoom in on the click until individual samples are visible. Select the damaged samples as tightly as possible. Go to Tools → Repair → Interpolate. Sound Forge synthesizes replacement samples based on the audio immediately before and after your selection. This is more accurate than drawing with the Pencil tool because it uses the real surrounding audio as a reference rather than a manual estimate.
Why does the DeClicker make my audio sound muffled in Sound Forge Pro?
The sensitivity setting is too high. The DeClicker is identifying fast-onset musical transients — drum attacks, plucked strings, consonants — as clicks and processing them. Reduce the sensitivity setting by 2–3 steps and preview again. Check drum hits and sharp consonants specifically — if they sound dulled after processing, the setting is still too aggressive. For complex material, use iZotope RX Elements' DeClick (bundled with Sound Forge Pro) instead, which handles percussive material with fewer artifacts.
Can I use iZotope RX Elements to remove clicks in Sound Forge Pro?
Yes — RX Elements is bundled with Sound Forge Pro and includes a DeClick function. Load it through the Plug-In Chainer (not directly from the Effects menu) to preview before applying. RX Elements handles material with dense transients better than the native DeClicker at high sensitivity settings, producing fewer false positives on percussion and consonants. The noise reduction guide covers other bundled iZotope restoration tools.
What is the Interpolate tool in Sound Forge Pro?
Tools → Repair → Interpolate synthesizes replacement audio for a selected region based on the audio immediately surrounding it. It's the most precise click removal method in Sound Forge Pro — select just the damaged samples, run Interpolate, and the algorithm fills the gap with audio that fits the surrounding context. More reliable than the Pencil tool for larger clicks, and more transparent on complex material like percussion or vocals than running the DeClicker at high sensitivity.
In what order should I run restoration tools in Sound Forge Pro?
DeClicker first to remove isolated clicks, then DeCrackler to reduce residual surface noise, then NR-2.0 or iZotope RX DeNoiser for broadband hiss or hum, then EQ corrections if needed, then normalize and master. The EQ guide covers the frequency correction step that often follows restoration on degraded recordings.
What is DeClipper in Sound Forge Pro — is it the same as DeClicker?
No — they solve different problems. DeClicker removes transient spikes: vinyl scratches, digital glitches, mouth pops. DeClipper repairs clipping distortion: audio that was recorded too hot and the waveform was flattened at the ceiling. If the recording sounds distorted and the waveform shows flat tops rather than smooth peaks, that's clipping — use Tools → Audio Restoration → DeClipper, not DeClicker. Running DeClicker on a clipped file won't fix the distortion.