
To cap volume in VEGAS Pro, click Master FX, add Wave Hammer Surround as the last plug-in and open its Volume Maximizer tab. Output level sets the peak ceiling and Threshold decides how much gain gets added on the way there, so set both to -2.0 dB for a pure cap. Leave the master fader at 0.0 dB, then read True Peaks in View | Window | Loudness Meters before you render. VEGAS Pro 17 has the same plug-in and meters; the few version differences are listed near the end.
I'd set that ceiling at -2.0 dB rather than the -0.3 dB a 2010 forum answer suggested, because the VEGAS help documents no true-peak detection for its dynamics plug-ins, and the strictest common delivery limit, ATSC A 85, sits at -2.0 dB FS. Then I'd fix the two or three loudest moments with a volume envelope. A limiter grabbing every shout gets audible long before a hand-drawn dip does. The cap is the safety net; the envelope is the mix.
Cap the master with Wave Hammer Surround
VEGAS doesn't ship a plug-in named Limiter. The VEGAS Pro 2027 audio plug-in reference lists Track Compressor, Wave Hammer Surround, Graphic Dynamics, Multi-Band Dynamics and ExpressFX Dynamics among its dynamics tools. The one built for a master ceiling is Wave Hammer Surround, a compressor and a volume maximizer in one plug-in.
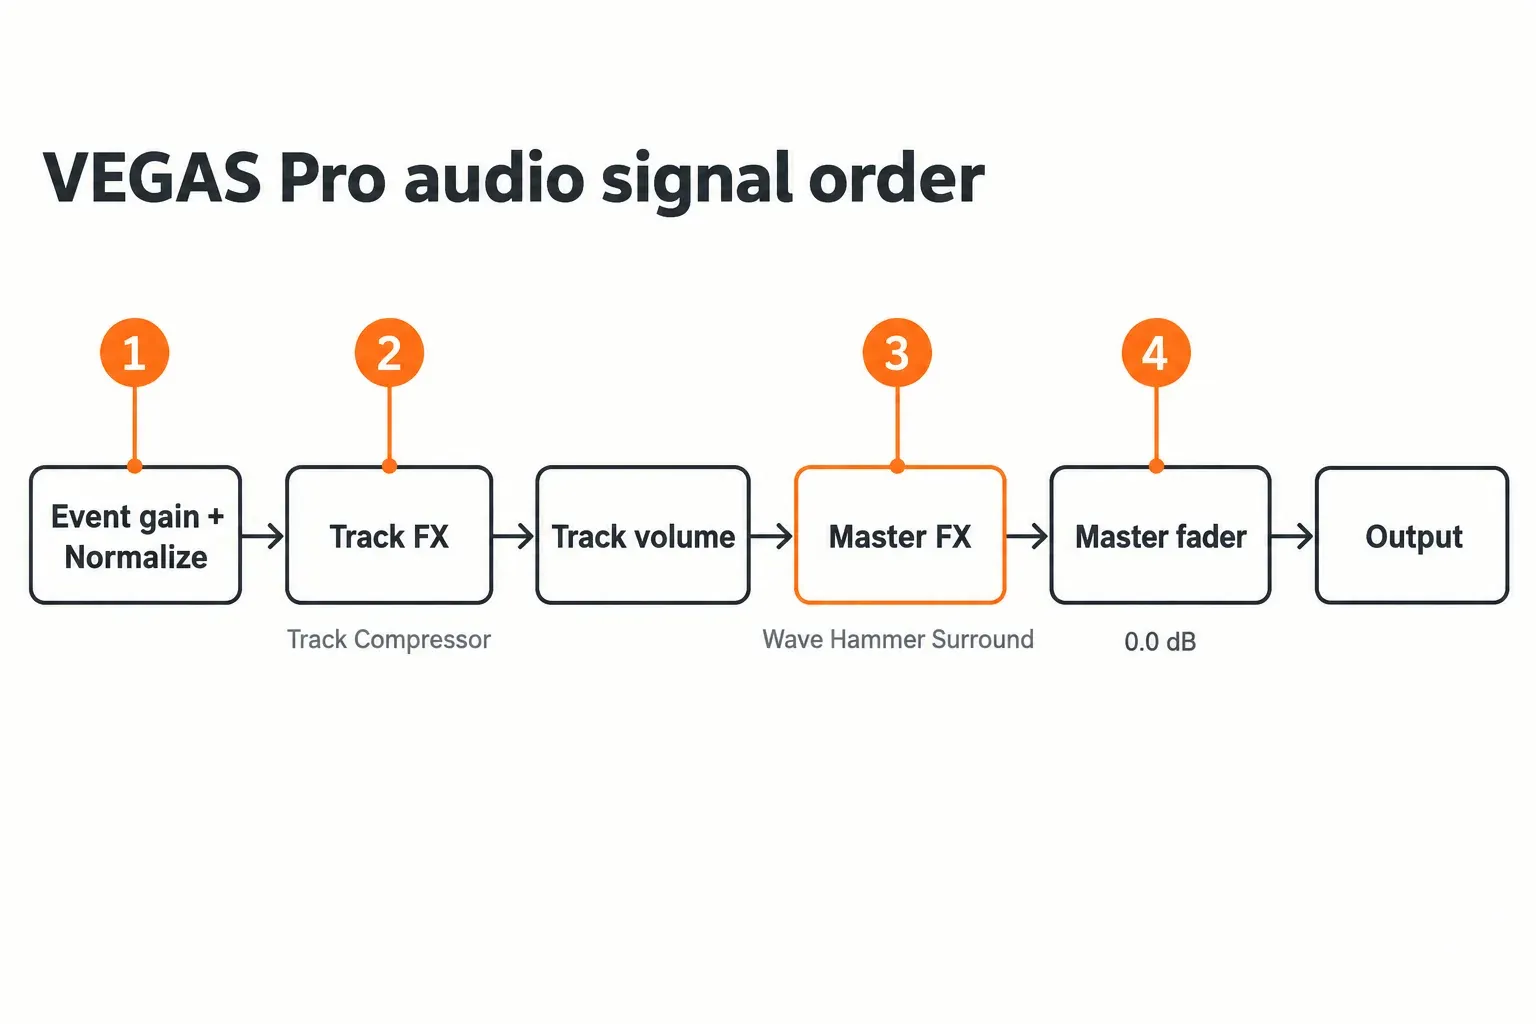
- Click the Master FX button on the Master bus. With no effects on it yet, it opens the Plug-In Chooser; add Wave Hammer Surround.
- If the master chain already holds other plug-ins, drag the Wave Hammer Surround button so it sits after all of them. Plug-ins in a bus chain are reordered by dragging their buttons.
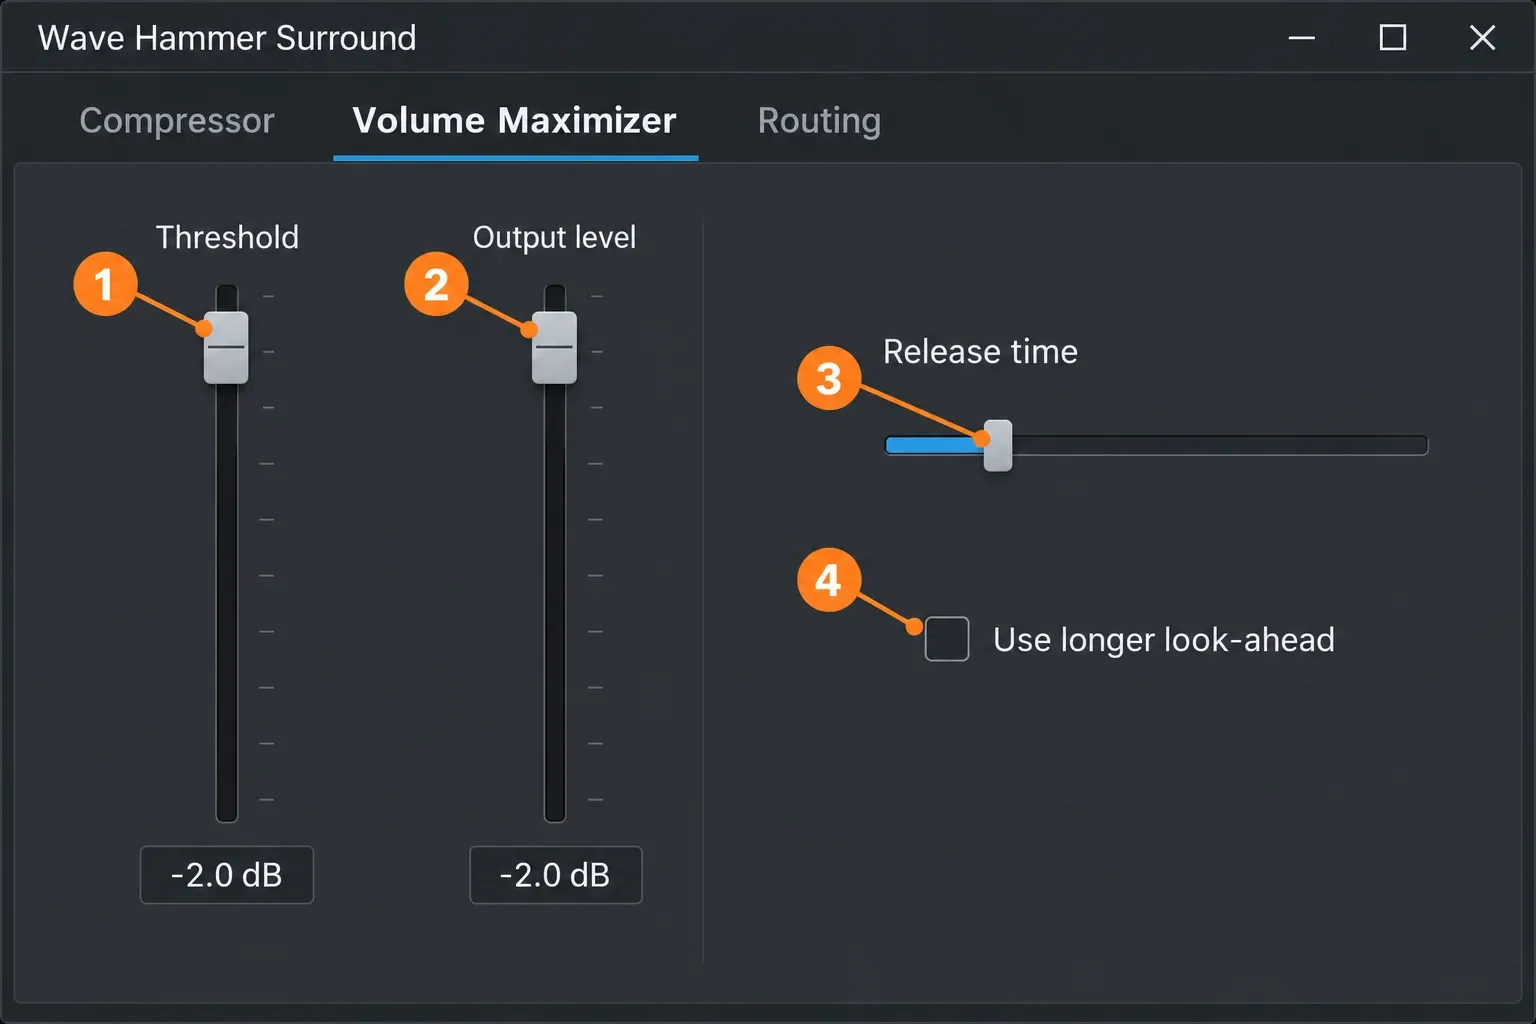
- Open the Volume Maximizer tab. Set Output level to -2.0 dB, then set Threshold to the same -2.0 dB.
- Leave Use longer look-ahead off and keep Release time moderate (more on both below).
- Reset the master fader to 0.0 dB: in the Master Bus window, double-click the center of the fader thumb.
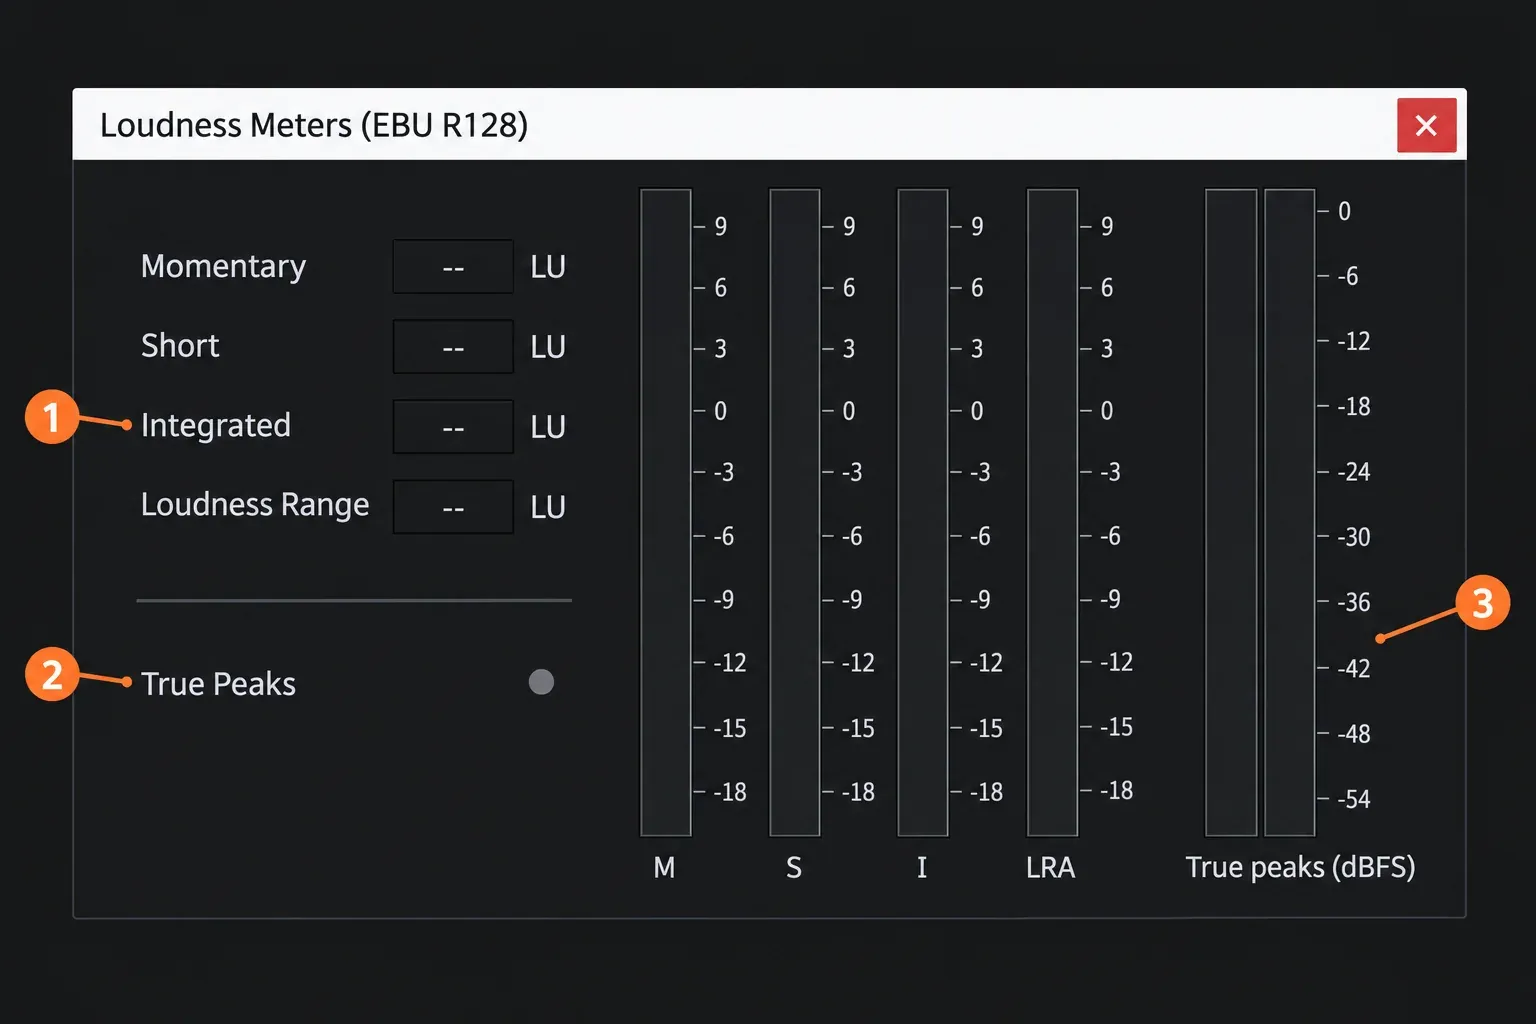
- Open View | Window | Loudness Meters, play the loudest passage and read the True Peaks meter.
How Threshold and Output level work together
The VEGAS help for the Volume Maximizer tab gives the arithmetic in its own example: with Threshold at -10 dB and Output level at -2 dB, the audio is boosted 8 dB so peaks above the threshold reach -2 dB. Read the other way round, the boost equals Output level minus Threshold. Set the two equal and the help's logic implies no added gain at all, only a hard stop at the ceiling. Pull Threshold below Output level and the whole mix gets louder, which is a different job from capping it.
Release time and Use longer look-ahead shape how the cap sounds. The same help page says a long release preserves decays, and longer look-ahead can cause pre-compression fades before attacks. I'd leave look-ahead off for dialogue and gunshots, because a dip that starts before the hit is exactly the kind of artifact you put the cap in to avoid.
Wave Hammer Surround also has a Compressor tab with its own Threshold, Ratio, Auto gain compensate and Output gain, and the help for that tab warns that output gain on top of auto gain can clip. A Vegas Pro 13-era answer on Creative COW's Wave Hammer Surround thread says the Volume Maximizer comes after the compressor and limits either way, and suggests bypassing the compressor when you only want limiting. The 2027 help doesn't describe that bypass control, so open the Compressor tab and see what the loaded preset is doing before you call the chain a pure limiter.
In a 5.1 project, put the cap on the Surround Master. On any other track or bus, Wave Hammer Surround processes only the left and right channels, so a centre-channel peak would pass straight through.
Keep the master fader behind the cap
The Master Bus window help describes a Post Volume option on the Master FX button that runs the chain after the bus volume, the same as choosing Pre FX on the bus output fader. Because Post Volume is something you switch on, the help implies that by default the master effects run before the master fader. A fader push after the cap would then lift peaks past the ceiling you just set. Keep the fader at 0.0 dB, or right-click Master FX and choose Post Volume if you like to ride the master.
Then check the result where it counts. The Master Bus meters show the summed track levels, and the audio track help says they should never show the red Clip indicator. They aren't the final word on a ceiling, though. The Loudness Meters calculate true peaks at a higher sample rate than the Master Bus peak meters, and none of the 2027 help pages for the bundled dynamics plug-ins mention true-peak detection. The True Peaks indicator lights when the selected mode's limit is exceeded: -1.0 dB FS in EBU R 128 Mode, -2.0 dB FS in ATSC A 85 Mode. So for a -2.0 dB cap, switch to ATSC A 85 Mode under Options | Loudness Meters, or read the True peaks meter value. If the peak goes past -2.0, lower Output level and Threshold together by half a decibel and play the passage again. Restart playback or right-click the Loudness Meters window and choose Reset Clip to clear the indicator.
Two limits of any cap are worth knowing. A lossy encode can still overshoot between samples, which true peak and codec headroom explains in detail. And a limiter stops new overs but can't rebuild a shout that already clipped in the camera or recorder; that repair is a job for DeClipper in Sound Forge. If you also master in Sound Forge, its classic Wave Hammer uses the same compressor-then-Volume-Maximizer layout, and the Sound Forge Wave Hammer guide goes through it.
Limit one track: Track Compressor or Graphic Dynamics
A music bed or an effects track can be capped on its own. Click the Track FX button in the track header; with no effects yet, it opens the Plug-In Chooser. Three bundled plug-ins can do the job:
- Track Compressor has Threshold, Amount (the X:1 ratio), Attack, Release, Auto gain compensation, Output Gain and Smooth Saturation, plus input, output and reduction meters, according to the Track Compressor help. For a cap, set a high Amount and a Threshold just under the loud hits. A 2010 answer in Creative COW's thread on lowering the loudest parts suggests a ratio of 4:1 to 10:1 for this. Leave Auto gain compensation off: it boosts the output by a constant amount based on Threshold and ratio, which raises the track instead of capping it.
- Graphic Dynamics can produce compression, limiting, noise gating and expansion through its envelope graph or its Threshold and Ratio controls, per the Graphic Dynamics help. Pick it when you want to see the transfer curve.
- ExpressFX Dynamics is the stripped-down option, with Threshold, Ratio, Attack, Release and Auto gain compensate.
On a single track I'd start with Track Compressor, because its reduction meter shows at a glance whether it's catching three hits or squashing the whole bed. If a 10:1 ratio still sounds like compression to you, compressor vs limiter draws the line between the two. For a dedicated third-party limiter, VEGAS Pro plugins by edition covers what each version includes and how to add more.
Once a track chain works, right-click the track header and choose Set Default Track Properties. It saves the current Track FX chain and Volume fader as defaults for new audio tracks, and Restore original defaults takes you back to the factory state.
Lower only the loudest parts
A handful of loud moments don't need a limiter at all. Pulling them down by hand leaves everything else untouched. The three answers in that 2010 Creative COW thread were clip gain, a limiter on the track and a volume envelope, and two of the three are manual.
For a volume envelope:
- Select the track and choose Insert | Audio Envelopes | Volume, or right-click the track list and choose Insert/Remove Envelope, as the audio envelope help shows.
- Drag a time selection across the loud passage.
- Drag the envelope segment inside the selection down. VEGAS moves every point in the selection and adds fades at its edges, creating points as needed. The fade length lives on the Editing page of Preferences.
For a whole clip, drag the volume line at the top of the audio event down. The gain shows in dB, Ctrl gives fine steps, and all selected events change together.
The track header Volume fader sits on top of all of this as a trim. At 0 dB it changes nothing, Ctrl gives fine steps, double-click returns it to 0 dB, and a -3 dB trim lowers every envelope point on the track by 3 dB. When the loud spots are everywhere rather than in a few places, go back to Track Compressor or Graphic Dynamics on that track; drawing fifty dips by hand is slower than one plug-in.
One change matters if you build hard volume steps with envelopes. In VEGAS Pro 2026, a dragged point can pass the neighboring point instead of stopping at it, which breaks the old way of making near-vertical steps. Users reproduced and confirmed it in a September 2026 Boris FX forum thread on envelope nodes; the workaround there is to zoom in and offset the second point slightly.
Auto Ducking for music under a voice
VEGAS Pro 22 and later can lower a music bed automatically while narration plays. Right-click the Track List and choose More | Auto Ducking Controls. The narration track is the controller and the music track is the listener: click the More button on the music track and choose Auto Ducking Listener. In the Auto Ducking help, Floor Reduction sets the lowest level the music ducks to, with about -12 dB named as a common setting for narration, while Peak Reduction makes the music react to individual peaks in the voice.
Normalize events in VEGAS
Normalize solves the opposite problem: a clip that's too quiet. It's an event switch that maximizes an audio event's volume without clipping.
- Select the event and choose Edit | Switches | Normalize, or right-click the event and open Switches.
- In current versions, the Normalize button in the event's More menu does the same and shows at a glance whether the switch is on.
- After trimming or extending a normalized event, open Event Properties and click Recalculate. Auto Normalize does that recalculation for you after trims and splits in VEGAS Pro 22 and later.
The peak it normalizes to comes from Preferences > Audio > Normalize peak level (dB). My rule is simple: normalize to get a quiet clip into range, then let the master cap handle the peaks. Normalize works on each event's peak, so two clips at the same peak can still sound different in loudness.
For RMS or LUFS loudness matching, normalize the audio in Sound Forge instead. VEGAS Pro Plus includes Sound Forge, and VEGAS Pro Ultimate includes Sound Forge Plus.
Ceiling and loudness targets for your render
The Loudness Meters have two built-in modes under Options | Loudness Meters: EBU R 128 Mode and ATSC A 85 Mode, with Show True Peak Meter and True Peak Blocking Filter in the same submenu. For a streaming target, choose Absolute (-23 LUFS) under Options | Loudness Meters | Loudness Scale; the meters then read LUFS instead of LU relative to the selected mode. The window shows Momentary (400 ms), Short-term (3 s), Integrated, Loudness Range and True Peaks.
| Destination | Integrated loudness | Maximum true peak | Where to check in VEGAS |
|---|---|---|---|
| EBU R 128 broadcast | -23 LUFS | -1.0 dB FS | EBU R 128 Mode |
| ATSC A 85 (US broadcast) | -24 LUFS | -2.0 dB FS | ATSC A 85 Mode |
| Spotify | Plays at -14 LUFS | Below -1 dBTP; below -2 dBTP if louder than -14 LUFS | Absolute (-23 LUFS) scale |
| Apple Podcasts | About -16 LKFS, plus or minus 1 dB | -1 dB FS | Absolute (-23 LUFS) scale |
| YouTube | No published target | No published target | True Peaks meter for the cap |
Spotify plays tracks at -14 LUFS and only lifts a quiet master as far as its true-peak headroom allows, leaving 1 dB for lossy formats; its own example raises a -20 LUFS track peaking at -5 dBTP only to -16 LUFS. Apple Podcasts asks for about -16 LKFS and true peak no higher than -1 dB FS, and says to get there before encoding, since codecs might clip when the limit is ignored. YouTube's recommended upload settings list AAC-LC, Opus or Eclipsa audio at 48 kHz but no loudness figure, and its Stable volume setting is on by default for viewers and evens out quiet and loud passages, except on YouTube Music and official music videos.
For one render that goes everywhere, I'd master to -2.0 dBTP and pick the loudness for the main destination, because -2.0 dBTP clears every ceiling in this table while the loudness targets genuinely differ. Those are the numbers a VEGAS render has to hit; the full list for every platform lives in streaming loudness standards, and podcast specifics are in the podcast loudness standard guide.
Audio too quiet (or too loud) after render
Measure before you boost anything. Work through it in this order:
- Compare two loudness logs. In the Render dialog, click Render Options and tick Save loudness log next to media file; VEGAS writes a
_loud.txtreport next to the render. That log is measured after the plug-in chain but before the codec. The loudness logging help says to analyze a rendered compressed file with Tools | Generate Loudness Log, which reads the selection or the whole timeline. Since that command works on a timeline, the implied step is to place the rendered file on the timeline of a new, empty project, so your master chain doesn't process it a second time, and run it there. If both logs match, the mix is quiet, not the render. - Confirm Master bus mode. The Audio tab of Project Properties sets Master bus mode to Stereo or 5.1 Surround. In 5.1, the loudness measurement adds about 1.5 dB to the surround channels; in Stereo, all channels count equally. A Movie Studio Zen moderator suggested a Stereo project unless you render to a 5.1 format in a 2016 thread on quieter Vegas Pro 13 renders.
- Check trims and envelopes. A trim pulled down months ago survives every render. In a VEGAS Pro 17 thread on extremely low rendered audio, the render came out about a tenth as loud as the timeline, and one track's volume sat at -23.8 dB. The thread never settled whether that setting was the cause, which is exactly why it's worth checking first.
- Open the render template's audio settings before adding gain, as a reply in Creative COW's quieter-render thread also advises. Render settings themselves are a separate topic.
- Only then try the forum fallbacks: a full program reset, the Windows Classic Wave Driver as the audio device type and a 10-second test project with the template noted. None of the threads above reports these as a confirmed fix.
For a second opinion on the rendered file without reopening VEGAS, a free online LUFS meter reads integrated loudness and true peak.
Render louder than the timeline, with clipping? Undo anything you changed in the internal settings first. In a Boris FX forum thread from April 2026, extremely loud, clipping renders in VEGAS Pro 2026 traced back to a Multi Stream internal setting the poster had changed on AI advice, and VEGAS Pro 23 started doing the same after the change.
Test results: published limits and forum fixes
No review or lab I could find publishes measurements of VEGAS's bundled limiters, so this composite has two parts: the ceilings a VEGAS render has to meet, and the fixes VEGAS users were given and what came of them.
Four published delivery specs put the maximum true peak at a median of -1.0 dBTP, with a range of -2.0 to -1.0 dBTP: EBU R 128 at -1.0 and ATSC A 85 at -2.0 in the VEGAS Loudness Meters modes, Spotify at -1.0 (or -2.0 for masters louder than -14 LUFS) and Apple Podcasts at -1.0. YouTube publishes no loudness target, so it stays out of the count.
| Spec | Maximum true peak | Conditions |
|---|---|---|
| EBU R 128 (VEGAS meter mode) | -1.0 dBTP | Broadcast, -23 LUFS integrated |
| ATSC A 85 (VEGAS meter mode) | -2.0 dBTP | US broadcast, -24 LUFS integrated |
| Spotify | -1.0 dBTP | Masters at or below -14 LUFS; -2.0 when louder |
| Apple Podcasts | -1.0 dBTP | About -16 LKFS, set before encoding |
| Composite | Median -1.0 dBTP | Range -2.0 to -1.0, 4 sources; YouTube excluded |
Ten readable VEGAS forum threads from Creative COW, Movie Studio Zen and the Boris FX forum, spanning 2010 to September 2026, show clear patterns:
- All 4 threads about capping peaks or clipping were answered with a limiter or a compressor set up as one.
- 3 of those 4 named Wave Hammer Surround's Volume Maximizer, with Output level ceilings of -0.3 dB in a 2010 thread on removing clipping, -3.0 dB in a Sony-era YouTube audio tips thread and -6 dB in the Wave Hammer Surround limiter thread.
- The only confirmed result in the whole set is that -6 dB case: the asker had to meet a broadcaster's -6 dB peak limit, set Output level to -6 dB, lowered Threshold until a -20 dB test tone read -20 dB again, and reported that it did the trick.
- Track Compressor as a limiter came up in 2 of the 4; envelopes or event gain as the precise fix also in 2 of 4.
- Normalize was suggested in 2 of 5 low-volume threads, including a 2026 Boris FX thread about a wireless mic recorded through a Sony camera.
- In 3 quieter-after-render threads, a reset, the Classic Wave driver, a new test project and a Stereo or 5.1 check each came up in 2 of 3, and none of the 3 was resolved in the captured posts.
- The 1 louder, clipped render traced back to a changed internal setting, not to the effects.
The -0.3 dB ceiling deserves a flag. It's a sample-peak setting, and it sits above every -1 dBTP limit in the table. It's a small, self-selected set of threads, so the counts show patterns rather than rates. What they add up to: Wave Hammer Surround's Volume Maximizer is the tool VEGAS users have been pointed to since 2010, and the setting that was confirmed to work was a ceiling chosen for a real delivery spec, then checked. Take your ceiling from the spec table, not from a forum post. -2.0 dB on Output level, confirmed on the True Peaks meter, sits at or under all four published limits.
What's different in VEGAS Pro 17
Plenty of search results still say Sony Vegas, but VEGAS Pro 17 is a 2019 MAGIX release. Its manual documents the same Loudness Meters with EBU R 128 and ATSC A 85 modes, the Normalize switch and its peak-level preference, the trim fader, Track FX, Master FX with Post Volume and the render loudness log, so the cap above works there the same way. Renders start from the Render As dialog instead of Render.
A few newer conveniences are missing. Dates come from a VEGAS Pro release history compiled on the Boris FX forum:
- No Normalize button in the event's More menu. It arrived in VEGAS Pro 20 build 139 in August 2022, so use Edit | Switches | Normalize.
- No Auto Normalize and no Auto Ducking. Both arrived in VEGAS Pro 22 build 194 in October 2024, so click Recalculate by hand and draw music dips with envelopes.
- Wave Hammer Surround and the Loudness Meters were already there. Loudness meters and logging date back to Vegas Pro 13 build 290 in April 2014, and a 2015 Vegas Pro 13 build fixed Wave Hammer Surround running in demo mode.
Nothing in this workflow changed in the newest release either. The VEGAS Pro 2027 What's New list has no dynamics, limiter or loudness-meter changes; its audio items are speech tools and High-Resolution Audio Export for PCM and AAC in AVC and HEVC renders. A cap set up in 17 translates directly to the current version.
Verdict
My verdict: put Wave Hammer Surround last on the master, set Volume Maximizer Output level and Threshold to -2.0 dB, keep the master fader at 0.0 dB and confirm on the True Peaks meter before every render. Fix the few loud moments with envelopes or event gain, use Track Compressor for a track that's loud all the way through, and save Normalize for quiet clips. That order keeps the limiter doing almost nothing most of the time, which is how a cap should sound.
When dialogue needs more than a ceiling, such as noise, clipped takes or uneven levels between interviews, send it out to Sound Forge and back; the Sound Forge and Vegas Pro workflow for video editors covers that round trip. The rest of the Boris FX tools around VEGAS are on the Boris FX hub.