
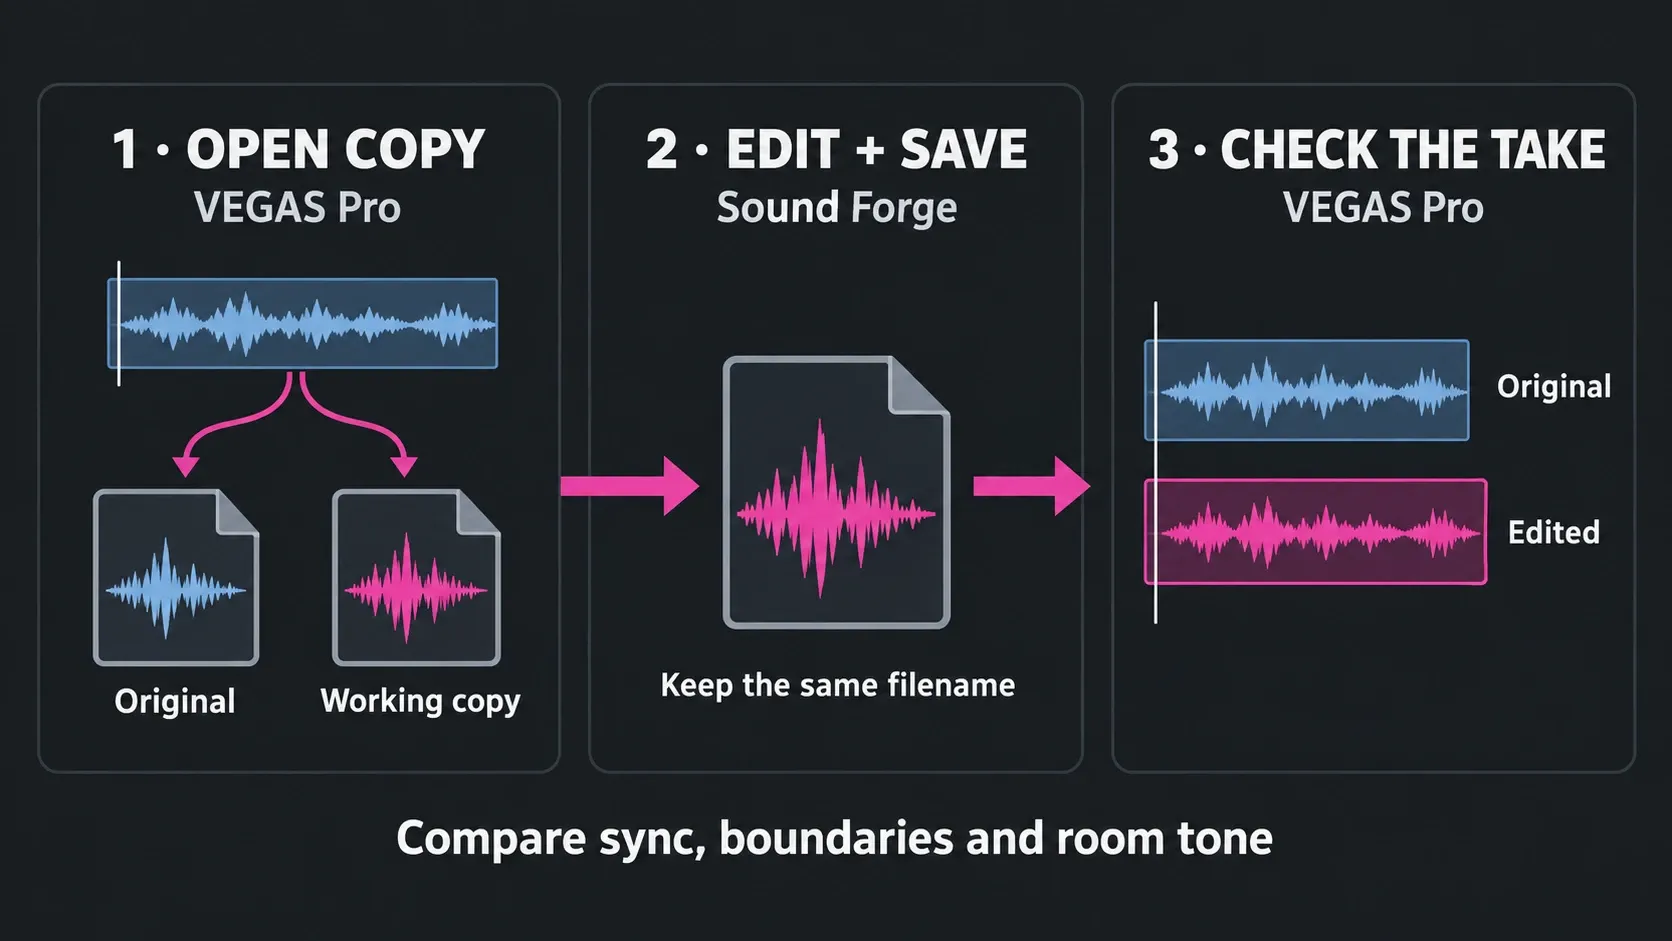
Use Vegas Pro for the timeline and Sound Forge for a file-level repair. In Vegas Pro, set Sound Forge under Options > Preferences > Audio > Preferred audio editor. Select an audio event and choose Tools > Audio > Open Copy in Sound Forge. Save with Ctrl+S, return to Vegas, and review the new active take against picture. If you are still deciding which application owns the job, use the Sound Forge vs Vegas Pro comparison before setting up the round trip.
Open Copy is the safer default for clip-specific work. It keeps the original as another take. Use Open in Audio Editor only when you deliberately want to change the shared source file and every event that references it.
Does the Vegas Pro and Sound Forge round trip still work in 2026?
Yes. Current Vegas Pro 2026 external-editor help still documents the source-file route, and the companion Open Copy procedure documents the safer copy-and-take route. Boris FX announced its acquisition of Vegas Pro, Sound Forge, and Acid Pro on March 30, 2026; the current owner-hosted manual confirms that the handoff remains available.
This is an external-editor workflow rather than a shared session. Vegas keeps the timeline, event placement, fades, automation, buses, and picture context. Sound Forge receives a media file. Changes to Vegas envelopes, track routing, video timing, or the rest of the mix won't appear in Sound Forge.
The round trip depends on three things: a valid editor path, the correct Open in/Open Copy choice, and saving the file under the name and location Vegas expects. Audio produced by a nested project is a documented exception and must be handled in the source project or rendered to ordinary media first.
1. Set Sound Forge as the preferred audio editor
Open Options > Preferences > Audio in Vegas Pro and inspect Preferred audio editor. The current Audio tab documentation says Vegas automatically assigns Sound Forge when it detects the application. If the field is empty or points to an uninstalled version, browse to the current Sound Forge executable.
- Close any Sound Forge file that could be confused with the test media.
- In Vegas Pro, open Options > Preferences > Audio.
- Set Preferred audio editor to the current Sound Forge executable.
- Select a short disposable audio event and choose Tools > Audio > Open Copy in Sound Forge.
- Make a harmless change, press Ctrl+S, and confirm that Vegas activates the returned copy as a take.
A successful launch only proves the executable path works. Check that the saved copy returns as the active take before using the workflow on irreplaceable media. For other application handoffs, the Sound Forge workflow guides separate file editing from the host application’s timeline jobs.
2. Choose Open in Audio Editor or Open Copy
| Vegas command | What opens | What Save changes | Use it when |
|---|---|---|---|
| Open in Audio Editor | The event's source media | The source file; every event using it can reflect the change | A source-level repair is intentional for all uses |
| Open Copy in Audio Editor | A new copy for the selected event | The copy; Vegas makes it the active take | The edit belongs to this clip or needs an A/B comparison |
Open in Audio Editor changes source media. A camera WAV or extracted audio file may feed several events. Saving that shared file can change every event that references it, including cuts other than the one currently visible.
Open Copy preserves a route back. Vegas adds the saved copy to Project Media and makes it the active take. The current takes documentation says T selects the next take and Shift+T the previous one; the Take submenu can also choose the active version.
Open Copy is still a working file; it isn't a backup system. Keep the project and its media in a stable folder and back up irreplaceable recordings before processing.
3. Run a safe Vegas-to-Sound-Forge round trip
- Back up source media. The current project documentation says a
.vegfile stores references to source files, so a project copy does not restore media overwritten by an external editor. - Select the exact audio event. Current help says multiple selected events can open in separate Sound Forge windows.
- Choose Open Copy for clip-specific work. Reserve Open in Audio Editor for an intentional source-wide repair.
- Repair the named defect. Preserve the file's duration unless the timeline edit explicitly permits a length change.
- Save without renaming. Use Ctrl+S on the file Vegas opened. For the Open in route, current help documents that a new name or location prevents automatic detection and requires manual import.
- Review the returned take. Listen across both event boundaries with room tone, music, and adjacent speakers active.
- Verify sync and the active take. Compare the start, end, duration, and picture relationship before continuing the edit.
Audio generated by a nested Vegas project cannot be sent directly to a sound editor. The current nesting documentation directs you back to the source project. Right-click the nested event and choose Edit Source Project. Edit there, or render the required audio from that source project to ordinary media. A nested 5.1 project is downmixed to stereo in the parent project; do not render that stereo output expecting to retain the original 5.1 channels.
4. Keep timeline jobs in Vegas and file jobs in Sound Forge
| Job | Best home | Reason |
|---|---|---|
| Clip gain, fades, track EQ, automation, ducking, buses | Vegas Pro | The decision depends on the complete timeline and remains editable |
| Sync, multicamera dialogue, music beds, stems against picture | Vegas Pro | The relationship between tracks and picture must remain visible |
| One click, clipped samples, a damaged word, precise waveform boundary | Sound Forge | The defect belongs to one media file and benefits from sample-level access |
| Steady hiss or hum in one source | Sound Forge or a suitable Vegas plug-in | Choose by defect, required control, and artifact risk |
| Integrated loudness, LRA, and true-peak compliance | Vegas Loudness Meters/log or the meter named by the delivery brief | The current Vegas manual explicitly documents these measurements |
| Noise, echo or wind cleanup | CrumplePop plug-ins in Vegas | Apply the appropriate repair while hearing the timeline context |
| Stem separation and rebalancing | Standalone SoundApp | Separate parts outside the timeline, then check the imported result against picture |
There's no reason to send every event out of Vegas. A track plug-in or envelope is easier to revise when the problem belongs to the mix. Send an event when the fault belongs to its media file and benefits from Sound Forge's documented waveform repair, restoration, or controlled file processing.
5. Clean dialogue without processing the performance away
Name the defect before choosing a process. Broadband room noise, electrical hum, isolated clicks, clipping, plosives, and harsh sibilance are different problems. One heavy “clean dialogue” chain can soften consonants, pump room tone, or make adjacent shots less consistent than the original noise.
Use Open Copy, then audition both a noise-only section and normal speech. If steady noise requires a noise print, exclude breaths, word tails, clothing movement, and transients. Preview quiet words and hard consonants before committing. The background-noise workflow separates broadband reduction from hum and click repair instead of assigning one amount to every recording.
For an isolated defect, follow the click-and-pop repair procedure. A steady tonal fault calls for the hiss-versus-hum diagnosis before any broadband reduction. Both routes keep the processing tied to the audible fault.
If clipped dialogue can be recorded again, compare that option before attempting reconstruction. When a new take is impossible, repair a copy and judge the word against picture and the surrounding microphone tone. A rounded waveform isn't proof that the speech sounds natural.
Back in Vegas, compare the returned take with adjacent shots. A cleaner file can still fail if room tone collapses at the cut or the speaker suddenly sounds farther away.
6. Prepare voice-over and standalone audio files
Voice-over delivered as a standalone WAV fits Sound Forge because the job centers on one file. Preserve the source, then work through the pass: trim approved boundaries, repair audible defects, shape tone conservatively, control dynamics, and measure against the written delivery brief. Once the file is approved, import it into Vegas, or use Open Copy when the narration already sits on the timeline.
Avoid fixed high-pass, presence, de-essing, or noise-reduction values. Microphone, room, voice, distance, and performance determine whether those moves help. The voice-over workflow covers recording level, punch-ins, breath editing, and ACX-specific delivery without presenting another narrator's curve as a preset.
If the video client also needs isolated narration, music, and effects stems, keep the Vegas session as the mix source. Export the approved stems and inspect each file, preserving alignment and duration across every downstream version.
7. Verify the final video mix as a file
Vegas should produce the mix. Render the requested deliverable, then measure the file with the tool that actually reports the required metric. Current Vegas Loudness Meters document momentary and short-term loudness, integrated loudness, loudness range, and true peaks. In Sound Forge 2026, Tools > Statistics explicitly includes true peak, integrated LUFS and LRA. Analyze the complete delivery file across the intended channels, not a short leftover selection. For six-channel surround audio, enable Enable surround processing for files with 6 channels on the Status tab of Preferences and compare each required value with the delivery brief. The Sound Forge Statistics guide keeps peak, RMS, DC offset, selection length, and standards-based loudness checks in their proper lanes.
The Vegas loudness-log documentation makes an important distinction: a log created during rendering is calculated before the codec is applied. Because compression can change levels, Boris FX advises measuring the encoded result. Put that file alone in a clean verification project, preserve its channel layout, use unity gain without reapplying mix effects, select the full file and choose Tools > Generate Loudness Log. This prevents an accidental second measurement of the original mix timeline. Check channel layout, sample rate, duration, integrated loudness, LRA when required, and the specified peak or true-peak limit on the actual delivery media.
Don't force every web video onto one inherited broadcast number. EBU R 128 and ATSC A/85 are documented broadcast modes, and they aren't universal upload presets. Use the destination's current written specification.
If the file fails because of balance, automation, bus processing, or interaction between tracks, return to the Vegas mix. Use Sound Forge only for a file-level correction that does not hide a decision that should remain editable in the timeline.
8. SoundApp, CrumplePop plug-ins, or Sound Forge?
The Boris FX plan comparison checked September 12, 2026 lists integrated audio tools in all three Vegas tiers. Vegas Pro Plus adds Sound Forge and CrumplePop VST plug-ins. Vegas Pro Ultimate includes those products and the standalone CrumplePop SoundApp.
CrumplePop plug-ins target quick in-timeline cleanup such as background noise, echo/reverb, wind, and speech clarity. SoundApp is presented as a standalone cleaning, separation, and rebalancing tool. Sound Forge is the more direct fit for exact waveform selection, manual repair, a controlled processing chain, file conversion, batch work, and independent file inspection.
Choose the least destructive route that gives enough control, then audition the result. AI separation can leave musical noise or alter speech texture; a noise-print process can suit steady noise and still fail on changing traffic. The fault and the delivery requirement decide the tool.
9. Fix common round-trip failures
Sound Forge does not appear in the Vegas Audio menu
Open Options > Preferences > Audio and set Preferred audio editor manually, making sure the path points to the current executable rather than an uninstalled older version. Repeat the disposable-event test after changing the path. If the old route remains in use, save the project and try restarting Vegas; a restart is a troubleshooting step, not a documented requirement for every path change.
Vegas does not update after Sound Forge saves
For the Open in Audio Editor route, one documented cause is changing the file name or folder with Save As. Save the file Vegas opened with Ctrl+S; if it was renamed or moved, import the new file manually. For Open Copy, confirm that the copy was saved and inspect the active take. Also confirm that the media remains online.
The edited event changed elsewhere in the project
The shared source may have been opened with Open in Audio Editor. In Project Media, right-click the file and choose Select Timeline Events. The documented selection command finds events using that media in their active take; it does not inventory inactive takes or other projects that share the file. Restore the source from backup, or choose a take that references genuinely untouched media. A take referencing the same overwritten file cannot undo that overwrite. Then use Open Copy for the clip-specific repair.
Open in Audio Editor is unavailable
Confirm that an audio event is selected, its media is online, and the Preferred audio editor path is valid. Audio generated by a nested project is a documented exception; open the source project or render ordinary media before attempting the external edit.
The returned take is out of sync
Return to the original take and compare file duration, sample rate, event stretch/pitch properties, and the start and end boundaries. These are diagnostic checks, not a guaranteed root cause. Repeat the repair without any process that changes duration unless the timeline is meant to be reconformed.
Sound Forge opens but playback is silent
First confirm that the expected file, duration and channels arrived and that the source is not silent. Compare playback with a known-good file. If the media is correct but output remains silent, keep the returned copy untouched while you follow the Sound Forge playback and ASIO checks. Once Sound Forge plays the file correctly, repeat the save-and-return test.
Round-trip checklist
- Set the preferred audio editor. Point Vegas to the current Sound Forge executable and complete a disposable test.
- Back up source media. Protect irreplaceable files before any source-level edit.
- Open a copy for clip-specific work. Use Open Copy so the original remains available as a take.
- Repair the identified defect. Process the audible problem and preserve duration unless the edit allows a change.
- Save without renaming. Use Ctrl+S and keep the path Vegas expects.
- Review the returned take. Check the active take, sync, boundaries, room tone, picture, and adjacent clips.
- Verify the delivery file. Measure the rendered or encoded media against the current written specification.
Frequently Asked Questions
How do I open a Vegas Pro audio event in Sound Forge?
In Vegas Pro, open Options > Preferences > Audio and set Sound Forge as the Preferred audio editor. Select the event, then choose Tools > Audio > Open Copy in Sound Forge for a clip-specific edit. Vegas opens a copy and makes the saved result the active take while retaining the original.
What is the difference between Open in Audio Editor and Open Copy?
Open in Audio Editor opens the source media. Saving it can change every event that references that file. Open Copy creates separate media for the selected event and activates the saved result as a take, so the original remains available for comparison or recovery.
Why does Vegas Pro not update after I save in Sound Forge?
For the Open in Audio Editor route, one documented cause is changing the file name or location with Save As. Save the file Vegas opened with Ctrl+S; if it was renamed or moved, import the new file manually. For Open Copy, confirm that the copy was saved and check which take is active. Also verify the Preferred audio editor path and media status.
Can I switch back to the original after using Open Copy?
Yes. Vegas keeps the original and edited media as takes in the event. Select the event and press T or Shift+T to choose the next or previous take, or choose the active version from the event's Take submenu.
Should dialogue cleanup stay in Vegas or go to Sound Forge?
Keep gain, automation, track EQ, buses, and other mix decisions in Vegas. Send a copy to Sound Forge when one media file needs precise waveform repair or source-specific restoration. Review the returned take against adjacent shots, room tone, music, and picture before accepting it.
Can audio from a nested Vegas project be opened in Sound Forge?
No. Current Vegas Pro 2026 help says audio events from nested projects cannot be edited in an external sound editor. Use Edit Source Project, then edit or render the required audio there. Nested 5.1 audio becomes a stereo downmix in the parent project, so return to the source project when the original surround channels must be preserved.
Is Sound Forge included with every Vegas Pro plan?
No. The Boris FX plan comparison checked on September 12, 2026 lists Sound Forge and the CrumplePop VST plug-ins with Vegas Pro Plus and Ultimate, but not the base Vegas Pro tier. The standalone CrumplePop SoundApp is listed for Ultimate.
Documentation reviewed September 12, 2026. The procedures follow current Boris FX help; this review does not claim a newly performed VEGAS–Sound Forge round trip.