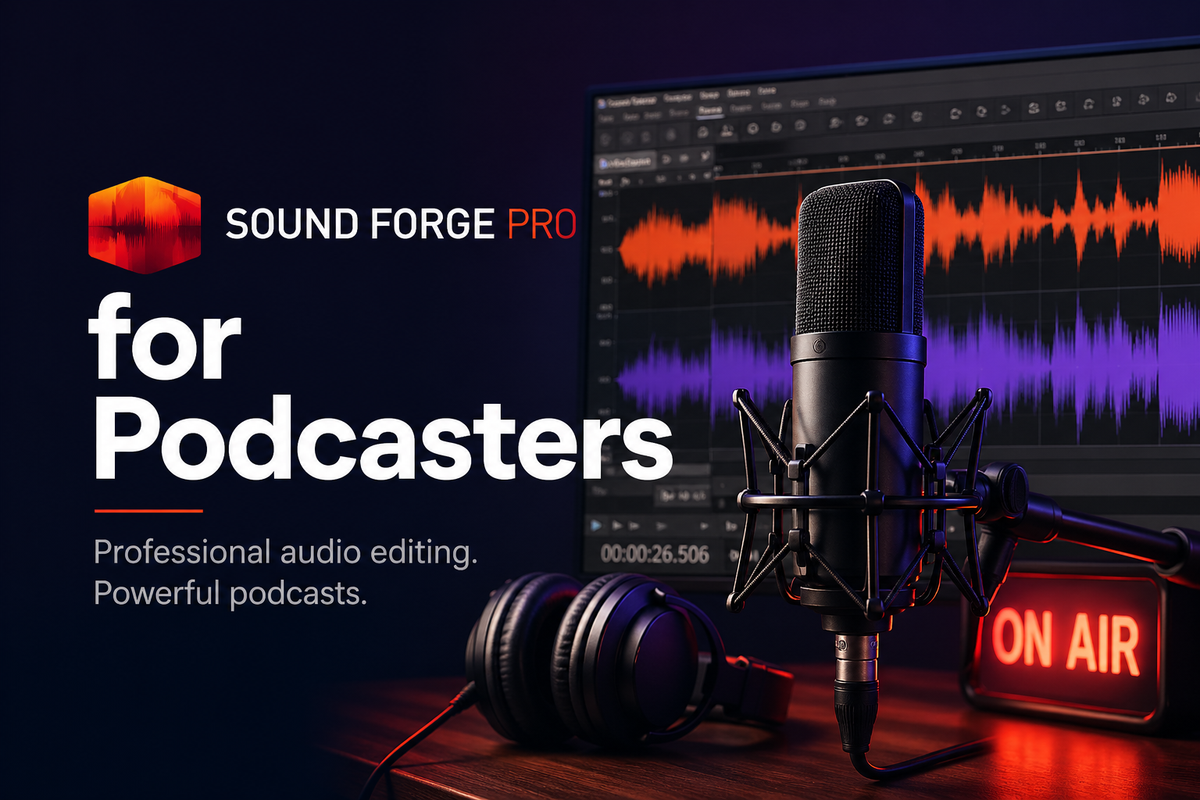
Sound Forge Pro for Podcast Editing: Noise Reduction, LUFS & Export Workflow

I've processed podcast episodes in Sound Forge Pro for three years, mostly corporate interviews and solo voice recordings. The workflow that ended up sticking: noise reduction first, EQ to clean up the voice, light compression to even out level variation, limiting and LUFS normalisation to hit the platform target, then export. The entire chain runs from a single file in under ten minutes for a well-recorded episode. Badly recorded episodes take longer, but SF Pro's restoration tools handle most of what home studio conditions throw at you.
Quick answer: Sound Forge Pro is a good podcast editor for single-track work — one host, one recording file, clean to deliver. It isn't a multitrack recorder and can't replace a DAW if you're mixing multiple guests recorded simultaneously on separate tracks. For everything after the recording — cleanup, processing, loudness, export — it covers the full chain.
What Sound Forge Pro Can and Can't Do for Podcasts
Sound Forge Pro is a single-file audio editor. It handles one audio file at a time — which covers most podcast use cases: one host recording direct to a WAV file, one interview recorded as a single stereo file from a mixer, one phone call exported from a recording service. What it doesn't do is multitrack: if your host and guest were recorded on separate tracks in Zoom, Riverside, or a DAW, you need to mix them down to a single file before bringing it into Sound Forge for cleanup and mastering. The software intentionally doesn't function as a DAW.
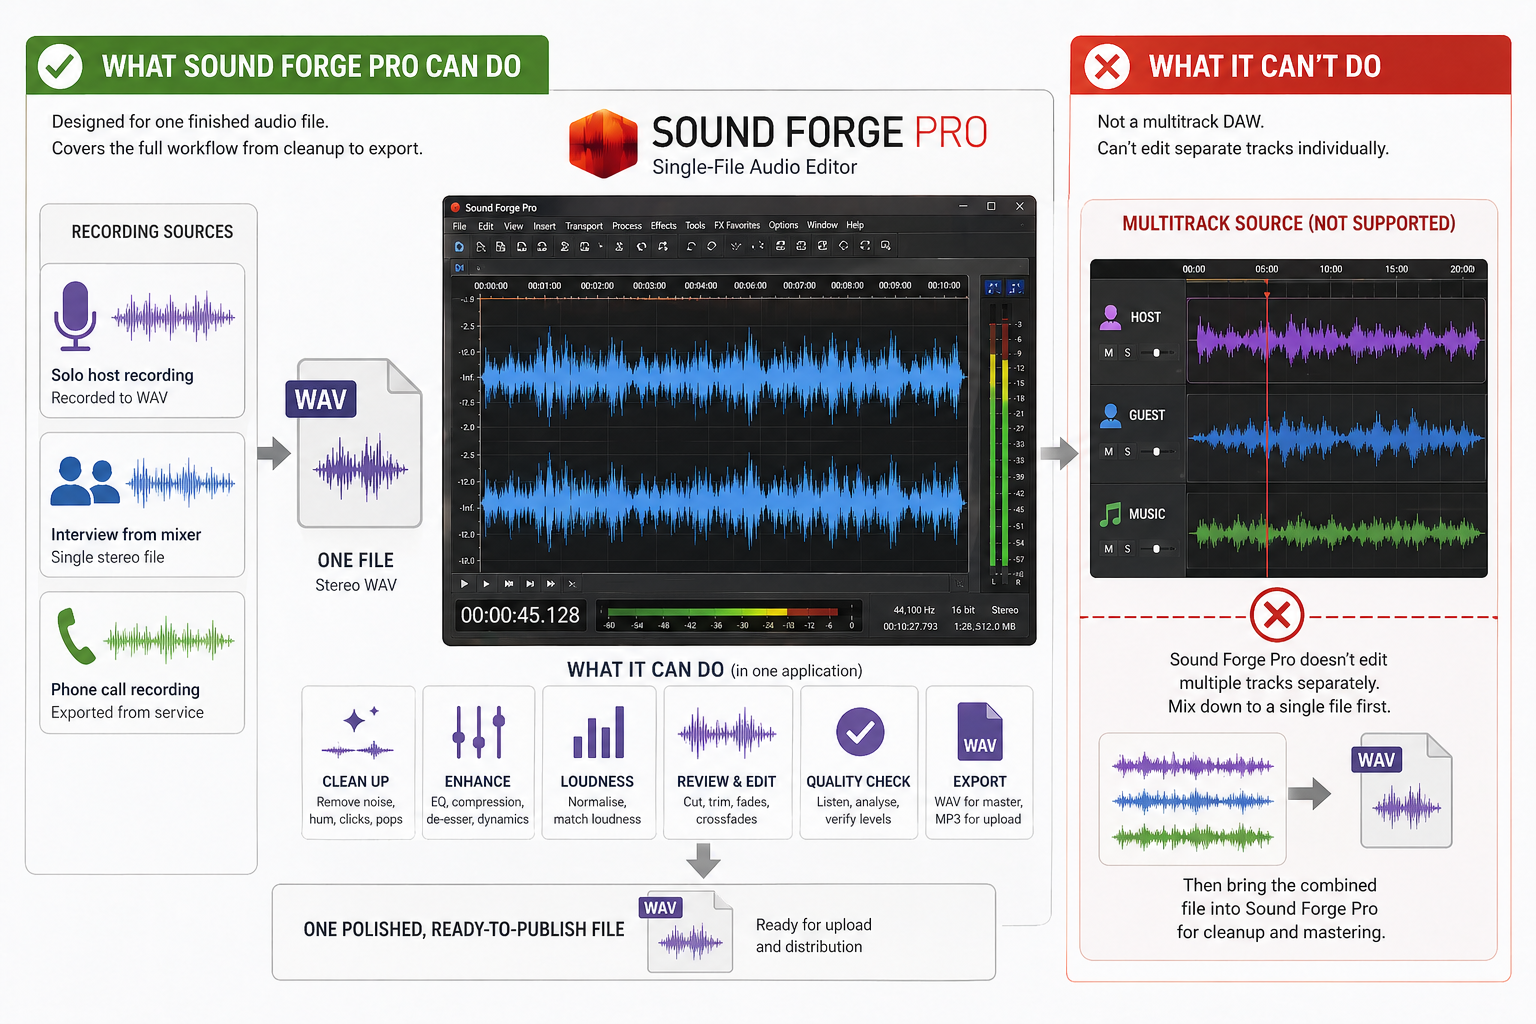
For the vast majority of solo and two-person shows — where the recording arrives as one file — SF Pro covers everything from cleanup to export without touching another application. That's the workflow this article covers. I started using it specifically because I was spending too much time bouncing between Audacity for cleanup and a separate normalisation tool for loudness — collapsing that into one application saved about 20 minutes per episode.
Cleaning Up the Recording: Noise Reduction First
Most podcast recordings have some ambient noise. A home studio with HVAC, a room with audible fan hum, a recording made on a laptop with built-in mic preamp hiss — all of these respond well to NR-2.0, Sound Forge Pro's noise reduction tool.
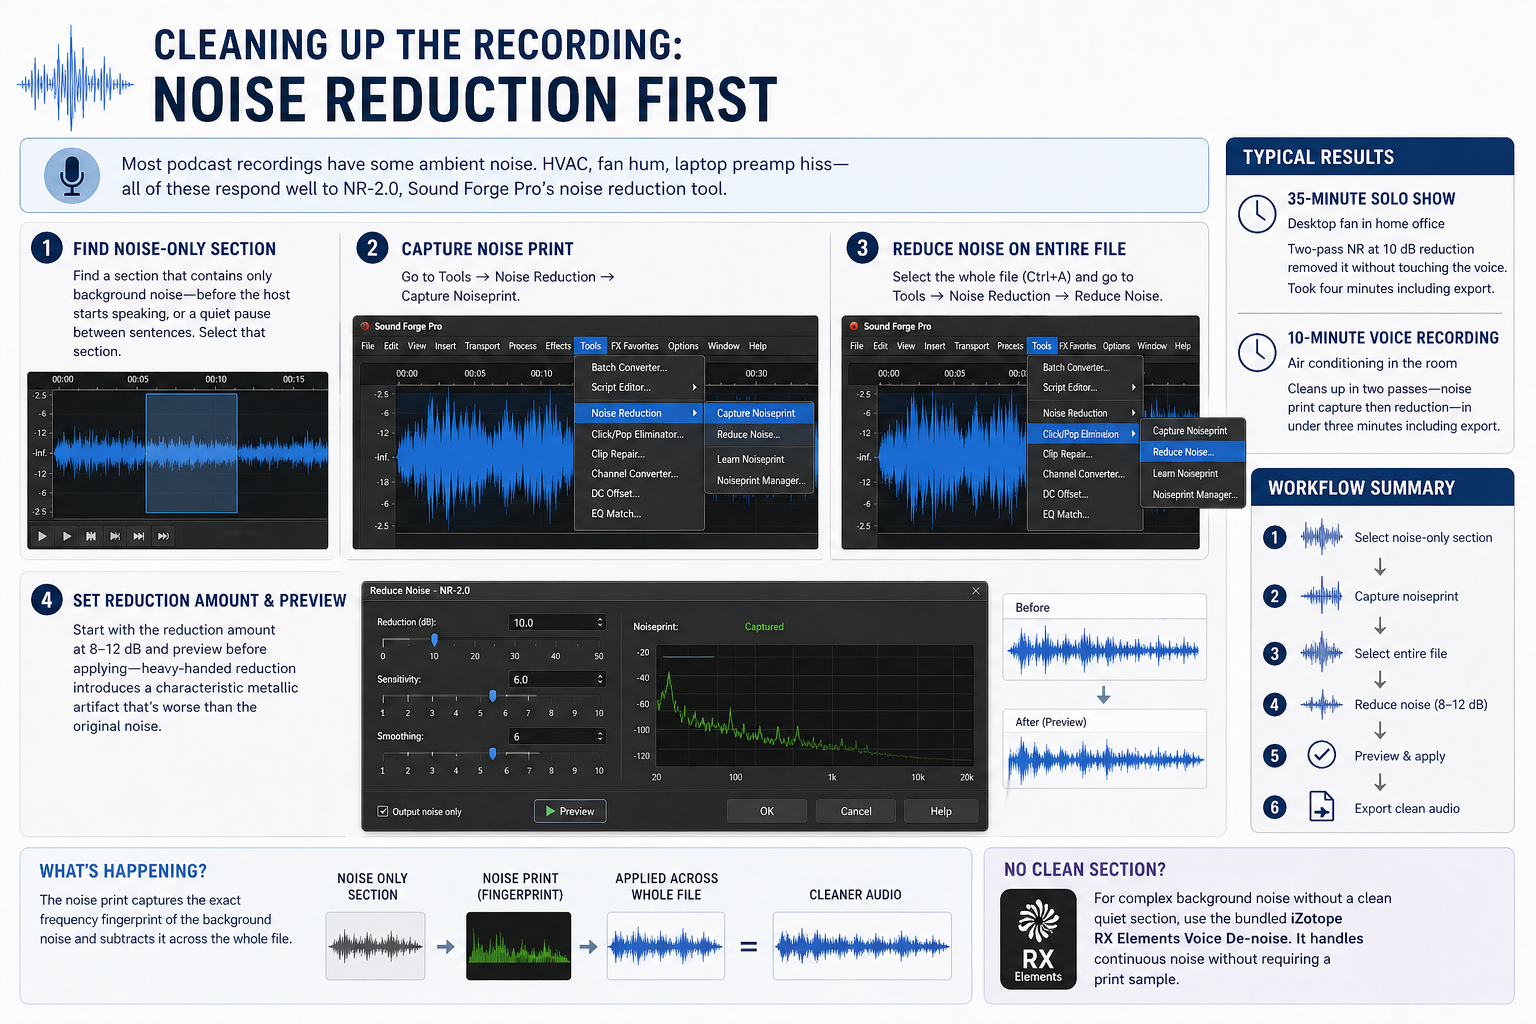
Find a section of the file that contains only background noise — before the host starts speaking, or a quiet pause between sentences. Select that section. Go to Tools → Noise Reduction → Capture Noiseprint. Then select the whole file (Ctrl+A) and go to Tools → Noise Reduction → Reduce Noise. The noise print captures the exact frequency fingerprint of the background noise and subtracts it across the whole file. Start with the reduction amount at 8–12 dB and preview before applying — heavy-handed reduction introduces a characteristic metallic artifact that's worse than the original noise.
The first podcast recording I cleaned in SF Pro was a 35-minute solo show recorded in a home office with an audible desktop computer fan. Two-pass NR at 10 dB reduction removed it without touching the voice. Took four minutes including the export. I've cleaned worse since.
A 10-minute voice recording in a room with noticeable air conditioning typically cleans up in two passes — noise print capture then reduction — in under three minutes including export. Most one-room home studio problems fall into this category. For more complex background noise that doesn't have a clean quiet section for the print, the bundled iZotope RX Elements Voice De-noise handles continuous noise without requiring a print sample. Full NR workflow is in the noise reduction guide.
EQ for Voice: What to Cut and What to Leave Alone
Podcast voice EQ has two jobs: remove the frequency ranges that make recordings sound bad, and optionally add presence and clarity. Both happen in Process → EQ → Paragraphic EQ.
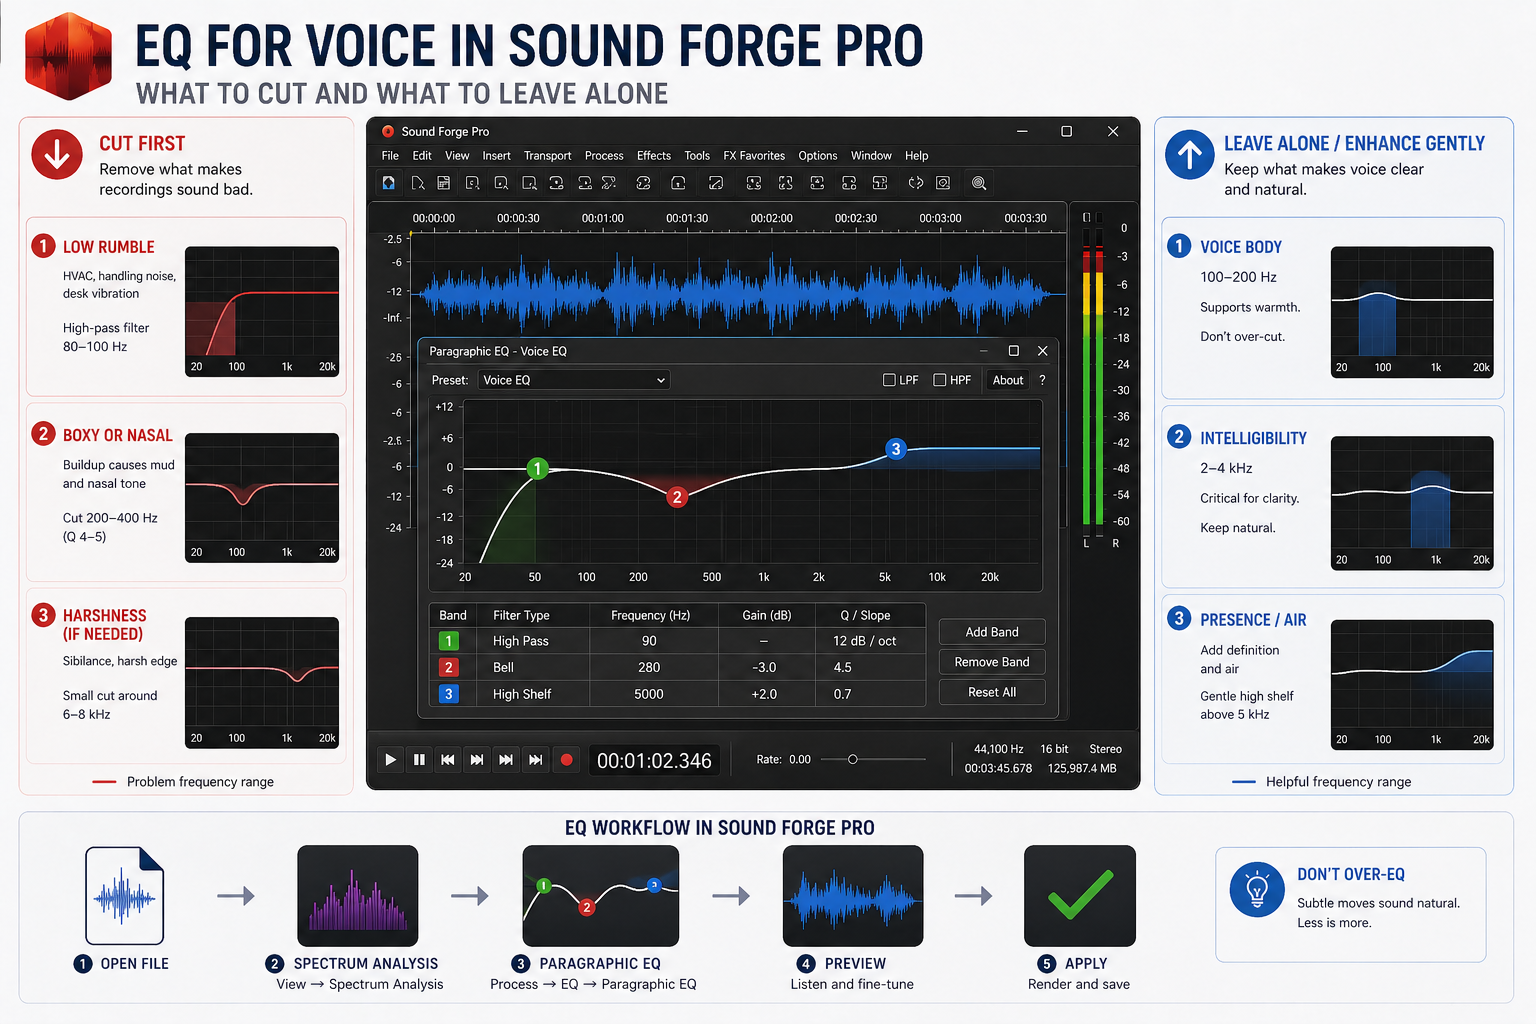
Start by cutting problems before adding anything. A high-pass filter at 80–100 Hz removes low-frequency rumble — handling noise, desk vibration, low-end room resonance — that doesn't contribute to voice intelligibility and only adds mud. If the recording sounds boxy or nasal, there's usually a buildup somewhere between 200–400 Hz: a narrow bell cut (Q around 4–5) at the offending frequency cleans it up without thinning the voice. Run Spectrum Analysis first (View → Spectrum Analysis) to see the buildup before guessing at the frequency — it's faster than sweeping by ear.
For presence and clarity, a gentle high shelf boost of +1.5 to +2 dB above 5 kHz adds definition and air without harshness on most cardioid condenser recordings. Dynamic microphones often need a bit more — +2 to +3 dB above 3 kHz — because they roll off the top end relative to condensers. Don't over-EQ: voice recordings that are trying too hard sound processed.
On a recent corporate interview I processed — two speakers, slightly different microphone placement, one sounding noticeably boxier than the other — I ran Spectrum Analysis on 30 seconds of each speaker separately and found a 6 dB difference at 280 Hz. One notch at -3 dB, Q 4.5 matched the tonal balance between them without either speaker sounding corrected. The EQ guide covers Paragraphic EQ settings in detail.
Noise Gate for Pauses and Breath Noise
Podcast recordings often have audible room tone during pauses — quiet enough that it didn't trigger the noise reduction pass, but present enough to be distracting between sentences. A noise gate closes the signal during those pauses below a threshold.
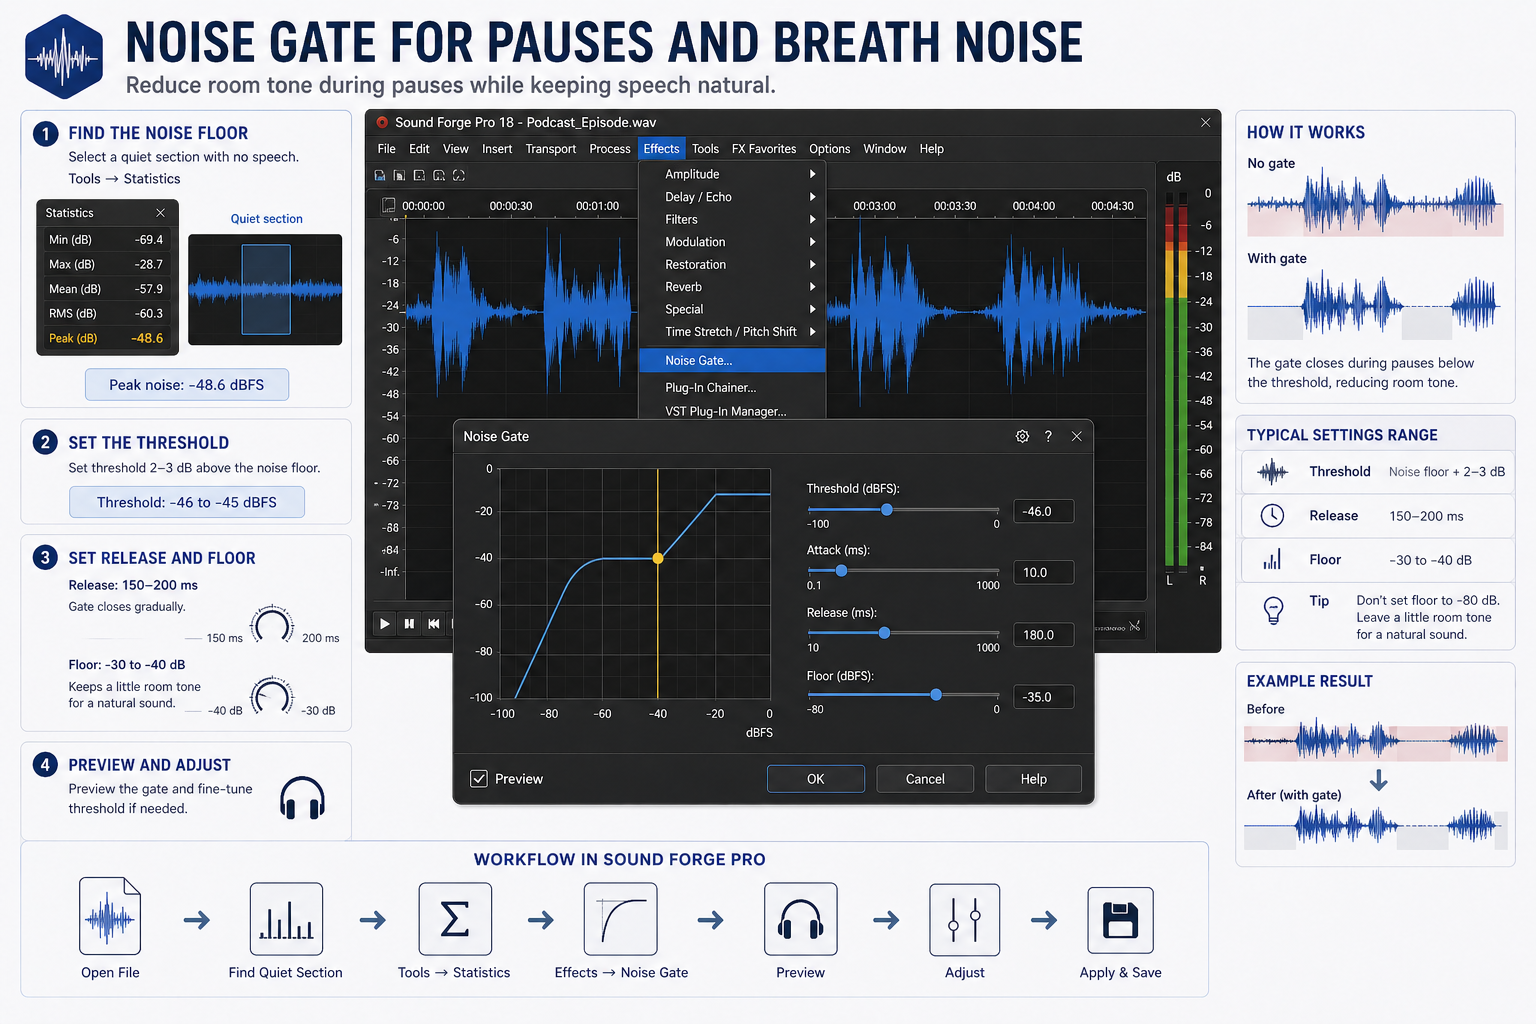
Go to Effects → Noise Gate. Set the threshold a few dB above the noise floor — use Tools → Statistics on a quiet section to find the peak noise level, then set the threshold 2–3 dB above that. Set Release to 150–200 ms so the gate closes gradually after speech ends rather than cutting off abruptly. A Floor of -30 to -40 dB rather than silence (-80 dB) keeps a small amount of room tone present, which sounds more natural than complete silence between sentences — the abrupt contrast between total silence and a voice is more distracting than low-level room tone.
On a serialised documentary podcast I processed last year, the host recorded in a room with low but consistent floor tone between sentences. Without a gate it sounded like the mic was never off. At threshold -42 dBFS, release 180 ms, floor -35 dB, the pauses read as natural silence without the awkward dead silence of a fully closed gate.
Conversational podcasts benefit from a light touch — natural breath and room tone between sentences is part of how real conversation sounds. The gate should clean up obvious noise floor in pauses without making the silences feel surgical. Voice-over style recordings are different: the expected convention is clean silence between lines, and a tighter gate fits the format. Full gate settings and chattering fixes are in the noise gate guide.
Compression and the Wave Hammer
Voice recordings have more dynamic range than they need for mobile listening. A host who speaks quietly between sentences and louder mid-story can swing 20–25 dB without ever clipping. On a car speaker or earbuds in a noisy environment, those quiet passages disappear. Compression narrows that swing. After light compression, the dynamic range sits around 12–15 dB — enough variation to sound natural, not enough to lose sentences at low volume.
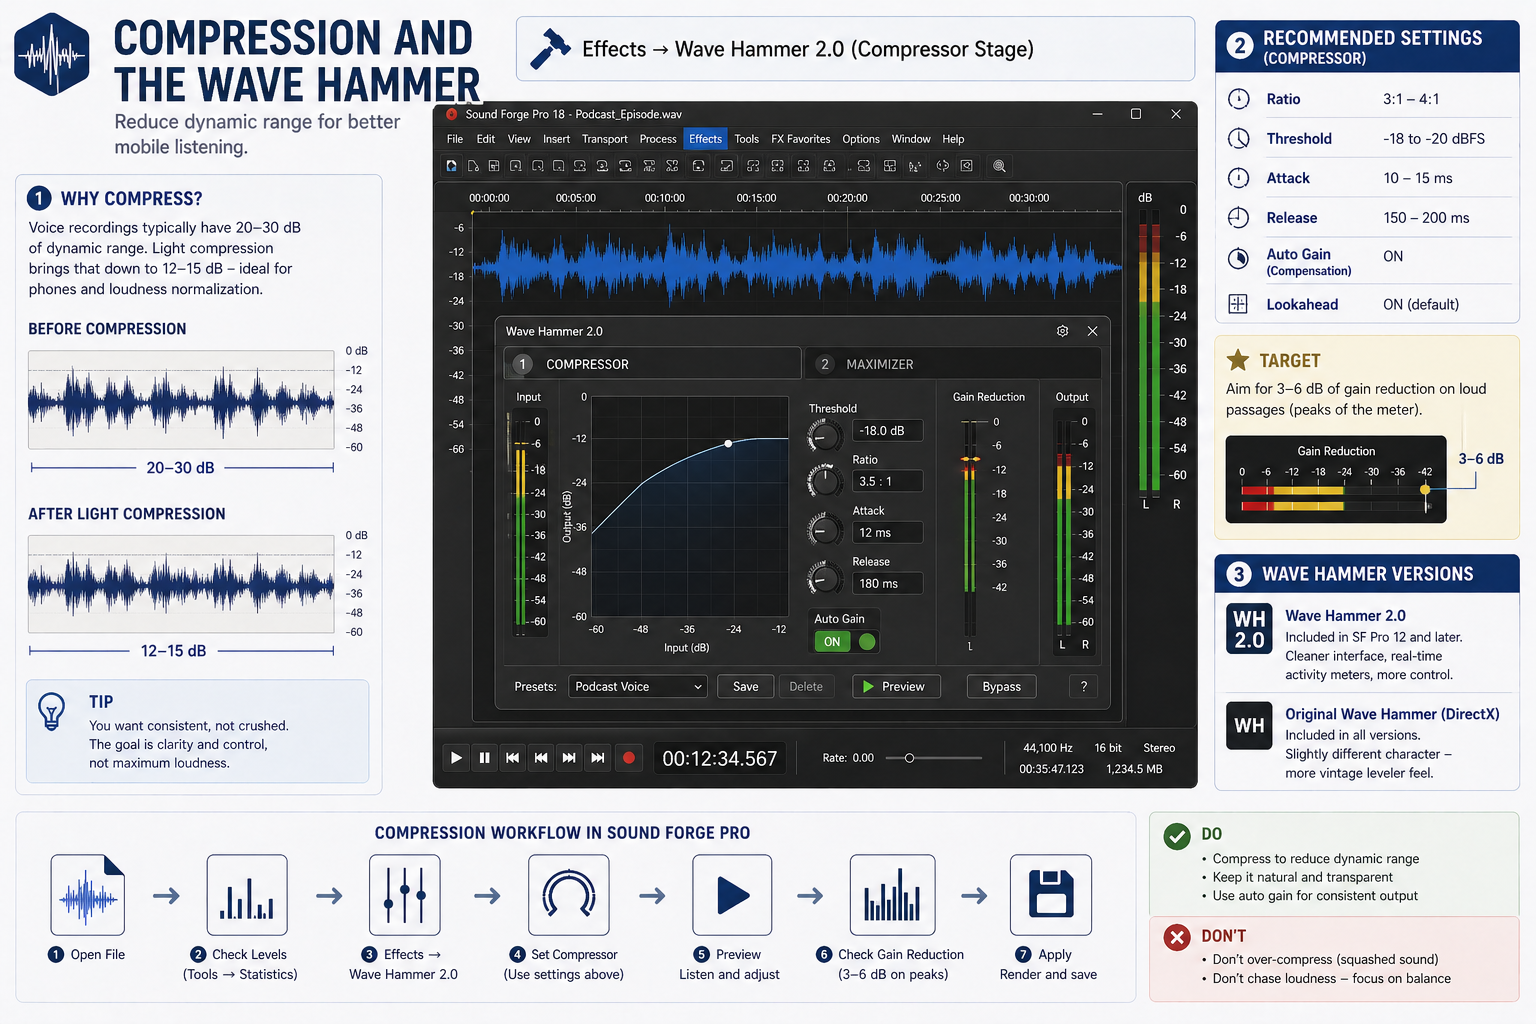
Sound Forge Pro includes the Wave Hammer plugin (Effects → Wave Hammer or in FX Favorites). Wave Hammer is a two-stage processor with a compressor and a maximizer. For podcasting, the compressor stage is what you want. A ratio of 3:1 to 4:1 with a threshold set to catch the louder passages — roughly -18 to -20 dBFS — reduces level variation without sounding pumped. Attack around 10–15 ms preserves the natural transient of consonants. Release around 150–200 ms. The auto-gain compensation option in Wave Hammer adjusts the output level to compensate for gain reduction, keeping the output level consistent regardless of how much compression is applied.
Wave Hammer 2.0 is the newer version, included in SF Pro 12 and later. The original Wave Hammer (DirectX) is also present in all versions and has a slightly different character — more reminiscent of a vintage leveler in how it handles release. Either works for podcast compression. I default to Wave Hammer 2.0 for its cleaner interface and the ability to see compressor activity in real time during preview.
Hitting -16 LUFS for Platform Delivery
Apple Podcasts targets -16 LUFS integrated loudness with a True Peak maximum of -1 dBFS. Spotify normalises to -14 LUFS. Most podcast producers target -16 LUFS as a safe universal target — it meets Apple's spec, and Spotify will adjust up slightly if needed, which is less destructive than Spotify pulling a too-loud file down. For mono files, -19 LUFS integrated reads equivalently to -16 LUFS stereo because mono sums differently — target -19 LUFS if your episode is mono.
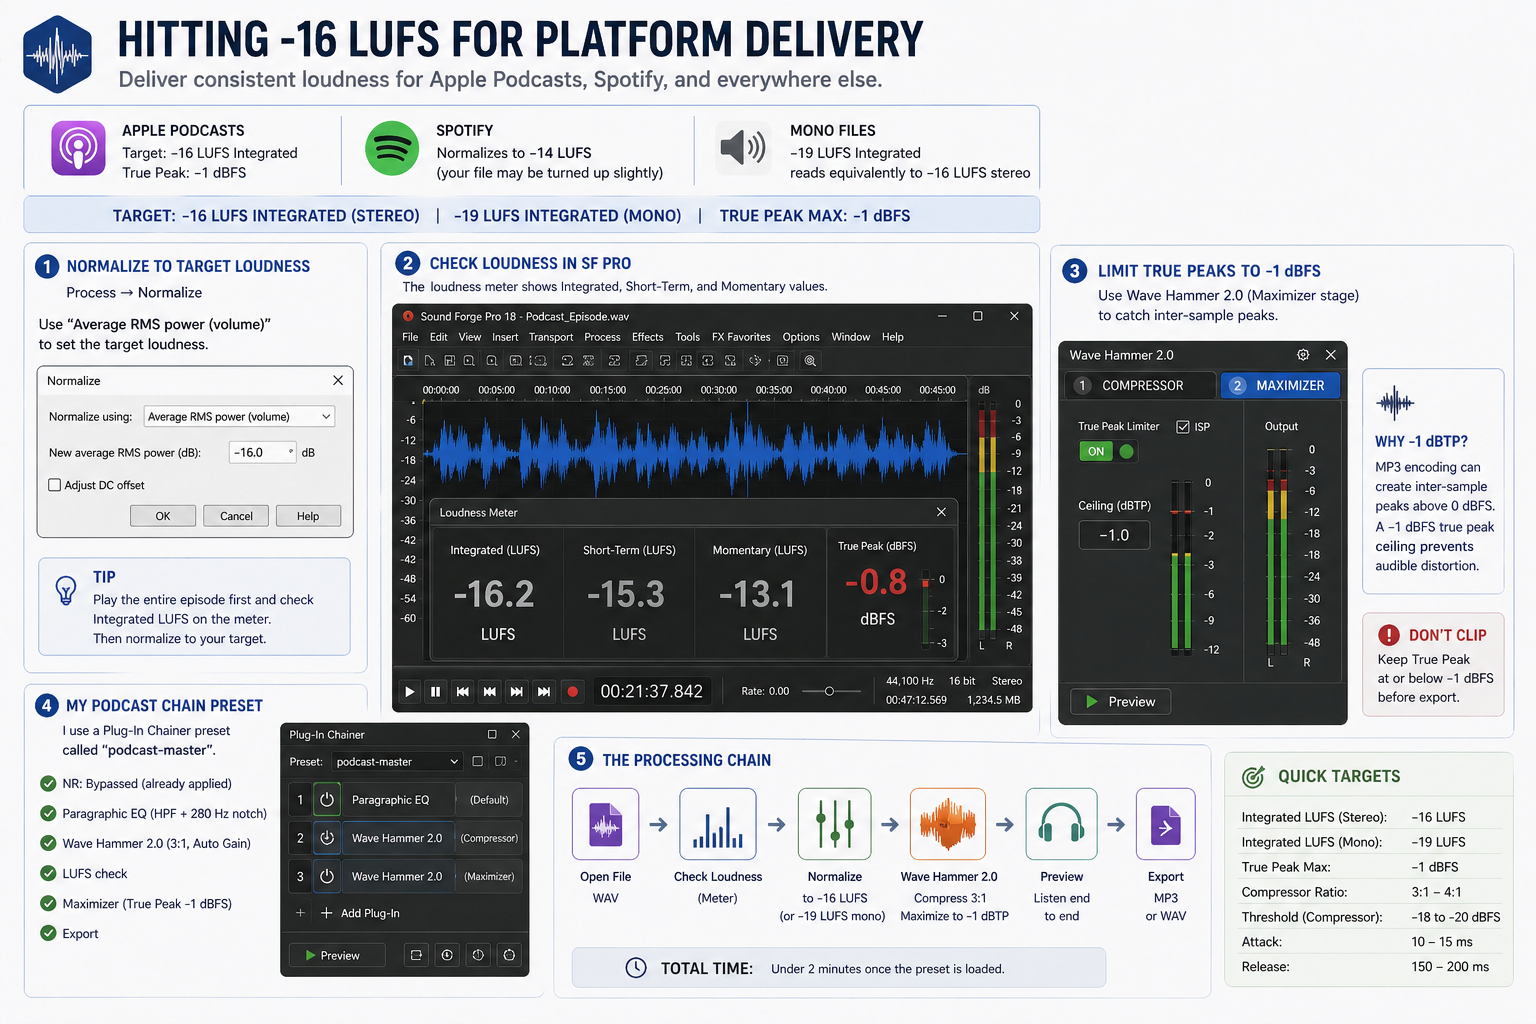
In Sound Forge Pro, checking integrated LUFS requires playing through the whole file with the LUFS meter active. Open View → LUFS Meter. Press Play and let the file run to the end — the Integrated value at the bottom shows the overall loudness of the episode. Note that number. Then use the Wave Hammer maximizer stage with the Output Level control to bring the integrated LUFS to target: if the file reads -20 LUFS and you need -16 LUFS, add approximately +4 dB of output. Run through the file again to verify. Process → Normalize with "Average RMS power" is a different operation — it normalises to a peak RMS value rather than integrated loudness, and will give you a different number than the LUFS meter. Use it only as a rough starting point, not as a LUFS delivery target.
After normalisation, run the Wave Hammer maximizer stage with True Peak limiting set to -1 dBFS to catch any peaks that clip during encoding. MP3 encoding can cause inter-sample peaks to exceed 0 dBFS even when the WAV file measures clean — a -1 dBFS true peak ceiling before export prevents audible distortion in the delivered MP3 file.
I keep a Plug-In Chainer preset saved as "podcast-master" — NR bypass (already applied destructively), Paragraphic EQ with the high-pass and 280 Hz notch I've calibrated for my client's room, Wave Hammer 2.0 at 3:1 with auto-gain, then LUFS check and export. The processing chain runs in under two minutes once the preset loads.
Markers for Long-Form Navigation
Podcast interviews run 30–90 minutes. Navigating without markers means scrubbing through audio looking for specific exchanges. Markers in Sound Forge Pro let you drop named waypoints at specific points in the file for instant access.
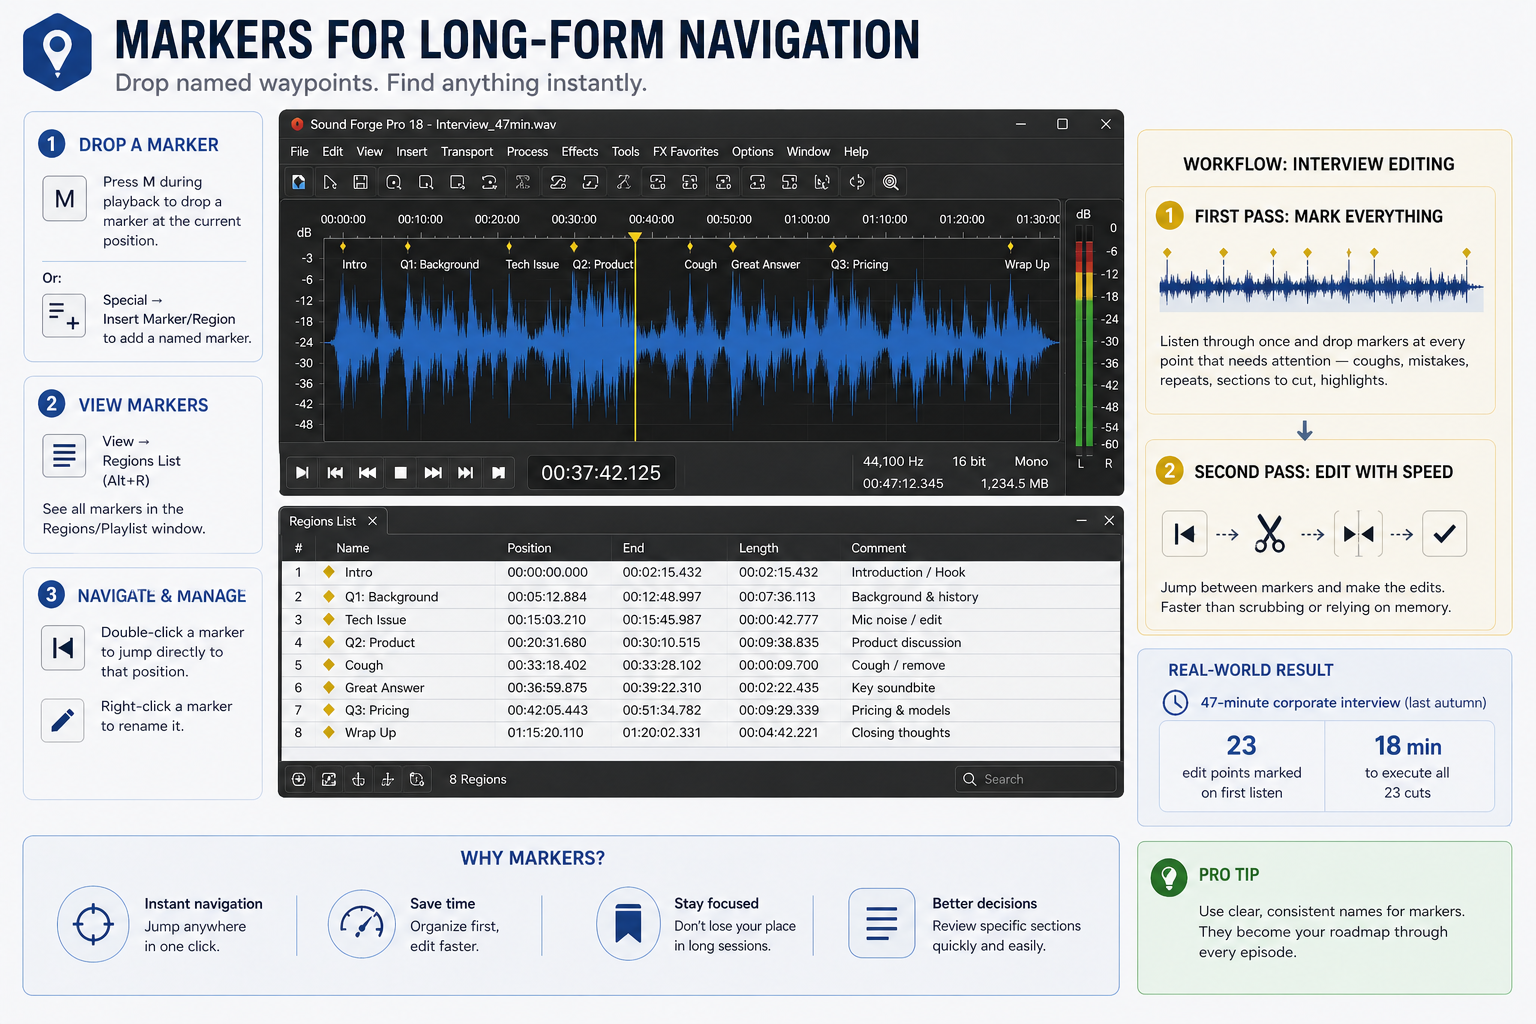
Press M during playback to drop a marker at the current position. Or go to Special → Insert Marker/Region to add a named marker. Markers appear in the timeline and in the Regions/Playlist window (View → Regions List). Double-click a marker to jump directly to that position. Right-click a marker to rename it.
For interview editing: listen through on first pass dropping markers at every point that needs attention — a cough, a repeated sentence, a section to cut. Second pass, jump between markers and make the edits. This is faster than relying on waveform navigation or memory alone. On a 47-minute corporate interview last autumn, I marked 23 edit points on first listen, then executed all 23 cuts in 18 minutes on the second pass. The official markers documentation covers naming, colours, and region creation.
Batch Export for Podcast Series
If you edit episodes individually but then need to apply the same loudness normalization and MP3 export settings to a batch of finished WAV files, the Batch Converter handles this without opening each file separately.
Go to Tools → Batch Converter. Add the finished episode WAV files via the Add Files button or by dragging them in. Set the output format to MP3 and click Custom to configure 128 kbps mono (or 192 kbps stereo). Add normalization to the processing chain. Set the output folder. Click Run Job. All episodes process to the same specs in a single pass. For a weekly podcast where I was delivering 4–6 episodes of documentary shorts per month, the batch export step took the deliverable prep from 40 minutes of manual work per batch to about 5 minutes of setup and waiting. Full batch settings and the proxy option for lossy source files are in the batch processing guide.
Fades, Silence, and Intro/Outro
Three basic operations that come up on every podcast episode and aren't covered by any of the tools above.
Fade in and fade out — select the first few seconds of audio (typically 0.5–2 seconds), go to Process → Fade → Fade In. Select the last few seconds, go to Process → Fade → Fade Out. This handles the intro moment when a host starts speaking and the ending where the recording cuts. Raw starts and stops without fades sound abrupt on headphones. I run fades on every episode as the last step before export, after all processing is applied — fading before compression changes how the compressor reacts at the boundaries.
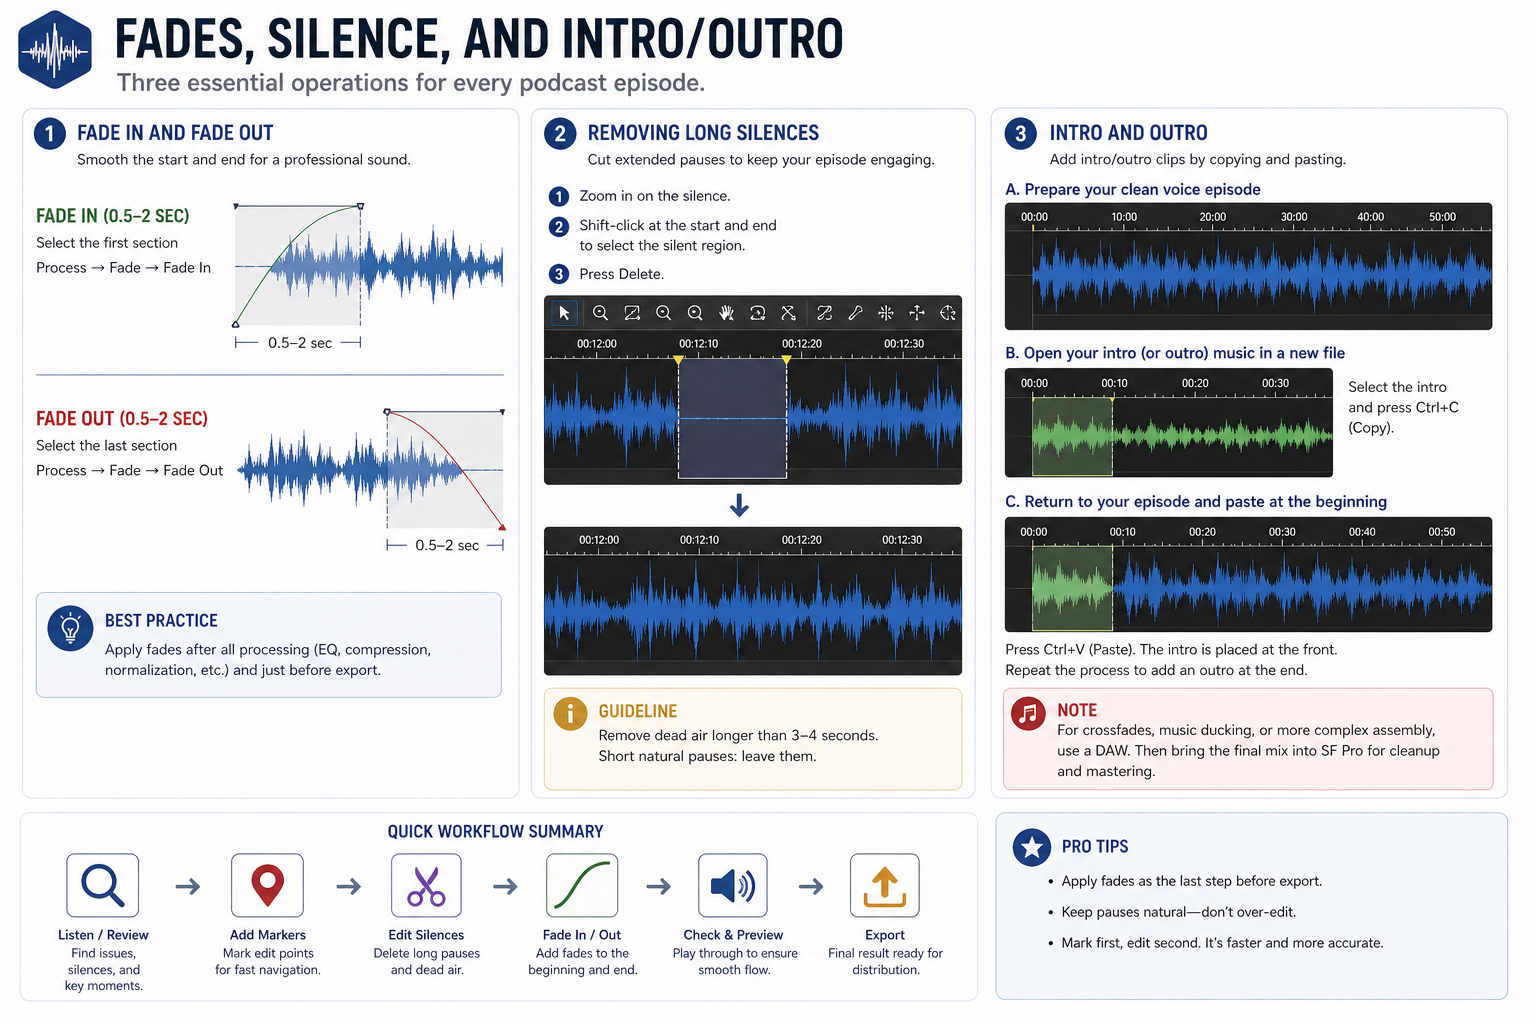
Removing long silences — for interviews with extended pauses between questions, go to Process → Audio and look for the Insert Silence / Silence options, or simply drag-select the silent region and press Delete. More precisely: zoom in to the silence region, place the cursor at the start of the silence, shift-click at the end of it to create a selection, then press Delete. The audio closes up without leaving a gap. For very short pauses between sentences, this is faster done manually than with any automation. For dead air that runs more than 3–4 seconds, it's worth removing — listeners perceive long silence as a technical problem, not a natural pause.
On a 52-minute interview I edited last month, there were 11 sections of silence longer than 4 seconds — questions the host had cut, technical pauses waiting for connection issues, one 18-second gap where both parties were looking for a document. Removing all 11 brought the episode to 49 minutes and removed every moment where a listener might assume the episode had ended. Total time: about 8 minutes including playback to find them.
Intro and outro — if you're adding a music bed or intro clip to the episode, Sound Forge Pro's single-file workflow means you can't layer them directly. The standard approach: export your clean voice recording, open your intro music as a separate file, copy the intro audio, and paste it at the front of the episode file. The timeline view shows the waveform of the combined result. This works for simple adds. For anything more complex — crossfades, ducking music under voice — you need a DAW for that assembly step, then bring the final mix into SF Pro for cleanup and mastering.
Frequently Asked Questions
Can Sound Forge Pro edit podcasts?
Yes, for single-track podcast files — one host or a pre-mixed stereo file from a recording service. Sound Forge Pro handles the full post-production chain: noise reduction, EQ, compression, LUFS normalisation, and export to MP3. It doesn't function as a multitrack DAW, so it can't record or mix multiple speakers on separate tracks simultaneously. If guests were recorded to separate tracks, mix them to a single file first, then bring the mix into Sound Forge for final processing.
What LUFS should I target for podcasts in Sound Forge Pro?
Target -16 LUFS integrated for stereo files, -19 LUFS for mono. Apple Podcasts officially recommends -16 LUFS with a True Peak maximum of -1 dBFS. Spotify normalises to -14 LUFS — at -16 LUFS your file will be brought up slightly, which is less destructive than being pulled down. Use Sound Forge Pro's LUFS meter to check integrated loudness during playback, then use Process → Normalize and Wave Hammer True Peak limiting to hit the targets before export.
Which compression settings work best for podcasts in Sound Forge Pro?
Wave Hammer is the most direct path. Use the compressor stage with ratio 3:1 to 4:1, threshold set to catch louder passages at around -18 to -20 dBFS, attack 10–15 ms to preserve consonant transients, release 150–200 ms. Enable auto-gain compensation. The maximizer stage with True Peak set to -1 dBFS catches output peaks before export. These settings work as a starting point — adjust based on how dynamic the specific recording is.
How do I reduce background noise in a podcast recording with Sound Forge Pro?
Select a section of background-only noise (before the host starts speaking). Go to Tools → Noise Reduction → Capture Noiseprint. Then Ctrl+A to select the whole file, Tools → Noise Reduction → Reduce Noise. Start with reduction at 8–12 dB and preview before applying. The bundled RX Elements Voice De-noise plugin handles constant noise without a print sample — useful when there's no clean noise-only section. Full workflow in the noise reduction guide.
Can Sound Forge Pro export MP3 for podcast platforms?
Yes — File → Save As → MP3 Audio → Custom settings for bitrate and sample rate. Standard podcast delivery is 128 kbps mono at 44.1 kHz for speech-only shows, 192 kbps stereo for shows with music. Apply LUFS normalisation and True Peak limiting before exporting to prevent clipping during MP3 encoding. The full export workflow is covered in the MP3 export guide.
How do I use markers in Sound Forge Pro for podcast editing?
Press M during playback to drop a marker at the current position. Go to Special → Insert Marker/Region for a named marker. Access all markers in the Regions List (View → Regions List) and double-click any marker to jump directly to that position. Use markers on a first-pass listen to flag every edit point — a cough, a repeated sentence, dead air — then execute all edits in a second pass by jumping between markers. This is faster than navigating a long file by waveform alone.
Is Sound Forge Pro better than Audacity for podcasting?
For basic editing, both work. Sound Forge Pro is faster at noise reduction (real-time noise print capture vs Audacity's sample-based approach), has a noticeably better compressor and limiter in Wave Hammer, reads LUFS directly without plugins, and handles batch processing across multiple episode files. Audacity is free. If you're processing more than a few episodes per month and your noise reduction or loudness workflow feels slow, Sound Forge Pro's toolset justifies the cost at $299.95. If you're just starting out and learning the process, Audacity or Sound Forge Audio Studio (the lighter version at lower cost) is the more appropriate starting point.