How to Change Sample Rate in Sound Forge Pro
Change sample rate in Sound Forge Pro with Resample, iZotope SRC, export settings, and safe downsampling choices.

Sound Forge Pro has two ways to change a file's sample rate and they produce completely different results. Process → Resample converts the audio data so the pitch and duration stay the same — this is what you want in almost every situation. Changing the sample rate through File Properties or the status bar sets the rate without converting the data, which shifts the pitch and speed. That second method is the one that causes the "pitch went up a third" complaints on the magix.info forum.
Quick answer: Process → Resample → enter the target rate → enable anti-alias filter if downsampling → set Interpolation accuracy to 3 for music → OK. For mastering-grade conversion, use Process → Resample → iZotope 64-Bit SRC instead. The rest explains what the settings do and when each method is the right call.
Process → Resample: The Standard Method
Go to Process → Resample → Resample. The dialog has three controls that matter.
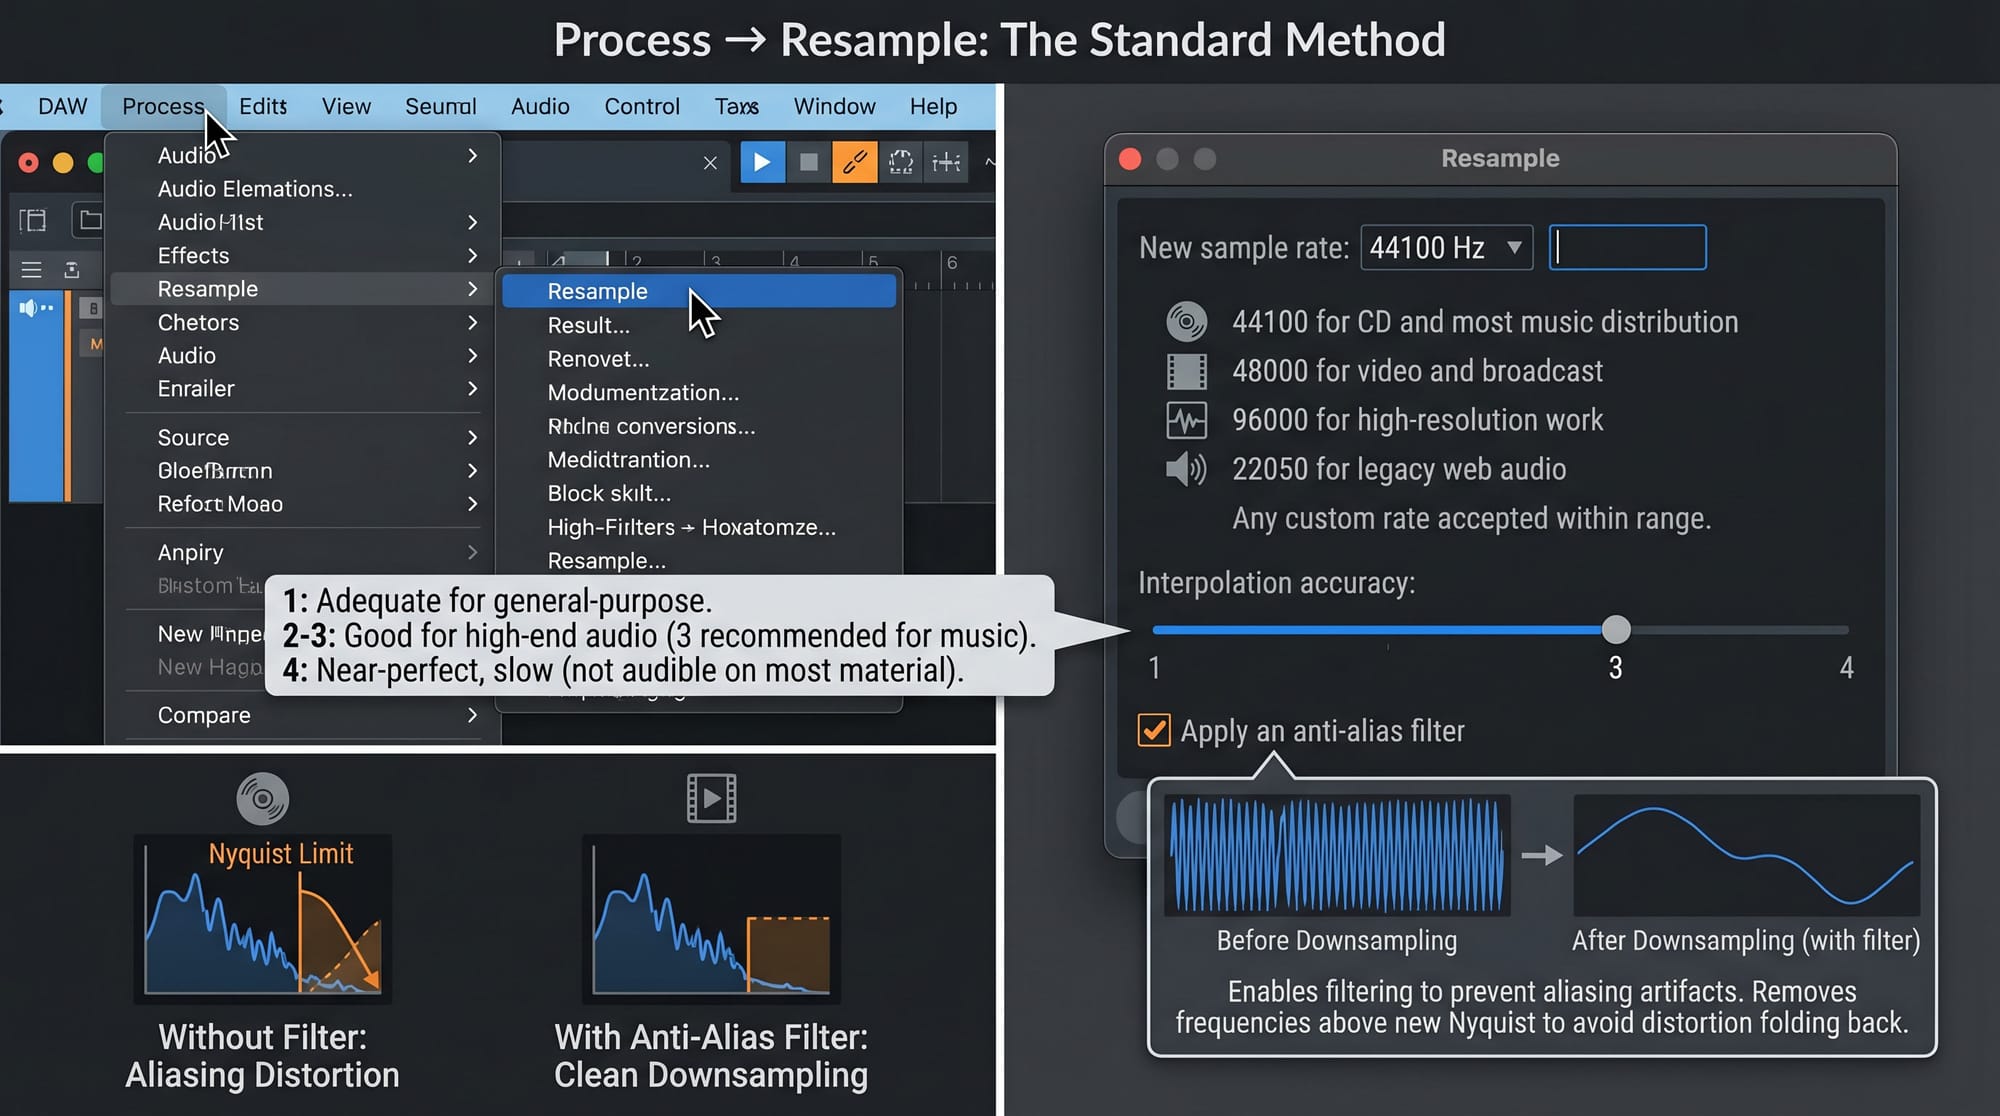
New sample rate — type the target rate directly. Common conversions: 44100 for CD and most music distribution, 48000 for video and broadcast, 96000 for high-resolution work, 22050 for legacy web audio. You can also type any custom rate — Sound Forge accepts any value within range.
Interpolation accuracy — a slider from 1 to 4. The official documentation puts it plainly: 1 is adequate for general-purpose audio, 2 and 3 are good for high-end audio, 4 produces near-perfect results but is slow. In practice, I use 3 for anything involving music and 1 for voice-only dialogue where the high-frequency content above 10 kHz is minimal anyway. Setting 4 on a 30-minute file is an exercise in patience — the quality difference over 3 is measurable but not audible on most material.
Apply an anti-alias filter checkbox — enables filtering to prevent aliasing artifacts when downsampling. When you reduce the sample rate, frequencies above the new Nyquist frequency (half the new sample rate) can't be represented and fold back as distortion. The anti-alias filter removes those frequencies before conversion. Always enable this when downsampling. It makes no difference when upsampling so you can leave it checked regardless.
Full parameter details are in the official Sound Forge Resample documentation.
The "Set the sample rate only" checkbox is the trap. This changes the metadata without converting the audio data — pitch and speed shift along with the rate. The file says it's 44100 Hz but the audio was recorded at 48000 Hz and now plays back faster and higher. Only use this if you know the file's sample rate tag is wrong and you need to correct it without touching the audio — forensic work, mislabeled recordings, that kind of situation.
iZotope 64-Bit SRC: For Mastering Work
Sound Forge Pro has a second resample engine at Process → Resample → iZotope 64-Bit SRC. It uses iZotope's sample rate conversion algorithms rather than the native Sound Forge engine.
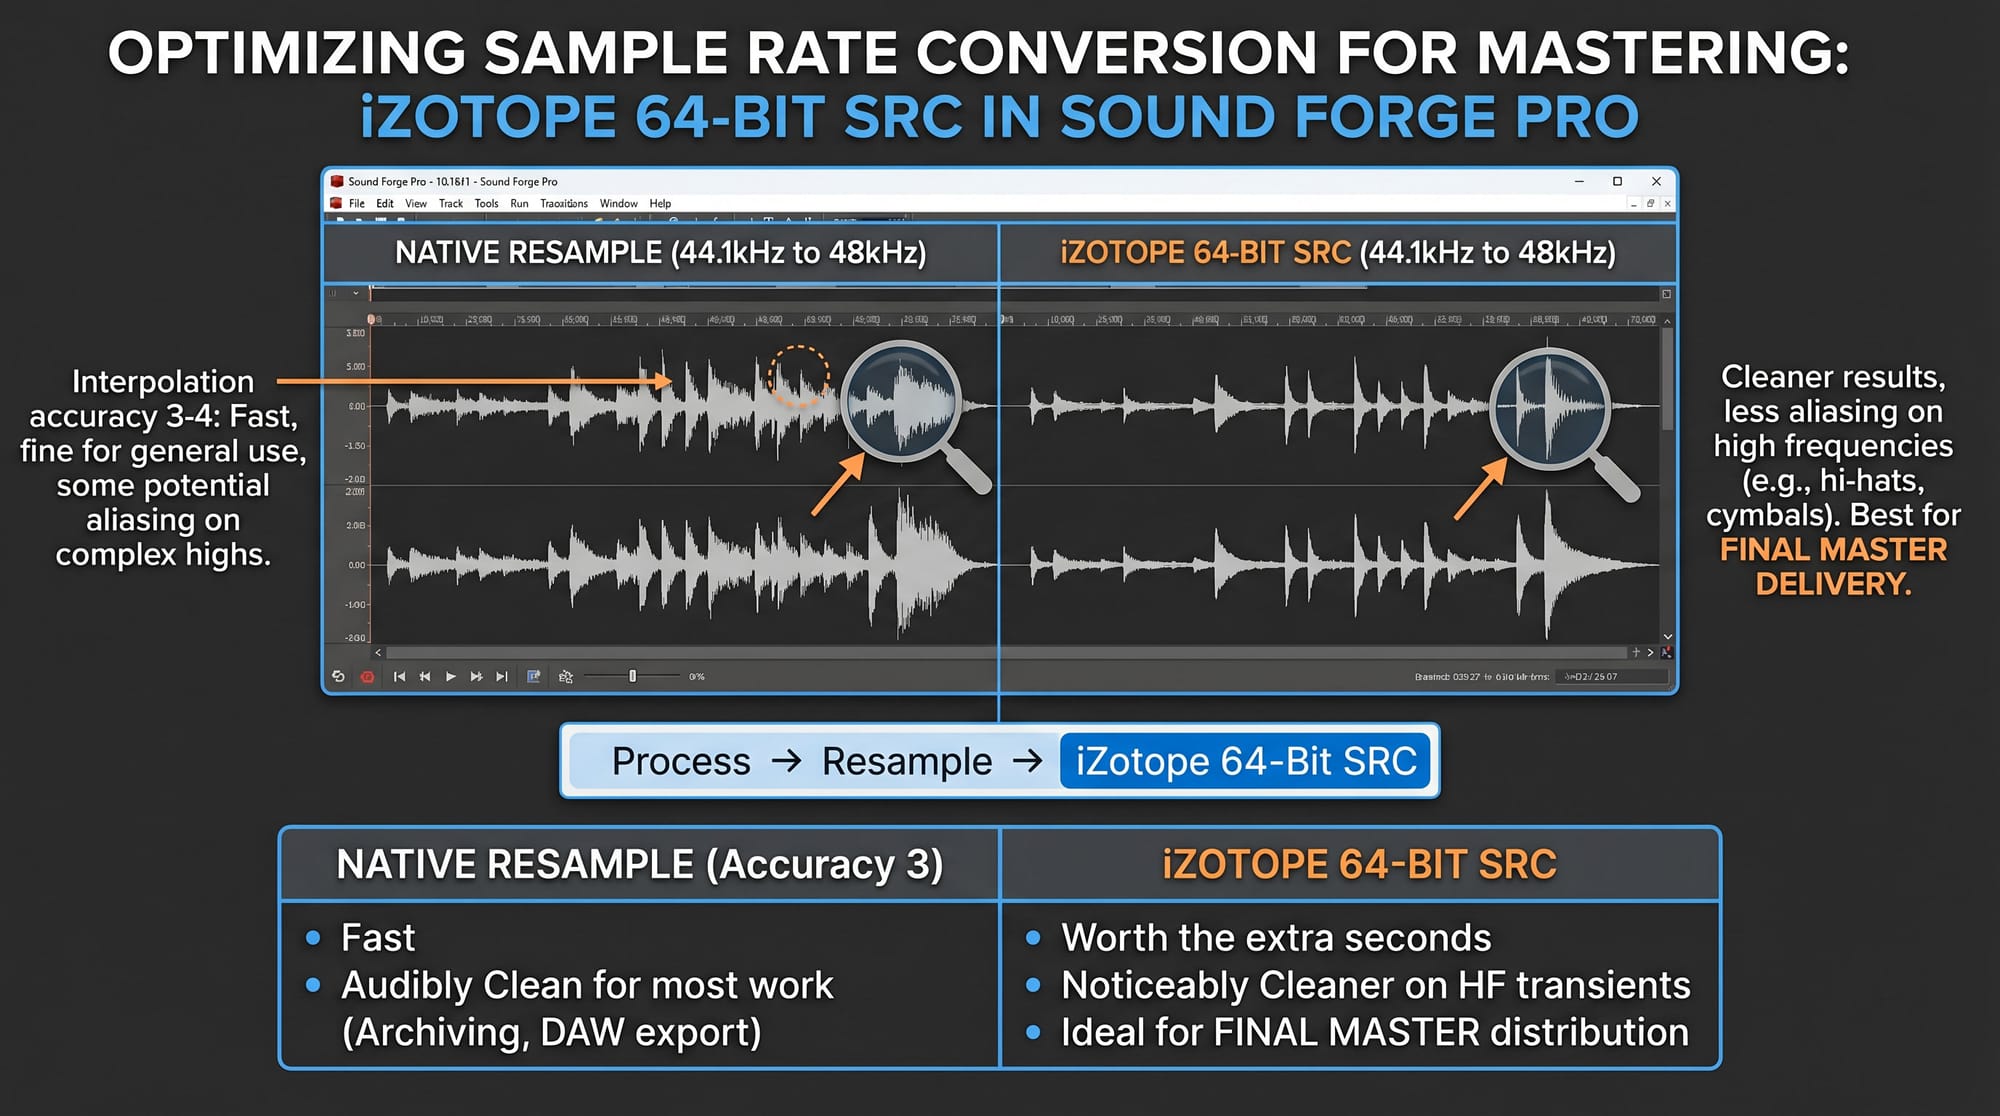
The iZotope SRC produces cleaner results specifically on the 44.1kHz ↔ 48kHz conversion, which is the most demanding common conversion because the ratio between the two rates (147:160) is not a simple integer relationship. The native Resample engine handles this fine at Interpolation accuracy 3 or 4, but iZotope's algorithm produces less aliasing at equivalent quality settings on music with strong high-frequency content — cymbals, acoustic guitar, bright vocals.
For most conversion work — archiving, format matching, exporting for a DAW project — the native Resample at accuracy 3 is fast and audibly clean. For a final master going to distribution where the 44.1 to 48 conversion is the last thing you touch before delivery, iZotope 64-Bit SRC is worth the extra few seconds. I used it on the last EP I delivered for a sync client who needed both 44.1k and 48k masters — the 48k version was noticeably cleaner on the hi-hat transients compared to the native resample at accuracy 4.
The official iZotope 64-Bit SRC documentation covers its specific parameters.
The Quick Method: Right-Click the Status Bar
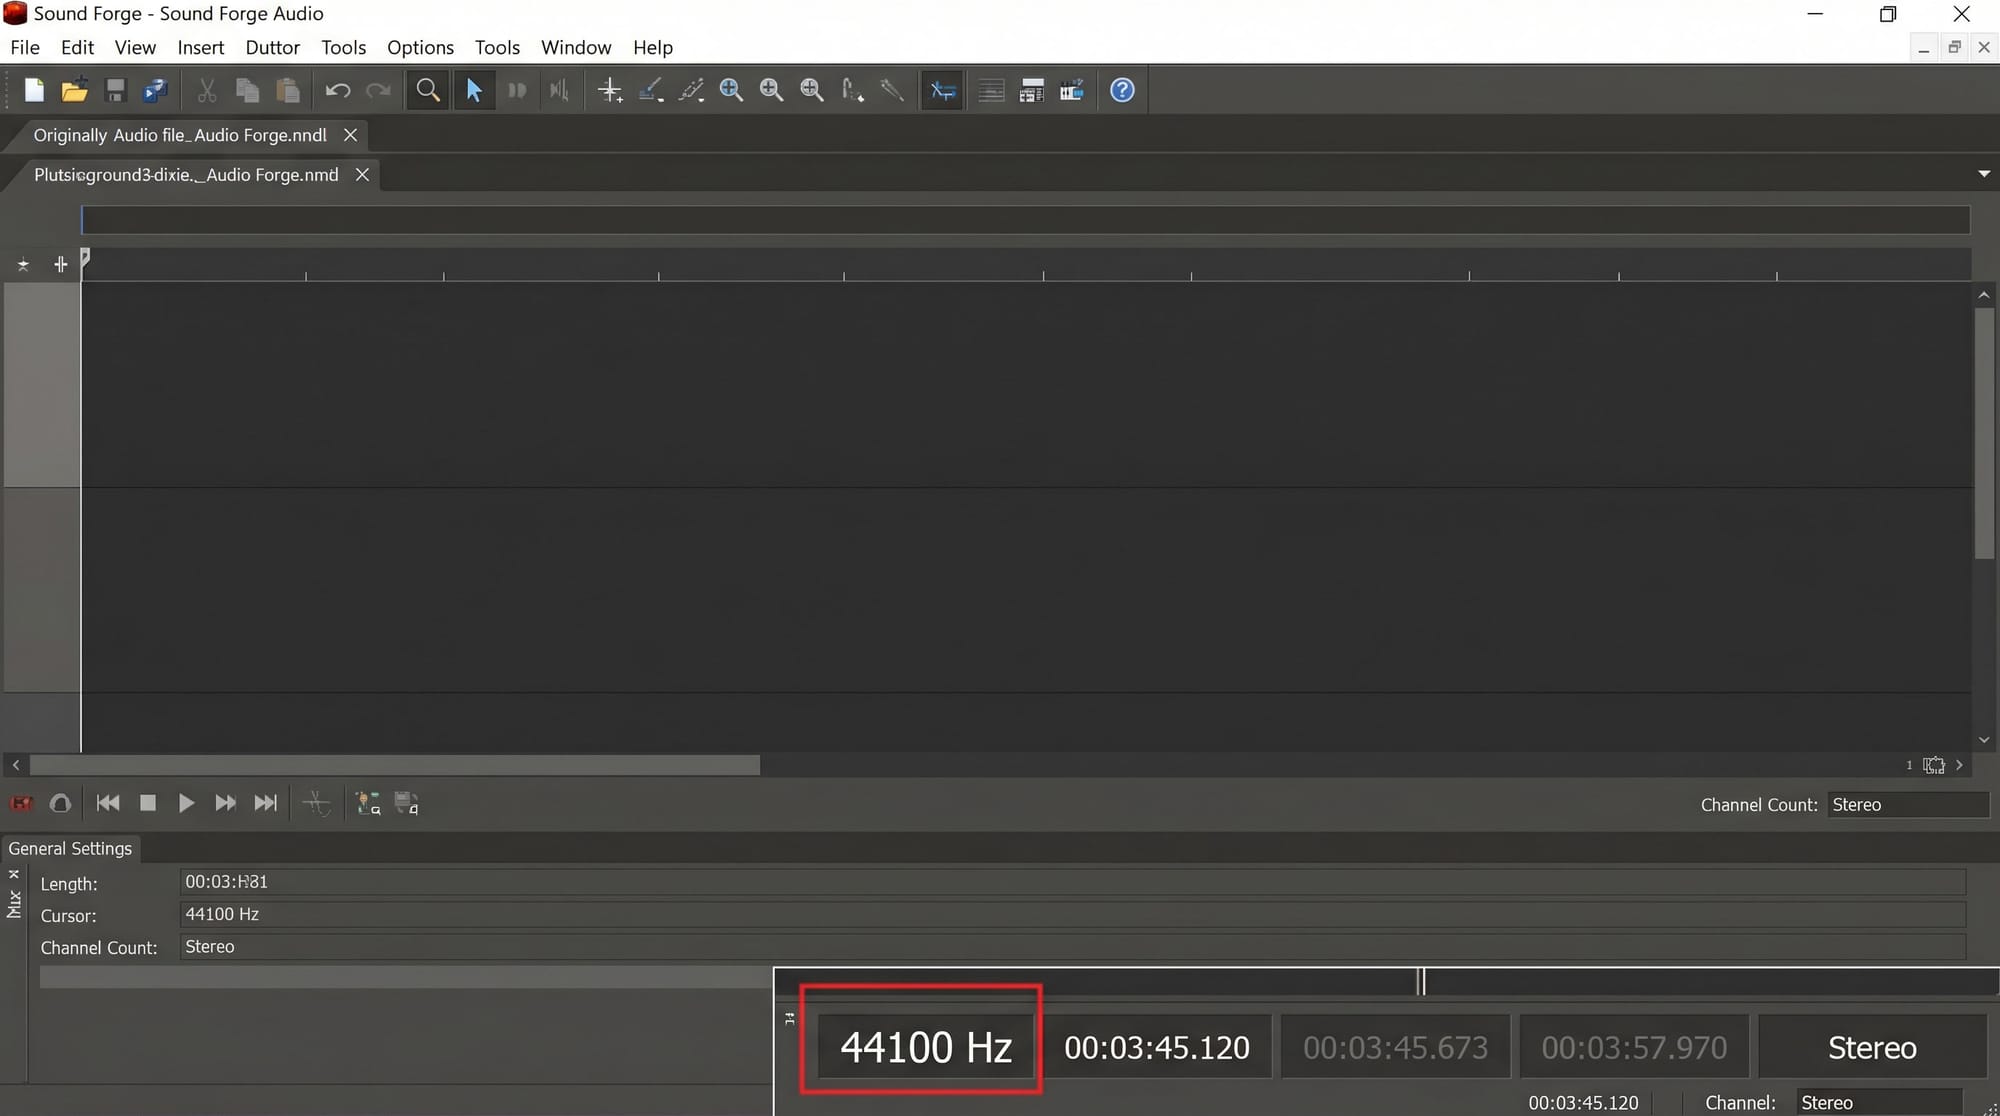
The status bar at the bottom of the Sound Forge window shows the current sample rate. Right-click it for a shortcut menu with common rates. This opens the same Resample dialog pre-populated with the selected rate — it's just a faster way to reach the same function rather than navigating the Process menu.
Useful when you're processing multiple files and want to resample each one quickly without navigating the menu every time. Click in the file, right-click the sample rate display, choose the target rate, confirm the settings in the dialog that opens.
The status bar also shows the current rate as you work. If a file opens at an unexpected rate — say, 22050 Hz when you expected 44100 — the status bar tells you immediately. I check it on every file I open from an external source because mislabeled sample rates are common enough to waste time if you don't catch them before processing.
Upsampling vs Downsampling — What Actually Changes
Upsampling (converting from a lower to a higher rate — 44100 to 96000, for example) does not recover audio information that wasn't in the original file. A 44100 Hz recording converted to 96000 Hz is still a 44100 Hz recording in terms of frequency content. What it does is create more headroom for sample-accurate processing — some algorithms produce better results internally when operating at 96k even on source material that only extends to 22 kHz. Worth doing before heavy processing, not worth doing as a last step before delivery just to make the numbers look better.
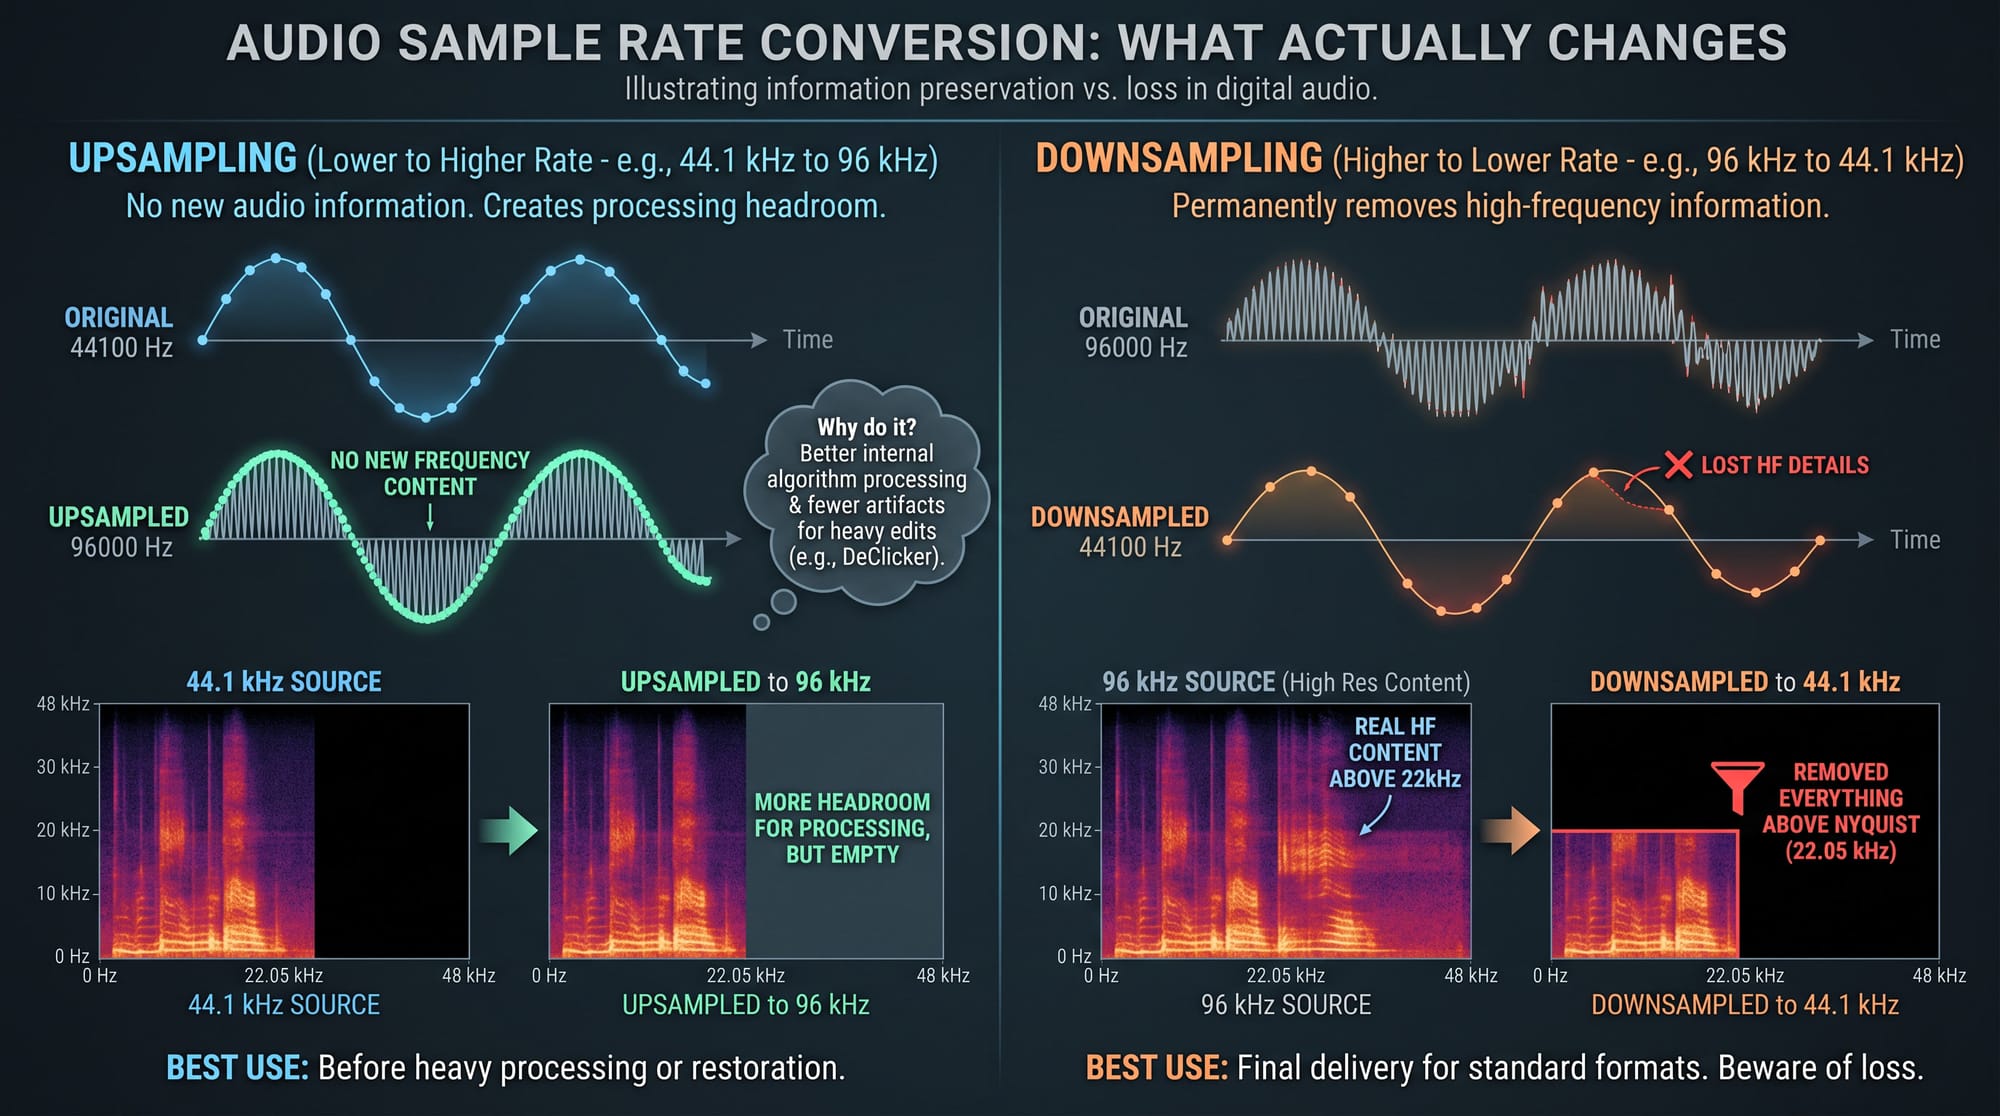
Downsampling (converting from a higher to a lower rate — 96000 to 44100, for example) actually removes information. Everything above the new Nyquist frequency is gone. On a well-recorded 96k file with real high-frequency content above 22 kHz, this matters — which is why the anti-alias filter exists. On a 48k file converted to 44100, the loss is only the content above 22050 Hz, which for most music means nothing audible.
I started upsampling source files to 96k before restoration passes after noticing the DeClicker left fewer artifacts at higher internal rates — two projects in a row where the difference was audible on piano attack transients. Part of my routine now for anything going through heavy processing before a downsample to the delivery rate.
The 44100 ↔ 48000 conversion in both directions is the one that requires care. This is the conversion that comes up constantly in practice — a track recorded in a video session at 48k that needs to be delivered at 44.1k for streaming, or a music file at 44.1k that needs to match a video project at 48k. Use anti-alias filter enabled, Interpolation accuracy 3, or iZotope 64-Bit SRC. The difference between a careful conversion and a careless one is audible on high frequencies at higher listening levels.
Changing Sample Rate at Export Without Modifying the Source
Sound Forge Pro lets you set a different sample rate at export without running Resample on the source file first. In the File → Save As dialog, click the Custom button next to the file format to access audio format settings including sample rate. The conversion happens during export and the original file stays unchanged.
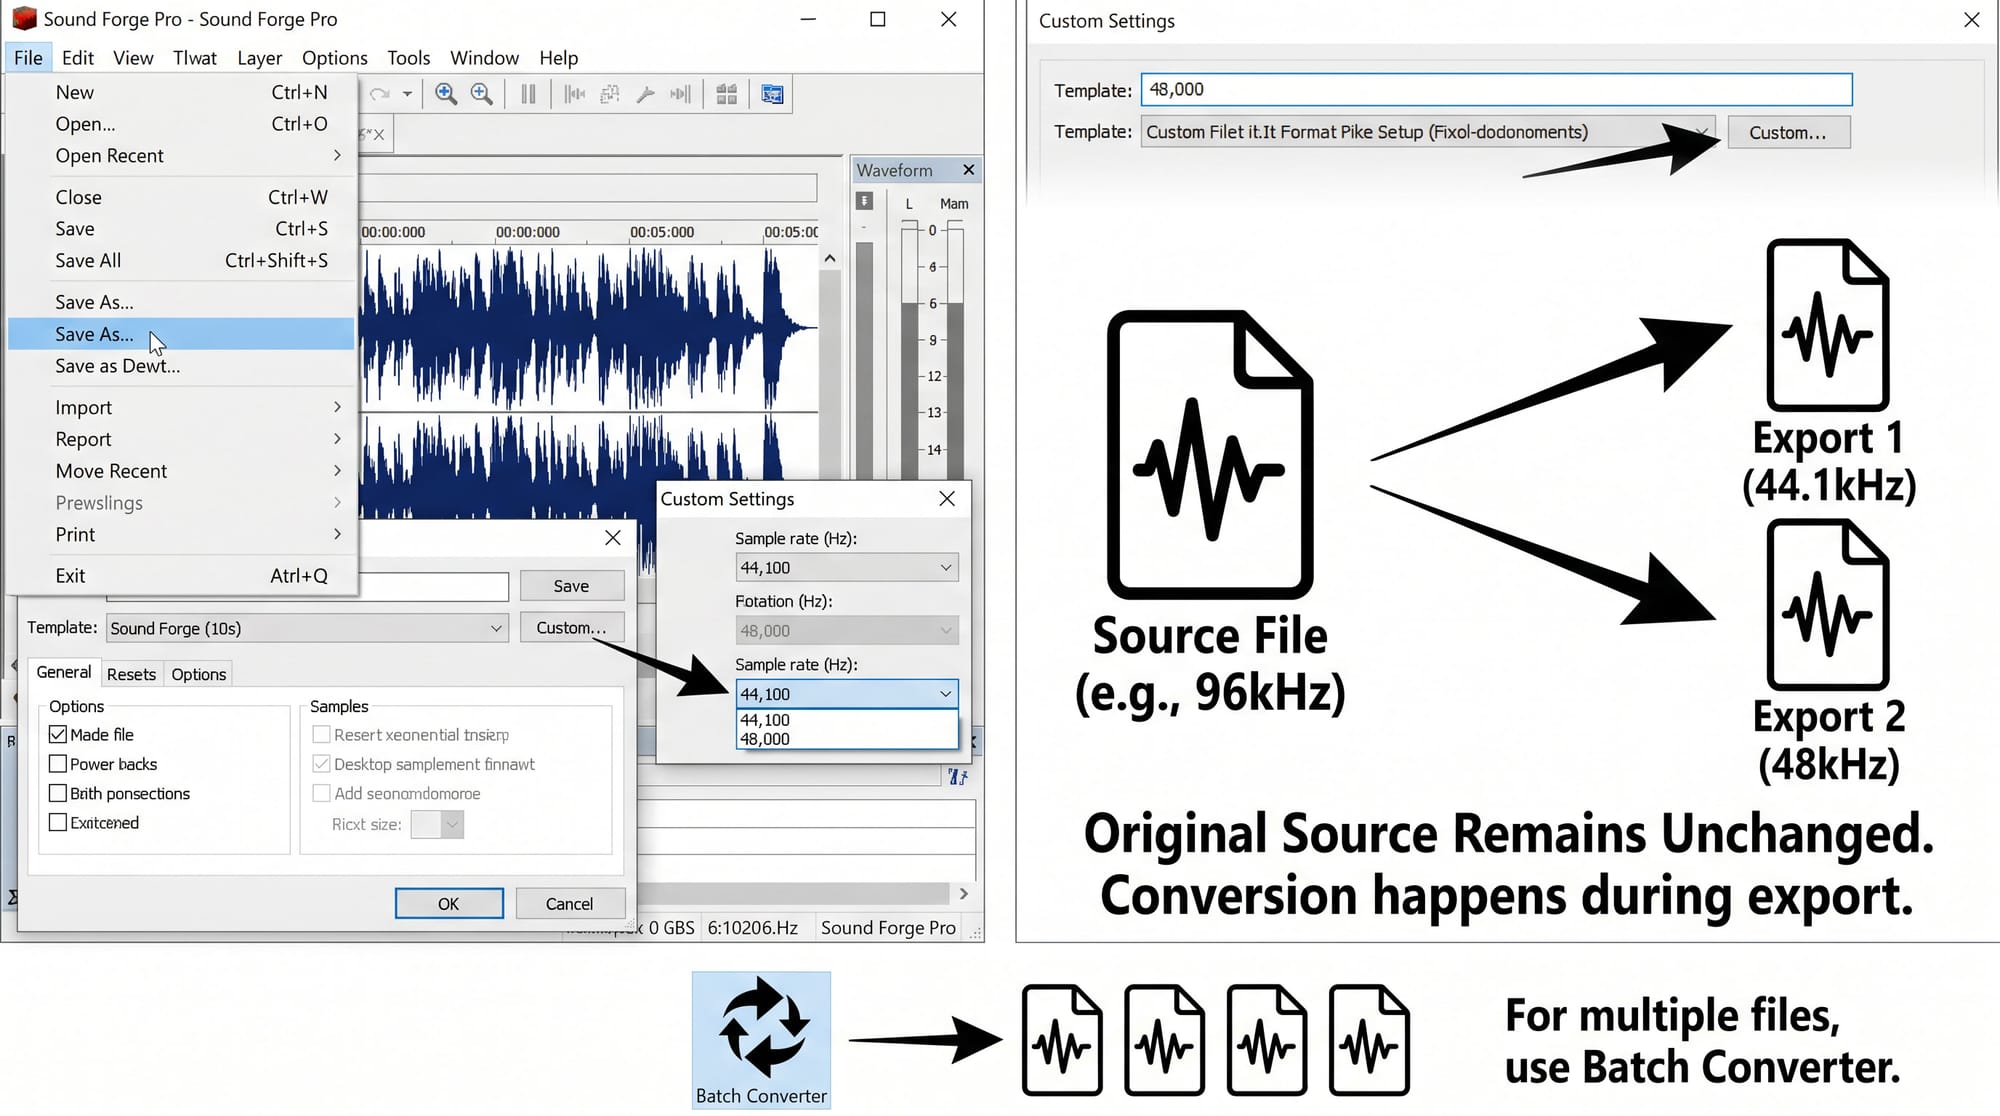
I do this for every project that needs both a streaming master (44.1k) and a broadcast or sync deliverable (48k) — one source file, two exports with different rate settings in Save As. No resampling the source, no saving an intermediate file at the wrong rate, no risk of accidentally processing the already-downsampled version.
Keep the source at its native rate — 48k, 96k, whatever it was recorded at — and set the target rate in the Save As dialog per export. The export guide covers the full Save As workflow including format-specific settings.
For converting multiple files to a target sample rate in a single pass, the Batch Converter handles this without opening each file individually. The batch processing guide covers the setup.
Frequently Asked Questions
How do I change sample rate in Sound Forge Pro without changing pitch?
Process → Resample → Resample. Enter the target rate. Make sure the "Set the sample rate only" checkbox is unchecked — that option changes the rate without converting the audio, which shifts pitch and speed. The Resample function converts the audio data so pitch and duration stay the same. This is the most common confusion with sample rate changes in Sound Forge — changing the rate in Properties or the status bar without using Resample produces the pitch shift problem.
What interpolation accuracy should I use in Sound Forge Pro Resample?
3 for music and high-quality audio work. 1 for dialogue, voice-only recordings, or situations where processing time matters more than marginal high-frequency quality. 4 is near-perfect but noticeably slow on long files — the audible difference over 3 is very small on material that doesn't have strong content above 18 kHz. The official Sound Forge documentation describes 1 as adequate for general-purpose audio and 3–4 as suitable for high-end audio work.
Should I use anti-alias filter when resampling in Sound Forge Pro?
Yes, when downsampling. The anti-alias filter removes frequencies above the new Nyquist frequency before conversion, preventing them from folding back as aliasing distortion. When upsampling, it has no effect — you can leave it enabled regardless of conversion direction. The only situation where you'd disable it when downsampling is if you specifically want a creative aliasing effect, which is unusual for standard mastering or restoration work.
What's the difference between Resample and iZotope 64-Bit SRC in Sound Forge Pro?
Both resample audio while preserving pitch. The difference is the algorithm. The native Resample engine is fast and capable — at Interpolation accuracy 3 or 4 it produces clean results for most work. iZotope 64-Bit SRC uses iZotope's conversion engine, which handles the 44.1kHz ↔ 48kHz conversion with less aliasing on complex musical material. For final masters and critical conversions, iZotope 64-Bit SRC is the better choice. For routine work, native Resample at accuracy 3 is fast and audibly clean.
Why does my audio speed up and pitch shift when I change sample rate in Sound Forge Pro?
Because the sample rate was changed without resampling the data. This happens when you change the rate through File Properties, through the status bar directly, or by checking "Set the sample rate only" in the Resample dialog. All three methods change the rate metadata without converting the audio — playback then interprets the same samples at a different rate, producing a pitch and speed shift. The fix is to undo, then use Process → Resample with the "Set the sample rate only" box unchecked.
Can I change sample rate during export in Sound Forge Pro?
Yes — File → Save As → Custom settings for the chosen format. Set the sample rate in the format options and Sound Forge applies the conversion during export. The source file stays at its original rate. This is the cleanest approach when you need multiple deliverables at different sample rates from one master — no intermediate files, no extra Resample pass. The full export workflow is in the export guide.
How do I change the default sample rate Sound Forge Pro opens with?
Sound Forge Pro defaults to 44100 Hz on startup regardless of your audio interface setting. To open a new file at a different rate, go to File → New and set the sample rate in the New Window dialog before recording or importing. For existing files, the rate is determined by the file itself, not by SF Pro preferences. If Sound Forge is forcing your interface to 44100 on startup, this is a known behavior — create a new file at your target rate (48000 for most broadcast and video work) and the interface follows the open file's rate rather than the SF Pro default.
Does upsampling improve audio quality in Sound Forge Pro?
No — upsampling doesn't recover frequency content that wasn't in the original recording. A 44.1 kHz file converted to 96 kHz still has the same frequency content. Upsampling creates more headroom for processing (some algorithms run better internally at higher rates) and can be useful before heavy EQ or restoration work, but it doesn't improve the finished audio on its own. Upsampling a finished mix purely to change the rate number before delivery adds processing for no audible benefit. Details on where sample rate fits in a full mastering session are in the mastering guide.