

Quick answer: save a working copy, place a marker at each wanted track start plus one at the final end, then choose Edit > Regions List > Markers to Regions. Check and name the regions before using Tools > Extract Regions. Reopen the output files to check their boundaries, order and audio format. Keep the continuous original untouched.
This workflow follows the Sound Forge Pro 2026 help. It is for turning concerts, LP sides, cassette transfers, DJ sets and interviews into separate files, not separating instruments from a mix. The Core Editing guides cover recording and basic edits before this stage.
Choose the splitting method before editing
- Concert, album or DJ set: use manual boundaries so applause, quiet music and crossfades remain where you want them.
- Interview or lecture: mark chapter changes, not every pause. A hesitation is not necessarily a new chapter.
- Repeated isolated sounds: Auto Region can propose regions from attacks or tempo. Inspect them before extraction.
- Clips whose intervening silence must be deleted: Auto Trim/Crop has a destructive phrase mode. Use a separate working copy.
- Fixed-length chunks: place boundaries at the required times, then check whether exact duration or an intact word or musical phrase takes priority.
There is no universal silence threshold for track detection. Vinyl noise, audience ambience and quiet passages can defeat a rule that works on another recording.
The seven-step long-recording workflow
- Protect the source. Save a separate working master and retain its marker metadata.
- Place all boundaries. For three contiguous tracks, use four distinct markers, including the first start and final end.
- Review each split. Listen before and after it, preserving attacks, breaths and tails.
- Convert markers to regions. Remove unwanted note markers from the working copy first.
- Name and check regions. Confirm count, order, start and end positions.
- Extract into a new folder. Select only the approved regions and review filename settings.
- Reopen the results. Check joins and file properties before converting or delivering them.
Save audio and boundaries safely
Keep an untouched original outside the output folder. Save a working copy under a different name in a suitable lossless format, preserving the source sample rate, channel count and precision unless a deliberate conversion is needed. Saving a lossy source as WAV does not recover information it has already lost.
In File > Save As, select Save metadata with file to retain markers and regions. The help says unsupported metadata can be saved to an external .sfl file. Keep that sidecar with the audio and reopen the working file to confirm its boundaries survived.
For an additional boundary backup, choose Edit > Regions List > Save As. The regions-list saving instructions offer a Playlist File (.sfl) or tab-delimited text. A list is not an audio backup.
If you use a .frg project, retain both the project file and its matching _frg folder. The project documentation warns that deleting that folder breaks the project. A project is not a playable delivery file.
Keep a cue sheet with titles, intended order and expected count. Finish any necessary whole-recording speed or timing correction before approving boundary positions. Do not apply cleanup merely because you are splitting the file. If outer material needs removal, follow the cut and trim workflow on the copy.
1. Place the complete marker set
Position the cursor and choose Insert > Marker, or press M during playback. The marker help documents both methods. A playback keypress gives you a rough location; zoom in and refine it afterward. To name a marker, right-click its tag and choose Rename.
Include a marker at the first wanted start, one at every internal track boundary, and a final marker after the last wanted tail. The Markers to Regions command creates intervals between consecutive markers: N markers produce N minus one regions. Three contiguous tracks therefore need four distinct boundary markers.
Every existing marker participates. An old note such as “repair click here” can become an unwanted split. Save the original list, then remove irrelevant note markers from the working copy before conversion. Material before the first marker or after the last one is outside those intervals.
2. Refine boundaries without damaging continuity
Listen several seconds before and after each boundary. A first consonant, breath, pick noise or count-in can precede the tallest waveform peak. Leave the entrance intact, and decide whether applause or room tone belongs at the end of the previous track or the start of the next.
For a continuous concert or crossfaded album, keep adjacent regions contiguous: the previous end and next start should represent the same boundary. Do not add fades or silence to every split by default. A split alone need not change the original sequence; independent edge fades would change it.
For files intended to start and stop independently, audition those edges separately. An abrupt transition to or from silence can click. A nearby zero crossing or short fade may help, but stereo channels need not cross zero together. Preserve timing in both channels. Use the fade-in and fade-out guide when an actual edge treatment is needed, keeping the unaltered continuous master for gapless use.
Test consecutive exported files in the intended player or delivery system. Player-added gaps or crossfades can change what you hear even when the source boundaries are correct. Do not promise gapless playback from region placement alone.
3. Convert, name and inspect regions
Choose Edit > Regions List > Markers to Regions. Open View > Metadata > Regions List to inspect the result. The Regions List reference documents editable Name, Start, End and Length cells, column sorting and a play button beside each region.
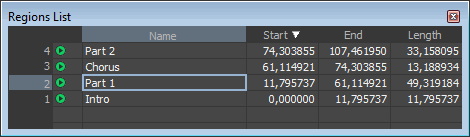
Name regions with unique ordered labels such as 01 Opening, 02 Main Set and 03 Encore. Use enough zero padding for the complete set: three digits for a project with 100 to 999 tracks. Sorting the list by name is not a substitute for checking the actual time order.
Right-click a starting or ending region tag and choose Select Region to inspect that span. The region instructions also explain that dragging one region tag changes that region's size. After conversion, do not assume moving one edge moves its neighbour: check both the preceding End and following Start. For contiguous delivery, remove unintended gaps and overlaps.
If you need only a few non-contiguous excerpts, select each wanted span and use Insert > Region instead. This avoids turning unwanted intervals into tracks. The markers and regions reference covers insertion shortcuts and region movement in more detail.
4. Extract into a clean output folder
Open Tools > Extract Regions. The current extraction instructions list these controls:
- Regions to extract: select the approved regions. Ctrl or Shift selects several.
- Destination folder: use a new folder for this revision, separate from the original and earlier exports. Check existing names before allowing any replacement.
- File name prefix: review the actual contents. Clear an unwanted prefix rather than assuming it is empty.
- Use long file names for destination file names: the documented filename combines the prefix and region name, up to 128 characters including spaces.
- Start file counter index: this belongs to legacy 8.3 naming when long filenames are disabled. It is not the track-number control for long names.
Click Extract, then check the resulting count and names. The help gives WAV output examples and does not document a codec, sample-rate or bit-depth selector in this dialog. Do not treat extraction as a promise that every delivery setting is correct.
Reopen one representative output and inspect its actual codec, sample rate, bit depth and channel count before completing delivery. If FLAC, MP3 or another format is required, use File > Save As on the extracted audio files, choosing the file type and Template or Custom settings, or follow the audio conversion workflow for a batch. Keep the extracted masters and write converted copies elsewhere.
A region label used in a filename is not proof of embedded artist, title or track-number tags. Inspect the delivered metadata in the receiving software. Historical community questions about named and tagged exports illustrate this distinction; their old script suggestions are not a tested 2026 workflow.
Auto Region is different from silence removal
Tools > Auto Region creates regions based on fast attacks or the current tempo. Its documented controls include Attack sensitivity, Release sensitivity, Minimum level and Minimum beat duration. They do not identify song titles or musical intent.
Use release point for end of region can end a region when the sound level drops. That can exclude silence from exported regions without using a command that deletes the underlying audio. It can also omit quiet material you wanted. Review every proposed region, especially for continuous music.
Process > Auto Trim/Crop > Remove silence between phrases (creates regions) does delete detected silence inside the selection. The Auto Trim/Crop help distinguishes this destructive mode from region detection. Attack and Release thresholds are levels, not fade durations; Minimum inter-phrase silence controls the qualifying gap, not how much pause is retained.
Use that mode only when shortening the gaps is intended. Save a pre-process copy, confirm the selected span, and inspect the result. If it cuts wanted material, undo back to that saved state or reopen the pre-process copy before changing settings. Do not process the already-shortened result again while trying to recover deleted sound. The Auto Trim/Crop guide covers its other modes.
Check the delivered sequence
Reopen every exported file. Listen to its first and last sections, extending the audition beyond any long reverb or applause tail. Check full files when the recording requires it; an arbitrary ten-second sample cannot certify the rest.
- Count and order: match the cue sheet and check for missing, duplicate or empty files.
- Edges: preserve the first attack and final tail; audition adjacent files in sequence.
- Duration: for unchanged, contiguous regions, compare summed durations with the intended span, allowing for displayed rounding. If gaps were intentionally excluded or audio was processed, use that edited span instead.
- Format and tags: verify codec, sample rate, precision, channels and required metadata in the actual outputs.
- Levels: check unexpected clipping or gain changes. Do not normalize every song independently unless changing album relationships is intentional.
Use the loudness-meter workflow for deliberate level decisions. Keep the continuous master, boundary backup and approved extraction folder until delivery has been accepted.
Split a long recording FAQ
Why is the last track missing?
Markers to Regions creates intervals between consecutive markers. Add a final closing marker or create the missing final region, then check its end before extracting. Also confirm that the region was selected in the extraction dialog.
Can Sound Forge split songs automatically by silence?
Auto Region can propose regions from level changes, but it does not understand song boundaries. Auto Trim/Crop's phrase mode deletes detected silence. Use manual boundaries for concerts, crossfades or quiet music whose continuity must remain intact.
Do I need fades at every track boundary?
No. Keep contiguous boundaries unchanged for a continuous sequence. Treat a standalone start or stop only when it needs an edge repair, and keep an unfaded master for gapless delivery.
Does Extract Regions change the original?
The command creates new files from regions. Protect the original with a separate working copy and output folder: earlier processing, saving over the source, or replacing an existing output can still lose wanted material.
Can I choose MP3 or FLAC in Extract Regions?
The current help documents WAV examples and region, folder and naming controls, not an output-codec selector. Convert approved extracted files with Save As or Batch Converter, then verify the format and metadata.
Why do the filenames sort in the wrong order?
Put zero-padded numbers in the region names before extraction and check the filename prefix. The legacy Start file counter index is not a numbering control for long filenames.
Documentation checked September 15, 2026. This is a documentation-led workflow, not a report of a Windows application or acoustic test.