
Quick answer: press M to place a marker at the cursor or during playback. Select a passage and press R to store it as a region, or Ctrl+Alt+R with the Event tool selected. Right-click the tag and choose Rename. To recall the complete region, right-click either boundary and choose Select Region. Save the metadata before closing the file.
These instructions follow the Sound Forge 2026 documentation. A marker stores one position; a region stores a start and an end. Neither insertion cuts the audio. This guide covers those objects, their saved metadata, and the choice between separate extracted files and one playlist sequence. For recording, trimming, and other editing tasks, use the Core Editing guides.
Marker, selection, or region?
| Object | What it stores | Use it for | Common mistake |
|---|---|---|---|
| Marker | One time position | A note, navigation point, or future boundary | Expecting a point to contain an audio span |
| Selection | The currently selected range | Auditioning or processing audio now | Clearing it before creating a reusable region |
| Region | Named start and end positions | Recalling, auditioning, or extracting a passage | Assuming it is already a separate audio file |
Use a marker for a note such as Check chair squeak. Use a region for the complete passage that needs repair or delivery. Creating a region does not apply an effect, start loop playback, or create a sampler loop automatically.
Insert, rename, and recall a passage
- Keep a working copy. Preserve the original audio before editing or replacing metadata.
- Place a marker. Position the cursor and choose Insert > Marker, or press M. You can also press M during playback.
- Name the point. Right-click its tag, choose Rename, type a useful label, and press Enter.
- Create a region. Select the complete passage and choose Insert > Region. The shortcut is R, or Ctrl+Alt+R when the Event tool is selected.
- Name and recall the region. Rename its starting tag. Clear the selection, then right-click either region boundary and choose Select Region.
- Check both edges. Audition the entrance and ending in context. Adjust the boundaries if they cut a wanted sound.
- Save and reopen. Preserve the metadata when saving, keep any required sidecar or project folder, and reopen the working file to check the named range.
The current marker instructions describe insertion followed by renaming; M is not a promise of a naming dialog. A point dropped while listening needs review. Stop, zoom in, and audition it rather than assuming the keypress landed at the intended sample.
Double-click targets differ. Double-click immediately to the right of a region tag to edit its name. Double-click the start or end region marker itself to select its audio range. If you keep opening the name field when you want the audio, use the explicit right-click Select Region command.
Use the Regions List for exact positions
Open View > Metadata > Regions List. The list contains the markers and regions in the active data window. The Regions List reference documents these controls:
- Click the leftmost numbered column to move the cursor to a marker or select a region.
- Click the Play button beside a region to audition it.
- Type new values in Name, Start, End, or Length to edit a region.
- Click a column heading to sort the displayed list. Sorting rows is not an audio rearrangement.
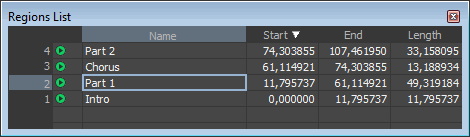
Give regions names that remain useful outside the editor: 01 Opening, 02 Interview, or Door_close_take03. Before entering times from a cue sheet, check the displayed time format so a sample count is not mistaken for seconds.
Move a region without resizing it
With length locking off, dragging one region tag changes that boundary and the duration. Hold Alt while dragging either tag to move the whole range at the same length. Hold Shift during the drag to override snapping.
There is also a persistent Options > Lock Loop/Region Length setting. The length-lock documentation says it keeps the length constant when changing a start or end time. If both boundaries move when you expected to resize one edge, check that setting. After a move, recall the region and listen again; an unchanged duration does not guarantee a useful new position.
Save markers and regions without losing them
In File > Save As, select Save metadata with file. For a Sound Forge project, use File > Render As to produce a media file. The Save As/Render As reference includes markers, regions, and playlists among the metadata preserved by this checkbox. Clearing it tells the save operation to ignore that data.
The manual lists internal metadata support for MP3, PCA, SFA, WAV, WAV64, and Windows Media formats. That does not mean another player will expose Sound Forge regions as chapters. When the chosen format cannot store all the metadata, Sound Forge prompts for an external .sfl file with the media file's base name. Keep that sidecar with the audio and verify the pair after moving it.
Save a separate list or text record
Choose Edit > Regions List > Save As, then select Playlist File (.sfl) to save the regions/playlist data separately. The same Save As command is available under Playlist/Cutlist. For a human-readable cue record, choose Text File (Tab delimited) (.txt); the list-saving instructions explicitly support markers and regions in that format. These lists are not substitutes for the audio master.
Save the current list before importing another one. Choose Edit > Regions List > Open to load a saved list into the current sound file. The import warning is explicit: opening a new regions/playlist file clears the current regions and playlist entries. It is not an append operation. Use the matching audio revision, then verify names and positions.
Keep an FRG project and its folder together
For an editable project, choose File > Save As > Sound Forge Pro Project File (*.frg). Sound Forge creates the FRG file and a companion [filename]_frg folder holding media and temporary editing files. The project documentation warns that deleting the folder breaks the project. Preserve both when archiving; an FRG is not a playable audio export.
If metadata disappears, first reopen the saved file in Sound Forge and distinguish missing data from a different application's inability to display it. Check the save checkbox, output format, and any SFL sidecar. A 2021 MAGIX forum report about lost track metadata shows why the checkbox is a useful first check, not proof of every cause: the reporter said it was already enabled. Do not reset or reinstall the application before protecting the current audio and list.
Convert boundary markers into regions
For consecutive deliverables, place a marker at the first start, every shared boundary, and the final end. Choose Edit > Regions List > Markers to Regions. The conversion reference says it uses all existing markers and creates a region between each consecutive pair. Four distinct boundary markers therefore create three intervals.
Save a separate list before removing note markers such as Check noise. A naming prefix does not exclude them from conversion. Review the resulting count and boundaries before extraction. Without a final closing marker, this conversion does not create the final wanted interval; select that passage and create a region manually rather than blindly converting the entire list again.
The long-recording split workflow covers track-specific decisions such as applause and continuous recordings. Here, keep the distinction simple: markers define points; the regions define the spans you can deliver.
Extract regions as separate audio files
Choose Tools > Extract Regions. In Regions to extract, select the wanted rows; Ctrl or Shift selects multiple regions. Choose a clean Destination folder and, if needed, a File name prefix.
The Extract Regions help distinguishes two naming modes:
- Use long file names for destination file names combines the prefix and region name. Number the region names themselves, for example 01 Opening and 02 Interview, when alphabetical ordering matters.
- With that checkbox cleared, names use the legacy 8.3 convention: the first five prefix characters plus a three-digit number beginning at Start file counter index. That counter is not a separate numbering control for long region names.
Click Extract, then reopen the outputs. Check the count, names, sample rate, bit depth, channel count, and both edges. Do not assume this dialog offers the same format/template controls as Save As. If the verified extracted masters need a delivery conversion, use the Batch Converter workflow on copies.
Use a playlist for one rearranged sequence
Separate extraction and playlist assembly solve different tasks. To make one sequence, open View > Metadata > Playlist. Select a region in the Regions List and choose Edit > Playlist/Cutlist > Add, or drag it into the playlist window. The playlist instructions describe arranging regions without altering the source file. Removing an entry from that window does not delete its source region or waveform.
Audition the sequence using the Playlist/Cutlist window's Play button. Then choose Edit > Playlist/Cutlist > Convert to New. The Convert to New reference says the new sound file follows the sequence heard in that window. It processes audio only and ignores any video stream. Save the resulting audio separately; saving an SFL list alone does not deliver that audio sequence.
Automatic regions are not automatic approval
Tools > Auto Region can create regions from fast attacks or musical intervals based on the current tempo. The Auto Region reference describes sensitivity, minimum level, minimum beat duration, and optional release-point boundaries. Review the results against the actual sounds; detection does not know which takes you intend to keep.
That differs from Process > Auto Trim/Crop. Its Remove silence between phrases (creates regions) mode deletes detected silence inside the selection while creating regions, according to the Auto Trim/Crop manual. Use a working copy and only choose that mode when removing gaps is intended. The Auto Trim/Crop guide covers those destructive modes separately.
Check boundaries before delivery
Listen across each proposed start and end from outside the selected range. Preserve wanted consonants, transients, breaths, and decays. A small waveform is not necessarily inaudible. If an exported edge clicks, inspect the transition and adjust it or apply an appropriate short fade on a copy; the fade-in and fade-out guide covers that editing step.
For a continuous sequence, audition adjacent outputs together as well as individually. Keep the original master, saved marker/region list, and delivery files distinct. Do not discard the working metadata simply because the extraction command completed.
Sound Forge markers and regions FAQ
Why does R not insert a region with the Event tool?
Use Ctrl+Alt+R when the Event tool is selected, or choose Insert > Region after making the intended time selection.
Why does double-clicking rename instead of select?
Double-clicking to the right of a region tag edits its name. Double-clicking the start or end region marker selects the region. Right-click either boundary and choose Select Region if the click target is unclear.
Can I import a saved list without replacing the current regions?
The Regions List Open command clears the current regions and playlist entries when it loads another list. Save the existing list first; do not treat Open as an append command.
Does saving MP3 always remove markers?
No. The current Sound Forge manual lists MP3 among formats that support internal metadata. Select Save metadata with file and verify by reopening. A different player's inability to display those markers is a separate compatibility issue.
Why is the last track missing after Markers to Regions?
The command creates intervals between consecutive markers. Add a closing boundary at the end of the wanted audio, or select the final passage and create its region manually.
Should I use Extract Regions or Convert to New?
Use Tools > Extract Regions for separate files from selected regions. Use Edit > Playlist/Cutlist > Convert to New for one new audio file following the sequence heard in the Playlist/Cutlist window.
Documentation checked September 15, 2026. Menu and format claims use the current Boris FX help; the historical forum is a troubleshooting signal, not a reproduced Windows test.