How to Use the Noise Gate in Sound Forge Pro

A noise gate in Sound Forge Pro silences audio that falls below a threshold you set. When the signal is loud enough — a voice, an instrument, a transient — the gate opens and lets it through. When the signal drops below the threshold — silence between sentences, the noise floor between notes — the gate closes and attenuates or mutes it. The result is a recording where the quiet sections are actually quiet instead of quietly noisy.
Quick answer: Effects → Noise Gate (legacy DirectX plugin) or Effects → coreFX → Gate (newer version). Set Threshold just above the noise floor, Attack at 2–5 ms, Release at 100–200 ms. Preview, adjust for chattering, apply. The rest explains what each control does and when to use a gate versus the noise reduction tools that do something different.
Two Gate Plugins in Sound Forge Pro
Sound Forge Pro has two gate implementations and the difference matters for how you access and configure them.
Noise Gate (Effects → Noise Gate) — the legacy DirectX plugin that's been in Sound Forge since the Sony era. Opens a dedicated window with Threshold, Attack, Release, and Floor controls. Direct access, no submenu. Works in all current versions of Sound Forge Pro including the Boris FX release.
coreFX Gate (Effects → coreFX → Gate) — part of the coreFX Suite bundle included with Sound Forge Pro. More modern interface, same core controls. The coreFX Gate adds a waveform display that shows the dry and processed signal in real time, which makes setting the threshold visually easier — you can see exactly where the gate is cutting. Both plugins apply destructively when run from the Effects menu directly, or non-destructively when loaded in the Plug-In Chainer.
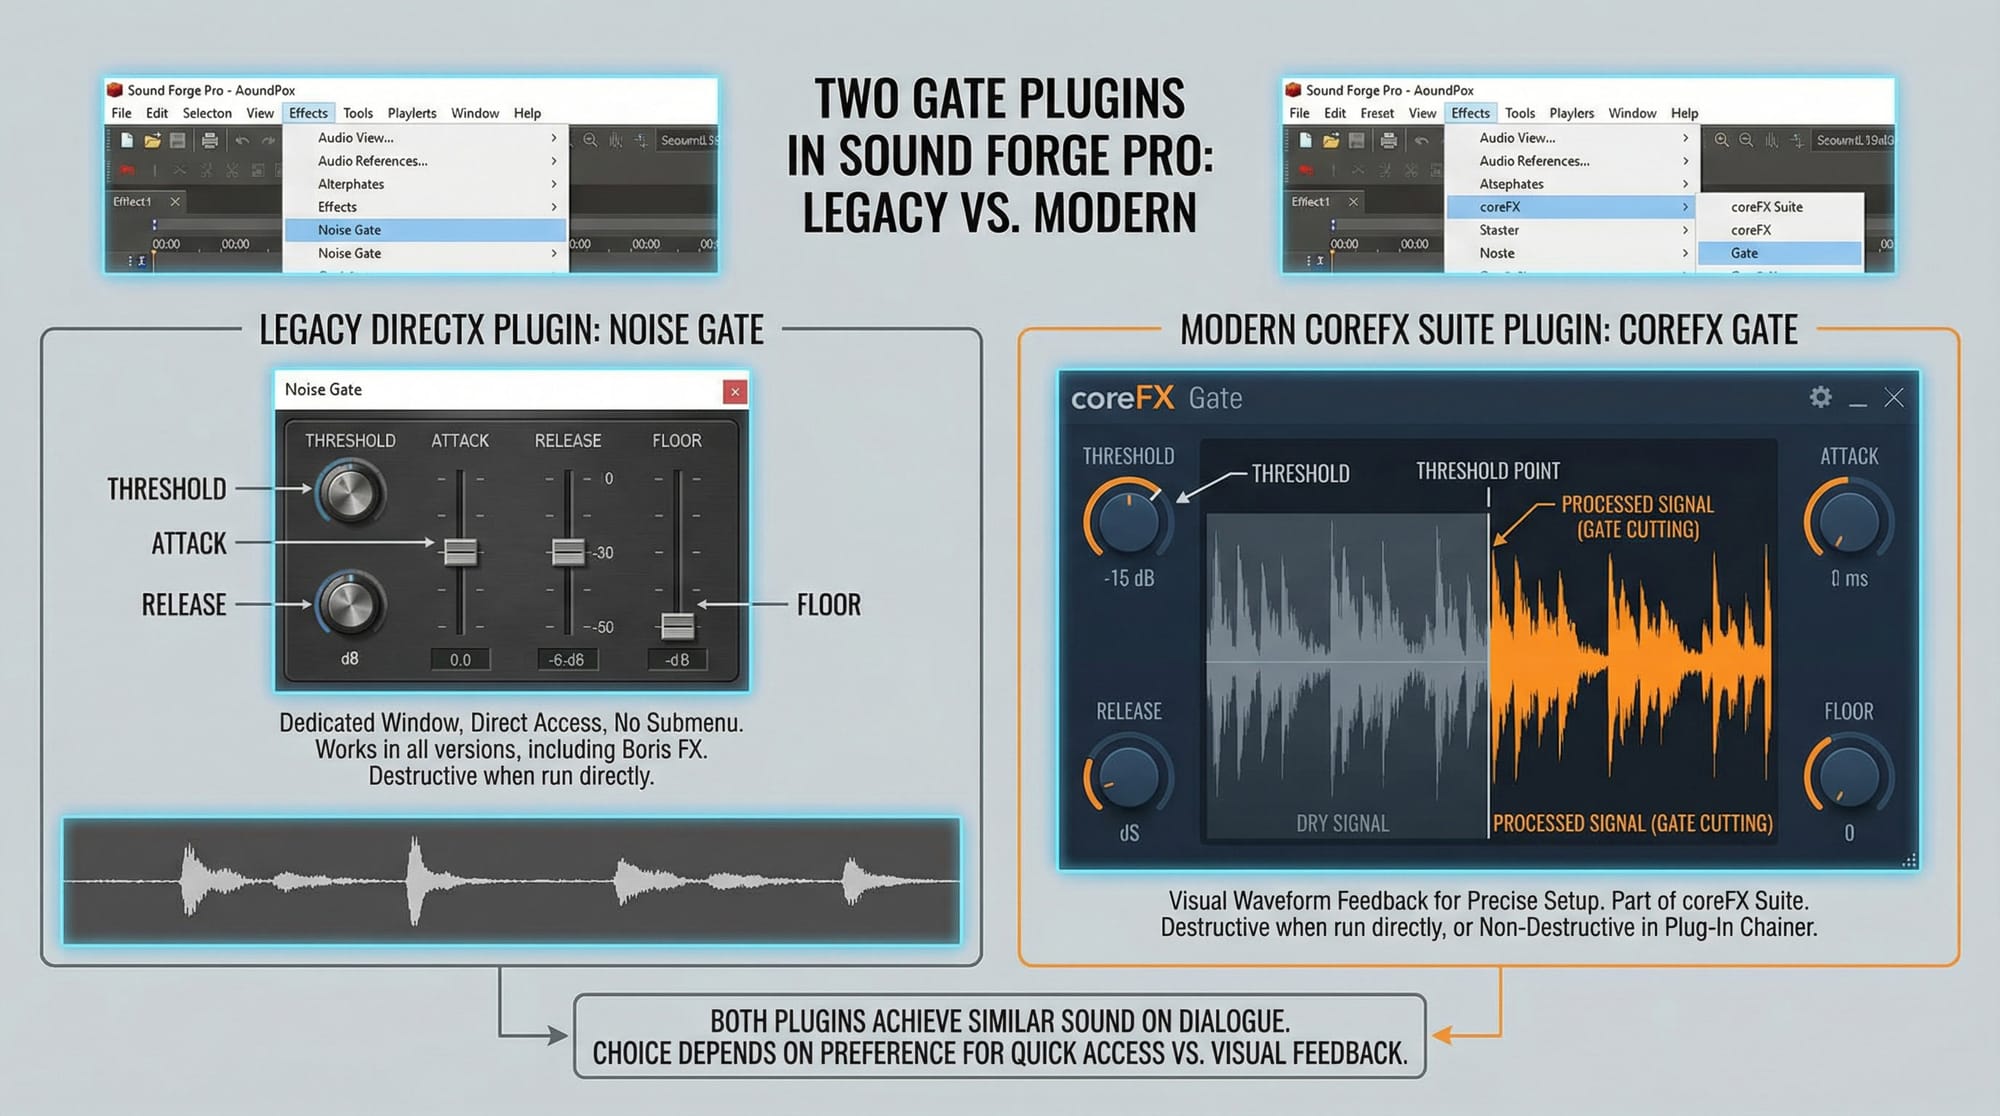
For most everyday work, both get to the same result. I default to the coreFX Gate when I want the visual waveform feedback during setup, and the legacy Noise Gate when I need to load the window quickly without navigating the submenu. Neither sounds dramatically different from the other on dialogue or voice recordings.
Threshold, Attack, Release, Floor
Threshold — the level in dB below which the gate closes. Any signal quieter than the threshold gets attenuated. Any signal louder than the threshold passes through. Setting this correctly is the whole job — everything else is refinement.
Set threshold just above the noise floor, not in the middle of the program material. Use the Statistics tool (Tools → Statistics) or watch the channel meters while previewing to find the peak level of the noise you want to suppress. If the ambient noise sits at -42 dBFS, set the threshold at -40 dBFS. If the voice or instrument regularly drops to -30 dBFS during pauses, but you want those pauses gated, the threshold needs to be above -30 dBFS — meaning you're setting it higher than the program material in the quiet sections, which is the intended use case.
Attack — how quickly the gate opens once the signal crosses the threshold, in milliseconds. Too slow an attack clips the beginning of transients — the first few milliseconds of a consonant, a drum hit, a note onset — because the gate hasn't fully opened yet. Too fast an attack can cause the gate to snap open abruptly on signals that approach the threshold gradually.
For most dialogue and voice work: 2–5 ms. For material with sharp transients like percussion or hard consonants: 1–2 ms. For sustained tones or synth pads where the onset is gradual: up to 20–30 ms without clipping the start. When in doubt, set attack fast and back off if the opening sounds artificial.

Release — how quickly the gate closes after the signal drops below the threshold, in milliseconds. Too fast a release creates an abrupt cutoff that sounds like the audio was edited with scissors. Too slow a release lets noise through after the program material ends, defeating the purpose of the gate.
100–200 ms is a reliable starting range for dialogue. It gives the end of a sentence enough time to decay naturally before the gate closes. For a voice-over session I edited last year — 38 minutes of solo narration recorded in a home studio with a consistent room tone — I ran the Noise Gate at -38 dBFS threshold, 3 ms attack, 150 ms release. The pauses between sentences cleaned up without any audible snapping at the end of words.
Floor — how much the gate attenuates the signal when closed, in dB. At -80 dB or lower (maximum attenuation), the gate is effectively silent when closed. At -20 dB, a noticeable amount of signal still passes through even when the gate is "closed" — the noise is reduced but not eliminated. A lower floor sounds cleaner. A higher floor sounds more natural because some ambient noise is still audible even in the quiet sections, which reduces the contrast between open and closed states.
For clean studio recordings with low noise floors: Floor at -60 to -80 dB. For location recordings with heavy ambient noise where a sudden silence sounds unnatural: Floor at -20 to -30 dB. I use a high floor (-20 dB) on documentary voice-overs where some room tone is expected to remain — cutting to complete silence between sentences would sound clinical and wrong in context.
How to Set the Threshold Correctly
The most reliable approach: run Statistics (Tools → Statistics) on a section that contains only background noise — no speech, no music, just the ambient room or recording environment. Note the peak level. Set the gate threshold 2–4 dB above that peak. This ensures the gate closes fully on the noise while leaving enough margin that small variations in the noise level don't cause the gate to flutter at the boundary.
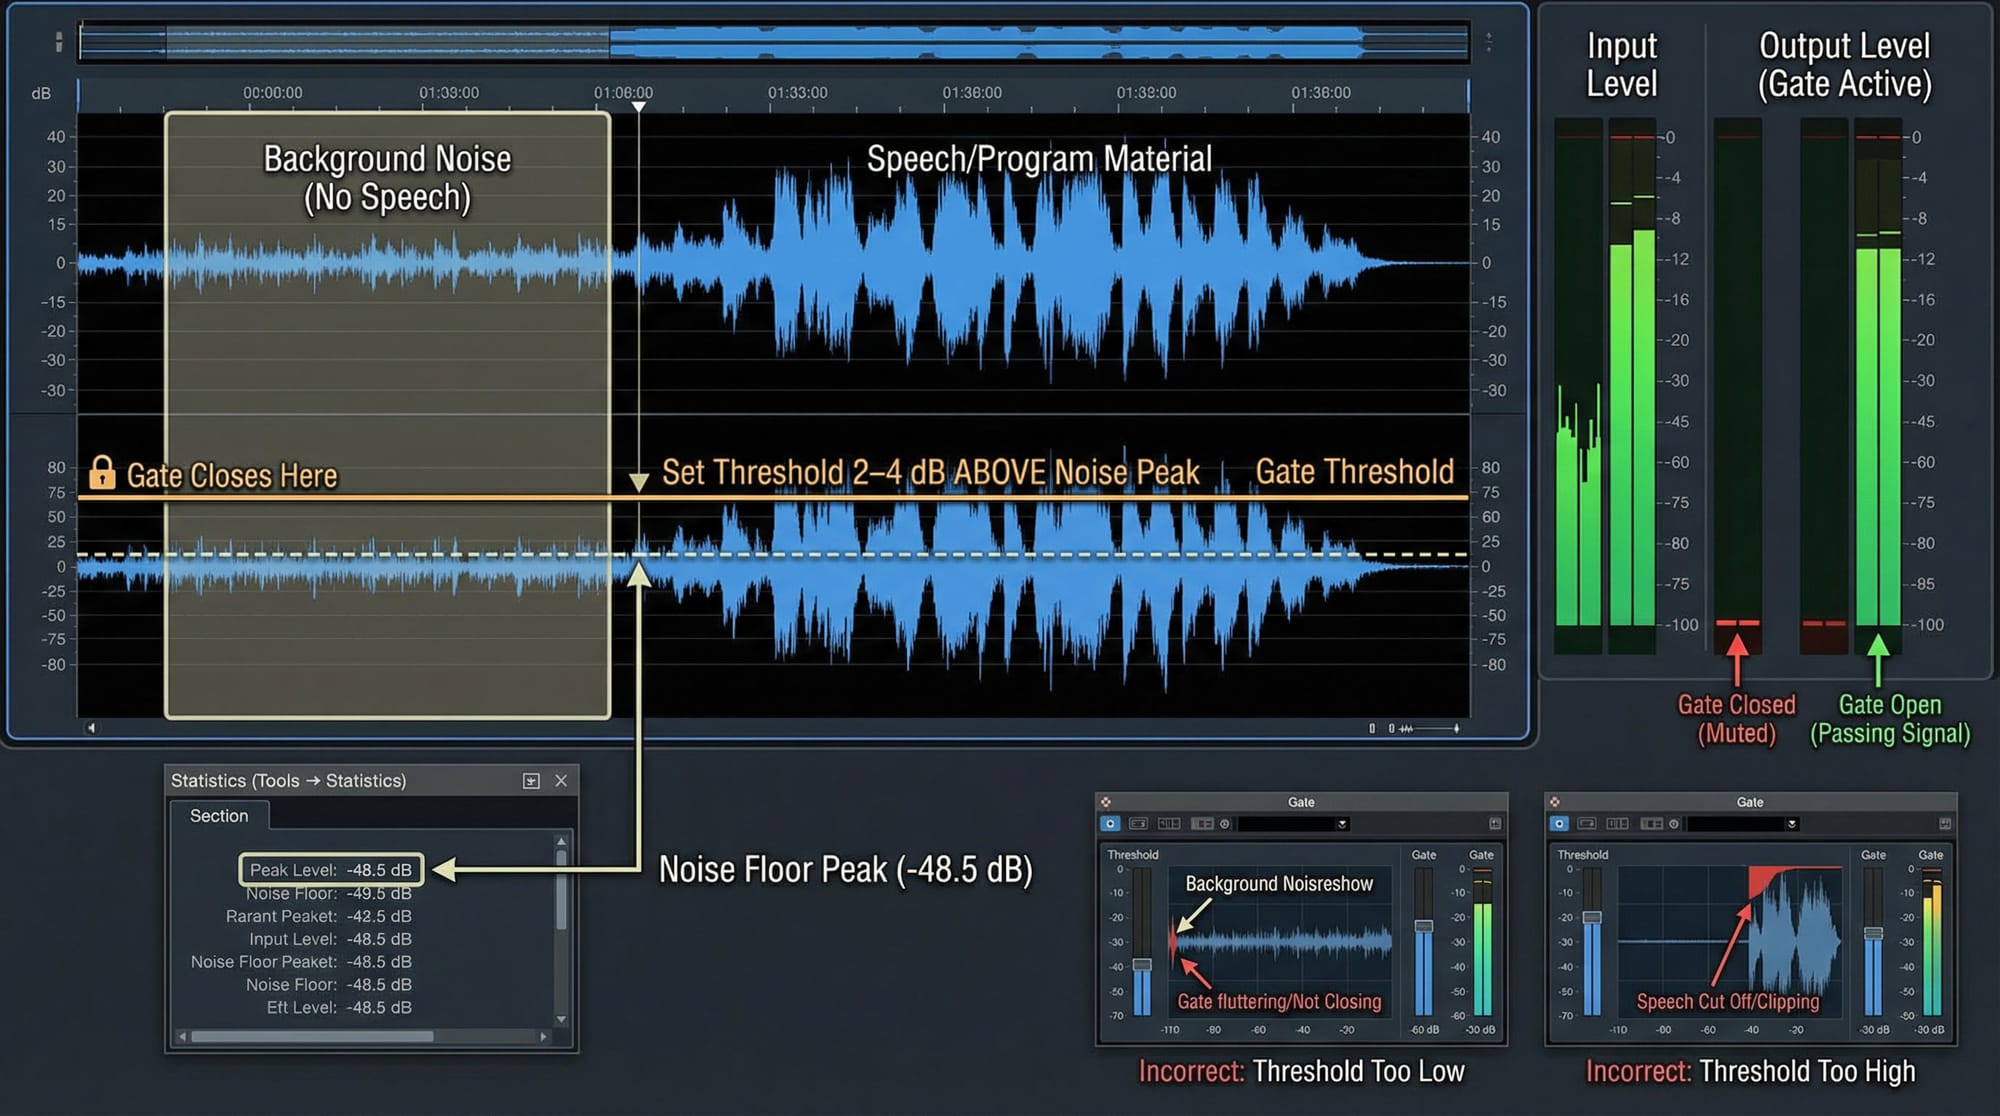
If you don't have a clean noise-only section, preview the file with the gate active and watch the level meters. The gate should be visibly closed during pauses — the meters should drop noticeably — and open cleanly when the program material starts. If the meters don't drop during pauses, the threshold is set too low. If speech gets cut off, it's set too high.
The first time I set up a gate on a vocal recording I misjudged the threshold by about 8 dB — set it too high and the gate was clipping the first syllable of every sentence. Backing it down until the gate stopped clipping and then checking Statistics against the noise floor took two minutes and fixed it permanently.
A common mistake is setting the threshold based on how much noise sounds audible rather than on the actual level difference between noise and program material. If the noise floor is at -42 dBFS and the quietest speech is at -28 dBFS, there's 14 dB of separation to work with. Setting the threshold at -35 dBFS gives 7 dB of margin on each side — enough for the gate to open reliably on speech without triggering on noise.
Chattering: What It Is and How to Stop It
Gate chattering is the rapid opening and closing of the gate when the signal hovers near the threshold. It sounds like a stuttering or pumping effect on a quiet passage — the gate triggers open and shut repeatedly as the signal fluctuates just above and below the threshold level. It's the most common artifact from a noise gate, and it almost always means one of two things: the threshold is set too close to the level of the program material, or the release time is too short.
Moving the threshold down is usually the first thing to try. If the signal regularly dips below the threshold during breaths or brief silences between words, the gate triggers closed on those dips and opens again immediately. Setting the threshold lower so those dips don't cross it stops the repeated triggering.
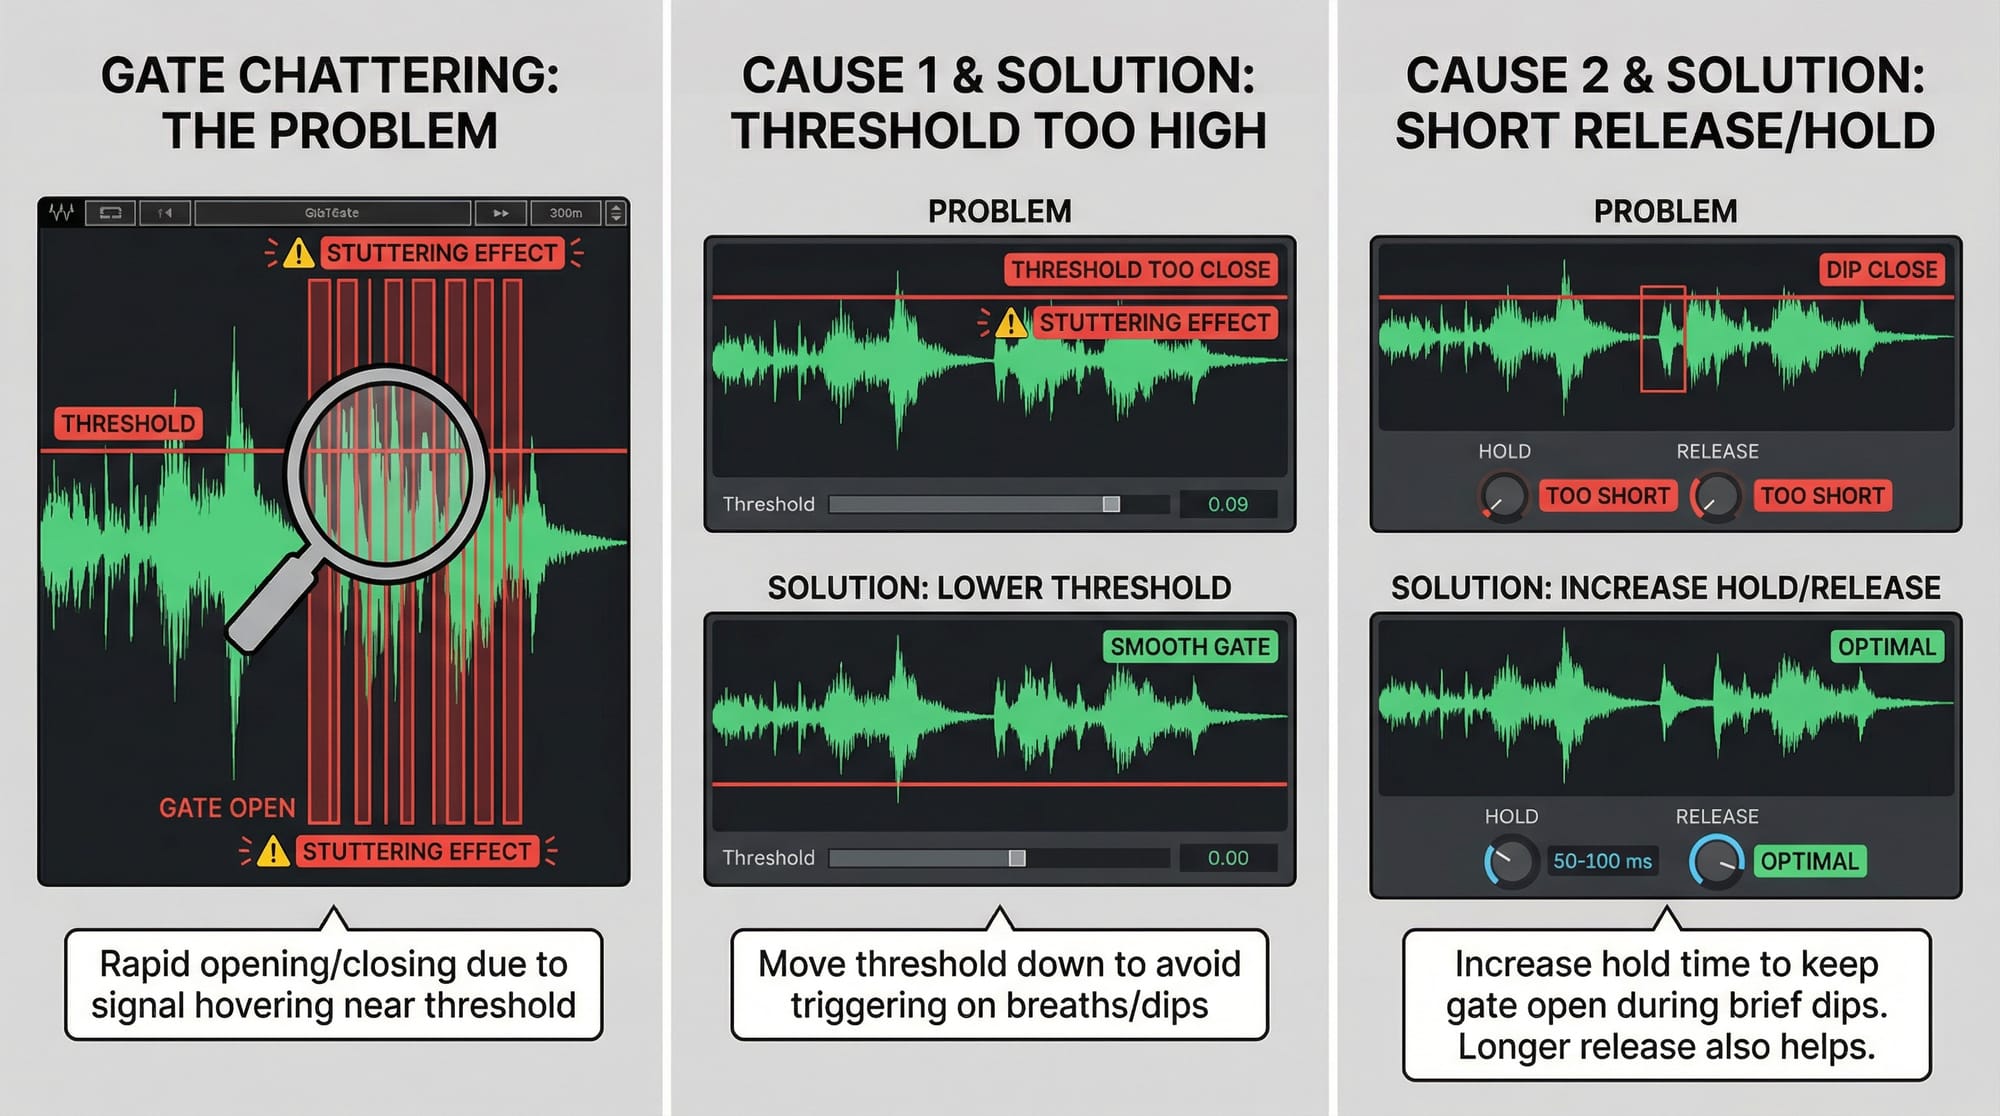
If moving the threshold doesn't help, increase the hold time. Hold time keeps the gate open for a fixed duration after the signal drops below the threshold, regardless of what the signal does during that window. Setting hold to 50–100 ms prevents the gate from closing on brief dips and then immediately reopening.
A longer release time also helps — the gate takes more time to close, so brief dips below the threshold don't produce an audible closure before the signal comes back up. A detailed explanation of how gate controls interact is in the ProSoundWeb noise gates guide.
On a location recording of a panel discussion I processed three months ago, chattering appeared between every sentence because the speaker had a habit of ending sentences quietly — the last syllable dropped below my threshold. Increasing the threshold by 4 dB fixed it in 30 seconds.
Noise Gate vs Noise Reduction: Different Tools for Different Problems
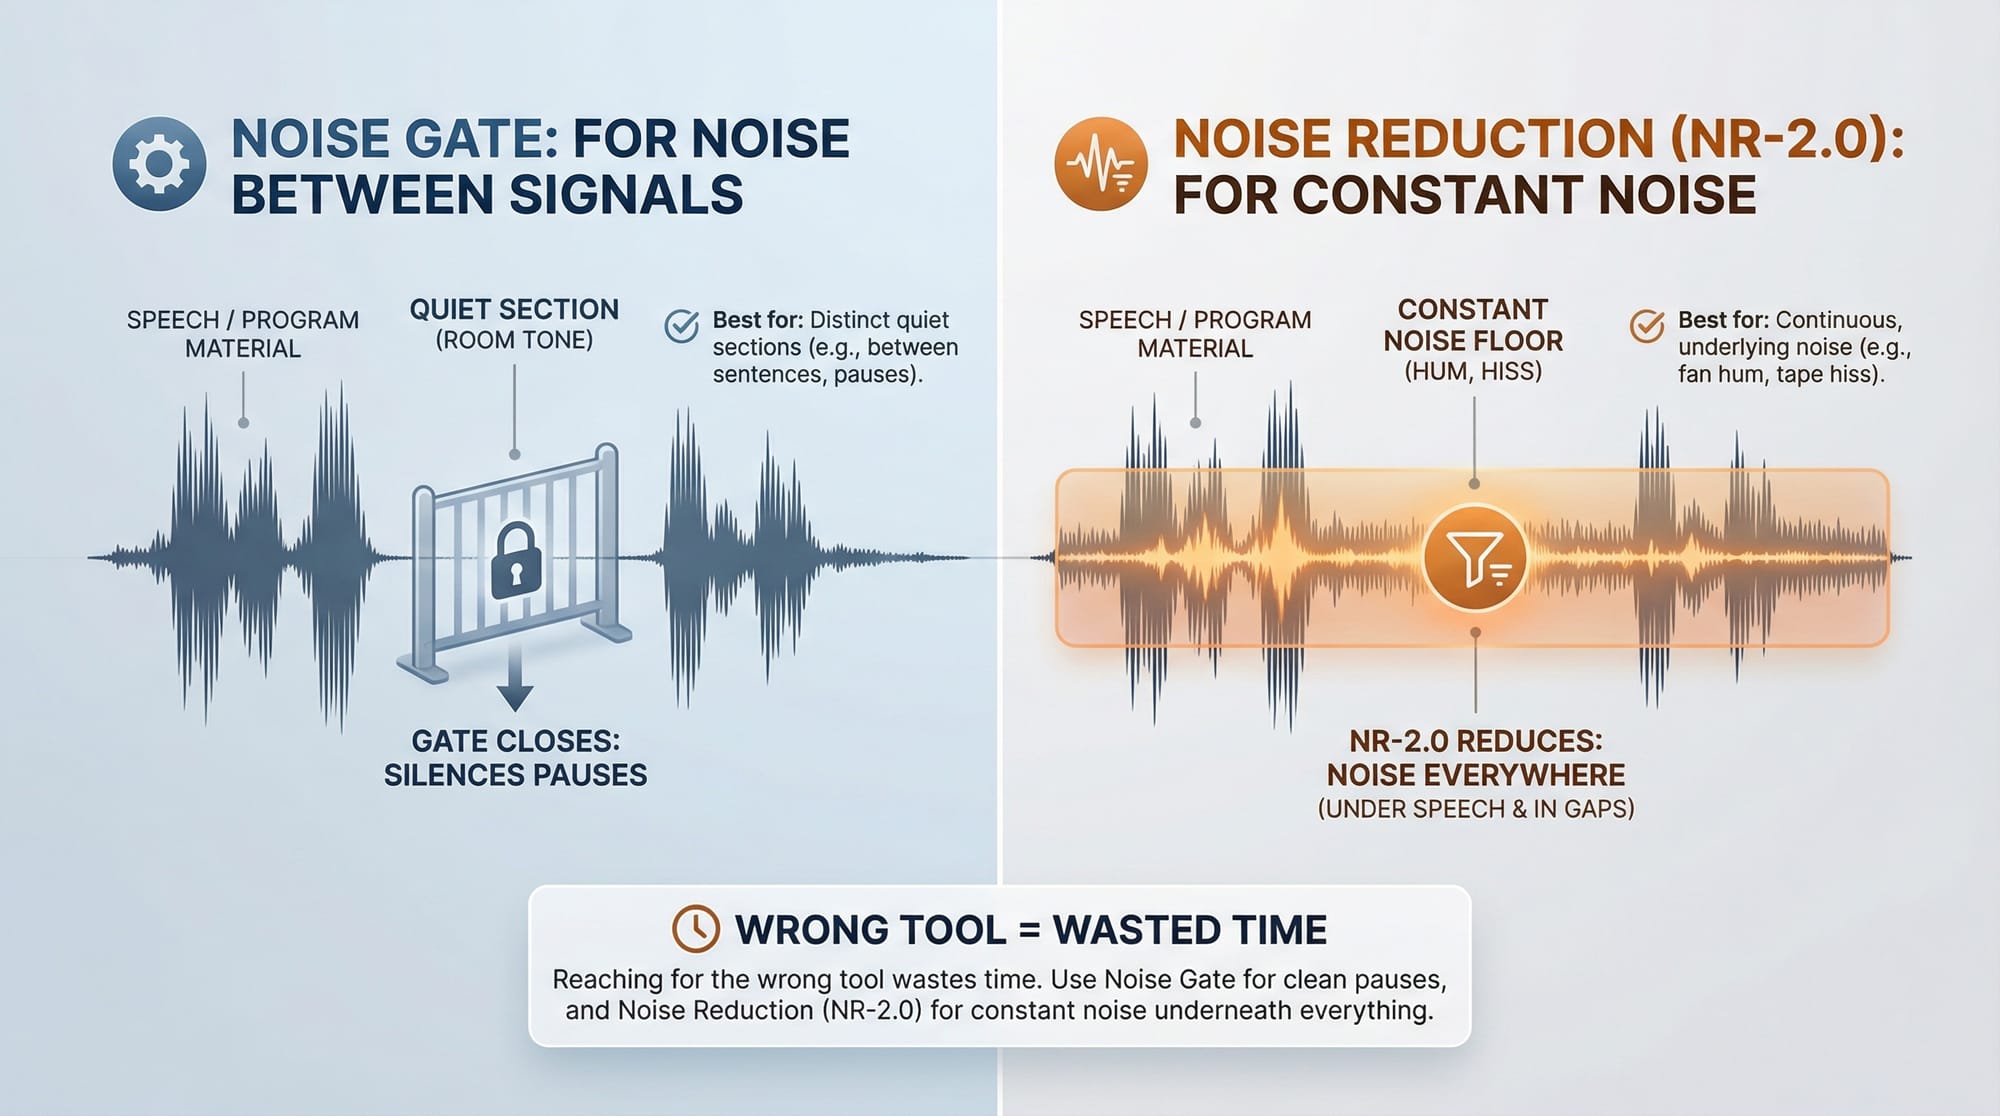
A noise gate and the NR-2.0 noise reduction tool do not do the same thing, and reaching for the wrong one wastes time.
The noise gate is the right tool when noise only appears in the quiet sections between program material — a home studio recording with room tone between sentences, a location recording where ambient noise drops when nobody is speaking. The gate works because there are distinct quiet sections to close on.
Noise Reduction handles the other problem: constant noise that runs underneath the program material as well as in the gaps. HVAC hum, tape hiss, computer fan noise, mic preamp hiss. These problems don't have clean pauses the gate can use as a reference — the noise is always present, whether the speaker is talking or not. The full NR workflow is in the noise reduction guide.
I've reached for the gate when NR was the right call — on a podcast recording with consistent fan hum, I tried gating first because the pauses seemed clean. The gate closed on the pauses but the hum was fully audible under every sentence. NR-2.0 with a clean noise print from the first 3 seconds removed it uniformly. Two minutes versus twenty.
The forum answer that gets this right: "Noise Gate may not be helpful for background noise reduction as in many cases it will effectively remove noise below the threshold in the quiet sections, but if noise is audible in sections louder than the threshold it won't necessarily be removed — the unwanted noise then tends to be more noticeable as it drops in and out." This is exactly the failure mode: a gate that works well in the pauses but does nothing during speech makes the noise floor more noticeable by contrast, not less.
The two tools can be used together. Run NR-2.0 first to reduce constant noise across the whole file, then apply the gate to clean up any remaining noise in the quiet sections. This combination often produces cleaner results than either tool alone, especially on location recordings where there's both a constant noise floor and quieter gaps between program material. That sequence fits into the broader signal chain covered in the mastering guide.
Applying the Gate: Selection vs Whole File
Sound Forge Pro applies the gate destructively when run from the Effects menu directly. Before running it, decide whether you want to gate the entire file or just specific sections.
Ctrl+A to select all and apply the gate to the whole file. Or drag a selection over specific sections — particularly useful when only part of a recording has the noise problem, or when different sections need different threshold settings.
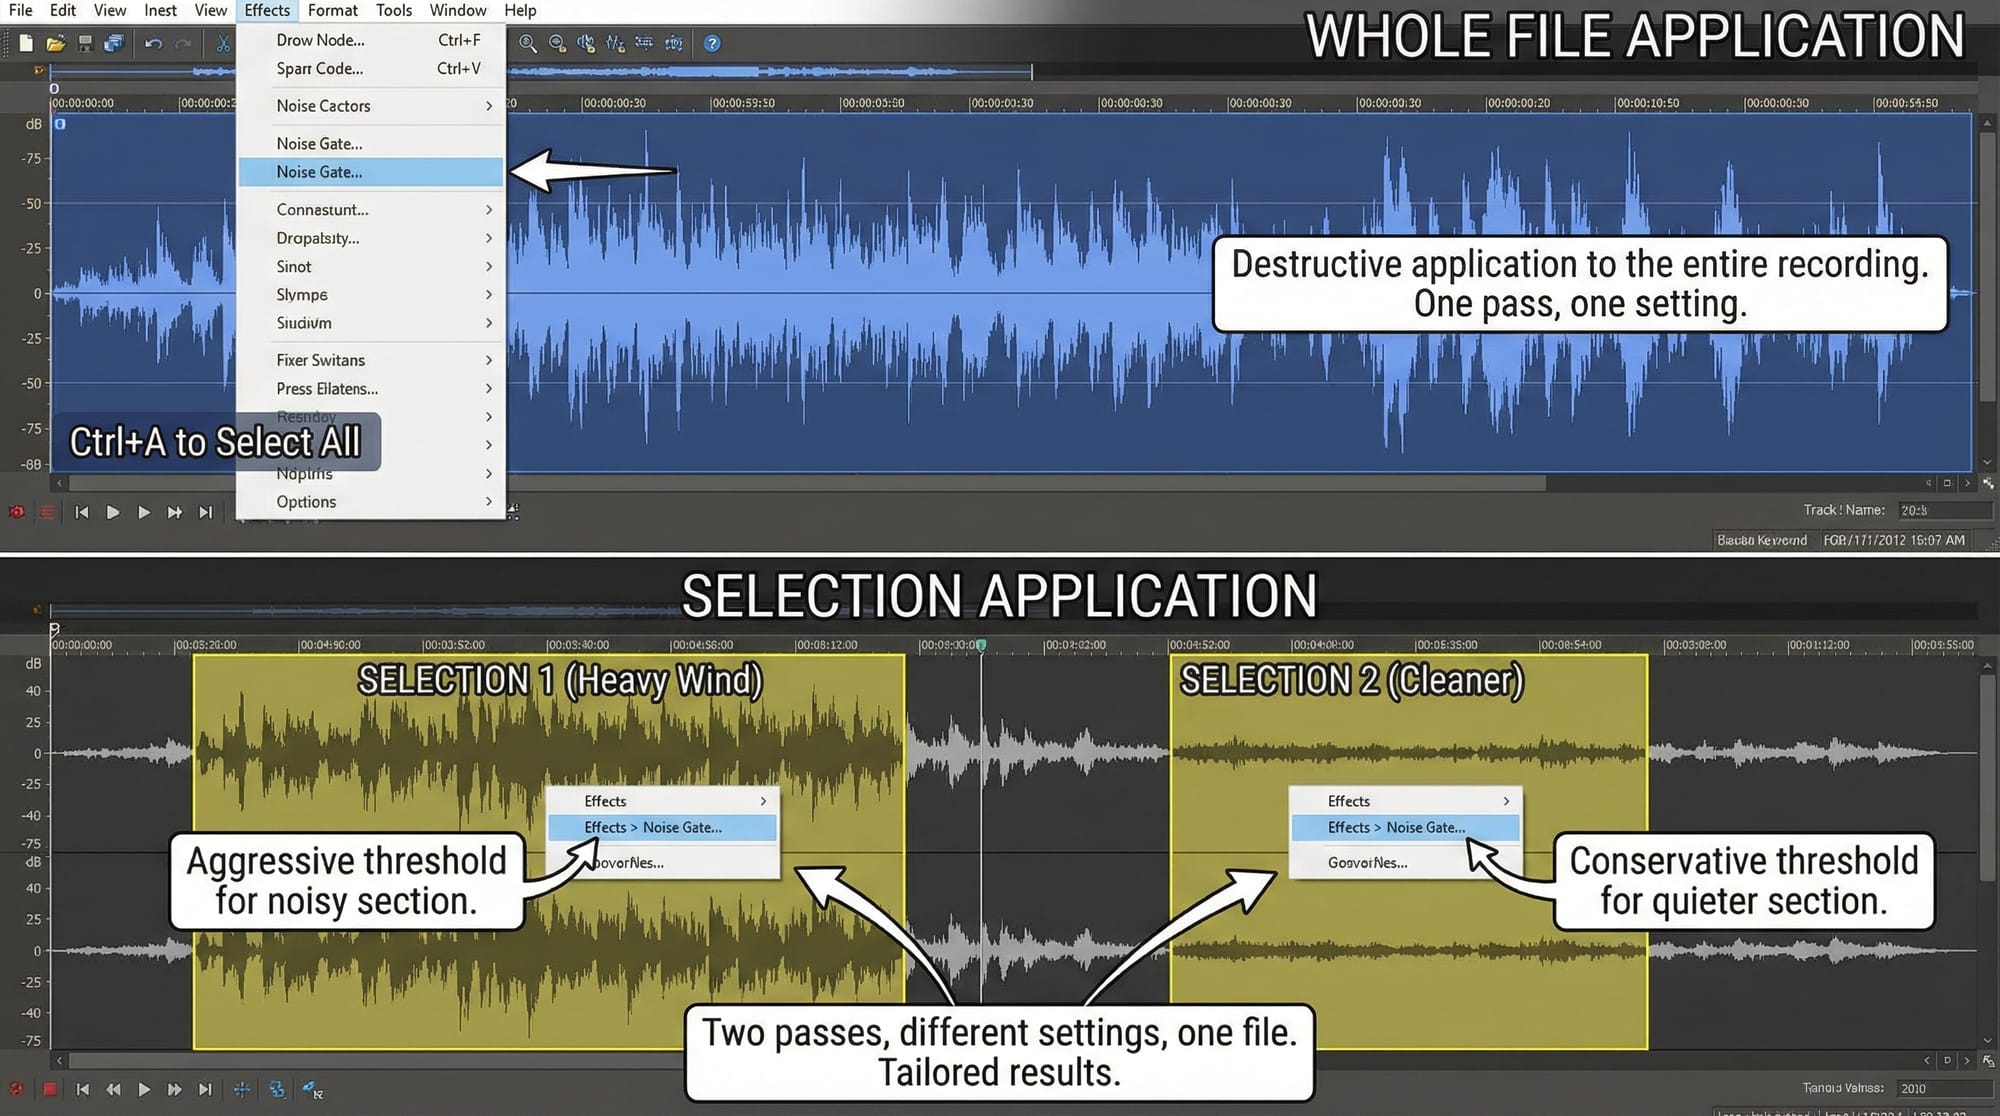
I did this on a 90-minute field recording from an outdoor event last summer — the first 30 minutes had heavy wind noise that required a more aggressive threshold, while the remaining 60 minutes were cleaner. Two separate selection passes, different thresholds, one coherent result.
For files where the noise floor varies — a recording that gets quieter in some sections and louder in others — applying different gate settings to different selections produces better results than a single pass. Select the noisier sections, apply a more aggressive threshold. Select the quieter sections, apply a more conservative threshold. Two passes, two selections, one file.
The EQ → gate order matters too. If the noise you're gating has a specific frequency character — low rumble, high hiss, room resonance — applying a high-pass or low-pass filter first with the Paragraphic EQ can bring the noise below the gate threshold without requiring as aggressive a threshold setting. A more conservative threshold means less risk of program material getting cut.
Frequently Asked Questions
Where is the Noise Gate in Sound Forge Pro?
Effects → Noise Gate for the legacy DirectX plugin. Effects → coreFX → Gate for the newer coreFX version included in the coreFX Suite bundle. Both are in the Effects menu. The coreFX Gate adds a real-time waveform display that makes setting the threshold easier visually; the legacy Noise Gate opens faster for quick access.
What threshold should I set for the noise gate in Sound Forge Pro?
Run Tools → Statistics on a noise-only section of the file and note the peak level. Set the threshold 2–4 dB above that peak. If the noise peaks at -42 dBFS, set threshold at -38 to -40 dBFS. This closes the gate fully on the noise while leaving margin so small noise variations don't cause chattering at the threshold boundary.
What attack and release times should I use for a noise gate in Sound Forge Pro?
Attack: 2–5 ms for dialogue and vocals, 1–2 ms for sharp transients like percussion. Release: 100–200 ms for most material. Too fast a release causes abrupt cutoffs at the end of words or phrases. Too slow a release lets noise bleed through after program material ends. Start at 150 ms release and adjust by ear — if the ending of words sounds clipped, increase it.
Why does my noise gate sound choppy or stuttering in Sound Forge Pro?
Chattering — the gate is opening and closing rapidly because the signal hovers near the threshold. Three fixes: (1) lower the threshold so brief dips in the program material don't trigger it closed, (2) increase the release time so the gate takes longer to close, (3) increase the hold time if available so the gate stays open through brief dips. Moving the threshold down by 3–5 dB resolves chattering in most cases.
What's the difference between the Noise Gate and Noise Reduction in Sound Forge Pro?
The Noise Gate attenuates audio during quiet sections where signal falls below a threshold. It only helps when the noise is isolated to quiet gaps in the recording — between sentences, between notes. The Noise Reduction tool (Tools → Noise Reduction) uses a noise print to reduce constant background noise that runs underneath program material. Use the gate for intermittent noise in pauses; use NR for constant noise like hiss, hum, or fan noise. The full workflow for NR is in the noise reduction guide.
What is the Floor setting in Sound Forge Pro's Noise Gate?
Floor sets how much the gate attenuates the signal when closed, in dB. At -80 dB the gate is effectively silent when closed. At -20 dB, some signal still passes through. A lower floor (more attenuation) sounds cleaner but can produce an unnatural silence in sections where some ambient noise is expected. A higher floor (-20 to -30 dB) sounds more natural by maintaining a low-level background even when the gate is closed.
Can I use the Noise Gate and Noise Reduction together in Sound Forge Pro?
Yes, and the combination often works better than either tool alone. Run NR-2.0 first to reduce constant broadband noise across the whole file. Then apply the Noise Gate to clean up any remaining noise in the quiet sections. The NR pass lowers the overall noise floor, which makes it easier to set a conservative gate threshold that won't clip program material. The full Noise Gate documentation on helpmax covers all available parameters.