
Quick answer: audio restoration starts with diagnosis. A preset comes later, if at all. Play the file in another app and through another output before you edit anything. A fault that repeats at the same timestamp across independent playback paths points toward the recording or encoded file; one that changes with the player, driver, cable or device usually belongs to playback. Work on a copy only once you know which problem you're dealing with.
This guide is a fault map rather than a plug-in tour. Read the waveform, spectrum and timing together, then route each symptom to the narrowest repair that can solve it. No processor can guarantee the exact samples that were never captured, were overwritten or were discarded by a codec.
What Audio Restoration Means
Audio restoration is the controlled reduction or reconstruction of unwanted changes in a recording while preserving as much of the wanted performance as possible. Typical targets include hiss, mains hum, clicks, crackle, clipping, dropouts, wow and flutter, room reflections and damage from lossy encoding. The goal is not “zero noise.” The goal is a more usable recording without distracting repair artifacts.
That definition matters because three very different problems are often grouped under audio repair:
- Signal damage: the file opens and plays, but the sound contains noise, distortion, missing moments or unwanted acoustics. Restoration tools can help.
- File or container damage: the player cannot open, seek or decode the file, or the recording ends unexpectedly. Header repair, recovery software, remuxing or another source comes before audio processing.
- Playback-chain trouble: the same file is clean on one device and faulty on another. The driver, interface, cable, enhancement, clocking or loudspeaker needs attention. Editing the file would bake in a needless change.
Missing information is a limit within signal repair, not a separate fault category. If silence overwrote a word, a clipped converter discarded the original peak shape or a codec removed upper-band data, software can estimate, mask or synthesize a plausible result. What it can't do is pull the exact original samples out of nowhere.
Diagnose Damaged Audio Before You Process It
Save the original, make a short working copy, and mark the exact timestamp where the defect is obvious. Then run the cheapest tests first:
| Symptom | Diagnostic check | Likely class | First move |
|---|---|---|---|
| The same fault occurs at the same timestamp everywhere | Two players and two outputs agree | Recorded signal or encoded file | Inspect waveform, spectrum and source history |
| The file will not open, seek or reach its expected end | A media probe reports a header, index or decode error | Container or data recovery | Preserve the source; recover a readable copy before signal processing |
| Only one app or device crackles | A second path is clean | Playback chain | Bypass enhancements; check driver, format and hardware |
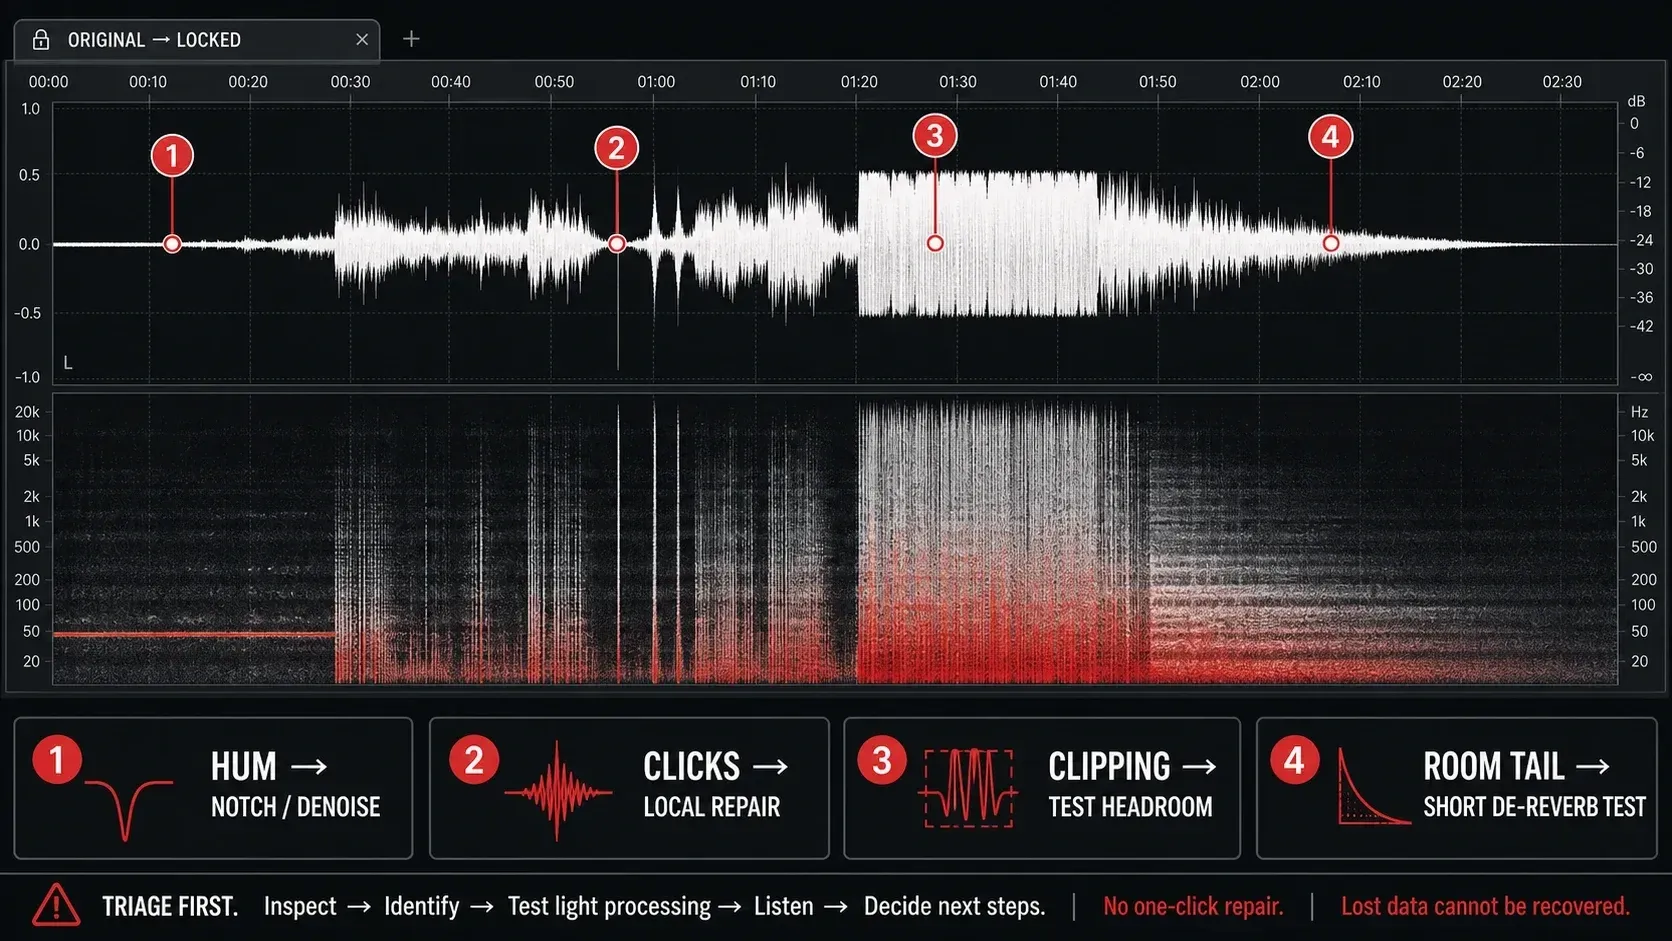
| A steady pitch remains under speech or music | The spectrogram shows horizontal lines at a fundamental and harmonics | Hum or whine | Find the fundamental; use narrow reduction before broad denoise |
| Needle-like ticks occur at isolated moments | The waveform shows short discontinuities or impulses | Clicks and pops | Repair locally before running a full-file de-click pass |
| Loud moments have repeated flat shelves | Sample-level zoom shows values held at the same ceiling | Possible clipping or limiting | Check source history and float headroom; test declipping only if peak information was lost |
| Words smear into their pauses | Reflections continue after the direct voice | Room reverb or echo | Decide whether tail control is enough or dedicated de-reverb is required |
| The WAV is clean but a small delivery file sounds watery | One encode changes the upper spectrum and transients | Lossy codec damage | Return to the lossless master and encode once |
Change one variable at a time. Switch the driver, sample rate and output device together and the problem may disappear, but you won't know which stage failed. A useful diagnosis predicts what the next test will do.
Read the Waveform, Spectrum and Timing Together
A waveform is best at showing level over time. Use it to locate discontinuities, repeated flat shelves, DC offset, dropouts and the envelope of a reverb tail. It's poor at telling a 60 Hz hum from low musical content, though, because both can look like ordinary oscillation at a wide zoom.
A spectrogram adds frequency. Stable electrical hum can form horizontal lines at a fundamental and its harmonics; short clicks often spread vertically across many frequencies. Steady hiss raises a broader noise floor, but its spectral shape need not be flat. A lossy codec may remove or rearrange upper-band energy, and reflections extend energy after the direct sound. Display settings and wanted musical content can resemble these patterns. Use them to choose a test, not to set processing strength automatically.
Timing is the third clue. A fault attached to edit boundaries suggests discontinuities. Distortion that follows only loud vowels or drum hits points to overload, and crackle that changes between playbacks usually means a real-time driver or buffer problem. A constant line at 60 Hz in North American material or 50 Hz in many other power systems supports mains hum, but check harmonics and local context before cutting a musical note that happens to share the frequency.
Meter readings support a diagnosis; they do not decide it alone. Crest factor can be calculated from compatible peak and RMS readings over the same selection; do not assume it is a dedicated Statistics field. Sample peak, true peak, RMS, loudness, DC offset and crest factor each answer a different question. Our Sound Forge Statistics guide explains what each reading can and cannot prove.
Choose a Repair Order, Then Test It

- Copy the source. Preserve the original file and its metadata. Never make the only copy your experiment.
- Verify playback and channels. Test another app and output to separate recording defects from playback faults. Check left/right balance and mono compatibility; do not change polarity or sum channels simply because the waveform looks asymmetric.
- Test confirmed clipping early. First lower gain if a floating-point source still retains intact peaks above 0 dBFS. If peak information was actually clipped, try conservative declipping before later processing reshapes it. Compare with the unchanged copy.
- Fix isolated faults. Treat short clicks or gaps locally when useful surrounding sound remains. Check that interpolation preserves consonants and attacks. Correct measured DC offset separately; it is not click repair.
- Compare noise-reduction orders. Hum often comes first when its fundamental and harmonics dominate. If broadband noise hides the tone, test broadband reduction first. Compare both orders on a short passage instead of applying a fixed full-file chain.
- Test difficult reconstruction separately. De-reverb and codec-artifact mitigation estimate overlapped or discarded information. Compare them with the simpler repair, and also test another position in the chain if needed. Reject changes that damage wanted speech or music.
- Set level and verify the export. Compare at matched playback loudness, disable Inverse/Delta/noise-only monitoring, and render a new lossless file. Reopen it outside the editor and check the repaired passage, transitions and ending.
That sequence is a starting point, not a mandatory recipe. iZotope’s repair-order walkthrough puts deep clipping damage early but explains why source conditions can change the order. After each stage, compare bypassed and processed playback at matched loudness. If a difference monitor is available, check its definition: a removed-noise signal and all changed signal are not the same thing. Reconstructed peaks can legitimately appear in a difference signal. Judge the normal output, then turn off diagnostic monitoring before rendering.
Route Each Fault to the Right Repair
Steady hum, whine and broadband hiss
When tonal hum dominates, begin there. If broadband noise prevents reliable hum detection, compare the reverse order. A 60 Hz fundamental may have 120 and 180 Hz harmonics; 50 Hz interference may have 100 and 150 Hz companions. Narrow notches or de-hum can spare more of the spectrum than broad noise reduction, but they can still cut wanted bass notes. For profile-based hiss reduction, select noise without speech or music, as Audacity’s noise-reduction guidance explains; adaptive methods work differently. The hiss and hum workflow separates tonal and broadband faults, while the background-noise guide covers profile selection and artifact checks.
Clicks, pops and crackle
A very short isolated click may respond to interpolation when clean material surrounds it. Larger gaps and dense crackle need different treatment; a sensitive full-file pass can mistake percussion and consonants for damage. Start with the biggest isolated events, then compare a conservative automatic pass with the unchanged copy. The clicks-and-pops guide covers that local-first workflow. For mouth clicks in spoken voice, distinguish the lip or saliva sound from wanted articulation before processing.
Hard clipping and upstream overload
First identify where overload happened. A floating-point file may retain intact peaks above 0 dBFS; lowering gain can reveal them, but cannot undo clipping that occurred earlier. Lowering an already clipped signal only makes its distortion quieter. Flat shelves are a clue, not proof by themselves: limiting and the source waveform also matter. The current Sound Forge DeClipper help describes interpolation from surrounding material, not guaranteed recovery of the lost original. Follow the clipping-repair guide for inspection and matched comparisons. For harshness without clear clipping, diagnose distorted audio across input, processing, codec and playback stages.
Room echo and reverberation
A gate can reduce exposed tails between phrases, and EQ can tame resonant buildup. Neither separates direct speech from reflections that overlap the words. Dedicated de-reverberation may reduce that overlap, with possible modulation or damaged consonants at aggressive settings. The echo and room-reflection guide separates manual tail control from true de-reverb and shows where a gate stops helping.
Lossy codec artifacts
Return to the highest-quality source. If a WAV or earlier master exists, don't “restore” the MP3 and then encode it again. Missing high frequencies won't reappear through normalization or EQ; an enhancer may create plausible brightness, but that's synthesis, not recovery. Keep one lossless master and create each delivery format once. The MP3 export guide covers bitrate and verification without treating lossy delivery as an archive format.
Vinyl, tape, speed instability and dropouts
Carrier condition and playback setup come before software. Use an appropriate stylus or tape machine and confirm the playback speed. For fragile, moldy or sticky material, get a preservation specialist’s assessment before cleaning or replaying it. Software cannot guarantee repair of damage introduced during a bad transfer. The vinyl restoration workflow covers capture, side splitting and conservative cleanup. Persistent speed instability, broken carriers and irreplaceable recordings can justify specialist equipment and handling.
Preserve the Source Before Restoring the Sound
Restoration and preservation are related but not identical. Restoration changes an access or production copy so it's easier to hear; preservation keeps an authentic, documented source that can be revisited when better tools or information become available.
The International Association of Sound and Audiovisual Archives separates signal extraction, ingest, archival storage, preservation planning and access in its TC-04 guidance. That is a useful model even for a family cassette: capture once as carefully as practical, keep the unprocessed transfer, document what you did, and make restored listening copies from it.
For media-independent digital audio, the Library of Congress Recommended Formats Statement prefers native resolution to up-sampling and uncompressed files to compressed delivery. It also prefers WAVE with embedded Broadcast WAVE metadata to WAVE without it. As a specific digitization example, the Library’s National Jukebox documentation describes 96 kHz/24-bit Broadcast Wave preservation masters. That project choice is not a rule that every podcast needs 96 kHz. Preserve native information, keep metadata, and make restored listening copies separately from the master.
For an ordinary project, a practical package is:
- the original carrier or received file, unchanged;
- a lossless transfer or working master at the captured resolution;
- a short text log naming the source, date, equipment and processing steps;
- one or more restored access copies;
- delivery files such as MP3 or AAC generated from the lossless master.
Where Sound Forge Fits
Sound Forge is strongest when one finished or transferred audio file needs close waveform editing, measurements, plug-in processing and repeatable export. In its 2026 product announcement, Boris FX describes Sound Forge as a dedicated environment for detailed work beyond a DAW timeline; the current Sound Forge Pro 2026 online help remains the version reference for menu and workflow details.
Use it as a diagnostic bench:
- mark one clean and one damaged passage;
- zoom to sample level for discontinuities and shelves;
- use spectral views and analysis for tonal or broadband patterns;
- build a short plug-in chain with a reason for each stage;
- bypass, loudness-match and render a new file;
- batch only after one representative file passes inspection.
Consider a specialist tool or workflow for detailed spectral editing, source separation, advanced de-reverb, container recovery or a full multitrack mix. These are different jobs, not reasons to run every damaged file through a larger suite. The audio restoration software comparison covers product selection; this hub covers diagnosis. If the problem is specifically noise, choose noise-reduction software by noise type and workflow. A free local editor can be enough for a small repair; before using a cloud service on private audio, check whether uploading it is acceptable.
Know the Limits Before You Promise a Result

Stop when the repair becomes more audible than the fault. A little residual hiss may be less distracting than metallic denoise artifacts, and speech with unstable consonants often sounds worse than a faint room. One remaining click may respond to a targeted repair; an over-sensitive de-click pass may soften every transient in the recording.
Re-record when the performance can be repeated and the clean take costs less than a compromised repair. Escalate to a specialist when the carrier is fragile, the only copy is irreplaceable, the transport needs alignment, the recording contains legal or historical evidence, or your test pass changes wanted material without making the fault acceptable.
AI tools deserve the same controlled review. Compare the same passage at matched playback loudness, listen for changed consonants and ambience, and disclose when missing content was generated rather than recovered. The AI audio restoration guide matches tool classes to noise, reverb, damaged vocals and missing bandwidth without treating plausible reconstruction as proof of the original signal.
Audio Restoration FAQ
What is audio restoration?
Audio restoration is the controlled reduction or reconstruction of unwanted changes in a recording while preserving the wanted performance. It includes noise reduction, de-clicking, de-hum, declipping, reverb reduction, speed correction and repair of short dropouts.
Can badly damaged audio be fully restored?
Not always. Steady hum and isolated clicks may improve substantially. Severe clipping, overwritten audio, heavy lossy encoding and reflections that overlap the direct sound contain information that was discarded or mixed together, so an exact original cannot be guaranteed.
What should I fix first in an old recording?
Preserve the source and verify playback first. If peak information was truly clipped, test declipping before other processes reshape it; if a float file retains intact peaks above 0 dBFS, try lowering gain first. Repair isolated faults and compare hum-first with broadband-noise-first on a short passage. Treat de-reverb and codec reconstruction as separate experiments, not compulsory final stages.
Is audio restoration the same as repairing a corrupted audio file?
No. Restoration processes sound that can be decoded. A file that will not open, seek or reach its expected end may need header, container or data recovery before an audio editor can work on its signal.
Should I remove all hiss from a recording?
No. Stop when additional reduction damages speech, music, ambience or transients more than the remaining hiss distracts the listener. A small noise floor often sounds more natural than metallic or pumping artifacts.
What format should I use for a restoration master?
Keep a lossless file at the source or capture resolution rather than up-sampling or repeatedly encoding a lossy format. Broadcast WAV is useful when embedded preservation metadata matters; ordinary PCM WAV can be a practical working master when metadata is documented separately.
Can Sound Forge restore old recordings?
Sound Forge can inspect and edit a single file closely, reduce several common noise and impulse problems, host restoration plug-ins and produce repeatable exports. Fragile-carrier playback, deep spectral reconstruction, advanced de-reverb and container recovery may require other tools or a specialist.