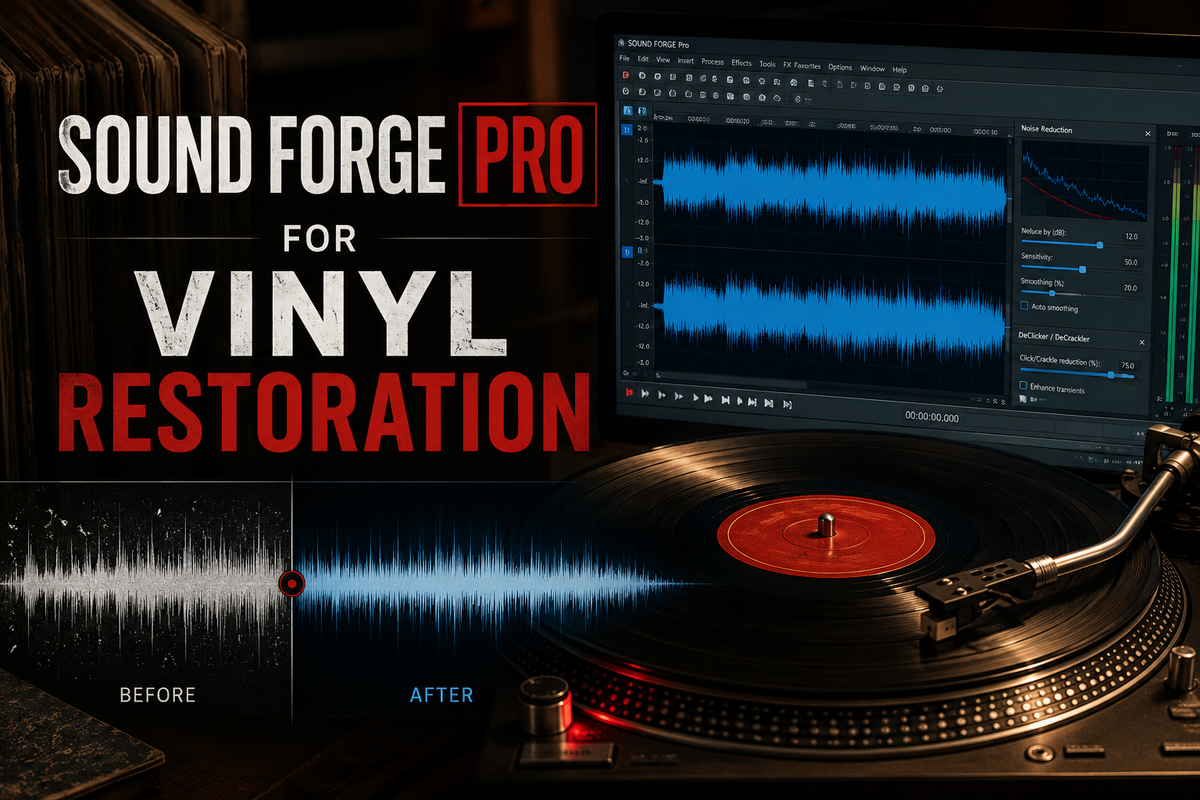
Sound Forge Pro for Vinyl Restoration

The box of 7-inch singles I mentioned in an earlier article turned into a longer project — 340 records over about eight months, varying condition from near-mint to visibly damaged. Sound Forge Pro was the application I used for all of it: recording, cleaning, splitting into individual tracks, and exporting to FLAC. The workflow that emerged across those sessions is what this article covers. The order of processing steps matters more than any individual setting, and the settings that forum posts recommend are often more aggressive than they need to be.
Quick answer: Recording at 24-bit/96kHz → DeClipper if needed → DeClicker → DeCrackler → NR-2.0 noise reduction → EQ for rumble and tone → normalize → split to tracks and export. Each step has a specific reason to come where it does in that sequence. The rest explains why, and what settings work at each stage.
Vinyl Restoration Signal Chain
Before opening Sound Forge Pro, the physical chain from turntable to software needs to be correct. Errors in the hardware chain produce problems that no software can cleanly fix afterward.
- Turntable with a clean stylus — a worn or dirty stylus is the single biggest source of added noise and distortion. Clean the needle before each session with a stylus brush. A worn stylus that tracks poorly generates false clicks that look identical to surface damage in the waveform.
- Anti-static brush or record cleaning before capture — surface dust increases click frequency dramatically. A carbon fiber brush during playback or a wet cleaning before the session reduces the volume of work the DeClicker has to do, which means less risk of false positives on program material.
- Phono preamp with RIAA equalization — required for any turntable that outputs a phono-level signal (most do). Without it, the recording arrives in Sound Forge thin and unbalanced. Some turntables have a built-in preamp with a line-level output — check whether your turntable has a Phono/Line switch before buying a separate preamp.
- Audio interface with line-level input — connects the phono preamp output to your computer. A dedicated interface with quality ADCs produces a cleaner capture than a laptop's built-in sound card. The line input accepts the phono preamp's output at consumer line level (-10 dBV).
- Sound Forge Pro set to 24-bit/96kHz stereo — configured in File → New before starting the recording. The full reason for 24-bit/96kHz is in the Recording Setup section below.
- Closed-back headphones for monitoring and artifact checking — essential for catching DeClicker false positives and DeCrackler smoothing artifacts. Speaker monitoring at normal listening levels masks subtle processing problems that are clearly audible on headphones.
The order in which the chain is set up matters for troubleshooting. If a recording arrives in Sound Forge with unexpected tonality or noise, I check the chain from the turntable out: stylus condition, phono preamp output level, interface input gain setting, and finally the recording format in SF Pro. Most problems trace back to one of those four points, and they're faster to catch before a full side is recorded than after.
Recording Setup: Before Sound Forge Opens
The quality of what goes into Sound Forge determines the ceiling of what comes out. Two decisions before hitting record matter more than anything done in software afterward.
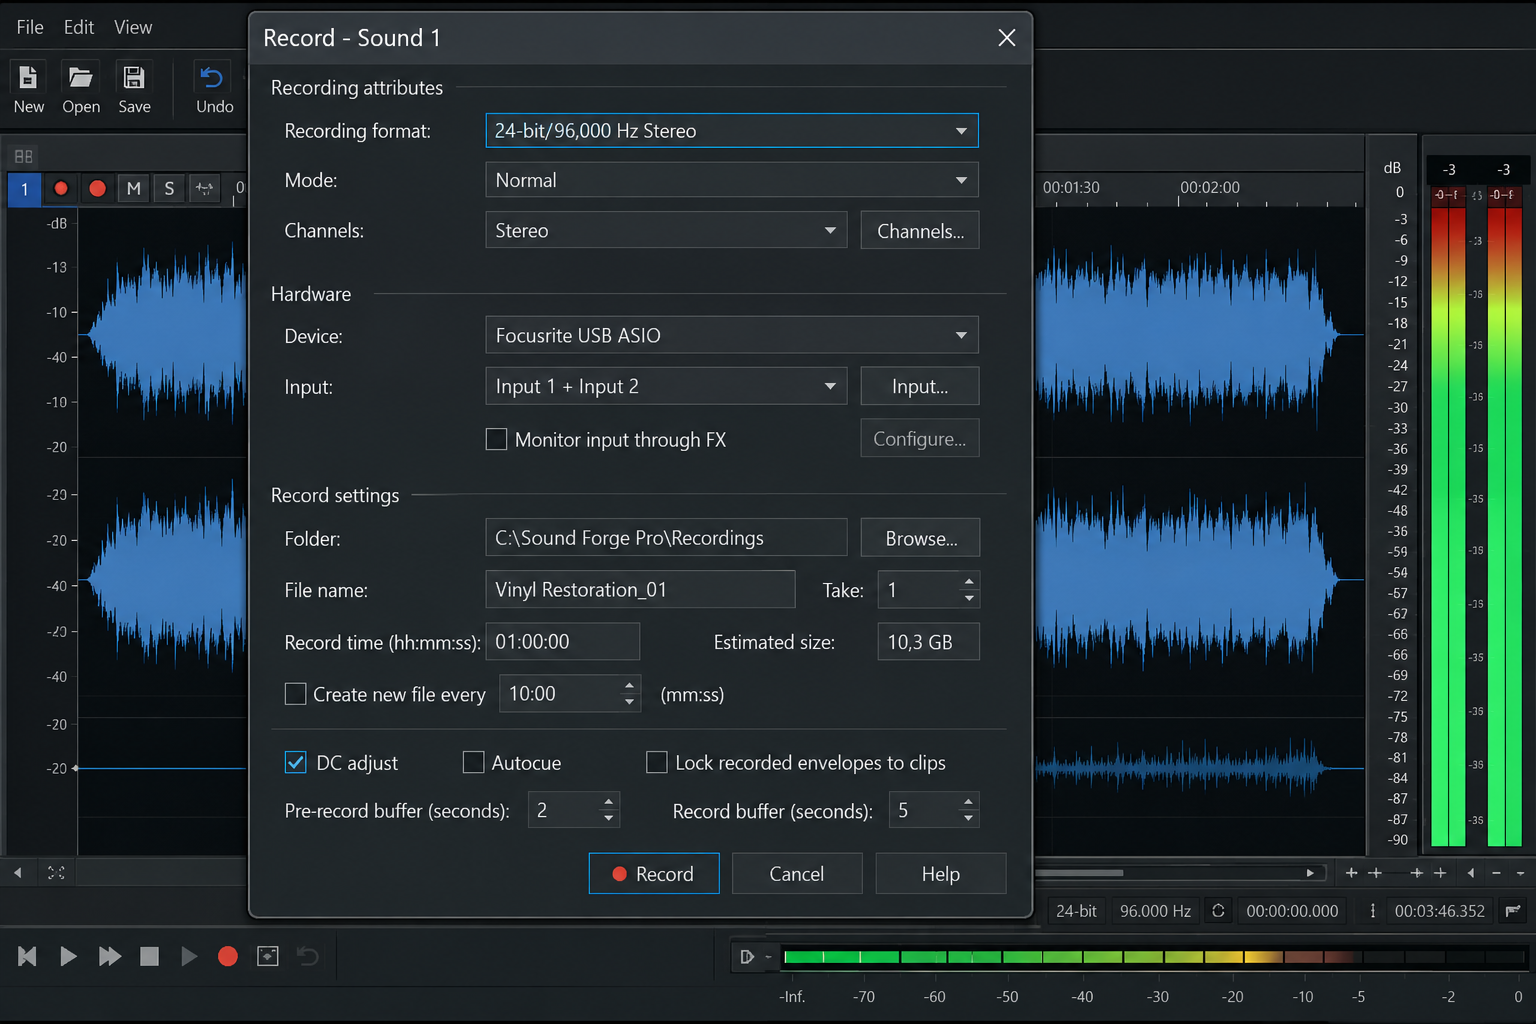
Sound Forge Pro 24-bit 96kHz recording setup for vinyl restorationFirst: record at 24-bit/96kHz, not 16-bit/44.1kHz. The 24-bit depth gives 8 extra bits of headroom during processing — DeClicker and NR-2.0 both benefit from the extra dynamic range when they're interpolating around click removal or subtracting a noise profile. The final output can be dithered to 16-bit for CD or streaming. Recording at 16-bit first and then processing is working at the floor, which shows up as subtle artifacts that wouldn't appear with headroom to spare.
Second: your turntable signal must pass through a phono preamp with RIAA equalization before reaching Sound Forge. A phono cartridge outputs a tiny signal with bass rolled off and treble boosted — this is intentional in vinyl cutting, and the phono preamp reverses it (RIAA EQ curve) while amplifying the signal to line level. Without a phono preamp, the recording arrives in Sound Forge with no bass and far too much treble: thin, bright, and unbalanced. Most modern audio interfaces don't have phono inputs, so an external phono preamp between the turntable and the interface is usually required unless the turntable has a built-in preamp with a line output.
In Sound Forge Pro, set the recording format to 24-bit, 96kHz, stereo before starting the first pass. Go to File → New and confirm these settings, then start recording. I record full album sides as single files — flip a record, record the other side, then split into individual tracks afterward. Splitting after recording is faster than starting and stopping the recording between tracks.
Recording Levels: Leave Headroom Before Restoration
The recording level you set on the audio interface determines whether the DeClipper has work to do before anything else. Getting the level right at capture is faster than running DeClipper on a clipped file — and DeClipper can't recover a severely overloaded recording anyway.
Target peak levels of -12 to -6 dBFS during recording. This leaves 6–12 dB of headroom above the loudest passages, which is enough for the restoration tools to operate without running into the digital ceiling. Watch the levels in Sound Forge's recording meters during playback of the loudest passage on the record before committing to the full capture — set the gain on the interface so the peaks land in this range, then start recording.
Do not record close to 0 dBFS. A reading of -1 or -2 dBFS during a test pass means the actual loudest transient on the full side — a loud brass note, a forte piano chord, a drum hit — can easily push over 0 dBFS and clip. Once a sample is clipped, it's flat-topped. DeClipper interpolates a plausible reconstruction, but it's an approximation, not a recovery. Clipping that happens at 0 dBFS cannot be undone.
A 24-bit recording at -12 dBFS peak has around 108 dB of usable dynamic range — more than enough to capture any vinyl record with room to spare. The instinct to record as loud as possible is a holdover from 16-bit recording, where low levels introduced audible noise floor. At 24-bit, record quiet and give the tools room to work.
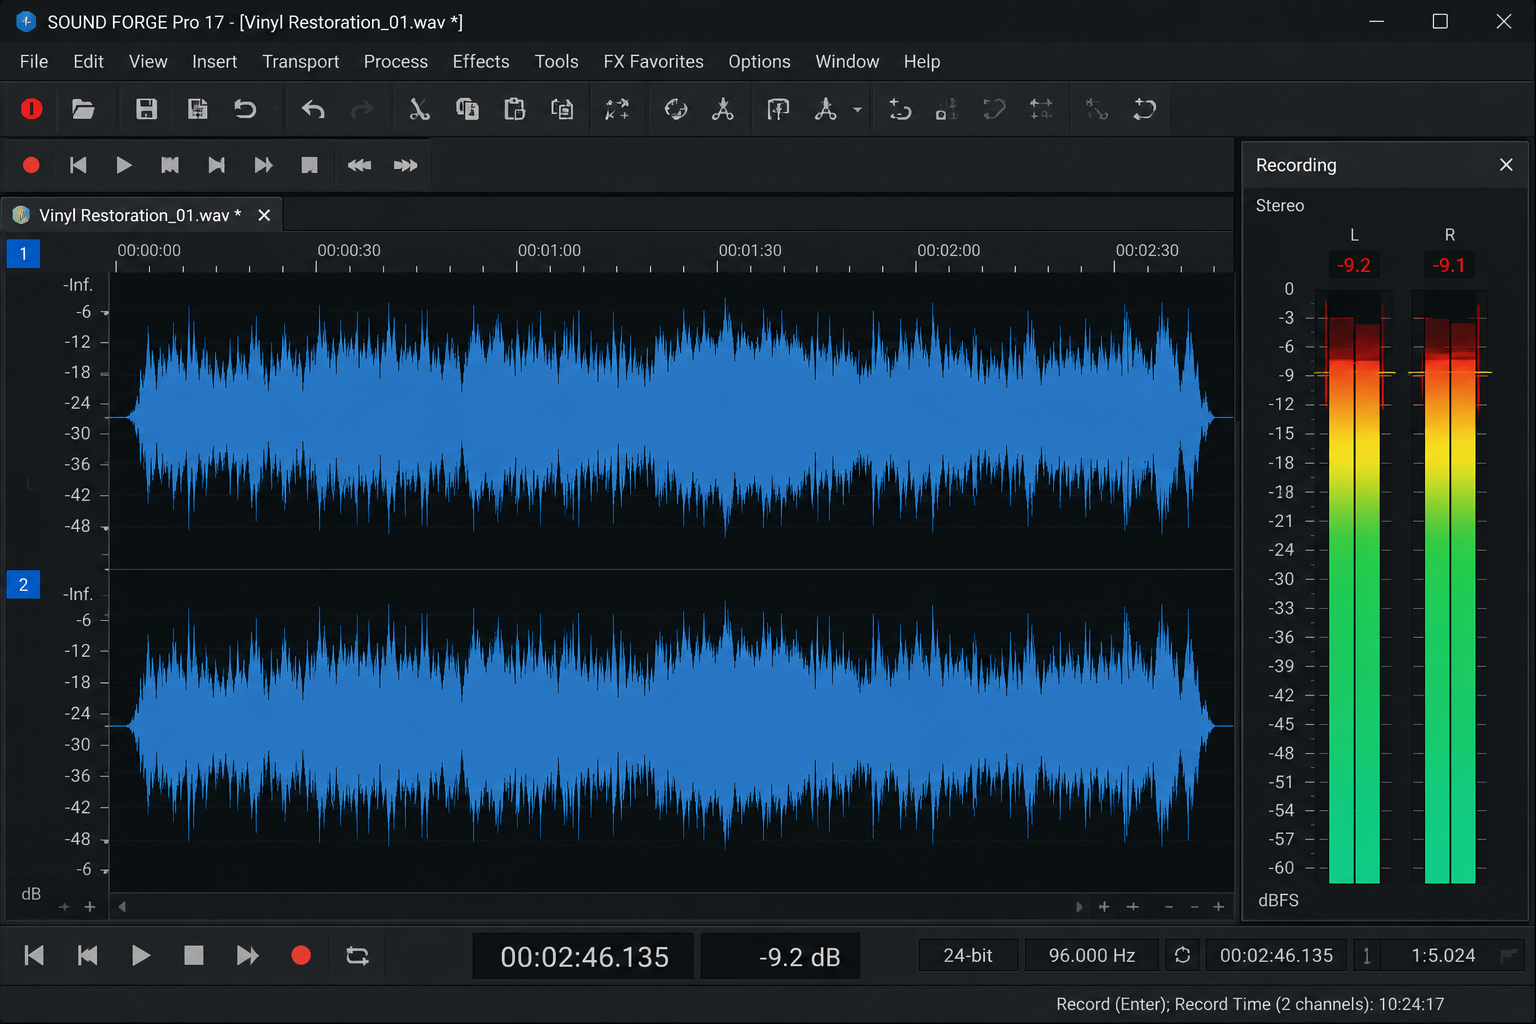
Sound Forge Pro recording levels for vinyl transfer with safe headroomOn the 340-record project, I set the interface gain once for the first record in each batch and checked with a 30-second test play of the loudest side. My target was peaks reaching around -9 dBFS — conservative enough that nothing clipped, high enough that the noise floor wasn't an issue. The few records that caught me by surprise with unexpectedly loud passages showed clipping in the waveform as flat tops immediately visible on the meters during recording. Those sides I re-recorded rather than run DeClipper, because the original pressing hadn't been damaged and the clipping was entirely my gain setting.
The Processing Order — and Why It Matters
Every step in vinyl restoration changes what the audio looks like for the next step. Running them in the wrong order produces worse results than running them in the right order at the same settings. This is the sequence that works:
Sound Forge Pro DeClicker and DeCrackler settings for vinyl records1. DeClipper first — if the recording overloaded the input or the phono preamp clipped. Clipping shows as flat-topped peaks in the waveform. DeClipper reconstructs those peaks before any other tool runs, because a clipped waveform will generate false positives in the DeClicker (it mistakes clipped transients for clicks).
2. DeClicker second — removes isolated transient spikes from needle hits on scratches. The DeClicker works by identifying anomalous short-duration amplitude peaks. It needs the original noise profile undisturbed — running NR-2.0 before DeClicker changes the noise floor and makes the DeClicker's detection less accurate.
3. DeCrackler third — handles continuous surface crackle that the DeClicker doesn't target. The DeCrackler analyses an ongoing noise profile; it works better after large individual clicks are removed, because those spikes skew the noise profile it's building.
4. NR-2.0 fourth — addresses broadband noise: surface hiss, needle hiss, preamp noise. The noise print is captured from the lead-in groove (the silent groove before the music starts) or the runout groove (after the music ends). Use that region, not a quiet passage in the music — the lead-in groove contains only surface noise, which is exactly what NR-2.0 needs to build an accurate profile. After click and crackle removal, the noise print is cleaner and the NR runs with fewer artifacts. This order is consistently recommended across the magix.info forum threads on vinyl restoration.
5. EQ fifth — frequency correction after the cleaning passes. Removing a subsonic high-pass filter before the noise reduction would alter the noise profile; doing it after means you're shaping an already-clean signal.
6. Normalize last — always. Normalizing before processing sets a fixed ceiling, and the subsequent processing steps (especially NR with its gain compensation) will push the level around unpredictably. Normalizing after everything is done gives an accurate final level reading.
I learned this the hard way on the third session of that 340-record project — ran NR-2.0 before the DeClicker on a batch of 1960s soul singles. The noise prints came back contaminated with click residue and the NR left a rhythmic artifact that matched the click frequency. Had to reprocess twelve sides from the raw recordings. Every session since then: DeClipper, DeClicker, DeCrackler, NR, EQ, normalize. In that order, every time.
DeClicker: Settings for Vinyl
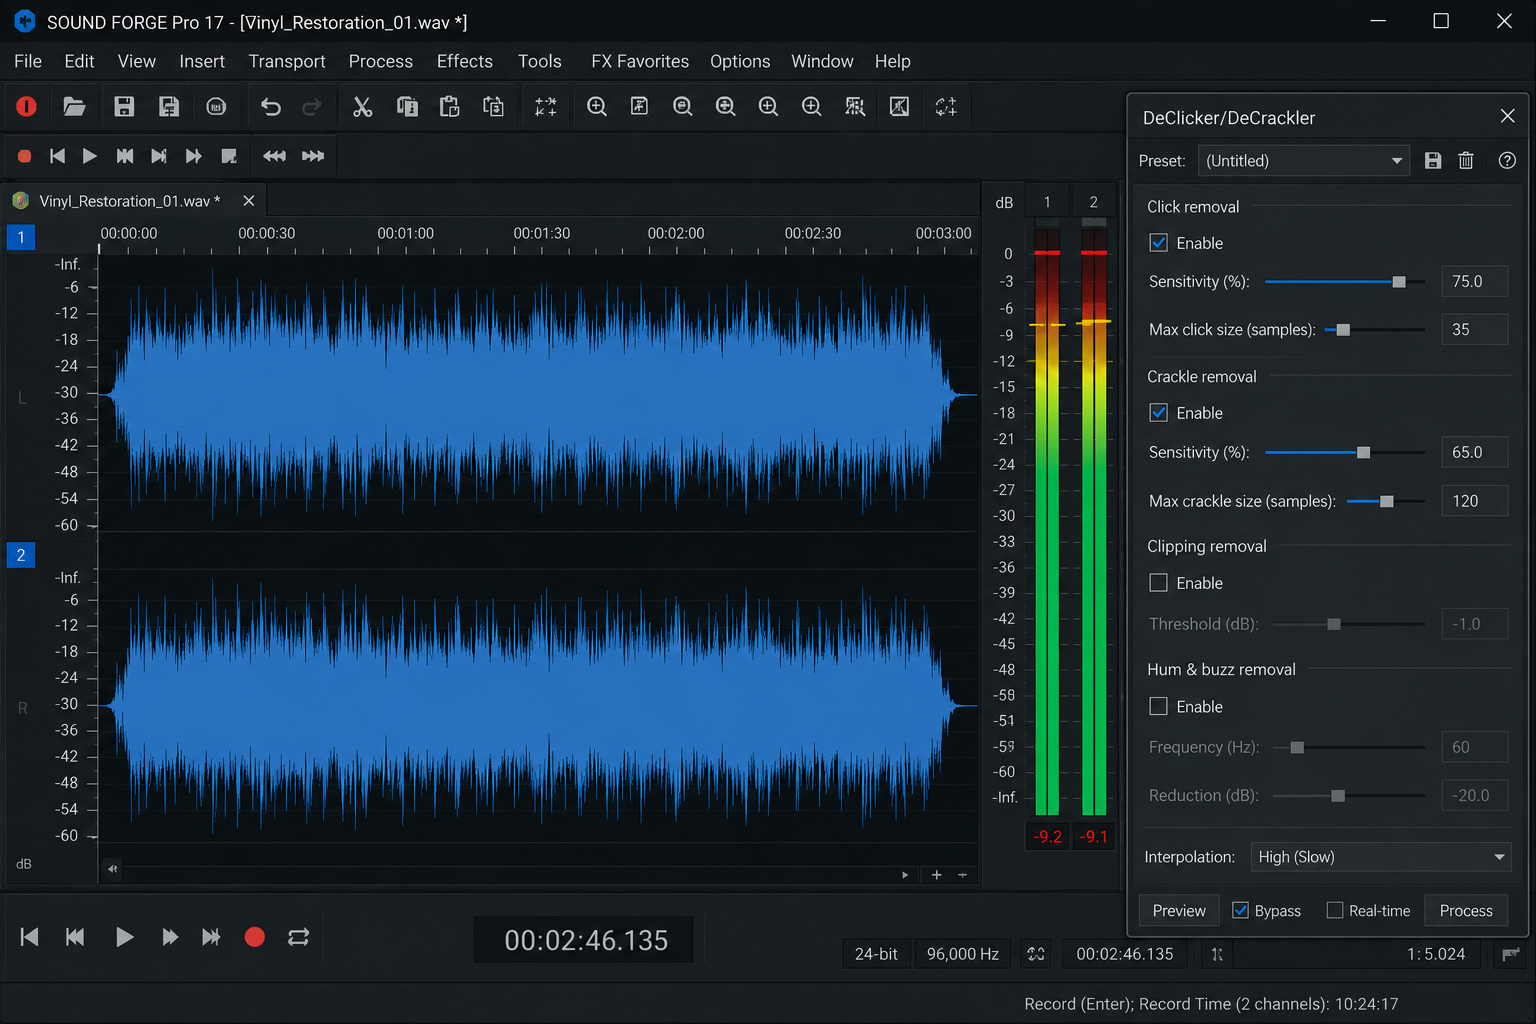
Open Tools → Audio Restoration → Declicker/DeCrackler, click the DeClicker tab. The main control is Sensitivity — how aggressively the algorithm hunts for clicks.
For vinyl, the range that works without damaging program material: sensitivity 3–5 for records in good to excellent condition (visible wear but mostly surface problems), 5–7 for records with obvious scratches and dense click activity. Above 7, the DeClicker starts misidentifying percussion transients and plucked strings as clicks. On a jazz record with brushed snare and upright bass plucks, sensitivity 8 was flattening the leading edge of every snare hit. Sensitivity 5 on the same record removed the audible clicks and left the snare alone.
Use the Inverse mode to verify your settings: click Inverse, then preview. You should hear near-silence with occasional discrete clicks. If you hear musical content — melody, rhythm, tonal material — the sensitivity is too high and you're removing audio that belongs there. This check takes 30 seconds and prevents the most common DeClicker mistake.
After applying DeClicker, preview the treated file and listen specifically to transient-heavy sections: percussion, piano attacks, picked guitar, brass stabs. If those sound softened or clipped on the leading edge, reduce sensitivity and re-run. One of the 7-inch sessions that gave me the most trouble was a 1960s Latin percussion record — dense congas and timbales with the same attack profile as a light click. Sensitivity had to come down to 3 to preserve the instrument attacks, and the remaining few clicks were handled manually with the Pencil tool and Interpolate.
DeCrackler: Reducing Surface Texture
Switch to the DeCrackler tab. The DeCrackler targets continuous surface crackle — the persistent texture of degraded vinyl that reads as a kind of roughness rather than discrete clicks.
The sensitivity range for vinyl crackle: start at 3–4 and preview. Listen on headphones for the DeCrackler artifact, which is a slight processed quality — a smoothing of high-frequency texture that can make the audio sound like it's been run through a light high-cut filter. If you hear that quality, back the sensitivity down. The goal is to reduce the crackle without making the recording sound processed. A reduction from obvious crackle to background-level crackle is a success; trying to eliminate it entirely at high sensitivity settings usually produces audible artifacts worse than the crackle itself.
On pressings from the early 1970s with light surface wear, DeCrackler at 4 was enough to clean the surface texture while leaving the transients and high-frequency instrument detail intact. On a heavily played copy of a 1980s pop record — the kind that had been through every house party of the decade — DeCrackler at 6 was still leaving audible crackle, and I accepted that result rather than push the sensitivity into artifact territory. Some records have been damaged past what software can cleanly restore.
NR-2.0: Capturing the Vinyl Noise Print
Vinyl has a specific noise profile: surface hiss from the groove walls, needle hiss from stylus contact, and often a low-frequency rumble from the turntable's motor. NR-2.0 handles all of these with a single noise print, as long as the print is captured from the right place.
Find the lead-in groove — the silent spiral section at the start of the record, before the music begins. In the waveform display, this appears as a low-amplitude section at the very beginning of the file. Select 0.5–1 second of this section. Go to Tools → Noise Reduction → Capture Noiseprint. Then Ctrl+A to select the whole file and go to Tools → Noise Reduction → Reduce Noise.
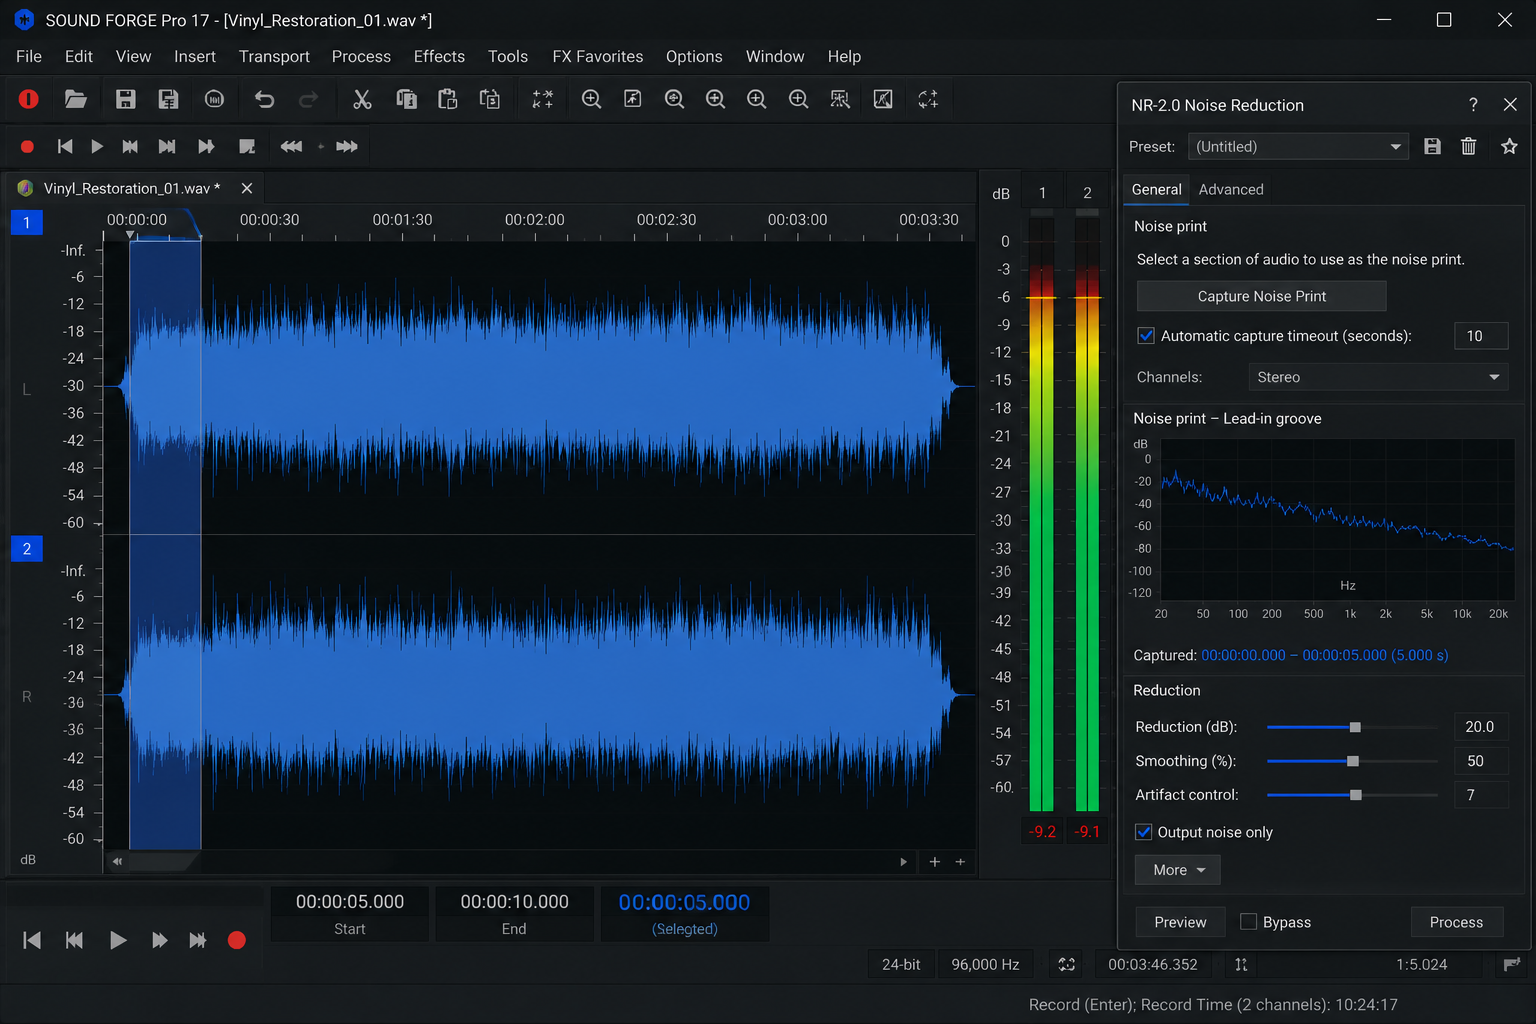
NR-2.0 noise print selection from vinyl lead-in groove in Sound Forge ProReduction amount for vinyl: 6–12 dB. Starting at 6 dB and previewing is the right approach. The Digital FAQ Sound Forge restoration guide documents this clearly: over-reducing the noise on vinyl introduces a metallic "underwater" artifact that's more noticeable than the original hiss. 8 dB removes the audible surface noise on most records without artifact. 12 dB is the ceiling — above that, you're in artifact territory on all but the cleanest recordings. Full click and crackle settings are in the click removal guide. The full NR-2.0 workflow is in the noise reduction guide.
If there's no clean lead-in groove — the record was cut to the edge and the music starts immediately — use the runout groove at the end of the side. On 45s this is often only half a second of usable silence, which is enough. I've captured noise prints from as little as 0.3 seconds on densely pressed singles without quality problems — the noise profile of surface hiss is consistent enough that a short sample still produces an accurate print. Same principle: it contains only surface noise, no program material. A 0.5-second sample is sufficient for an accurate print.
EQ After Cleaning: Rumble and Tone Correction
After the three restoration passes, use the Paragraphic EQ for two specific corrections common to vinyl.
Subsonic rumble — turntable motor noise, floor vibration, and warped record warble all produce low-frequency energy below 30–40 Hz that isn't audible but consumes headroom and can cause speaker problems. Apply a high-pass filter at 30–40 Hz. Set the filter type to High-Pass in the Paragraphic EQ, center at 35 Hz, and run a steep slope. This removes subsonic content without touching the audible bass frequencies.
On a batch of original 1950s Blue Note jazz pressings last autumn, the Spectrum Analysis before EQ showed a consistent 4–5 dB rolloff starting above 8 kHz compared to a modern digital transfer of the same recordings. A +2 dB high shelf at 9 kHz restored the cymbal detail without touching the midrange. On one pressing, that shelf also revealed click residue at 11 kHz that the DeClicker had missed — which is why checking Spectrum Analysis after cleaning and before EQ is worth the extra two minutes.
Tonal correction — older records often have a rolled-off top end from stylus wear or storage degradation. A gentle high shelf boost of +1 to +2 dB above 8–10 kHz can restore some of the original brightness. Check with Spectrum Analysis first (View → Spectrum Analysis) to see where the high-frequency content is actually rolling off before applying any boost. The key is checking that no content was boosted into clipping — reduce overall level first if the file is sitting close to 0 dBFS before EQ. The Paragraphic EQ settings for vinyl in specific detail are in the EQ guide.
Splitting an Album Side into Individual Tracks
After processing, you have a single audio file containing a full album side. Splitting it into individual tracks uses Sound Forge's Marker and Region system.
Press M during playback (or go to Special → Insert Marker/Region) to drop markers at the start of each track. Name each marker with the track number and title. Then go to File → Save Regions to export each marked region as a separate file. Sound Forge exports each region as its own file, named by the marker label, to a directory you specify. This is faster than manually selecting each track, doing a Save As, and repeating.
For precise track start positions, zoom in to the transition between tracks — the silence between the end of one track and the start of the next — and place markers at the exact zero-crossing before each musical entry. Placing markers during playback gets you in the right area but often lands a fraction of a second into the silence rather than at the precise edge of the next track. Zoom in to 1:500 or finer, find the last sample of silence before the waveform rises, and place the marker there.

Sound Forge Pro markers and regions for splitting vinyl album tracksI processed 12 full album sides from one session last winter — a box of classical LPs in various condition. After the cleaning pass on each side, the marker placement and region export took about 8 minutes per side including double-checking start points for all tracks. The result was 87 individual FLAC files named by composer and track title, ready to import into a media library without any renaming.
Export: Format and Settings for Archival
The processing chain for the 340-record project produced 340 24-bit/96kHz WAV masters, which I then dithered and re-exported to 16-bit FLAC via Batch Converter. The master files sit on a drive at 96kHz — if a better declicker algorithm becomes available in five years, the masters are there to reprocess from a cleaner starting point than 16-bit would allow.
For archival purposes, export the fully processed file as 24-bit FLAC before dithering down to 16-bit for delivery. FLAC is lossless — the 24-bit file preserves all processing headroom and can be re-exported at any future time without generation loss. Keep this as your master.
For streaming or media library playback: export a 16-bit/44.1kHz FLAC or WAV via File → Save As. In the Save As dialog, click Custom, set bit depth to 16-bit, sample rate to 44.1kHz. Sound Forge applies dithering automatically during the bit depth reduction. POW-r dithering (available in SF Pro) is the preferred type for musical material — it shapes the dither noise to the upper frequency range where it's less audible.
For batch processing multiple processed album sides to the same format: Tools → Batch Converter saves doing this manually per file. The full batch workflow is in the batch processing guide. For the vinyl project, I saved a Plug-In Chainer preset with the full processing chain and applied it to each side through batch, which reduced the per-side processing time after the first few sessions considerably. The chain runs in sequence — DeClicker, DeCrackler, NR-2.0, EQ high-pass — and each side comes out with the same baseline treatment. Anything needing extra attention gets a separate manual pass.
Frequently Asked Questions
What sample rate should I use when recording vinyl in Sound Forge Pro?
Record at 24-bit/96kHz. The extra bit depth gives restoration tools more dynamic range to work with during click removal and noise reduction, reducing artifacts. The higher sample rate captures ultrasonic information that some restoration algorithms benefit from during processing. Export the finished file as 16-bit/44.1kHz for CD or streaming delivery, using dithering during the conversion. Recording at 16-bit/44.1kHz saves storage but leaves no headroom for the processing passes.
What order should I run restoration tools for vinyl in Sound Forge Pro?
DeClipper first (if the recording clipped), then DeClicker for isolated clicks, then DeCrackler for continuous surface crackle, then NR-2.0 for broadband noise, then EQ, then normalize last. Running NR-2.0 before DeClicker produces worse results because the noise print no longer matches the original vinyl noise profile. Normalizing before processing leads to unpredictable levels after the restoration steps alter the signal.
What DeClicker sensitivity should I use for vinyl in Sound Forge Pro?
Start at 3–5 for records in good condition and 5–7 for records with visible scratching or dense click activity. Always use Inverse Mode to verify: preview with Inverse on and listen for near-silence with isolated clicks. If you hear musical content, the sensitivity is too high. Check percussion transients, piano attacks, and plucked strings after applying — if these sound softened or muted at the leading edge, reduce sensitivity.
Where should I capture the noise print from vinyl records in Sound Forge Pro?
Capture the noise print from the lead-in groove — the silent section at the very start of the record before the music begins — or the runout groove at the end of the side. Both contain only surface noise with no program material. Do not capture the noise print from a quiet musical passage: those sections contain residual instrument information that contaminates the noise profile and causes NR-2.0 to remove content that belongs in the recording.
How much noise reduction should I apply to vinyl in Sound Forge Pro?
6–12 dB is the practical range. Start at 6–8 dB, preview the full result, and increase only if the surface noise is still clearly audible. The Digital FAQ guide on Sound Forge audio restoration documents the metallic "underwater" artifact that appears above 12 dB on most vinyl recordings. Some surface noise level remaining in the finished file is acceptable — it's part of the source material's character — and is preferable to the artifact that results from over-aggressive reduction.
How do I split a vinyl album into individual tracks in Sound Forge Pro?
Press M during playback to drop markers at the start of each track, or use Special → Insert Marker/Region for named markers. Zoom in to the silence between tracks to place each marker at the precise start of the next musical entry. Then go to File → Save Regions to export all regions as separate files in one pass. Sound Forge names each exported file by the marker label and places them in the directory you specify.
Does Sound Forge Pro work for 78rpm record restoration?
Yes — the same tools apply, with adjustments. 78rpm records have far more surface noise and typically narrower dynamic range than vinyl LPs. DeClicker sensitivity usually needs to be higher (5–8) because the clicks are more dense and the program material was originally recorded with less transient content. NR-2.0 reduction can go slightly higher — 10–14 dB — because 78rpm surface noise is louder relative to the music. EQ corrections differ: 78rpm recordings have their own equalization curves predating the RIAA standard, which may require additional frequency shaping depending on the label and pressing year. The DeCrackler often needs to run at higher sensitivity on 78s because shellac produces coarser crackle than vinyl.