
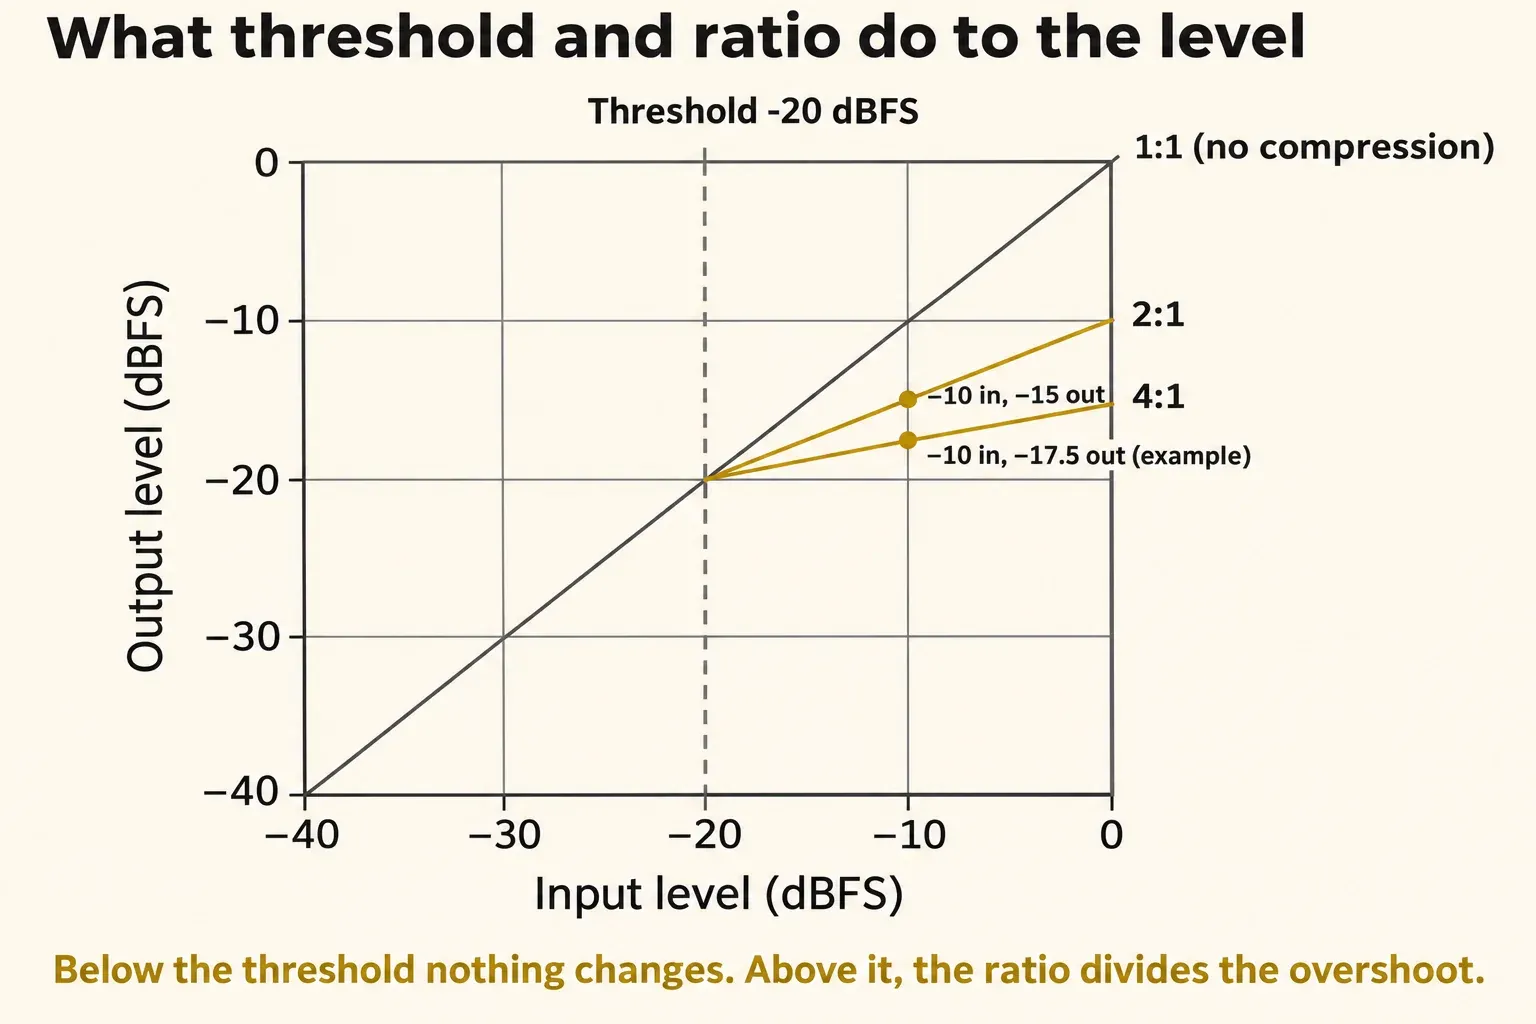
A conventional downward compressor reduces louder material to narrow the gap between loud and soft. Threshold and ratio set its level response; attack and release control how quickly the gain changes.
In the hard-knee, steady-state response shown in Sound On Sound's measured example, 2:1 at a -20 dBFS threshold maps a -10 dBFS input to -15 dBFS. A soft knee rounds the transition, and release can keep gain reduction active after the level falls below the threshold. Makeup gain then raises the whole signal, which is how the quiet parts end up relatively louder; the compressor itself never lifts them.
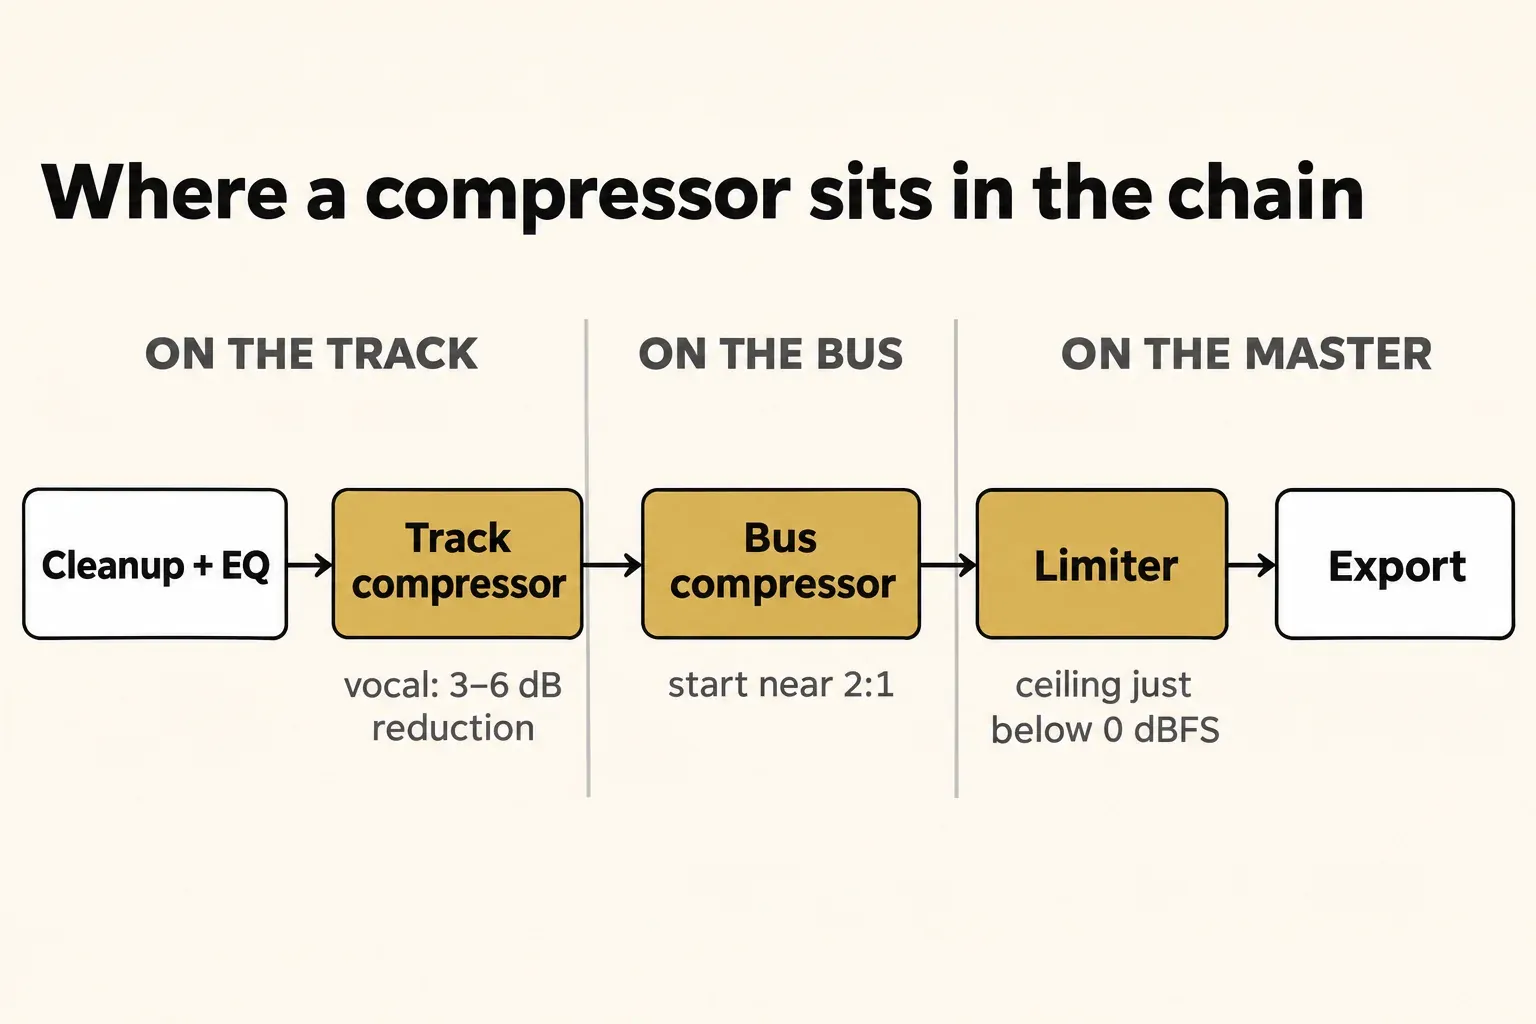
My rule is simple. Move the threshold first, watch the gain-reduction meter, and judge the result against a bypassed copy at the same level, because ears tend to prefer whichever version is louder. A lower threshold means more compression, not less. For a single vocal, Waves and Universal Audio both suggest 3–6 dB of gain reduction as a starting range; the table below separates that job from gentle bus control and harder drum processing.
What a compressor does to the level
Think of a compressor as an automatic hand on the fader that pulls back louder passages and then lets go. The Sound Forge Pro help on dynamics effects describes it as reducing amplification whenever the level is above the threshold. The gap between loud and soft parts shrinks, and the whole signal can then be raised with makeup gain without overdriving the peaks. Attack and release set how fast that hand moves in and lets go.
Here is a hard-knee, steady-state calculation from the figures Sound On Sound published, before makeup gain and without modeling attack or release. Take a passage that swings from -35 dBFS to -5 dBFS, a 30 dB range, and run it through 2:1 at -20 dBFS. The peak sits 15 dB over the threshold, so it comes out 7.5 dB over, at -12.5 dBFS. An isolated -35 dBFS level stays unchanged once any release from an earlier peak has finished. Add 7.5 dB of makeup gain and the peak is back at -5 dBFS while the quiet parts rise to -27.5 dBFS, so the range is now 22.5 dB.
So the compressor didn't make the quiet parts louder. It turned the loud parts down, and the makeup gain lifted everything by the same amount afterwards. Quiet material rises only through makeup gain, a parallel blend or a true upward compressor, a device that lifts quiet signals and leaves loud ones alone and that Sound On Sound describes as rare in hardware.
The same process runs in broadcast chains and in hearing aids, where, as Wikipedia's entry on dynamic range compression notes, it brings audio into the listener's hearing range. Audio compression in this sense has nothing to do with shrinking files: MP3 and AAC are data compression, which the WAV vs FLAC vs MP3 comparison covers.
The controls, one at a time
The controls to recognize are threshold, ratio, attack and release, makeup gain and, where provided, mix. The gain-reduction meter shows their result. These terms transfer between many hardware and plug-in compressors, although some designs fix or combine controls.
Threshold
Threshold sets the reference level for compression. The Sound Forge help's simple example puts it at -20 dB. With a hard knee and settled levels, material above that point is reduced and material below it is unchanged before makeup gain. A soft knee can begin the transition below the marked threshold, and release doesn't stop immediately when a peak falls back below it. Lower the threshold and more of the signal crosses it, so you get more compression; raise it and you get less. The VEGAS Pro Track Compressor help adds a warning that heavy compression from a very low threshold usually causes distortion.
Ratio
Ratio sets how hard the compressor pushes back once the signal is over the threshold. The Sound Forge help gives the Ratio arithmetic for 2:1: every 2 dB of input above the threshold produces 1 dB more output. The VEGAS Pro help says the same thing at 3:1, where the input has to rise 6 dB over the threshold to raise the output by 2 dB. The ratio divides only the overshoot, never the whole level.
On those hard-knee, steady-state curves, an input 10 dB over the threshold comes out 5 dB over at 2:1 and 2.5 dB over at 4:1, which is 7.5 dB of gain reduction. Those are the two points marked above. The bend is the knee. A soft knee rounds the transition around the threshold instead of making one abrupt change of slope; use the straight-line ratio arithmetic beyond that transition.
Attack and release
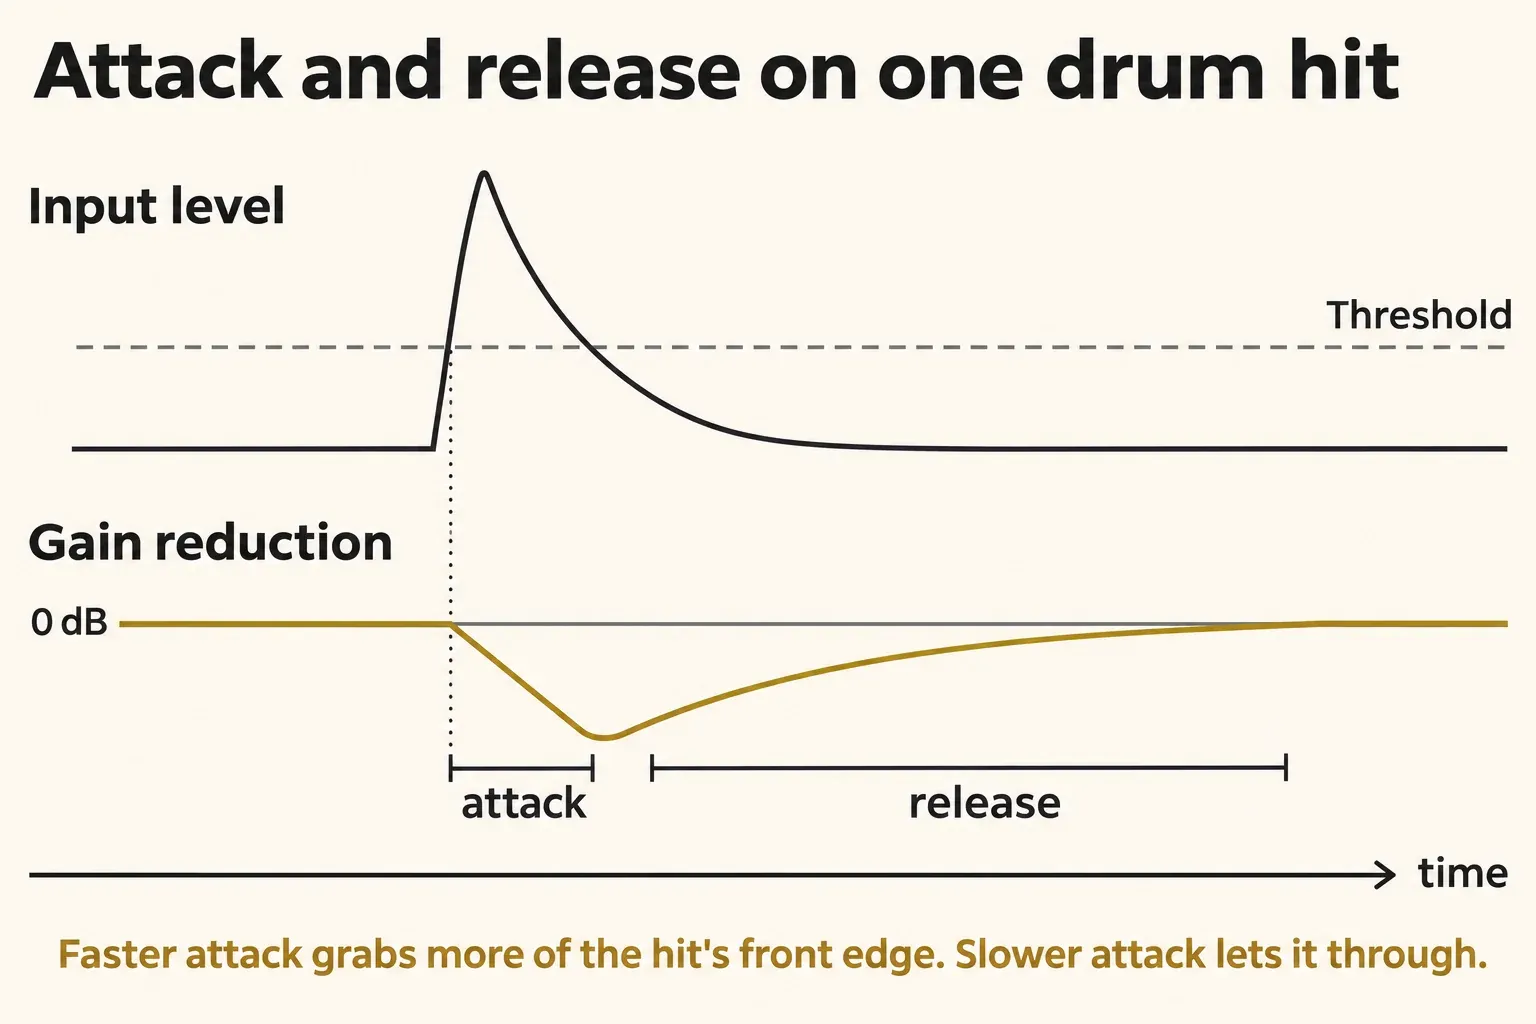
Attack governs how quickly gain reduction builds; release governs its recovery. The VEGAS Pro help describes these as the times to reach maximum reduction and return from maximum to zero. Treat those as that plug-in's definitions rather than assuming equal millisecond settings behave identically on every compressor. The spans differ a lot between units: Universal Audio's compression basics put fast attacks at 20–800 microseconds and slow ones at 10–100 ms, with release anywhere from 40–60 ms up to 2–5 seconds, depending on the type and brand. A fast attack catches the front edge of a drum hit or a consonant, while a slower one lets that edge through and clamps down on what follows. Many compressors also offer an auto release that follows the material instead of a fixed time. A signal can still be attenuated below the threshold while that release recovers; FabFilter's explanation of knee and release describes the smoother recovery with a soft knee.
Detection mode shapes the timing too, since a peak detector reacts faster while an RMS detector follows the average level more closely.
Makeup gain
Makeup gain, the output control, simply restores the compressed signal to roughly its former level, as Sound On Sound's Compression Made Easy puts it. Sound Forge Pro labels it Out Gain. In the VEGAS Pro Track Compressor, Auto gain compensation adds a constant boost based on the Threshold and Ratio settings, and Output Gain still fine-tunes the result.
Mix
The Mix control sets the balance between the dry and the compressed signal, according to the Sound Forge help. That is how you get parallel compression inside a single plug-in, without a second track.
The gain-reduction meter
The gain-reduction meter shows when the compressor is turning the level down and by how much. I'd watch it more closely than the knobs, because the same ratio can mean 1 dB or 10 dB of reduction depending on the threshold and the material. VEGAS Pro shows it as the Reduction meter on the Track Compressor.
What compression is used for
Compression keeps a part steady in its place: a vocal that doesn't jump out on loud words, a voice-over that holds one level, a bass that sounds even, drums that hang together and a master that moves less between sections.
On vocals, the job is taming loud syllables so the words sit at one level. A compressor-based de-esser uses a filtered detector focused on the vocal's sibilant range, as iZotope's dynamics primer explains. That makes it react to "s" sounds instead of simply following the full voice level. The guide to reducing sibilance in Sound Forge without dulling the voice shows that tool at work.
Voice-over and podcast chains start light. Sound On Sound's podcast chain runs a gentle 2:1 compressor first and adds a second, higher-ratio compressor with a faster release for the loud syllables. The whole route from microphone to export is in the guide to Sound Forge Pro for voice-over recording.
On bass, the aim is a part that sounds "tight and even," in the words of Sound On Sound's guide to bass guitars in the mix, with the loudest notes pulled back toward the rest.
A drum bus can go either way. The iZotope and Sound On Sound starts in the table below use 2:1 for gentle drum-bus control, while Waves' SSL bus compressor guide lists a firmer 4:1 setting as the one that adds punch. A strong kick can dominate the detector and pull down the whole bus. A sidechain high-pass filter can reduce that trigger without cutting bass from the audible signal, as Sound On Sound's Q&A on kicks losing weight explains. Use it when the kick causes unwanted gain reduction, rather than treating every compressor as inherently bass-sensitive.
On the mix bus and in mastering, the settings get gentle. A light bus compressor is one step of mastering a track in Sound Forge Pro, not the whole job.
Published settings: choose the job before the numbers
These published settings answer different questions: gentle mix control, mastering, drum punch, bass consistency and single-vocal leveling. The table keeps each recommendation attached to its job. An upper limit is not a target, and a setting that works in one example is not a measured optimum.
| Job | Published starting points | How to use them |
|---|---|---|
| Gentle mix bus | iZotope starts at 2:1; Sound On Sound suggests 1.5:1 or 2:1 with 1–3 dB of reduction; Waves suggests 2:1 or less and 1–2 dB at the loudest points. | About 2:1 is a useful audition start. Lower the threshold only until the mix becomes steadier, then match bypass loudness. |
| Mastering | Waves gives 1.25:1 or 1.5:1 with 1–2 dB of reduction; LANDR also discusses ratios such as 1.5:1. | Keep this separate from mix-bus processing. If the master already moves as intended, adding a compressor is optional. |
| Drum bus: glue or punch | For glue, iZotope gives 2:1 and 1–2 dB of reduction, while Sound On Sound uses 2:1 and an average 2–3 dB. For punch, Waves' SSL table uses 4:1 and 4–6 dB. | Choose the effect first. Averaging the glue and punch settings would hide the reason they differ. |
| Bass: individual track or bus | iZotope starts a bass track at 2:1–4:1. Waves gives 2:1 or 4:1 and 1–3 dB for a bass bus. Sound On Sound describes 4:1 or higher for holding a bass part in a fixed mix position, with gentler settings for less assertive styles. | A pre-leveled track, an uneven performance and a combined DI/amp bus need different amounts of control. Start gently and add reduction only when notes still jump out. |
| Single vocal | Waves gives 3–6 dB as a general starting range; Universal Audio also gives 3–6 dB. For a subtler result, Sound On Sound suggests no more than about 4 dB. | The first two publishers agree on the range; the third describes an upper limit for subtlety. It is not another midpoint to average into a target. |
Timing needs the same separation. Waves' mix-bus tips suggest 10–30 ms attack and release below 50 ms; its mastering tips start the attack at 30–40 ms and relate release to the beat. In Sound On Sound's mix-bus interview, Peter J Moore suggests about 50 ms attack and 250 ms release, or auto release. iZotope's guide contains a 50 ms attack example but two different release values, 130 ms in its walkthrough and 100 ms in its default-settings block. Those examples do not establish a single best release time. I'd try auto release where available, then watch whether gain reduction recovers naturally with the phrase or groove.
Vocal ratio also follows the goal. iZotope suggests 5:1 for pop vocals, Sound On Sound gives 2:1–5:1 in its vocal advice, and LANDR goes to 10:1 or higher for strict level control. The last is an intentional stronger treatment, not evidence that every voice needs a high ratio.
Speech examples cover different positions in the chain. Descript describes a ratio just under 2:1 for light control of a spoken voice; Sound On Sound opens a podcast chain with a soft-knee 2:1 compressor and follows it with a higher-ratio stage for loud syllables. Waves' 1–2 dB example is optional stereo-bus compression for multiple speakers, not the same first-stage treatment of one voice.
Use the table to pick the relevant job, not to copy a universal preset. I'd loop a representative phrase, select a gentle ratio and move the threshold until the gain-reduction meter responds to the troublesome peaks. Adjust attack if the front edge disappears, release if the level stays down or audibly bounces back, and output gain for an equal-loudness bypass. Keep the compressor only if the part sits better in the mix. Large phrase-level jumps are often easier to balance with clip gain or automation before compression.
Parallel and sidechain compression
Parallel compression blends an untouched copy of the signal with a compressed copy. On page two of Sound On Sound's parallel compression feature, an Audio Precision measurement shows that with both paths at unity gain, quiet material below the threshold comes up by 6 dB, because it is identical in both paths. A plug-in's Mix control provides a dry/wet blend, but its gain law and any automatic gain compensation determine the resulting level. A 50% setting does not by itself promise the 6 dB rise of two unity-gain paths.
Sidechain compression lets a different signal drive the gain reduction. The Sound Forge help's example is a kick drum ducking another track for the familiar pumping effect; the host has to route that audio into the plug-in's extra inputs 3/4, and the coreFX Limiter doesn't offer a sidechain.
Compressor vs limiter
A limiter uses strong gain control to enforce a ceiling, but a high ratio by itself does not guarantee that fast transients stay below it. There is no agreed ratio where compression becomes limiting. LANDR's compression explainer and Waves call 10:1 or higher limiting, iZotope says around 12:1, Universal Audio, Hollyland and Sound On Sound put it at 20:1 or higher, and the Sound Forge help describes a theoretically infinite ratio and a ceiling preset at -0.1 dB. Its Output Clip mode can still pass very fast transients beyond that ceiling; Look Ahead adds a second limiting stage that scans 10 ms ahead to prevent clipping, at the cost of 10 ms latency. If your real question is which of the two belongs on the master, the compressor vs limiter guide walks through that choice.
Compressors in Sound Forge Pro and VEGAS Pro
In Sound Forge Pro, part of the Boris FX audio lineup, the Effects toolbar has buttons for the coreFX Compressor, 2-Point Compressor and Limiter, plus Wave Hammer and Wave Hammer 2.0. Classic Wave Hammer, a mastering tool that pairs a compressor with a volume maximizer, opens from its toolbar button. Effects > Wave Hammer 2.0 is the menu route to the newer version, which processes dynamics in up to four independent frequency bands. Effects > Dynamics still exists, but the help marks it deprecated in favor of Wave Hammer 2.0.
Each of these ships with presets that the help describes as starting points. Applying an effect works the same way for all of them: pick a preset, click Preview to hear it, tick Bypass to compare with the untouched audio, then move the threshold until the meter shows the reduction you want. The Sound Forge Wave Hammer guide covers its presets and audition ranges in full. Its voice starting points of 2.5:1–4:1 are firmer than the light first stage in Sound On Sound's podcast chain. They are audition settings for Wave Hammer, not a replacement for either documented podcast stage. I'd start gentle and move toward the firmer voice setting only when loud syllables still jump.
VEGAS Pro handles compression per track. The Track FX button on each audio track opens that track's effects chain, where you add or edit the Track Compressor, which has Threshold, Amount (its ratio), Attack, Release, Auto gain compensation, Output Gain, Smooth Saturation, a Reduction meter and presets. Smooth Saturation reduces distortion and pumping when the compression gets heavy. If all you need is to stop a render from getting too loud, capping volume in VEGAS Pro covers the limiter and normalize routes.
Common compression mistakes
Most compression problems come from too much of a good thing: too low a threshold, too fast an attack or more reduction than the job needs.
- Threshold too low. Pulling the threshold down until everything is compressed flattens the part, and the VEGAS Pro help warns that heavy compression from a very low threshold usually distorts.
- Attack too fast. Kick drums can lose their bass with attack times under about 50 ms, according to Sound On Sound's Compression Made Easy, and Waves' vocal compression guide warns that too fast an attack flattens consonants until the voice sounds lispy and muffled.
- Release too fast. If the level audibly breathes or bounces back between hits and you want a steadier sound, lengthen the release while watching the gain-reduction meter. Universal Audio explains how a very short release can cause pumping. If that still pulls the whole part around, reduce the gain reduction with a higher threshold or gentler ratio and compare at matched loudness. There is no one release time for every tempo and source.
- Too much gain reduction. A meter reading needs a job attached to it. Hollyland's beginner guide flags sustained readings of 10 dB or more as a warning; Waves' SSL guide cautions against more than 4–5 dB on the mix bus. Sound On Sound's 4–5 dB warning applies to a bass track already leveled with edits, while its vocal advice allows much heavier reduction for an intentionally crushed sound. These are context-specific checks, not hard limits. Listen for lost impact, distracting level movement or a part that sits worse when compressed.
- Judging at different levels. Ears tend to prefer the louder version, as iZotope's dynamics primer points out, so match the compressed and bypassed levels with makeup or auto gain before you decide.
- Compressing the recording pass. For 24-bit recording, Sound On Sound's Hugh Robjohns advises leaving 10–15 dB of headroom, with peaks around -10 dBFS, instead of printing compression on the way in. That's expert advice rather than a rule, but a level you can fix later beats a squash you can't undo.
- Expecting a loudness target. Compression changes the dynamics; it doesn't set the final loudness, which you check on a LUFS meter once the master is done.
Verdict
My verdict: learn a compressor by moving the threshold and watching how the meter reduces loud passages and recovers afterwards. The knee shapes the transition, so the threshold is not an instant on/off boundary. Choose the published starting point for the actual job, about 2:1 for gentle mix-bus control or the 3–6 dB audition range that Waves and Universal Audio give for a single vocal. Compare against a level-matched bypass and stop when the part sits well without losing its front edge. If the master needs a final peak ceiling, I'd put the limiter after that dynamics work and check its mode and output level.