Sound Forge Pro records voice-over directly, edits at the sample level, and processes audio with a toolset that covers the full VO chain — from noise reduction and EQ through de-essing, compression, and platform-specific export. Most professional voice-over artists I know who use it choose SF Pro specifically because of how fast it is to record, mark mistakes on the fly, and return to punch-ins without the overhead of a multitrack DAW. The workflow is file-first and destructive by default, which is exactly what VO work needs: one pass, one file, clean result.
Part of the Sound Forge Pro 2026 Guide — start there if you're new to the editor.
This guide is part of the Sound Forge Pro Workflows hub. Start there if you need podcast, voice-over, vinyl restoration, video editor, music production or Samplitude handoff workflows.
Quick answer: File → New at 24-bit/44.1kHz mono → Options → Preferences → Audio → select ASIO driver → set recording level to -12 to -6 dBFS peaks → record using Ctrl+R → mark mistakes with M during recording → process with EQ, de-esser, compression → export to delivery spec. The rest covers each step in detail including OTR workflow, punch-in setup, and ACX/audiobook delivery.
What SF Pro Does Well for Voice-Over — and One Thing It Doesn't
Sound Forge Pro is a single-file editor. It records one track at a time — which is exactly what solo VO work requires. One microphone, one take, one file. For narration, audiobooks, e-learning, corporate VO, and most commercial work, this is the correct structure. The workflow is fast: record, mark mistakes while recording, punch back in on the bad sections, process, deliver.
What it doesn't do: simultaneous multitrack recording with a separate track per speaker. If you're directing talent and want to record yourself and a client on separate tracks for editing flexibility, SF Pro isn't the tool for that session. Use a DAW for multitrack capture, mix down to a single file, and bring it into SF Pro for final processing. This is a deliberate design choice — the software was built for audio editing and mastering, not session recording with multiple channels simultaneously active.
For solo narration — audiobooks, e-learning modules, commercial reads, corporate training videos — SF Pro handles the complete workflow without needing a second application. I've processed full audiobook narrations of 8–10 hours across multiple sessions entirely in SF Pro: recording, punching in on retakes, editing breaths, processing, and delivering to ACX standards. The speed of sample-level editing in SF Pro is what makes long-format VO work manageable in a single-file editor.
Audio Device Setup: ASIO Driver and Input Configuration
Before recording anything, set up the audio device correctly in Sound Forge Pro. The driver choice affects latency during monitoring — the gap between speaking and hearing yourself in your headphones — which matters for VO because performers need to monitor naturally without delay.
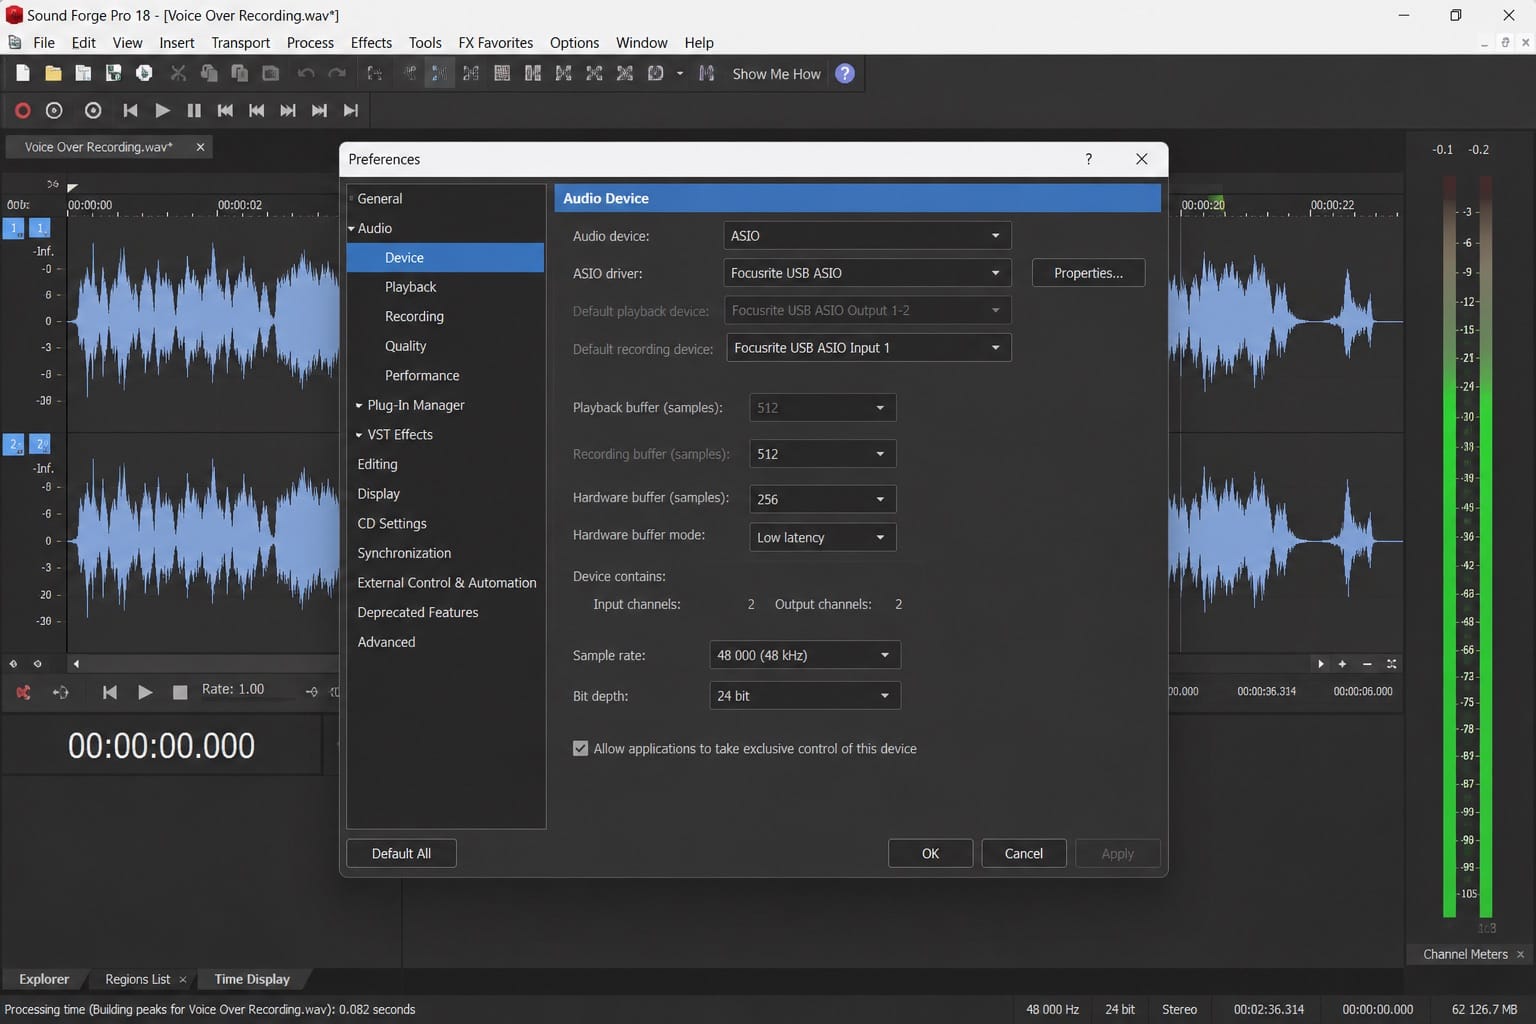
Go to Options → Preferences → Audio Device. In the Audio Device Type dropdown, select your interface's ASIO driver rather than Windows WDM/Wave driver. ASIO provides lower latency: a typical Focusrite Scarlett or UA Volt ASIO driver runs at 3–6 ms latency, which is transparent during monitoring. The Windows WDM driver can run at 20–50 ms or more, which creates an audible delay that makes it difficult to perform naturally.
On my own setup — Focusrite Scarlett 2i2 — selecting the Focusrite USB ASIO driver brings latency to around 4 ms at 64-sample buffer size, which is transparent for monitoring. Switching to the Windows WDM driver on the same hardware produces 28 ms latency, which creates enough delay to make natural speech delivery noticeably difficult.
If no manufacturer ASIO driver is available for your interface, ASIO4ALL provides a generic ASIO wrapper. It works on most hardware and typically gets latency to 10–15 ms — acceptable for VO monitoring, though noisier than a native driver on some systems. On the magix.info forum, the solution for "Sound Forge not detecting my Focusrite" is consistently the same: confirm the ASIO driver is selected and click Apply before configuring inputs. The ASIO driver won't activate until Apply is clicked.
Once the driver is selected, configure the input. Click the Input button in the Preferences Audio panel to open the input routing dialog. Select the input channel corresponding to your microphone connection. For a mono vocal mic on input 1 of a Focusrite Scarlett, select channel 1 as the record input and set the file format to mono in the record dialog. Recording a mono source as stereo doubles the file size and creates a file where both channels are identical — mono is correct for VO.
Recording Levels: Where to Set Your Gain
The correct recording level for voice-over is peaks between -12 and -6 dBFS, averaging around -18 to -10 dBFS on the input meters during normal speech. This is the consensus across professional VO resources and is confirmed in Sound Forge's recording meter behavior.
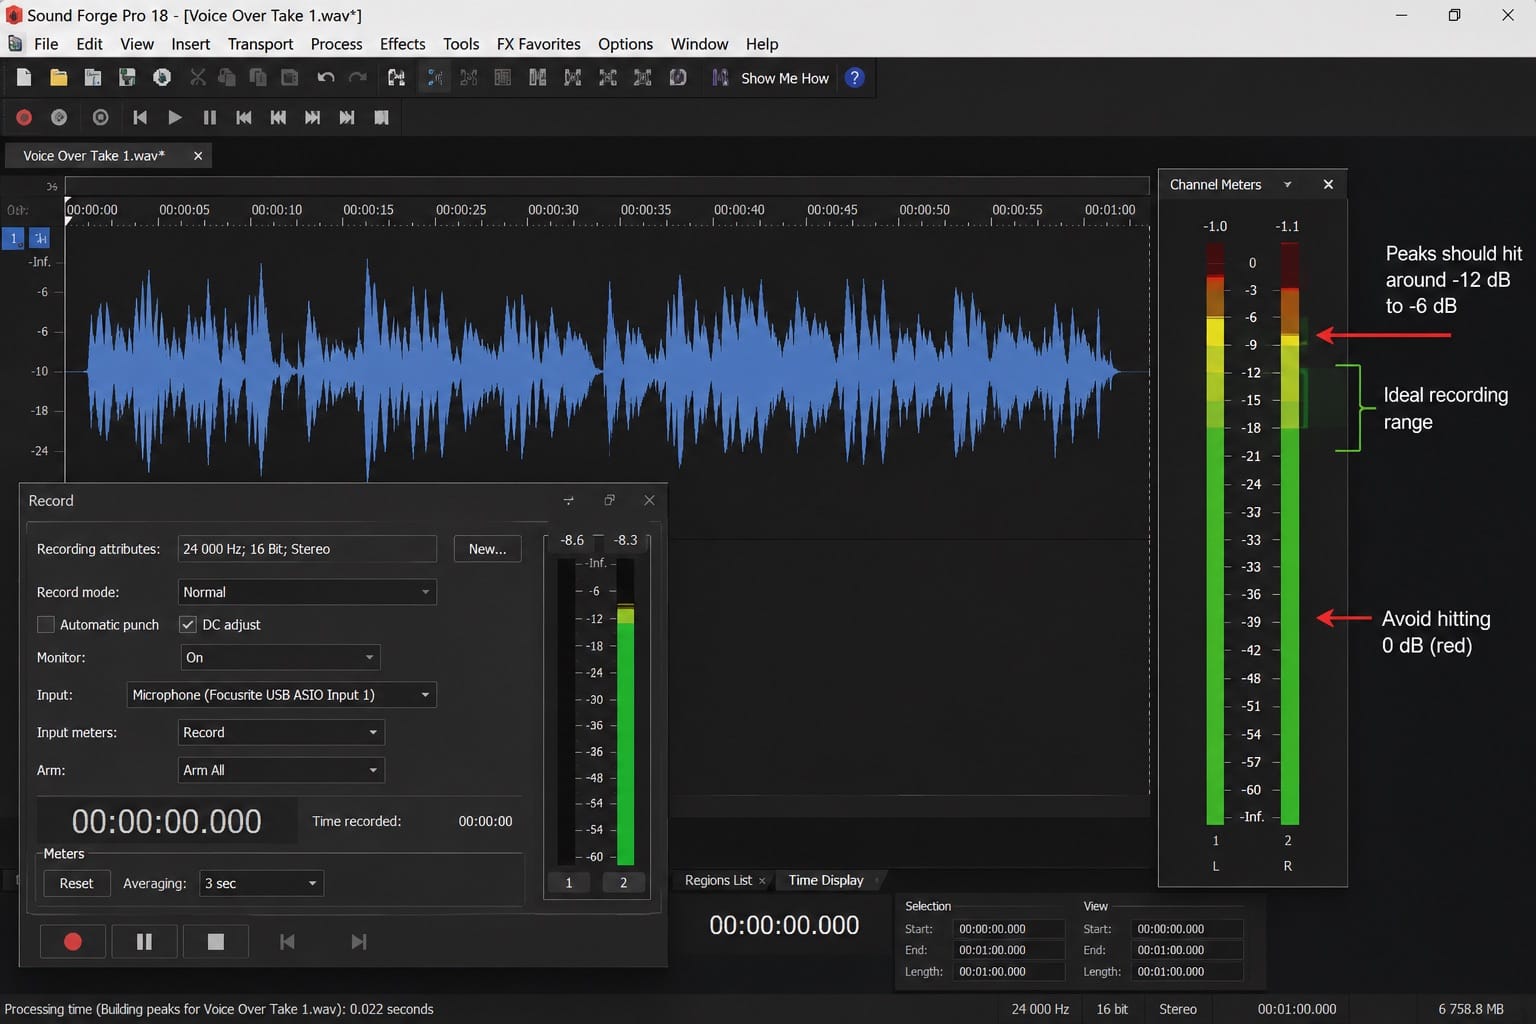
That range gives processing headroom — the EQ, compression, and de-esser you apply later need room to work without clipping the output. A recording peaking at -3 dBFS has almost no headroom; adding 2 dB of presence boost in the EQ clips the output before you can do anything else. A recording peaking at -8 dBFS has room for all of that plus normalization at the end.
Set the gain on your audio interface hardware, not in software. Sound Forge's input meter shows what's arriving, but the gain control should be the interface's physical gain knob before the signal reaches the software. Turn it up until loud passages peak around -6 dBFS in Sound Forge's recording meters, then back off a notch. Check for clipping — flat-topped peaks in the meter or red indicators — and reduce gain until they disappear.
Too quiet is fixable. Too loud (clipping) is not. On every new session with an unfamiliar script or voice, I record a 30-second test passage at normal reading volume and loud emphasis, check the peak in the meters, and adjust the interface gain before starting the actual session. This takes 90 seconds and prevents the session-ruining discovery of clipping halfway through a chapter.
The Record Dialog: Key Settings for Voice-Over
Open the Record dialog via Special → Record or the Record button on the Transport toolbar. All Record dialog parameters are documented in the SF Pro recording documentation. The dialog has several settings that matter specifically for VO work.

Method: Manual is the correct mode for VO. Manual starts recording at the cursor position when you click Record (or press Ctrl+R) and stops when you stop. The Automatic Threshold mode starts when it detects sound above a level — useful for unattended recording but not reliable for VO where you want precise control over start and stop points.
Pre-roll — enable this and set it to 2–5 seconds. Pre-roll plays back the existing audio before the record-in point when you punch in for a retake. Hearing the last few seconds of the previous take before your punch-in is how you match pace, tone, and rhythm when re-recording a single sentence. Without pre-roll, you're recording blind into a context you can't hear.
Prerecord buffer — on the Advanced tab, enable this and set it to 5–10 seconds. The prerecord buffer captures audio continuously even while not recording. If you forget to click Record, the buffer may have caught the take. On a long narration session last winter, the talent delivered the best read of a difficult section exactly as I clicked Record — meaning the buffer had it from one second before Record was pressed. That prerecord buffer saved a retake.
Create regions mode vs Normal mode — Normal overwrites from the cursor position. Create regions mode keeps each recorded take as a separate region in the file, which lets you compare multiple takes of the same line before committing. For VO work where you want options on important lines, Create regions is useful. For routine narration where you punch in and overwrite mistakes, Normal mode is faster.
OTR: Recording While Your Script Is Visible
Sound Forge Pro 15 and later include On-The-Record (OTR), a floating recording toolbar that sits in front of any other application window. You can keep your script — in Word, a PDF, a browser — visible and readable while OTR provides recording controls overlaid on top.
Access OTR from the Record dialog by clicking Remote (or View → OTR). A compact window appears with Record, Stop, and Pause buttons, a level meter, and a time display. It floats above all other windows. You read from your script, click Record when ready, narrate, click Pause or Stop between sections.
This is the workflow SF Pro is specifically designed for VO. The alternative — having the SF Pro main window open alongside a script — requires constant window-switching that interrupts delivery. OTR removes that friction. I set up my dual-monitor arrangement with the script full-screen on the secondary monitor and OTR floating in the corner of that screen. The main SF Pro waveform window is on the primary monitor for after-session editing.
Marking Mistakes While Recording: The M Key
During recording, press M to drop a marker at the current playback position without stopping recording. This is the fastest way to flag bad takes, stumbles, mispronunciations, or sections to retake — you mark them in real time and come back later.
The workflow: record a full pass without stopping. Every time you stumble, mis-read, or cough, press M. Don't stop and restart — keep going. At the end of the session, you have a complete recording with markers at every problem point. Navigate between markers using the Regions List (View → Regions List) and zoom in to each marked section for the retake.
This is faster than stopping and restarting for every mistake, and it produces a more natural performance because you're not mentally recovering from a stop-start recording process. A session that would have been 30 retakes with full stops becomes a continuous take with 30 markers — same corrections to make but half the session time.
On a 4,200-word corporate training narration last spring, I recorded the full pass with 14 markers dropped during recording. After the pass, I went through each marker, zoomed in, and punched in the retake for each. Total session time: 47 minutes including the retakes. The same session stopping and restarting on every stumble would have taken 90 minutes.
Punch-In Recording for Retakes
Punch-in records over a specific section of an existing recording without affecting the rest of the file. In SF Pro, place the cursor at the start of the section to replace, or select the region to overwrite.
Set Method to Manual and enable Pre-roll (5 seconds is typically right). Play from the pre-roll point, hear the preceding audio, deliver the retake with matching pace and tone, and stop. The new recording overwrites only the selected region or from the cursor forward — depending on whether a selection is active.
The critical detail on punch-in: match the room tone in your retake. If you've moved from your recording position, or if the session has a gap of several hours, the room noise floor may have changed. A retake recorded with noticeably different background noise than the surrounding take will be audible even after noise reduction. I do a 30-second noise reduction pass before listening critically to punch-ins — sometimes the apparent tonal mismatch between the original and the punch disappears after the noise floor is equalized.
EQ for Voice-Over: The Specific Moves
Voice-over EQ has different priorities from music EQ or podcast EQ. The goal is maximum intelligibility and presence without harshness or fatigue on long-form listening. Open the Paragraphic EQ via Process → EQ → Paragraphic EQ.
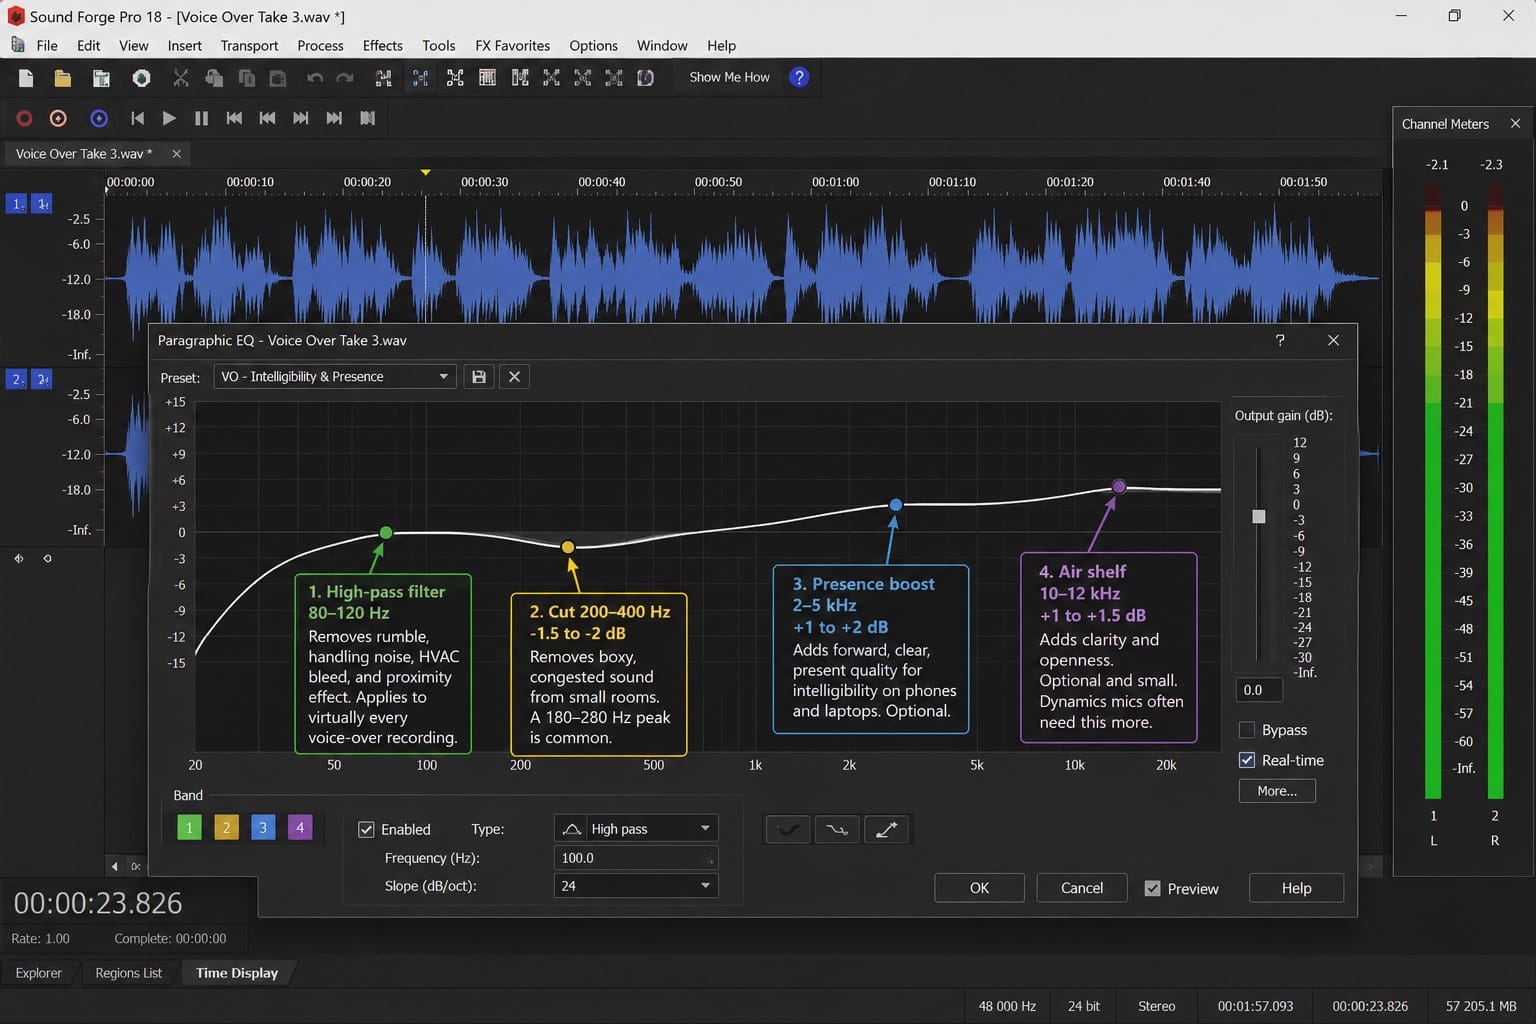
High-pass filter at 80–120 Hz — removes low-frequency rumble, handling noise, HVAC bleed, and the proximity effect (bass boost from close-miking). For most cardioid condenser mics at 6–10 inches, the proximity effect starts to accumulate below 150 Hz. A high-pass at 100 Hz removes it without affecting the fundamental voice frequencies above 150 Hz. Dynamic mics need a higher cutoff — 120 Hz is often right for an SM7B or Electrovoice RE20 recorded at close range.
This is the one move that applies to virtually every VO recording regardless of microphone or room. Apply it first before evaluating anything else — removing the low end changes how the midrange reads.
Cut at 200–400 Hz if boxy — a -1.5 to -2 dB narrow bell cut in this range removes the boxy, congested quality that comes from recording in a small untreated room. Spectrum Analysis (View → Spectrum Analysis) shows the buildup clearly. A 180–280 Hz peak is common in bedroom studios. Cutting it opens the voice without thinning it.
Presence boost at 2–5 kHz — a gentle +1 to +2 dB shelf or broad bell in this range adds the forward, clear, present quality that makes VO intelligible on phone speakers and laptop audio. The exact frequency depends on the voice — deeper voices benefit from the lower end of this range (2–3 kHz), brighter voices may not need this move at all. This boost is optional; if the voice already sounds present and clear, skip it.
Air shelf at 10–12 kHz — a +1 to +1.5 dB high shelf adds clarity and openness. Optional and small. Dynamic mics often need this more than condensers because they naturally roll off the top end. On a regular audiobook narrator client with an Electro-Voice RE20 dynamic mic, I apply +1.5 dB above 10 kHz routinely — without it the recordings sound slightly dull on earbuds. The full Paragraphic EQ settings and controls are in the EQ guide.
De-essing: Controlling Sibilance
Sibilance — the harsh, hissing quality of S and SH sounds — is a consistent problem on condenser mic recordings and on voices with naturally pronounced sibilance. In Sound Forge Pro, the de-essing options are: a manual EQ notch, iZotope RX Elements (bundled with MAGIX-era installs), or a third-party VST de-esser loaded through the Plug-In Chainer.
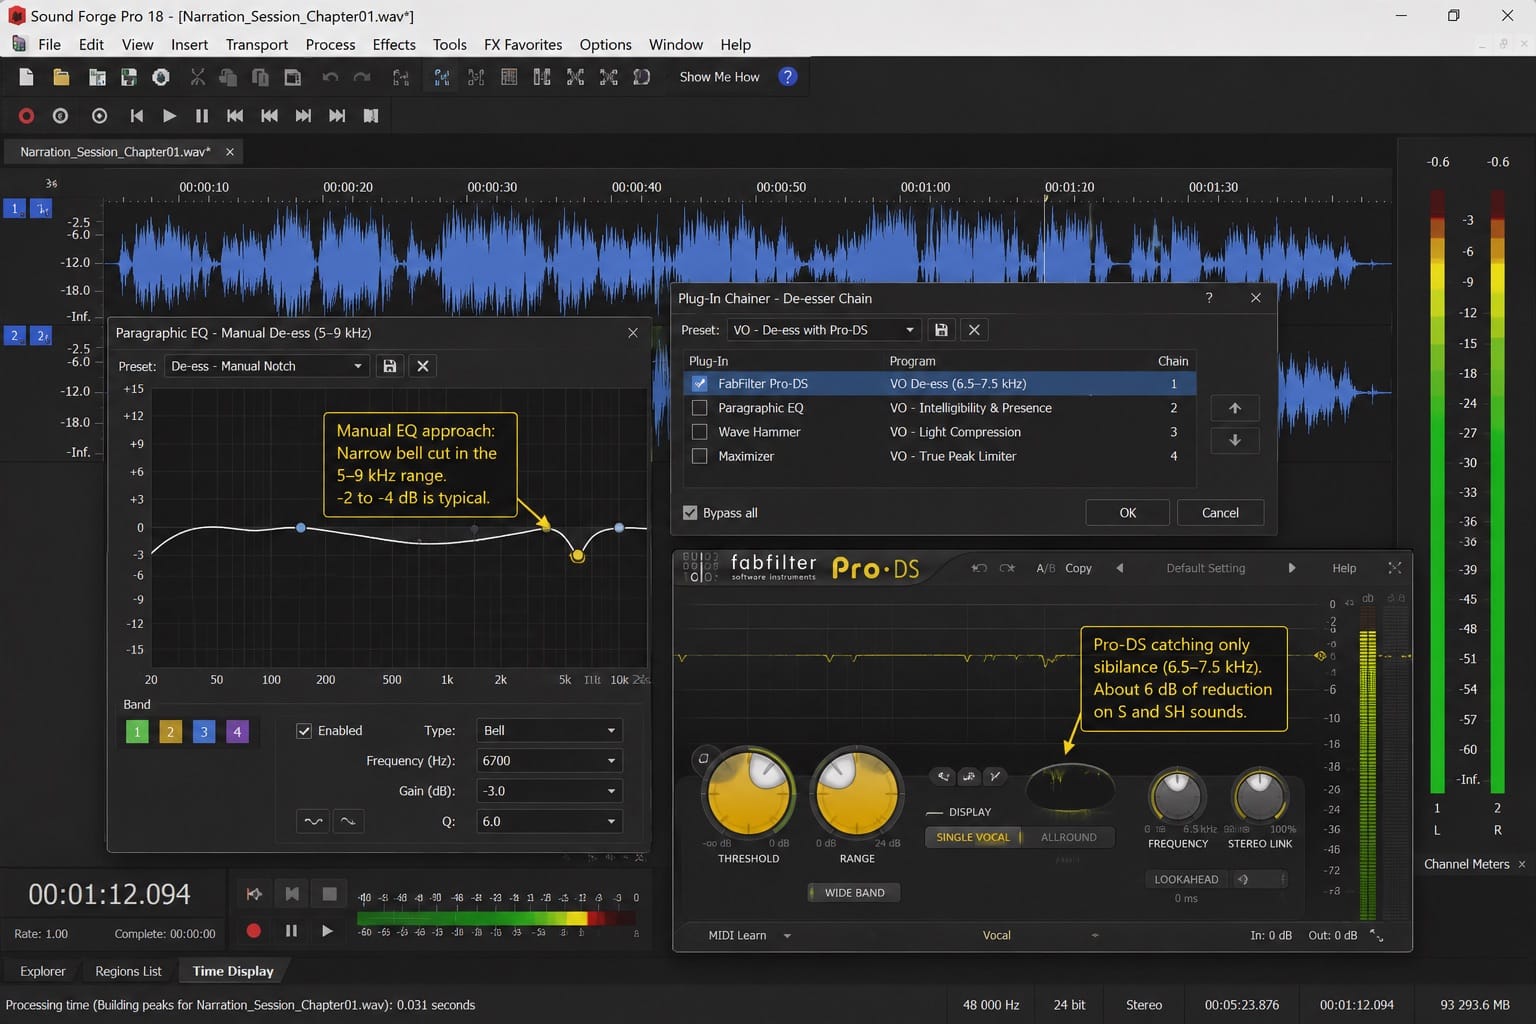
The manual EQ approach: identify the sibilance frequency by playing the file and locating the frequency range (usually 5–9 kHz) where S sounds are harsh. Apply a narrow bell cut of -2 to -4 dB at that frequency in the Paragraphic EQ. This is a blunt instrument — it reduces the harshness on S sounds but also slightly dulls the entire file at that frequency. Works for mild sibilance problems.
RX Elements (on MAGIX-era installs) contains a Mouth De-click module that addresses specific transient events in voice recordings, but not a dedicated de-esser. For serious sibilance issues, a dedicated de-esser VST loaded through the Plug-In Chainer is the cleaner option. FabFilter Pro-DS, Waves DeEsser, and the free Lisp de-esser (Sleepy-Time DSP) all work in SF Pro's Plug-In Chainer.
On a narrator I work with regularly whose voice has very prominent sibilance in the 6.5–7.5 kHz range, I run FabFilter Pro-DS through the Chainer before the EQ pass. At a threshold that catches only the S and SH sounds — not affecting the rest of the voice — it reduces the peak sibilance by about 6 dB, which is enough to make the recordings comfortable on headphones without touching the overall air and clarity. That setup has been running unchanged for about 18 months across 40+ chapters for that client.
Editing Breaths and Room Tone
Breath sounds between sentences divide opinion in VO production. Some clients want all breaths removed; others want natural breathing kept because breath removal makes recordings sound clinical. Know your client's preference before starting the editing pass.
To remove a breath: zoom in to the breath region until it's clearly visible in the waveform. Select the breath waveform — it looks like a wider, lower-amplitude wave before a sentence begins. Press Delete to silence it, or use Process → Silence to replace it with a flat line. A cleaner approach: first find a same-duration region of silent room tone elsewhere in the file and copy it (Edit → Copy). Then select the breath region and paste (Edit → Paste Special → Overwrite) to replace the breath with room tone. The silence matches the ambient noise floor instead of being digital zero.
For room tone consistency: keep a 2–3 second section of clean room tone (before the session starts, or between takes) and save it as a separate file. When you need to insert a pause or replace a breath, use room tone from this file rather than silence — it matches the acoustic environment of the recording and sounds natural under headphones.
I keep a preset in FX Favorites called "breath-to-room-tone" which automates the selection-to-clipboard-to-paste workflow on a keybinding. On a session with 200 breaths to remove across a 90-minute audiobook chapter, having that as a single key command saves about 40 minutes compared to menu navigation.
ACX and Audiobook Delivery Standards
If you're delivering audiobooks to Audible/ACX, there are specific technical standards to meet. As of 2026, ACX audio standards require:
Loudness: -18 to -23 dBFS RMS (Root Mean Square average level, not LUFS). Room noise: noise floor below -60 dBFS RMS when no voice is present. True Peak: no more than -3 dBFS. Format: MP3 only, 192 kbps CBR (Constant Bit Rate) minimum, 44.1 kHz sample rate. ACX does not accept WAV files — other platforms like Authors Republic and Google Play accept WAV, but ACX requires MP3.
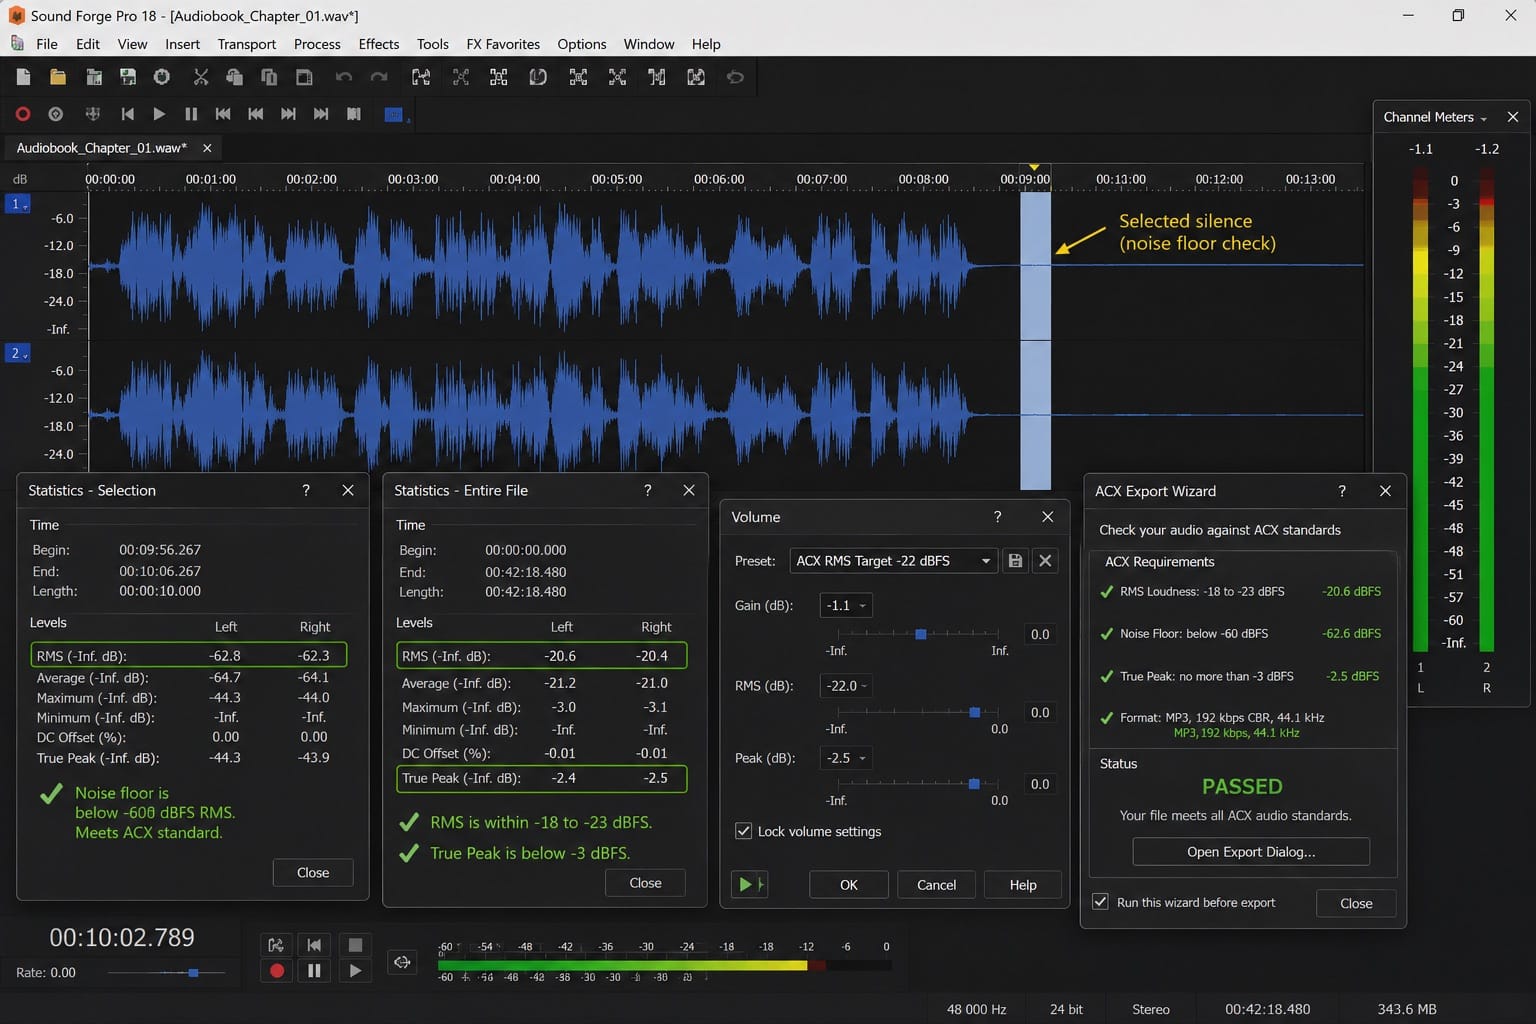
The -60 dBFS noise floor requirement is the one that most home studio recordings fail on first submission. Check it in Sound Forge via Tools → Statistics: select a section of silence between sentences, run Statistics, and check the RMS value. Any value louder than -60 dBFS means the ambient noise is too high for ACX delivery. NR-2.0 typically brings home studio recordings from -45 to -50 dBFS noise floor down to -65 to -70 dBFS — well within spec. The full NR-2.0 workflow is in the noise reduction guide.
The loudness target is -18 to -23 dBFS RMS — ACX measures RMS, not LUFS. This is quieter than typical podcast or music mastering targets. Run Tools → Statistics on the full chapter after processing and read the RMS Average value. Use Process → Volume to bring the RMS level to -20 to -23 dBFS — a comfortable midpoint in the -23 to -18 dBFS range ACX requires. Verify True Peak doesn't exceed -3 dBFS after the gain adjustment.
SF Pro 18 includes an ACX Export Wizard (accessible from the File menu in some versions) that checks audio against ACX standards and flags sections that don't meet the noise floor or loudness requirements. If present in your version, run it before export — it identifies problems before submission rejection.
Frequently Asked Questions
Can Sound Forge Pro be used for professional voice-over recording?
Yes, for single-track voice-over work — one microphone, one narrator, one file. SF Pro records, edits at the sample level, and processes through the full VO chain: noise reduction, EQ, de-essing, compression, normalization, and export. The OTR (On-The-Record) floating toolbar lets you keep scripts visible in other applications while recording. For multitrack recording with multiple simultaneous inputs on separate tracks, SF Pro isn't the right tool — use a DAW for the multitrack session, then bring the mixed file into SF Pro for processing and delivery.
What recording levels should I use for voice-over in Sound Forge Pro?
Peaks between -12 and -6 dBFS, averaging -18 to -10 dBFS during normal speech. Set the gain on the audio interface hardware while monitoring SF Pro's input meters — the goal is a strong signal without clipping. Clipping (flat-topped peaks at 0 dBFS) cannot be fixed in post. A recording that peaks at -8 dBFS has enough headroom for EQ, compression, and de-essing without the output clipping. Set gain conservatively for the first session with a new voice; loud emphasis can easily push 6 dB above average level.
How does OTR work in Sound Forge Pro for voice-over?
OTR (On-The-Record) is a floating recording toolbar available in recent versions of SF Pro (SF Pro 16 and later, and present in the current Boris FX release). Open it from View → OTR or via the Remote button in the Record dialog. It displays on top of all other windows, so your script document stays visible while the OTR controls are accessible in a corner of the screen. Record, Pause, and Stop buttons function the same as the main toolbar — OTR is a remote control for the SF Pro recording engine, not a separate recorder.
How do I do punch-in recording in Sound Forge Pro for voice-over?
Place the cursor at the start of the section to re-record. In the Record dialog, set Method to Manual, enable Pre-roll (3–5 seconds), and enable Arm/Record Ready. Press Ctrl+R or click Record — SF Pro plays back from the pre-roll point so you hear the preceding audio, then starts recording at the punch-in position. Stop when the retake is complete. The new audio overwrites the original from the punch-in cursor position forward. With a selection active before punching, the recording stops at the end of the selection automatically.
What are the ACX audio standards for audiobooks in Sound Forge Pro?
ACX requires: -18 to -23 dBFS RMS average loudness — ACX measures RMS, not LUFS — noise floor below -60 dBFS RMS in silent sections, peak no higher than -3 dBFS, 44.1 kHz sample rate, 192 kbps CBR MP3 only (WAV not accepted by ACX). Check noise floor and RMS Average via Tools → Statistics. The ACX Export Wizard in SF Pro 18 automates these checks before export.
How do I remove breaths from voice-over in Sound Forge Pro?
Zoom in until the breath is clearly visible in the waveform — it appears as a wider-amplitude wave before a sentence. Select the breath region. For complete removal: press Delete or Process → Silence. For a more natural result: copy a same-duration region of silent room tone from elsewhere in the file and paste it over the breath. This replaces the breath with the ambient noise floor of the recording environment instead of digital silence, which sounds more natural on headphones. For large-volume projects with many breaths to process, the batch processing guide covers how to automate repetitive tasks across multiple files.
Does Sound Forge Pro have a de-esser for voice-over?
Not as a dedicated native plugin. For mild sibilance: a narrow EQ cut of -2 to -4 dB in the Paragraphic EQ at the sibilant frequency (usually 5–9 kHz, identified by ear or Spectrum Analysis) reduces harshness. For serious sibilance: load a VST de-esser through the Plug-In Chainer — FabFilter Pro-DS, Waves DeEsser, or the free Sleepy-Time Lisp all work in SF Pro. On MAGIX-era installs, the bundled RX Elements includes Mouth De-click which addresses specific mouth noise transients but isn't a traditional de-esser. iZotope RX Standard (separate purchase) includes a Mouth De-click with better sensitivity for voice-over work.
Related Sound Forge guides
- Workflows hub
- Sound Forge Pro for Podcast Editing: Noise Reduction, LUFS & Export Workflow
- Sound Forge Pro for Music Production: What It Can and Can't Do
- Sound Forge Pro for Vinyl Restoration
- Sound Forge and Vegas Pro Workflow for Video Editors
- Sound Forge Pro keyboard shortcuts
- Sound Forge Pro: The 2026 Guide (start here)