
For mixing, start at the side-wall first reflection points, add a ceiling absorber only where an approved overhead mounting system is suitable for the ceiling, then treat accessible bass-trap corners and a close rear wall. For voice recording, start with absorption behind the performer rather than buying the mixing-seat panel list. Use broadband fibrous panels at least 2 inches thick for the first reflection points; deeper treatment may be needed for bass. Treatment changes what you hear inside the room; it does almost nothing to stop sound leaking out.
Before buying a ceiling panel, confirm that its manufacturer approves overhead suspension and specifies fixings suitable for your actual ceiling substrate. Primacoustic's acoustic-cloud installation manual, for example, gives different anchor instructions for solid-backed and hollow-backed ceilings. Follow the instructions for the panel and suspension you choose; a wall-mounting method is not automatically suitable overhead. Check materials and fire safety before buying, too.
For a mixing seat, I'd spend the first treatment budget on broadband absorbers and corner traps rather than a thin foam pack, because a room needs control below the high frequencies too. Published results show why the actual construction matters: Primacoustic's 2-inch Broadway report and 3-inch report both list NRC 1.00, yet their 125 Hz coefficients are 0.45 and 0.92. The test-results table keeps each sample and mounting separate; those figures aren't a prediction of the improvement at your chair.
Where acoustic panels go first
Try the free placement changes before buying treatment. Set the speakers and your chair first, because every reflection point moves with them; the speaker placement calculator gives stereo starting positions, including the seat about 38 percent of the way back that RealTraps uses as a starting point. Listen to the stepped bass tones at a comfortable level from that chair and note which notes boom or fade. Keep that position and playback level for the after-treatment comparison. A sweep recorded with a measurement microphone can show frequency response and decay, as the RealTraps primer explains; a hand clap alone doesn't assess the bass.
Sound from each speaker bounces off the side walls, the ceiling and the desk and reaches your ears a few milliseconds after the direct sound. A room-measuring primer from RealTraps, a treatment maker whose articles are written by Ethan Winer, puts those early reflections within about 20 ms of the direct sound and says they obscure detail and cause comb filtering. A common target, in the same primer, is reflections at least 10 to 15 dB softer than the direct sound. Absorbers at the reflection points are how you get there.
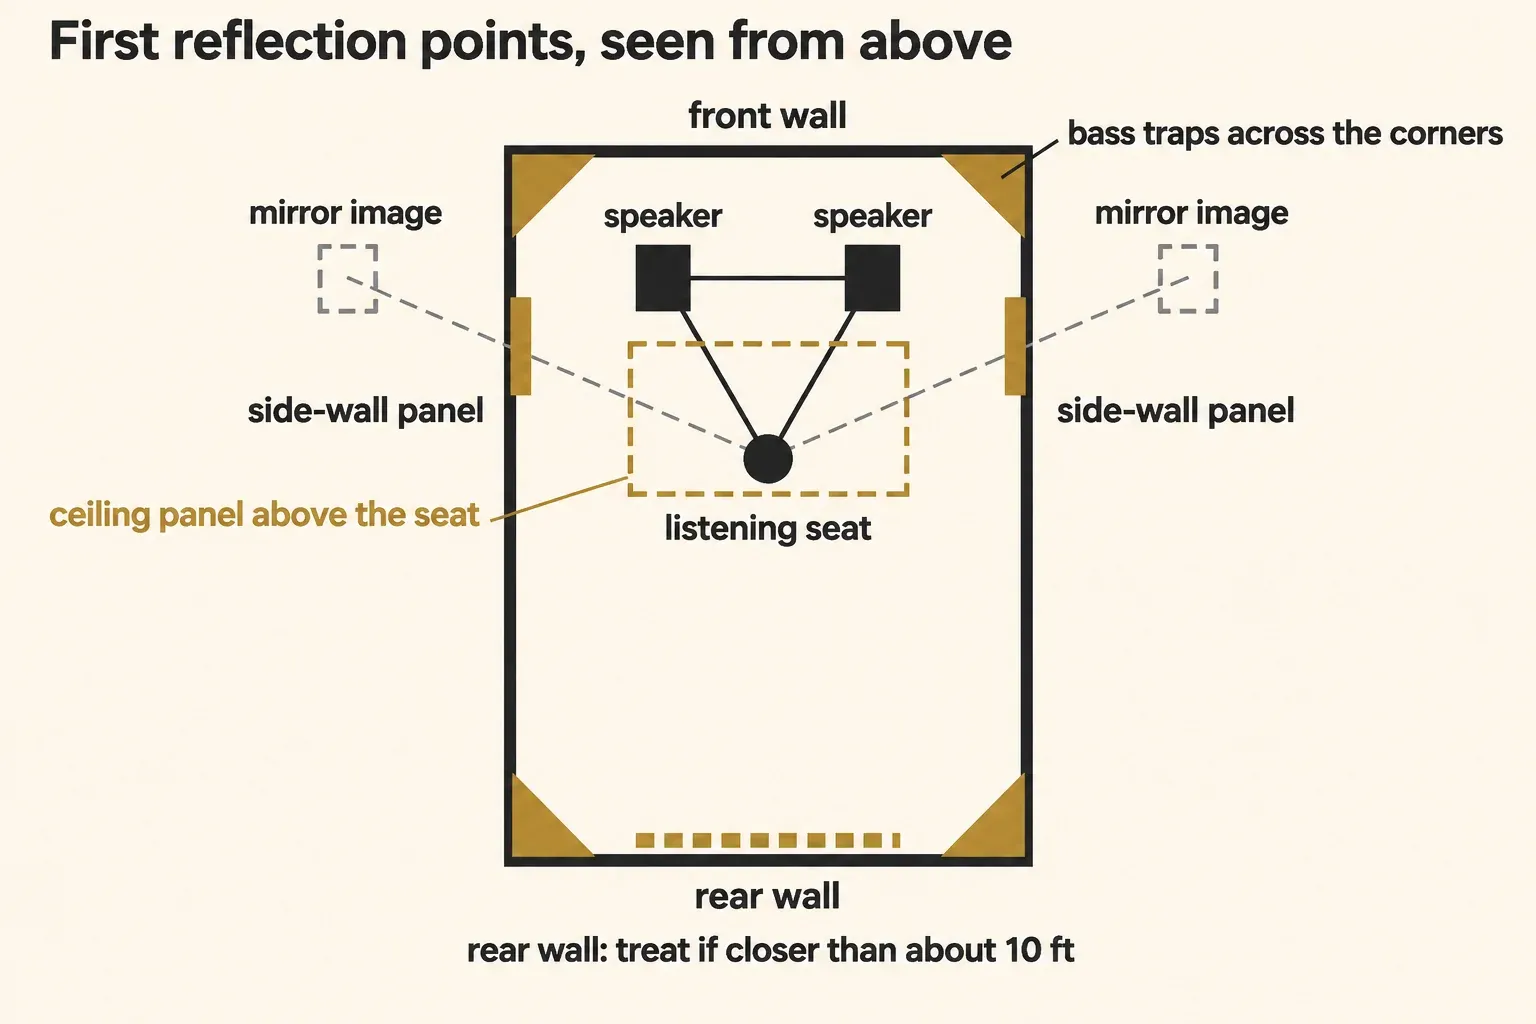
Finding the side-wall points takes a mirror and a helper. Sit in the mix position while someone slides a mirror flat along the side wall: wherever you can see a monitor in it is a first reflection point, as Sound On Sound's guide to small-room acoustics describes. The geometry behind the trick is in RealTraps' room set-up article: picture a mirror image of the room beyond the wall, and the straight line from that phantom speaker to your seat crosses the wall at the reflection point. Side-wall panels usually land slightly forward of the halfway point between speaker and listener, centered vertically on tweeter height, which should match your ear height when you sit.
For a mixing seat with suitable overhead mounting, the ceiling is another reflection point to treat. Both Sound On Sound's small-room plan and Genelec's monitor setup guide put an absorber on the ceiling above the listening position, next to the side walls. A reflection point is valid for one seat only. In a small room one 2x4 ft panel per point is usually enough, according to RealTraps; a larger room or a second listening seat needs more.
Bass traps: corners first
Bass is where small rooms go wrong. Ethan Winer writes in RealTraps' acoustics basics article that nulls as deep as 30 dB are typical in untreated small rooms, often several of them below 300 Hz. EQ can't fill them, he adds: every seat has a different response, and boosting a deep dip only adds speaker distortion. Genelec's guide makes the related point that monitor calibration helps but may not resolve all room problems on its own.
Corners are the place to start. Sound On Sound's plan puts bass traps in whatever corners are accessible, and the same guide is blunt about thin panels: thin glass-fiber or foam panels work in the mids and highs, while bass traps, often across corners or in ceiling voids, reach lower. Genelec adds that absorbing low frequencies efficiently, for example on the wall behind the speakers, may require substantial absorbents.
How a trap sits in the corner matters too. In a RealTraps home comparison of air gaps and corner mounting, three traps straddling a corner beat six traps flat on a wall or door at most low frequencies, and traps sealed tight across the corner did better than ones with air leaking around them. With a 3-inch gap behind them, the six flat traps overtook the three in the corner. Winer is clear that a home test like this shows trends, not absolute absorption.
Corner traps are also hard to compare on paper, because many are reported as a total per unit instead of a coefficient. Acoustimac's BT6000, a fabric-wrapped trap 6.25 inches deep, absorbed 19.39 sabins per unit at 125 Hz in a Riverbank ASTM C423 report on its corner traps with mounting J (units set at a 45-degree angle along the chamber's north, south and west walls, spaced 6 in apart); the report doesn't name the core material. That figure can't be lined up against the per-surface coefficients in the test results below.
Play the stepped low tones in the bass test from your seat before and after the corner traps go in, and use its boundary-gain and room-mode tables to read what changed. Sound On Sound checks the same thing with a chromatic sequence of sine tones at the listening position; a slow pass of the sine sweep generator through the range below 300 Hz shows the peaks and dips as a rising and falling level. If one note still booms or disappears after the traps are in, SOS suggests moving the monitors a few inches and playing the sequence again until you find the most even spot. No practical treatment fully fixes a small box-shaped room, the guide adds; trapping improves it, and moving the chair out of the room's central dead zone helps too.
How many acoustic panels do you need?
For one mixing seat, two side-wall panels, a ceiling panel where safe mounting is feasible, and accessible corner traps are a first-round plan from the Sound On Sound and RealTraps guides. They aren't a fixed package for every room. I'd follow that order after the placement check because it addresses early reflections and bass separately, then use the room's response to decide what still needs work.
| Position | What goes there | When |
|---|---|---|
| Side-wall first reflection points | One 2x4 ft absorber at each point, 2 in thick or more | For a mixing seat; one set covers one seat |
| Ceiling above the listening position | One 2x4 ft absorber | For mixing, where manufacturer-approved suspension and substrate-suitable fixings are feasible |
| Room corners | Bass traps across the corner | Every corner you can reach |
| Rear wall | Absorption, or a mix of absorption and scattering | A higher priority when closer than about 10 ft; assess it from the room's response rather than distance alone |
| Wall behind the monitors | Panels if practical | Optional; low frequencies there may need substantial absorbent |
The rear wall depends on the room. RealTraps treats it as optional and more important when it's closer than ten feet behind your head, Genelec includes the back wall when the room is large enough, and Sound On Sound suggests a mix of scattering and absorption there. Diffusers are a weak first buy in a small room. Genelec's guide says a room under 25–30 m² of floor area (about 270–320 sq ft) mainly needs absorption, that diffusion is usually less beneficial there, and that diffusion works at mid and high frequencies but usually not at low ones.
More absorption isn't automatically better. Too much thin absorption makes the highs die away fast while the lows hang on, which RealTraps calls an unbalanced sound, and Sound On Sound notes that covering the walls with something thin like carpet stops the hand-clap ring but absorbs only the highest frequencies. Thick panels at the right points beat wall-to-wall coverage with thin material.
Treating a room for recording vs mixing
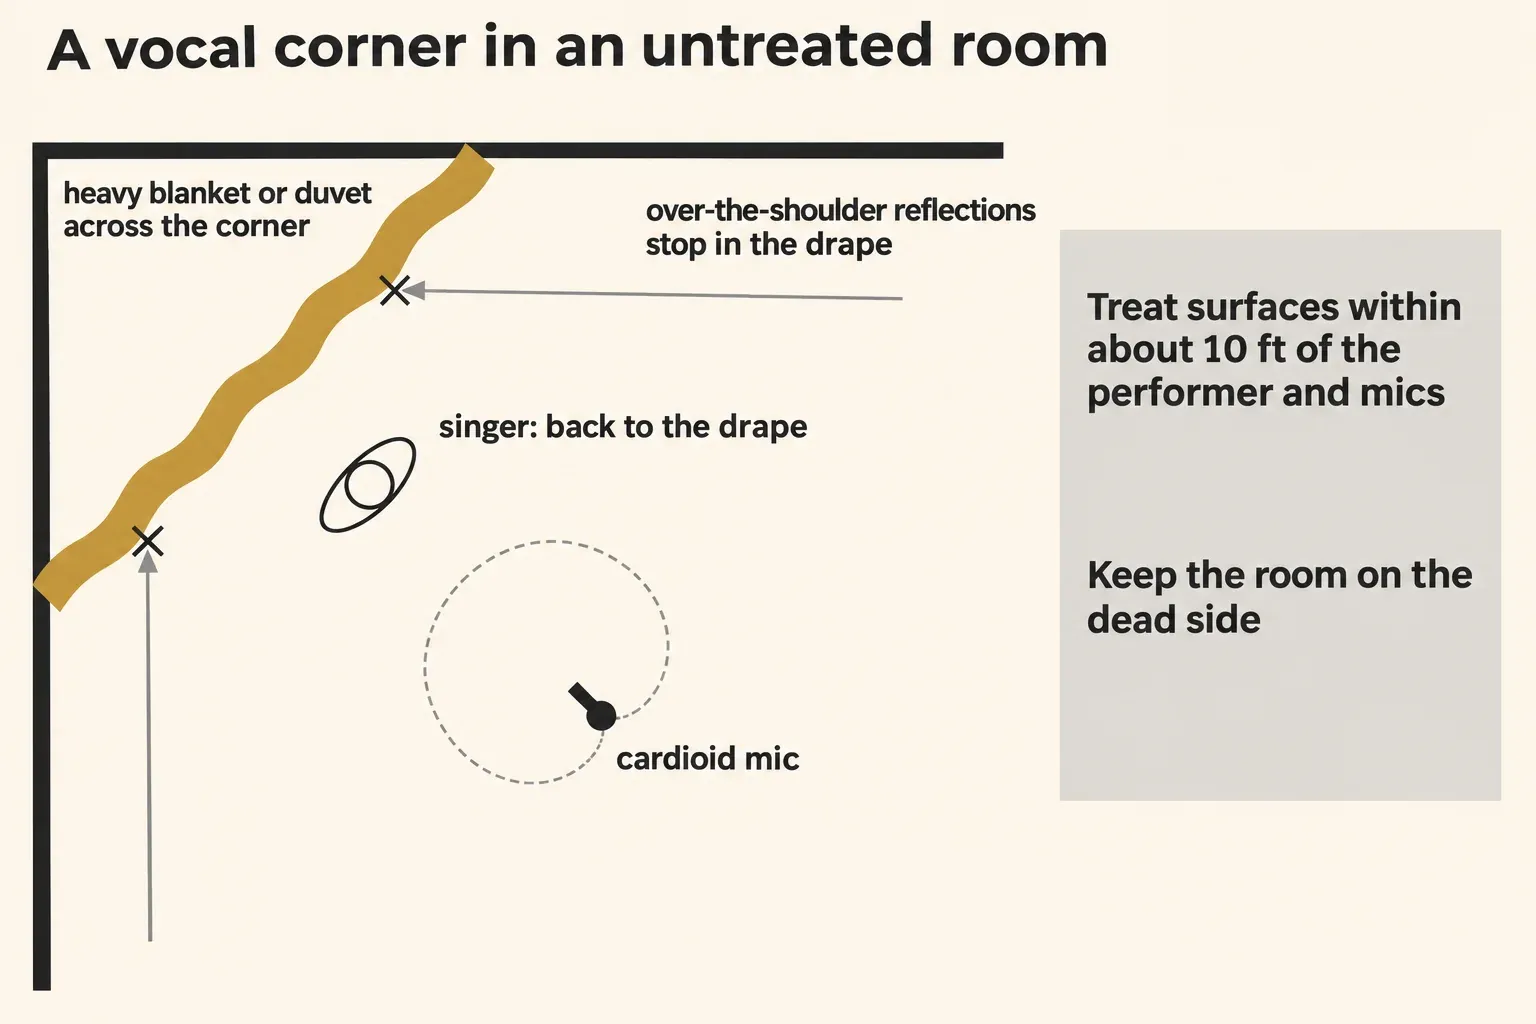
A mixing room is treated around one chair. A recording room is treated around the mic, and the rule changes: RealTraps' basics article says absorption or diffusion matters most on surfaces within about ten feet of the performer and the mics, especially the ceiling above drum overheads. Sound On Sound's advice for domestic rooms is to keep them on the dead side and add ambience later as artificial reverb.
For a voice in an untreated room, the cheapest fix in that guide is a heavy blanket or duvet hung across a corner, with the singer standing in front of it, back to the drape, facing the mic. Reflections that would otherwise come over the singer's shoulder into the front of the mic land in the duvet instead. I'd set that up before buying a single panel for vocals, because it puts the absorbent exactly where a front-facing mic hears best. A cardioid microphone's polar pattern is least sensitive at the rear, so the open room behind the mic matters less than the wall behind the singer.
Leave the treatment where it is for the whole session, because room tone only matches edits recorded in the same room state. Once reflections are baked into a take, the repair moves to software, covered in how to remove echo from audio; treating the corner before you record is the cheaper fix.
Panel thickness and the air gap
Porous absorbers turn sound into heat through friction in moving air. Sound On Sound puts their low-frequency performance in proportion to their thickness and says a typical 2-inch foam panel fixed straight to a wall does little below about 300 Hz. Genelec makes the same point: thin porous layers only reduce high-frequency reflections, and low frequencies need a thick layer.
The gap works for the same reason. A porous absorber works best where the air moves fastest, about a quarter wavelength from the wall; right at the wall surface there's pressure change but no air movement, as SOS explains. At 50 Hz that quarter wavelength is around five feet, so very low bass can't get its ideal gap in a home room. A smaller gap still helps: SOS says 2-inch foam spaced 2 inches from the wall is almost as effective as 4-inch foam glued directly to it.
Published pairs of the same product, flat and spaced, point the same way. In Auralex's 2011 acoustical data table (ASTM C423, lab not named), 1-inch SonoSuede fiberglass rises from 0.14 at 125 Hz laid flat (Type A) to 0.40 on spacers (mounting F, spacer depth not given), 2-inch SonoSuede goes from 0.59 to 0.67 under the same two mountings, and 3-inch TruTraps foam goes from 0.40 to 0.62 on 3-inch spacers (the table lists Type A for both rows). These are three product-specific pairs from one manufacturer, with different panel designs and gap conditions; they don't define a universal gain from spacing. RealTraps' home comparison found the same trend when it raised nine panels from flat to a 1.5-inch and then a 4.5-inch gap: each step improved absorption at most frequencies.
If the mounting leaves room for a gap, I'd take it, because the same panel gained absorption at 125 Hz in every published flat-versus-spaced pair above. One more spaced example: Riverbank report A11-013 tested Acoustimac's ACM-422, a fabric-wrapped 2.375-inch panel whose core isn't named, on 2-inch spacers (ASTM C423-09, mounting F, edges unsealed) and lists 0.39 at 125 Hz and NRC 1.15. If you rent, Acoustimac's product page for the 422 panel says it goes up with no more wall damage than a picture would need, and its BT6000 page says those traps can simply stand on the floor against a room corner.
Is acoustic foam worth it?
Foam can reduce mid- and high-frequency reflections, but a thin flat foam pack is a weak first purchase for boomy bass. Auralex's 2-inch Studiofoam Wedge sample measured 0.21 at 125 Hz in its 2019 report; its 4-inch Wedge measured 0.31 in a 1993 report. Those are different tests, with different edge conditions, so they aren't a controlled thickness comparison. I'd choose deeper broadband or bass treatment from a report that matches the intended mounting, rather than judging a foam pack by its shape or NRC.
Foam does reduce mid and high reflections, which is what Sound On Sound expects of thin panels, and that's why its NRC can look strong: Auralex's 4-inch Studiofoam Wedge report (Riverbank RAL-A93-136, 1993) lists 1.25 at 500 Hz and NRC 1.10 for the foam laid flat under ASTM C423 (Type A), and coefficients above 1.00 are printed here as published. Household substitutes don't qualify at all. RealTraps' basics article says egg cartons are too thin for low frequencies, non-acoustic packing foam isn't open-cell, and rigid Styrofoam insulation has no useful acoustic value.
Fire ratings are the other difference. Sound On Sound notes that mineral fiber boards satisfy most fire regulation requirements, which many foams do not, so check the rating on any foam before it goes on a wall, as the safety section below explains.
Test results: published absorption data by thickness
Start with the report for the exact product and mounting you're considering. The results below come from manufacturer-published Riverbank reports and data sheets using ASTM C423 reverberation-room testing. Different cores, facings, specimen sizes and exposed edges can change the result. ASTM E795 specifies specimen mounting, and the Riverbank reports limit the results to the tested samples. An absorption coefficient describes that lab sample; it doesn't tell you what fraction of the bass will disappear from your room.
| Tested product and thickness | 125 Hz coefficient | NRC | Reported mounting and date |
|---|---|---|---|
| Broadway fiberglass, 2 in | 0.45 | 1.00 | Type A, directly on the test surface; perimeter sealed with metal framing. RAL-A06-219, 2006 |
| Broadway fiberglass, 3 in | 0.92 | 1.00 | Type A; perimeter sealed with wood and metal framing. RAL-A06-231, 2006 |
| ProPanels fiberglass, 1 / 2 in | 0.07 / 0.42 | 0.80 / 1.05 | 2015 spec sheet lists impaling clips; the 2011 master table labels these values Type A |
| ROCKBOARD 40, 2 / 3 / 4 in | 0.25 / 0.63 / 0.93 | 1.00 / 1.10 / 1.10 | Mounting and lab not stated on the April 2026 sheet |
| ROCKBOARD 60, 2 / 3 / 4 in | 0.28 / 0.85 / 0.88 | 1.00 / 1.00 / 1.00 | Mounting and lab not stated on the April 2026 sheet |
| Safe'n'Sound cavity batt, 3 / 6 in | 0.44 / 1.38 | 1.10 / 1.25 | Mounting and lab not stated on the November 2025 sheet; this is cavity insulation, not a finished wall panel |
| Studiofoam Wedges, 2 in | 0.21 | 0.75 | Type A with perimeter edges exposed. RAL-A19-427, 2019 |
| Studiofoam Wedges, 4 in | 0.31 | 1.10 | Type A, directly on the test surface. RAL-A93-136, 1993 |
Within these product lines, the thicker versions generally publish higher 125 Hz coefficients. That supports checking depth when buying, but it doesn't isolate thickness from the rest of the construction. Even the two Broadway reports use different panel sizes and perimeter framing. ROCKWOOL's sheets don't state mounting, so they can't establish how one of those cores will compare with a finished, fabric-wrapped panel in your installation. The spaced Acoustimac panel and the corner trap above remain separate examples because their mountings and units differ.
NRC can hide the low end. It's the average of the 250, 500, 1000 and 2000 Hz coefficients rounded to the nearest 0.05; SAA averages twelve one-third-octave bands from 200 to 2500 Hz, as the definitions in the 2019 Riverbank report explain. Neither includes 125 Hz. The two Broadway samples both have NRC 1.00 despite their different 125 Hz results, and ROCKBOARD 60 keeps NRC 1.00 at all three listed thicknesses. For a bass problem, read the low-frequency bands and mounting details as well as NRC. Coefficients above 1.00 are shown as published.
Sound On Sound, RealTraps and Genelec provide the placement guidance used here. Their recommendations concern the room and listening position; the lab table concerns particular material samples. Use the table to question a product claim, then verify the room before and after treatment.
Acoustic treatment vs soundproofing
Treatment and isolation are different jobs. Sound On Sound's guide says the treatment that improves listening accuracy usually has a negligible effect on how much sound leaks into or out of the room. Some studio-panel marketing still ties panels to keeping studio noise out of the rest of the house. Panels at the reflection points and traps in the corners fix what you hear at the desk; they won't keep a drum kit from reaching the neighbors.
Materials, fabric and fire safety
Check the fire rating before anything goes on a wall. Auralex's page on the ASTM E84 fire standard lists the classes by flame spread index: Class A 0–25, Class B 26–75 and Class C 76–200, with a smoke developed index of 450 or less. The same page notes that US fire rules are set at state and local level, so ask your local fire marshal which class is allowed in your building. Ratings appear on the product documents: ROCKBOARD 40 lists ASTM E84 flame spread 0 and smoke developed 0 (Class A) and Safe'n'Sound is listed as noncombustible per ASTM E136, Primacoustic's Broadway brochure lists ASTM E84 Class A/1, and the ProPanels spec sheet lists Class A with flame spread 10.
Fibrous cores need protective gear. The Broadway panels safety data sheet warns that glass-wool dust may irritate the eyes, nose and throat and calls for adequate ventilation, safety glasses, gloves and long sleeves, and it says not to dry sweep or use compressed air to remove dust. Sound On Sound adds a dust mask whenever you cut or bend rockwool or glass fiber. Follow the maker's own sheet for the product you buy.
The cover matters as much as the core. Fabric over an absorber has to be acoustically transparent; Sound On Sound suggests checking it by blowing through it, and reports that painted canvas stopped sound from reaching the mineral wool underneath. Paint changes the numbers too: the Broadway wall panels page lists the 2-inch Paintable Broadway, a glass-wool panel, at NRC 1.00 raw, 0.50 roll-painted and 1.05 spray-painted in the 2012 Riverbank ASTM C423 reports it links, with the panels laid flat and the outer edge of the test area sealed.
Check the room after treatment
RealTraps' room-measuring primer shows before-and-after measurements made with Room EQ Wizard in a typical spare room of 16 by 11.5 by 8 feet. After extensive bass trapping, the low-frequency response is much flatter and the decay times are much more uniform. The article shows that in graphs rather than numbers, but the direction is clear, and it's the same change you're listening for with the bass tones and sweep from the corners section.
For a recording room, record the same short passage before and after, keeping the mic position, input gain and performer distance unchanged. The voice-over recording workflow in Sound Forge Pro covers capturing the take. Compare the tails of words at matched playback loudness. For a mixing room, repeat the bass tones from the marked chair at the same level; if a note still stands out, move the monitors a few inches and compare again. Keep notes on each change so moving the chair and adding a trap don't get credited as the same improvement. Genelec strongly recommends a professional acoustician for monitoring rooms, which is the next step when treatment and placement still leave serious problems.
The verdict
My verdict: for mixing, settle the speaker and chair positions, then start with two 2x4 ft broadband panels at the side-wall mirror points, a ceiling panel where approved overhead mounting is feasible, and bass traps across accessible corners. Give a close rear wall extra attention; distance alone doesn't decide whether it needs treatment. I'd choose fibrous panels at least 2 inches thick for the first reflections and deeper treatment for bass, because thin absorption can leave the low end ringing after the highs have died away. Check the actual product report, leave an air gap where the mounting allows it, and verify fire ratings against local rules. For vocals, try a securely hung duvet behind the performer first, then compare a test take before buying more.