Sound Forge sits at a specific point in the music production chain. The current product is sold as Sound Forge 2026 under Boris FX — many producers still search for it as Sound Forge Pro, which was the MAGIX-era branding. Both names refer to the same application; this article uses Sound Forge Pro for search continuity. Not at the beginning, not in the middle. It handles audio once it's already recorded or mixed — final mastering, sample preparation, stem processing, and the precise single-file editing that DAWs handle poorly. Producers who use it aren't using it instead of a DAW. They use it alongside one, for the work their DAW does slowly.
Part of the Sound Forge Pro 2026 Guide — start there if you're new to the editor.
This guide is part of the Sound Forge Pro Workflows hub. Start there if you need podcast, voice-over, vinyl restoration, video editor, music production or Samplitude handoff workflows.
Quick answer: Use your DAW for composition, arrangement, and mixing. Use Sound Forge for precision audio work after the bounce — mastering finished stereo files, editing samples and loops, cleaning stems, and recording single-source audio.
Best use cases for Sound Forge in music production:
- Mastering finished stereo mixes for streaming delivery, CD export, archive files, or client WAV/FLAC delivery
- Editing audio samples and loops at sample-level precision
- Cleaning vocal or instrument recordings — clicks, pops, clipped peaks, broadband noise
- Batch converting sample libraries to consistent formats and levels
- Processing individual stems for remix, sync licensing, or client delivery
- Recording single-source audio like vocals or a solo instrument directly into a clean file
In March 2026, Boris FX acquired Sound Forge from MAGIX Software. The current product is sold as Sound Forge under the Boris FX/Vegas Creative Software umbrella. Package names and bundled third-party plugins may differ from older MAGIX-era Sound Forge Pro 18 bundles — check the current Sound Forge product page for what ships with the version you're considering.
Don't use Sound Forge as your main production environment if you need: MIDI sequencing, virtual instruments, drum programming, arrangement lanes, multitrack mixing, buses, sends, automation across multiple tracks, or full song production. All of that belongs in a DAW.
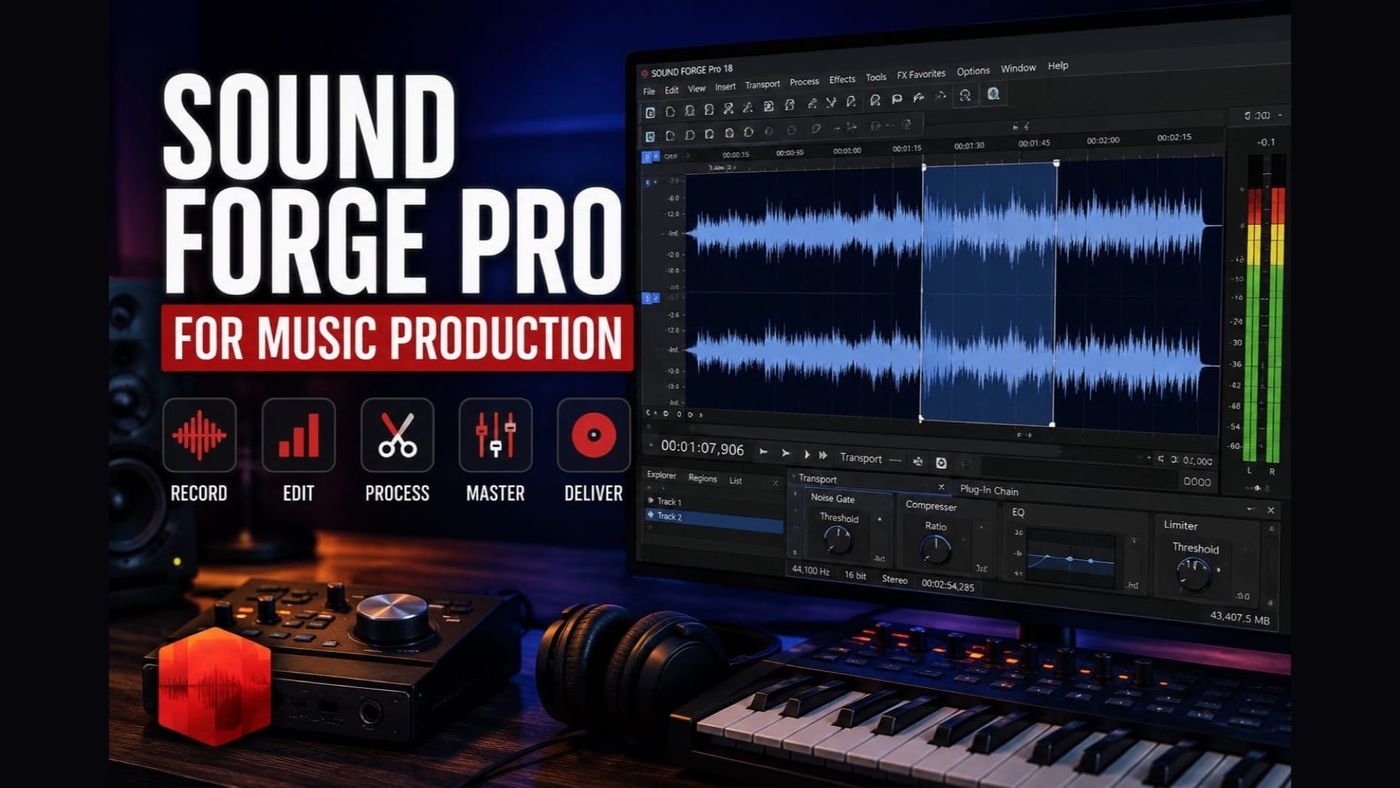
What Sound Forge Can and Can't Do for Music Production
Sound Forge is a single-file audio editor. It records, edits, and processes audio one file at a time with exceptional precision. That sentence covers most of what it does and doesn't do for music production.
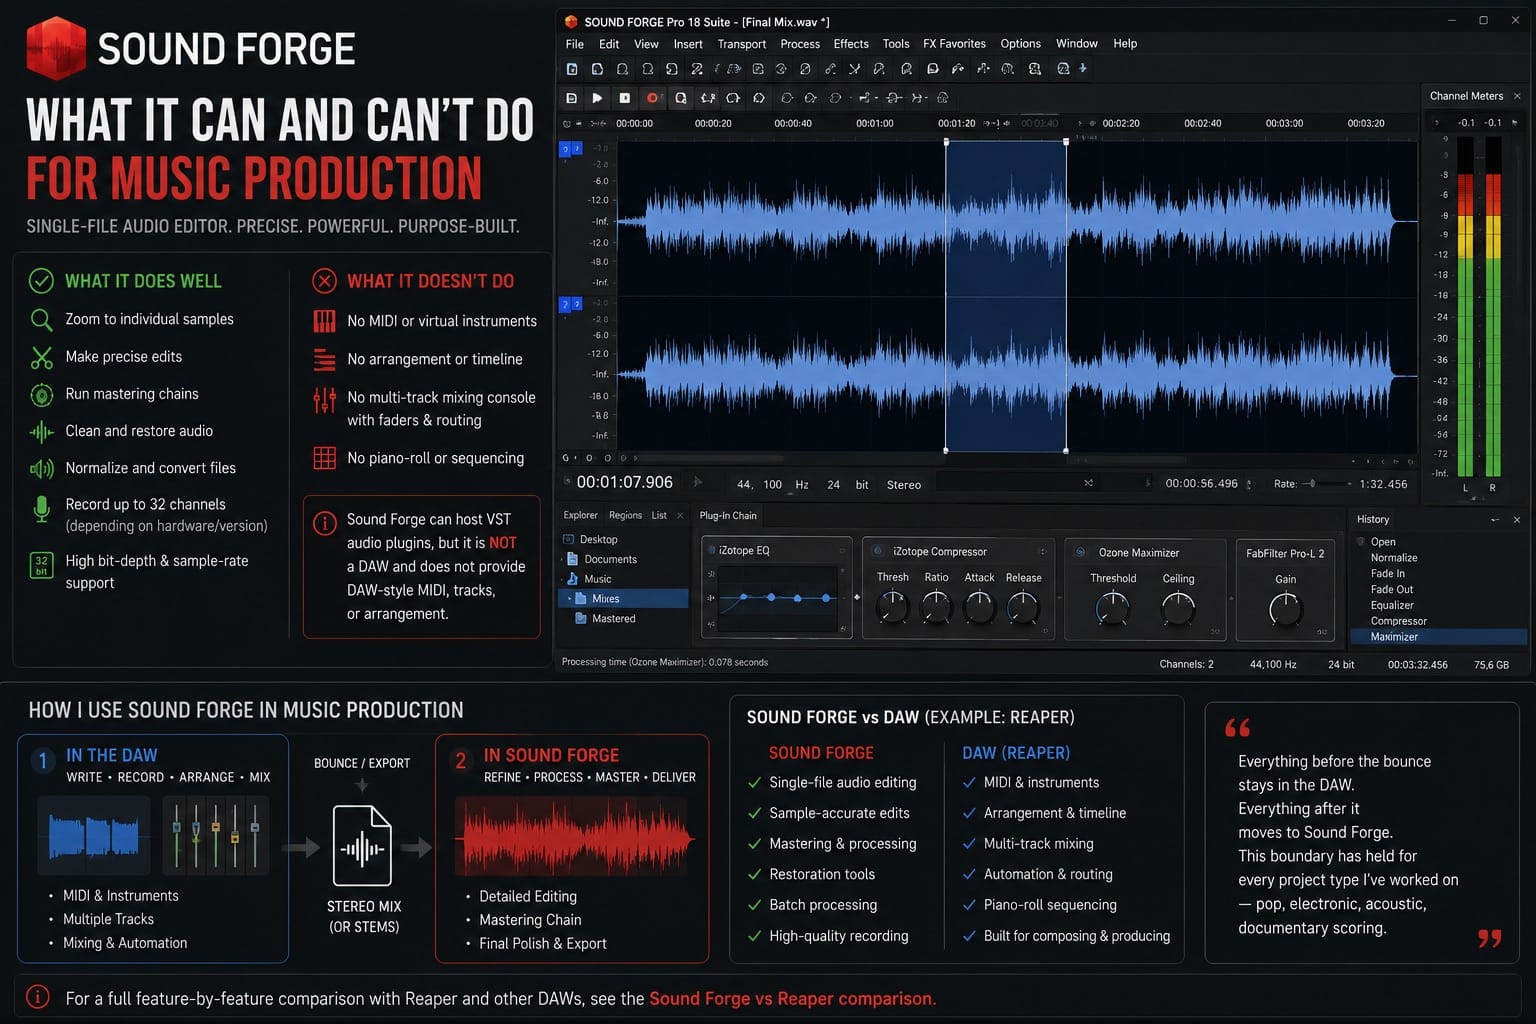
What it does well: zooming in to individual samples, making edits that would be clumsy or impossible in a DAW's waveform view, running a complete mastering chain on a finished mix, cleaning restoration problems from a recording, normalizing and converting batches of audio files. The Boris FX product page describes it as supporting up to 32-channel recording depending on hardware and version, with high bit-depth and sample-rate options.
What it doesn't do: MIDI, virtual instrument tracks, arrangement, mixing across multiple simultaneously active tracks with faders and routing. Sound Forge can host VST audio processing plugins, but it does not provide DAW-style MIDI instrument tracks, piano-roll sequencing, or arrangement lanes for virtual instruments. The application intentionally does not function as a DAW.
I've used Sound Forge alongside a DAW for three years on music projects. The dividing line is the bounce: everything before it stays in the DAW, everything after it moves to Sound Forge. That boundary has held for every project type I've worked on — pop, electronic, acoustic, documentary scoring.
The full breakdown of what Sound Forge does and doesn't do compared to a dedicated DAW is in the Sound Forge vs Reaper comparison.
Where Sound Forge Fits in a Producer Workflow
Most music production workflows run through three phases: composition and arrangement, recording and mixing, and mastering and delivery. Sound Forge lives primarily in the third phase, with a foothold in the second for specific single-source tasks.
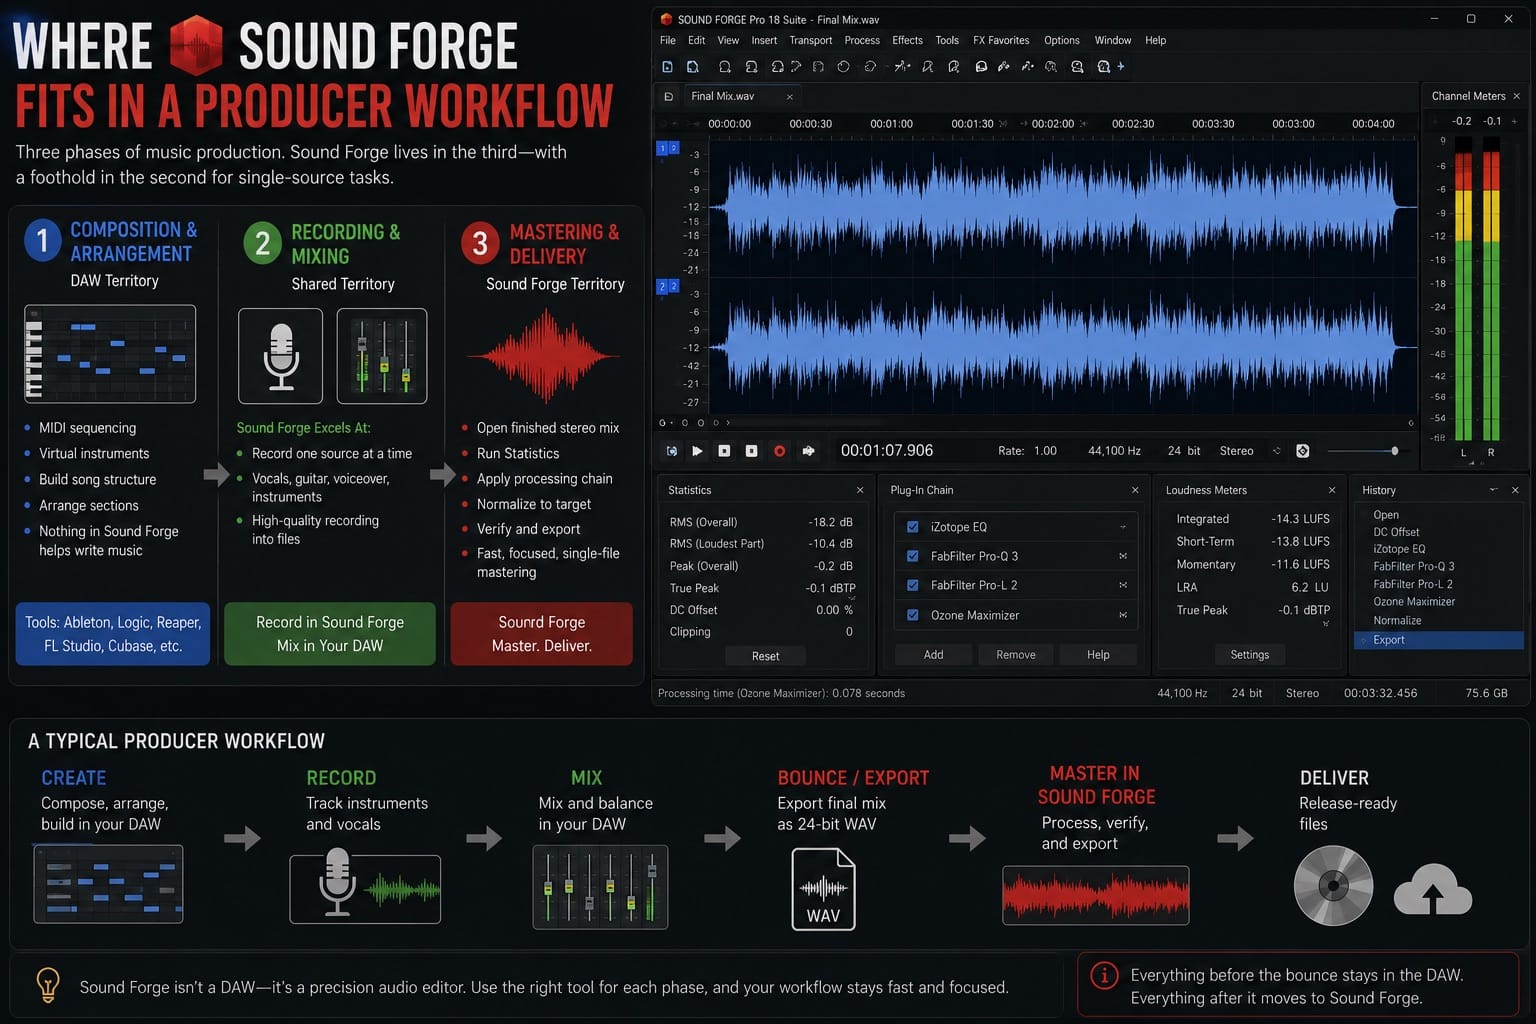
The composition and arrangement phase — MIDI sequencing, virtual instruments, building song structure — happens entirely in a DAW. Nothing in Sound Forge helps write music. If your production involves programming drums, sketching chord progressions, or building a beat from MIDI patterns, that work stays in Ableton, Logic, Reaper, FL Studio, or whatever you use.
Recording and mixing splits. Recording a single instrument or vocal directly into Sound Forge works well — one guitar, one vocal, one source at a time. Mixing multiple recorded tracks with faders, buses, and routing is a DAW job. Sound Forge records into files; it doesn't assemble and mix a session.
Mastering and delivery is where Sound Forge is the fastest tool for the specific job. Open a finished stereo mix, run Statistics, apply the processing chain, normalize to the delivery target, verify, export. The whole process runs on a single file. For producers mastering their own music, that directness is what makes Sound Forge worth running alongside a DAW.
I use this split on most productions: everything compositional in the DAW, the finished mix exported as a 24-bit WAV, then into Sound Forge for mastering and delivery. The two workflows don't interfere with each other.
Mastering Finished Mixes in Sound Forge
Mastering a finished stereo mix in Sound Forge follows a consistent sequence: run Statistics before touching anything to see the pre-mastering state, apply Paragraphic EQ correction, apply Wave Hammer compression and limiting, adjust final loudness and true peak toward the delivery target, run Statistics again to verify, dither to 16-bit if needed for CD, export.
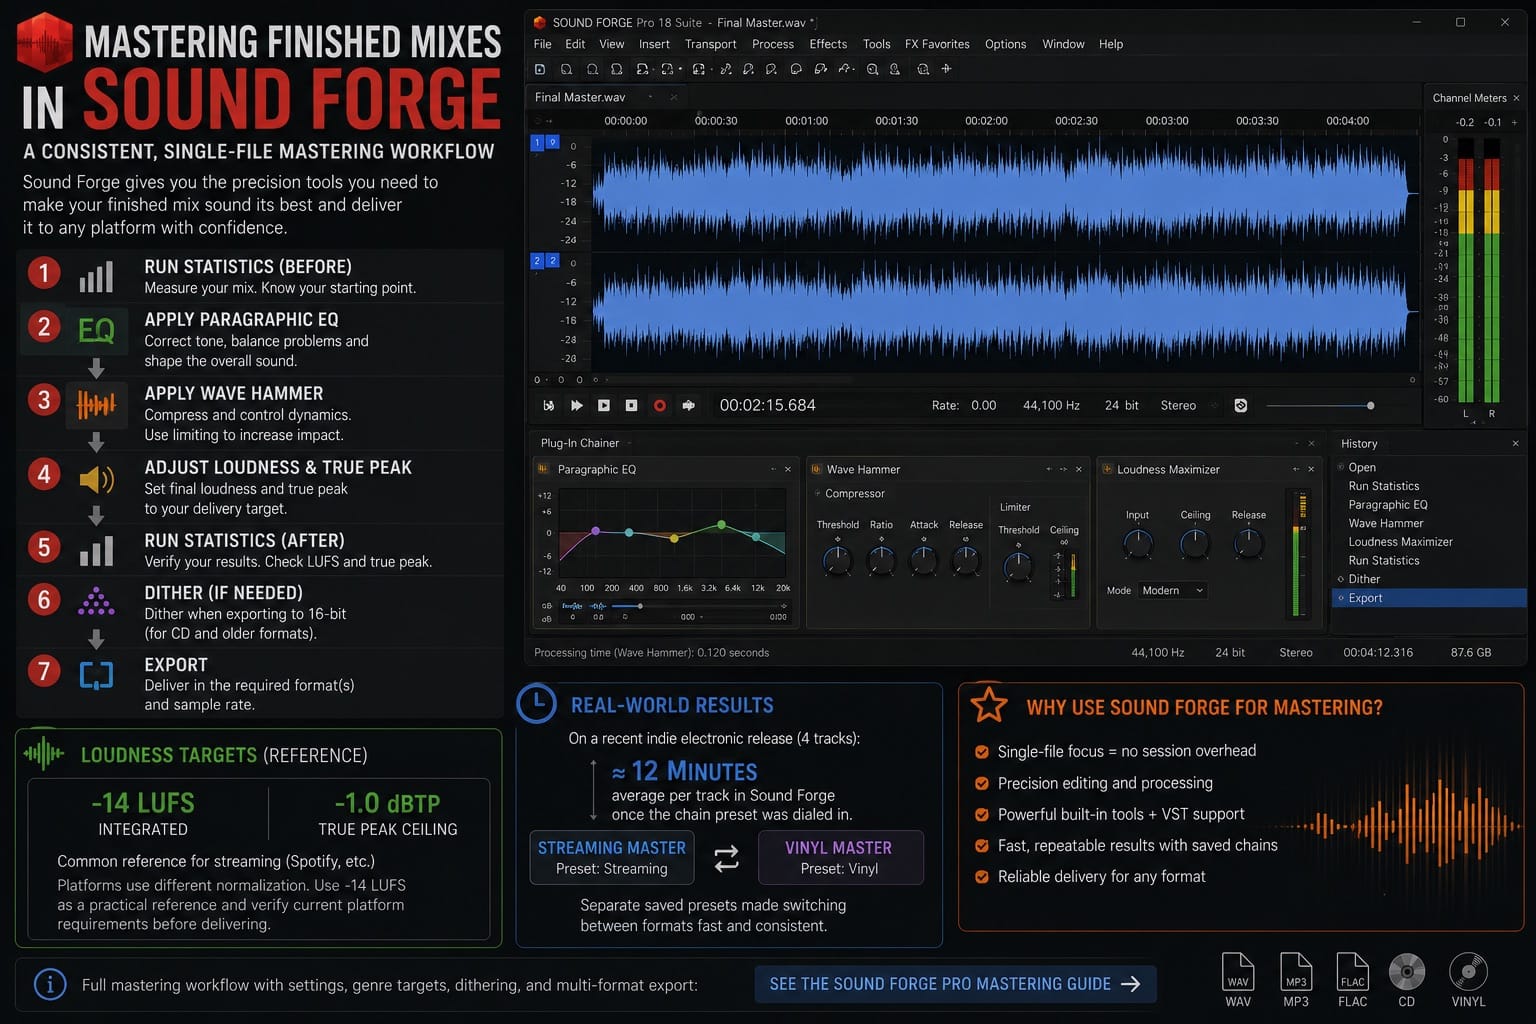
For Spotify-style loudness normalization, -14 LUFS integrated with a true peak ceiling around -1 dBTP is a common practical reference point. Other platforms use their own playback normalization behavior — treat -14 LUFS as a practical reference point rather than a universal rule, and verify current platform requirements before delivering a final master.
On a recent indie electronic release I mastered — four tracks, streaming and vinyl masters both needed — the Sound Forge portion averaged about 12 minutes per track once the Plug-In Chainer preset was set up. Having the streaming and vinyl processing as separate saved presets made switching between delivery formats fast rather than rebuilding the chain per track.
The full mastering workflow with specific settings, genre-specific targets, dithering, and multi-format export is in the Sound Forge Pro mastering guide.
Sample Editing and Loop Creation
Producers who work with sample-based music use Sound Forge for editing that requires more precision than a DAW's waveform editor provides: trimming to exact zero crossings, cleaning loop points so they play back without a click, normalizing a batch of samples to consistent levels, removing background noise from field recordings before they go into a sampler.
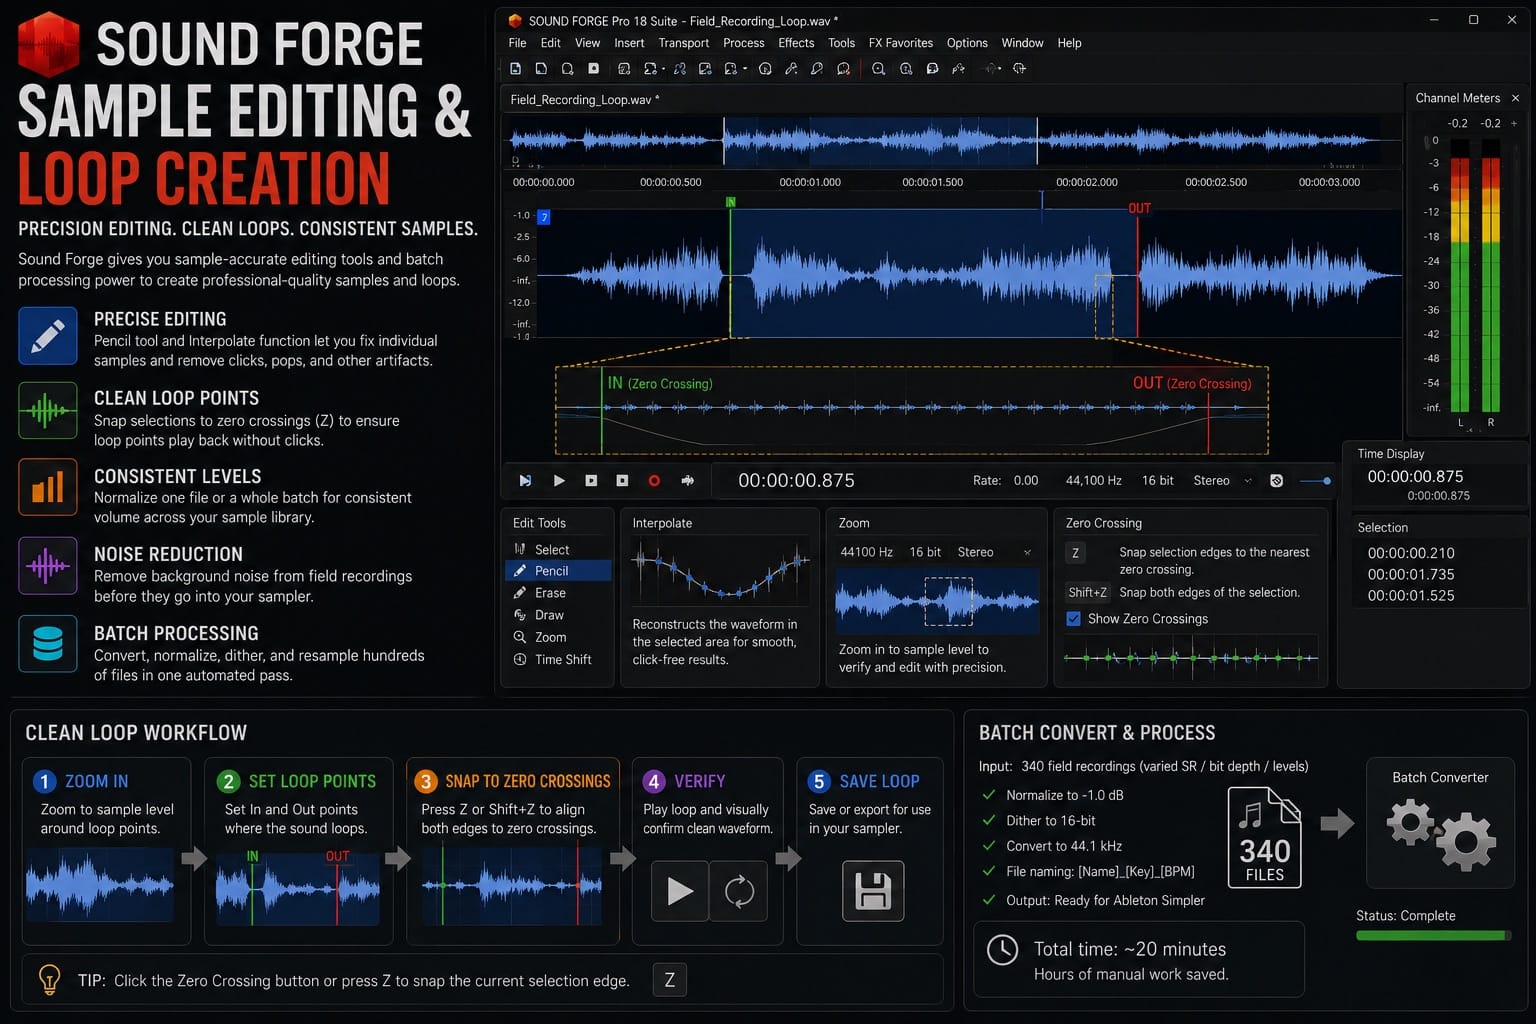
The Pencil tool and Interpolate function let you fix individual corrupted samples — visible at maximum zoom, corrected in a few seconds. That precision matters for samples that will loop repeatedly: a click at the loop point is the most noticeable thing in the mix once it repeats every bar.
The Z and Shift+Z shortcuts snap selection edges to zero crossings. Set loop in/out points, confirm both land on zero crossings, and the loop plays clean. Zoom in to verify — even a subtle offset is visible at sample-level magnification.
On a recent sample-library project, I needed to process 340 field recordings — different levels, sample rates, bit depths — into a consistent library for Ableton's Simpler. The Batch Converter ran normalization, 16-bit dither, and 44.1kHz conversion on all 340 files in one configured pass. That setup took about 20 minutes and saved what would have been hours of manual work per file.
Recording Vocals and Instruments
Sound Forge can be the recording application for single-source sessions. A vocalist tracking multiple passes, a guitarist recording acoustic takes, a sound designer capturing field recordings — all work in Sound Forge's recording workflow without needing a full DAW session.
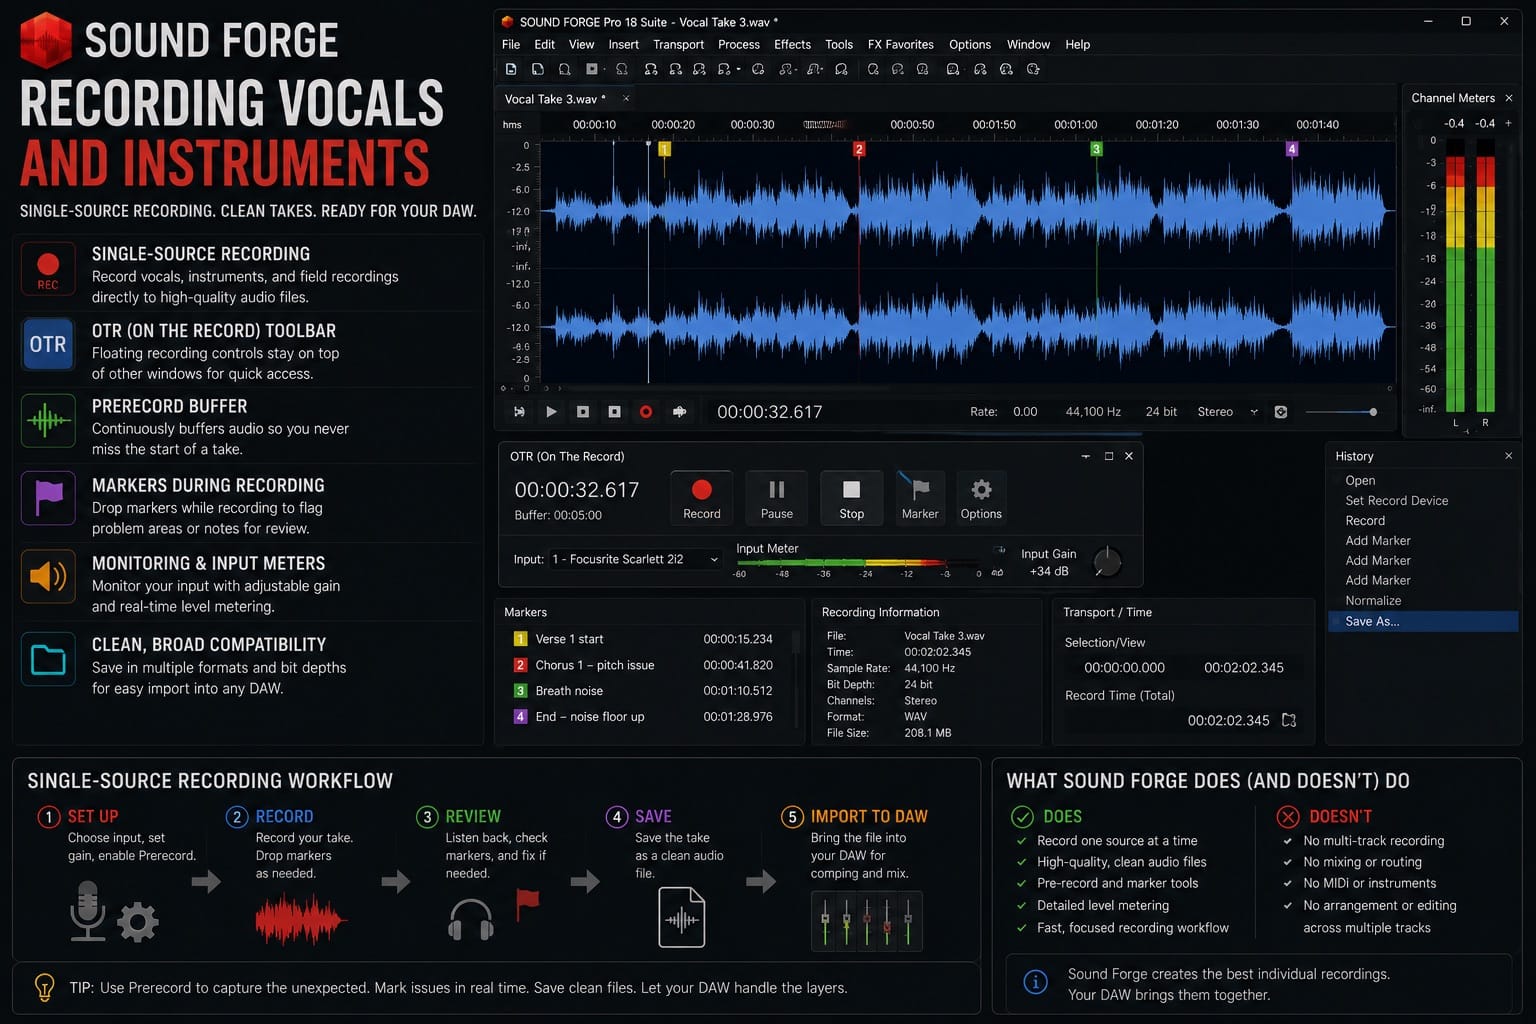
The OTR (On The Record) floating toolbar keeps recording controls accessible over other windows. The Prerecord buffer captures audio continuously so a take that starts before you press Record is still recoverable. Markers dropped during a take flag problem areas without stopping the recording.
On a recent singer-songwriter session, I recorded eight vocal passes into Sound Forge — each a full run of the song — then opened them in the DAW side by side to choose the best sections. The clean individual files made that comparison faster than recording directly into the DAW with eight tracks to manage simultaneously.
What this doesn't support is layering. Two performances mean two separate files. Assembling them requires a DAW. Sound Forge's role is to produce the cleanest possible individual files, which then go into the DAW for mixing. Full recording setup is in the recording guide.
Stem Processing and Cleanup
Stem mastering — processing individual stems (drums, bass, keys, vocals) rather than the summed stereo mix — suits Sound Forge's file-by-file approach. Each stem gets its own pass: noise reduction if needed, frequency correction, dynamics, export. The stems then go back into a DAW for final assembly or are delivered as client files.
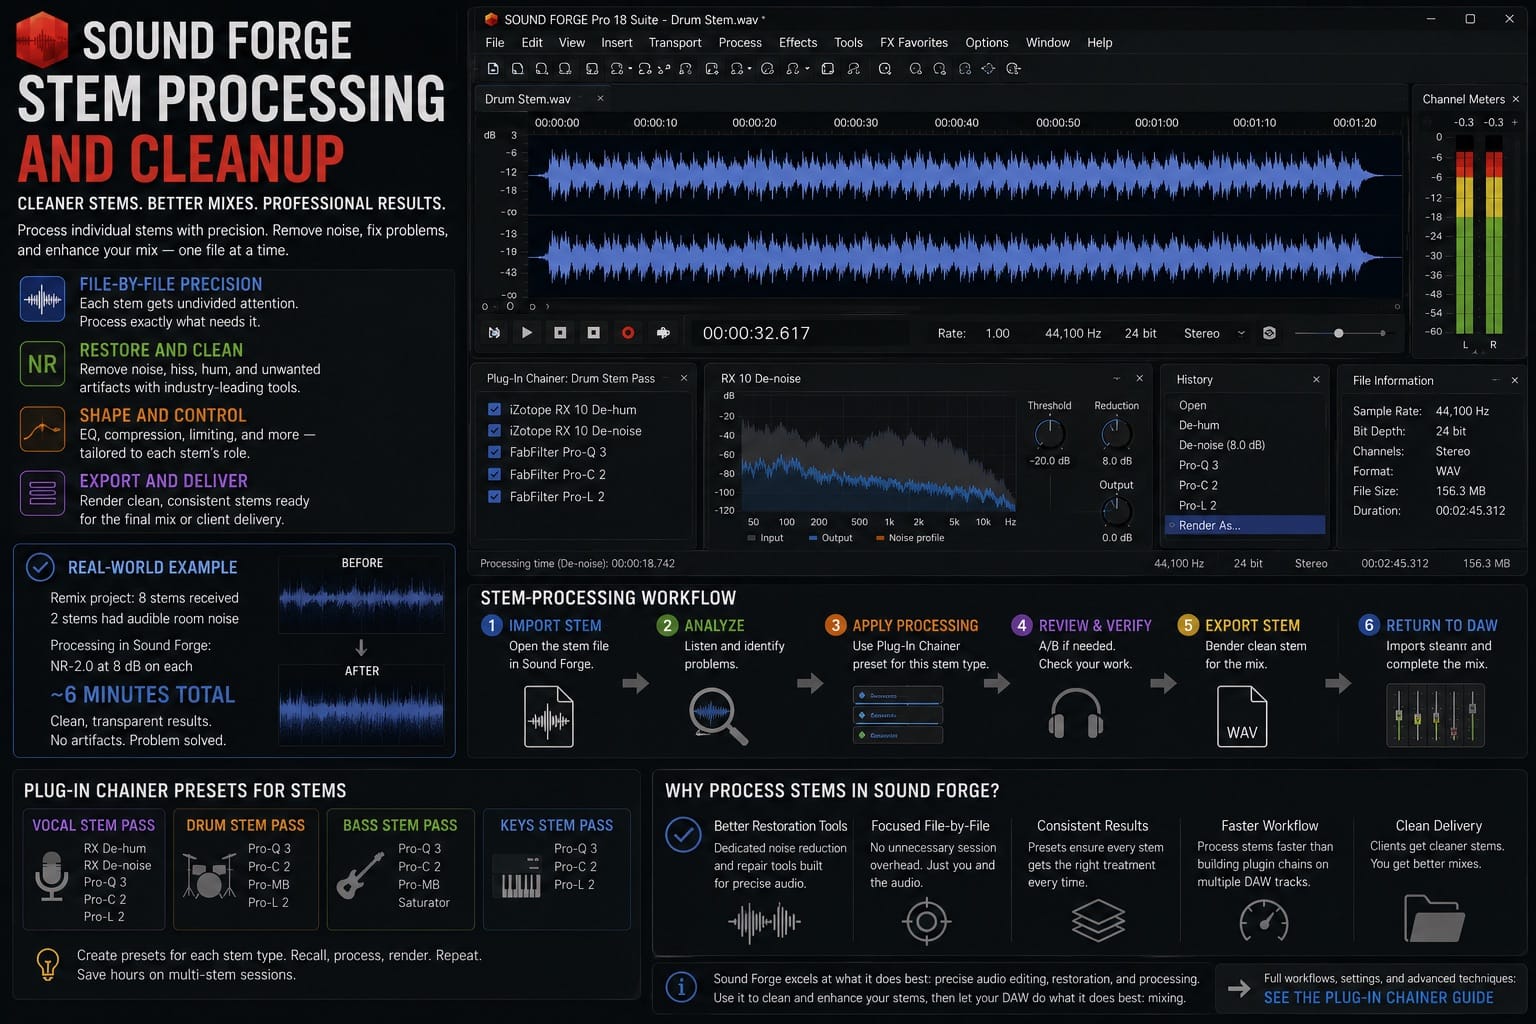
Processing stems in Sound Forge is useful when the mix engineer sends stems that have a specific problem — a vocal stem with room noise, drum overheads with consistent high-frequency hiss. Those are restoration and cleanup tasks that Sound Forge handles more directly than a plugin chain on a DAW track.
On a remixing project last year, I received eight stems from the original production — two had audible room noise problems. The Sound Forge pass on those two took about six minutes. NR-2.0 at 8 dB on each cleaned them without artifacts, and they went back into the DAW without any trace of the original room.
Plug-In Chainer presets matter here. Create a preset for the vocal stem pass, a different one for the drum stem pass, recall them per file rather than rebuilding each time. For sessions with eight or more stems, that cuts the processing time per stem to essentially just the render time. The Plug-In Chainer workflow is in the Plug-In Chainer guide.
Pro vs Suite: What the Bundle Difference Means for Producers
Sound Forge comes in base and Suite tiers. The base version includes the core editing toolset, Wave Hammer, Paragraphic EQ, and restoration tools.
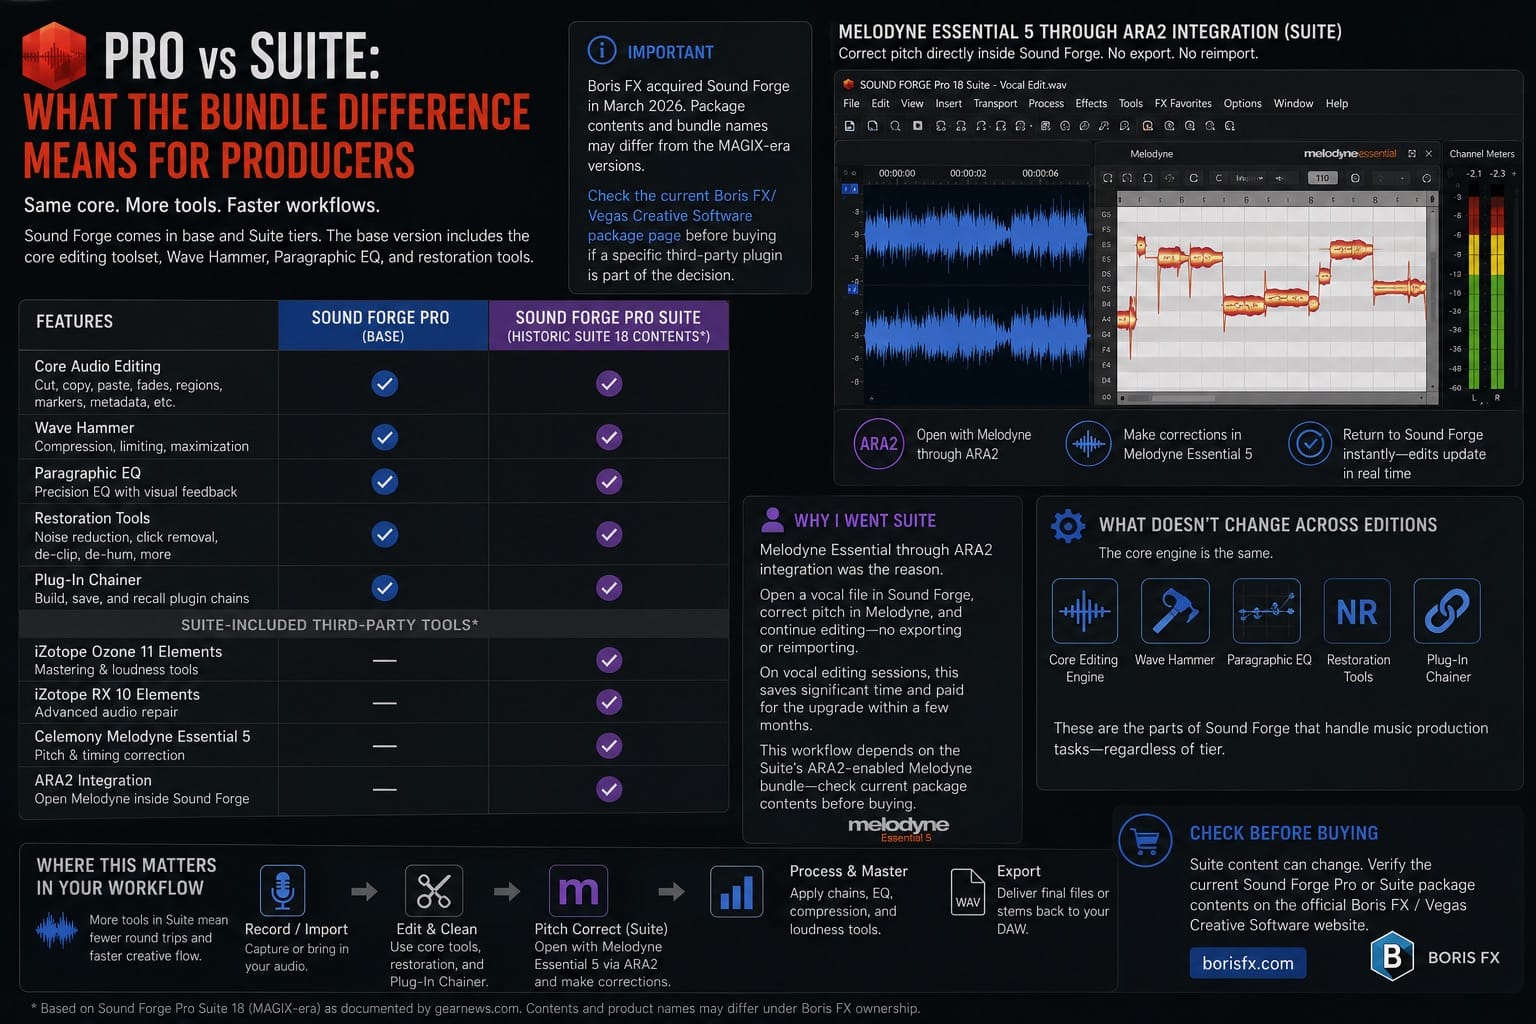
Historically, Sound Forge Pro Suite 18 (the MAGIX-era version) included iZotope Ozone 11 Elements, iZotope RX 10 Elements, and Celemony Melodyne Essential 5, as documented in gearnews.com's Sound Forge Pro 18 coverage. Since Boris FX acquired Sound Forge in March 2026, package contents and bundle names may differ. Check the current Boris FX/Vegas Creative Software package page before buying if a specific third-party plugin is part of the decision.
The Suite tier pushed me from base to Suite about two years ago — Melodyne Essential through ARA2 integration was the reason. Being able to open pitch correction directly inside Sound Forge on a vocal file, correct it in Melodyne, and continue in Sound Forge without exporting and reimporting saved enough time on vocal editing sessions that it paid for the upgrade within a few months. That workflow depends on the Suite's ARA2-enabled Melodyne bundle, which is why checking the current package contents before buying matters.
What doesn't change across editions: the core editing engine, Wave Hammer, restoration tools, and the Plug-In Chainer. Those are the parts of Sound Forge that handle music production tasks regardless of tier.
The DAW + Sound Forge Workflow in Practice
The combination of a DAW for production and Sound Forge for post-production and delivery is faster than trying to do both in a single application. Here's how it runs in practice:
Step 1 — Produce and arrange in your DAW. Composition, MIDI, virtual instruments, recording, mixing, automation — all of it happens here. Sound Forge isn't involved yet.
Step 2 — Export a 24-bit WAV from the DAW. No dithering, no limiting, no loudness processing on the mix bus. Export the raw mix with 2–4 dB of headroom below 0 dBFS. Remove any master bus limiter before bouncing.
Step 3 — Open in Sound Forge and run Statistics. Note the integrated LUFS, true peak, and RMS before touching anything. This is the pre-mastering baseline.
Step 4 — Edit heads, tails, fades, and any sample-level problems. Trim silence from the start and end of the file. Apply fades. Fix any clicks or clipped peaks from the mix that didn't get caught before the bounce.
Step 5 — Run the mastering chain. Paragraphic EQ correction, Wave Hammer compression and limiting, adjust final loudness and true peak toward the delivery target. Preview the whole chain before committing.
Step 6 — Verify with Statistics. Confirm integrated LUFS, true peak ceiling, and RMS against your delivery spec. Adjust if needed.
Step 7 — Export deliverables. 24-bit WAV for streaming distribution. 16-bit/44.1kHz WAV with POW-r dithering for CD. Keep the 24-bit version as the archive master.
I've run this workflow across 30+ releases and client projects in various combinations. The DAW handles everything up to the bounce. Sound Forge handles everything after it. The split means each application is doing what it's fastest at, and neither is compensating for what the other does poorly.
Frequently Asked Questions
Can Sound Forge Pro be used for music production?
Yes, for mastering finished mixes, editing samples and loops, cleaning recordings, processing stems, and recording single-source audio. It is not a DAW — no MIDI, no arrangement, no multitrack mixing. Most producers use it as the final step after composition and mixing are done in a DAW.
Can Sound Forge Pro replace a DAW?
No, not for full music production. It can replace a DAW only for single-file editing, mastering, sample cleanup, and recording one source at a time. For MIDI, virtual instruments, arrangement, multitrack mixing, buses, automation, and full song production, a DAW is still required. Sound Forge handles the work that happens after the DAW session is finished.
Does Sound Forge Pro have MIDI?
No. Sound Forge Pro has no MIDI sequencer, MIDI editor, or virtual instrument hosting in the standard workflow. Music involving MIDI programming is composed in a DAW. Sound Forge handles audio after it has been recorded or bounced to a stereo or stem file.
Is Sound Forge Pro good for mastering music?
Yes — single-file stereo mastering is the primary music production use case. The workflow: Paragraphic EQ correction, Wave Hammer compression and limiting, LUFS targeting via Statistics, dithering for 16-bit CD export. The full mastering workflow with genre-specific settings is in the mastering guide.
Can I record music directly in Sound Forge Pro?
Yes, for single-source recording. Sound Forge supports recording live instruments and vocals directly, with up to 32 input channels depending on hardware and version. What it doesn't provide is a DAW-style multitrack session — no arrangement timeline, no mixer channel strips, no layering simultaneous recordings in a session. Record each source to its own file, then assemble in a DAW for mixing.
Related Sound Forge guides
- Workflows hub
- Sound Forge Pro for Podcast Editing: Noise Reduction, LUFS & Export Workflow
- Sound Forge Pro for Voice-Over Recording
- Sound Forge Pro for Vinyl Restoration
- Sound Forge and Vegas Pro Workflow for Video Editors
- Acid Pro vs Sound Forge
- Sound Forge in Samplitude Suite
- Sound Forge Pro: The 2026 Guide (start here)