Sound Forge Pro for Mastering (Full Guide)
Master Sound Forge Pro with EQ, Wave Hammer, Ozone Elements, LUFS targets, Statistics checks, dithering, exports, and genre settings properly.

Mastering is the last thing that happens to a track before it reaches a listener. Done correctly in Sound Forge Pro, it's a sequence of deliberate decisions applied to a finished stereo mix — frequency correction, dynamics shaping, loudness targeting, verification, and export. Done incorrectly, it makes a quiet mix louder and calls that mastering. The difference shows up immediately when the track plays next to anything else.
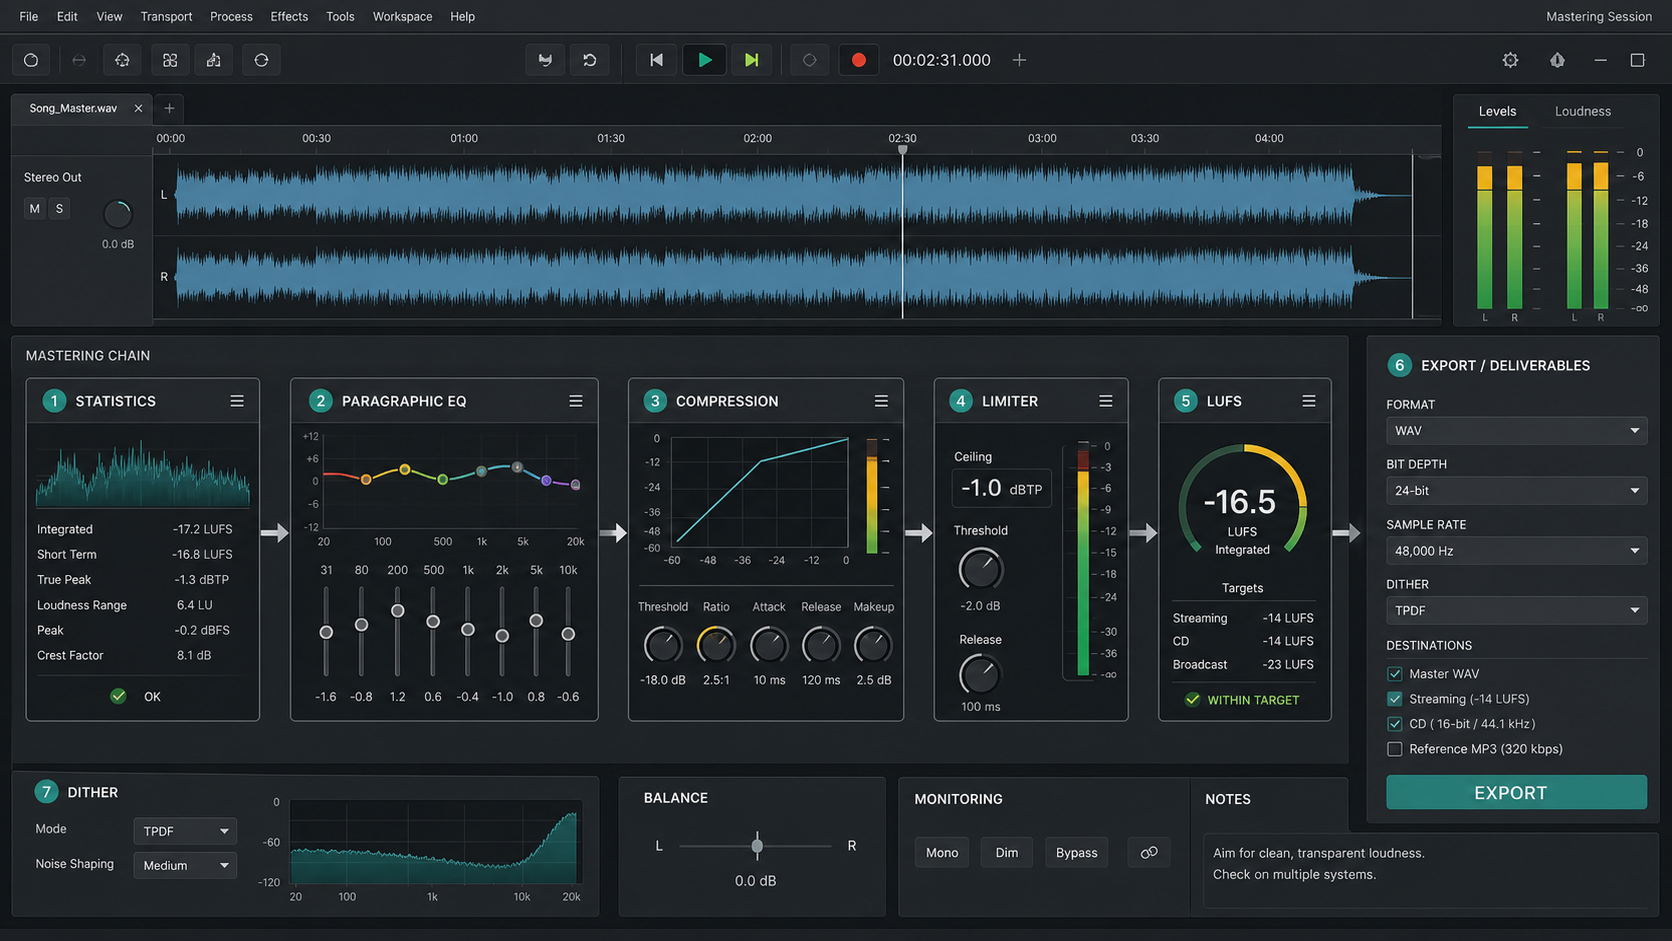
Sound Forge Pro ships with everything needed for professional stereo mastering: Paragraphic EQ, Wave Hammer 2.0, coreFX dynamics, iZotope Ozone Elements, LUFS normalization, POW-r dithering, and the Statistics process. The Plug-In Chainer ties them into a reviewable chain before anything is committed to disk. This guide covers the full workflow from mix preparation through final export, including settings for different genres and how to produce multiple deliverables from one session.
Quick answer: Check headroom via Statistics → EQ corrections → Wave Hammer compression → Volume Maximizer/limiting → LUFS normalization to target → verify with Statistics → dither only if going to 16-bit → export. Every step has a reason for its position. The rest of this guide explains each step in detail.
What to Check Before You Open Sound Forge
Mastering starts before Sound Forge Pro opens. The mix you bring in determines what's possible. A well-prepared mix limits how much mastering needs to do; a poorly prepared one requires the mastering chain to compensate for problems that should have been fixed upstream.
The mix should arrive with 2–4 dB of headroom below 0 dBFS. That means peaks landing around -2 to -4 dBFS, not -0.1 dBFS. Mastering requires room to apply EQ and dynamics processing without the output clipping. A mix that's already hitting 0 dBFS repeatedly has been limited or over-compressed at the mix stage — the mastering chain has nowhere to work.
Remove any master bus limiter or loudness maximizer from the mix before exporting to Sound Forge. The mix should represent the true dynamic balance of the arrangement, not a loudness-chased version of it. If the mix has a light bus compressor for glue — 1–2 dB of gain reduction that affects the track's character — that's typically fine to keep. A limiter that's holding the peak level artificially should come off before the mastering file is created.
The mix format: deliver a 24-bit WAV at 44.1kHz or 48kHz, whatever sample rate the project was recorded at. Don't convert sample rates before mastering. The sample rate guide covers the iZotope 64-Bit SRC conversion if a rate change is needed after mastering. Don't dither to 16-bit before mastering. Work at the original bit depth.
On a recent album project, the producer sent me a mix that was peaking at -0.3 dBFS and measuring -7 LUFS integrated — it had been run through a limiter set to brick-wall before export. Opening it in Sound Forge confirmed the waveform showed flat-topped peaks throughout. The EQ I needed to apply to the low mid pushed some transients over 0 dBFS immediately. We went back, removed the limiter from the mix bus, re-exported at -8 dBFS peak, and the mastering session proceeded normally. That's a fixable problem but it costs time.
Session Setup: Statistics Before You Touch Anything
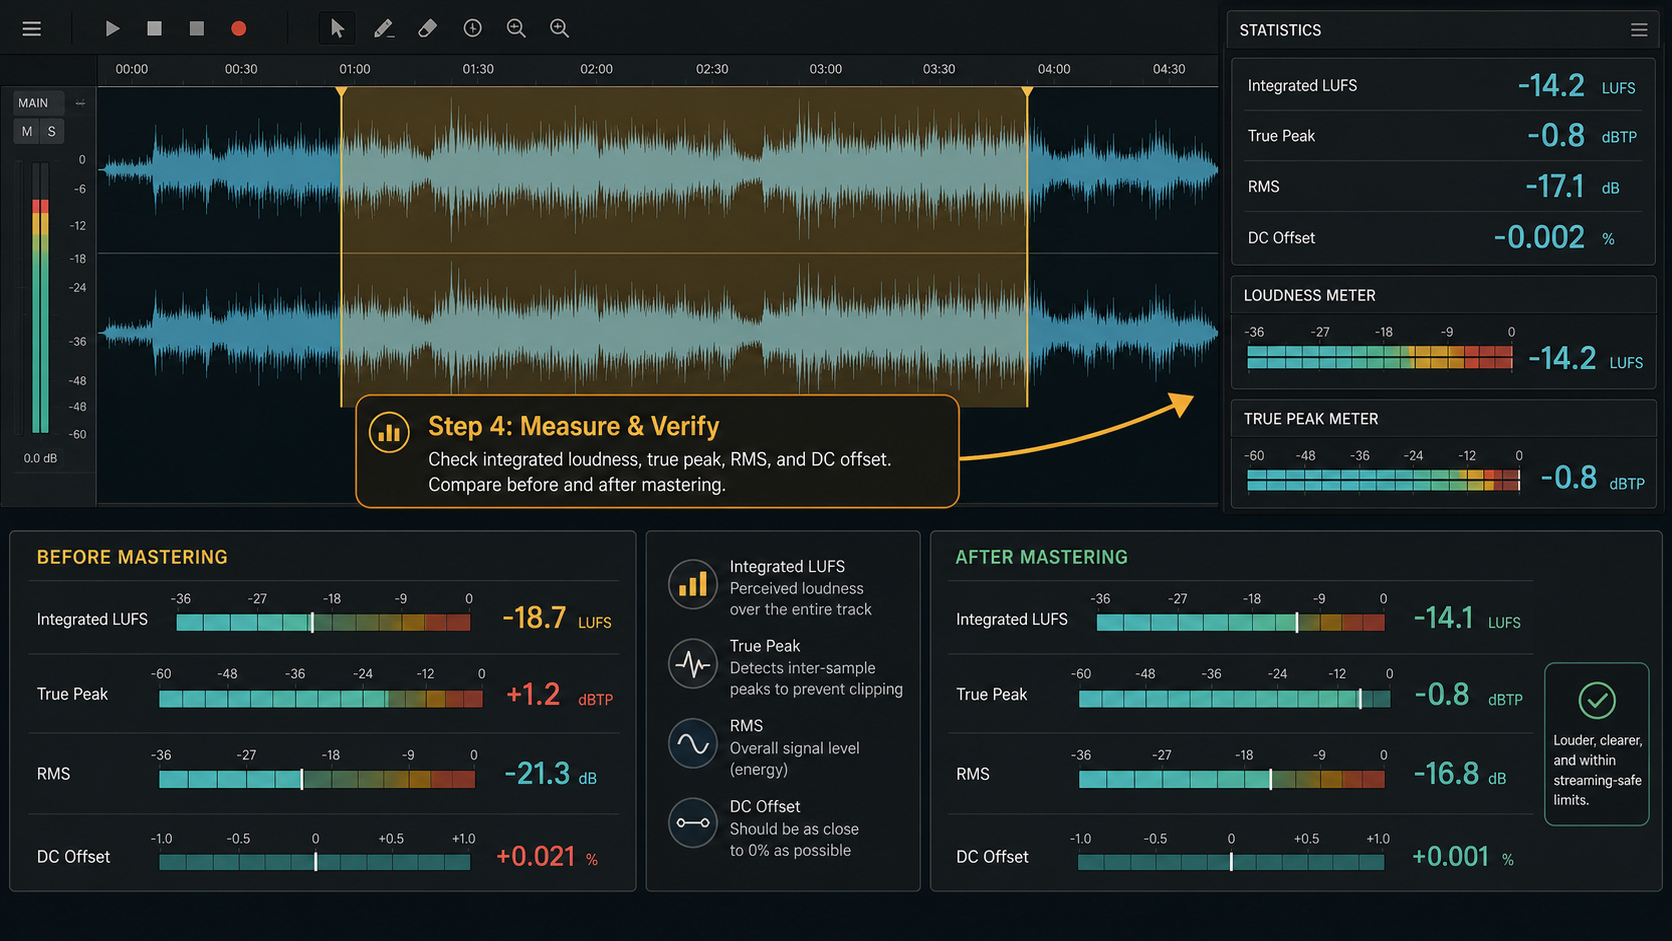
Open the mix file in Sound Forge Pro. Before applying any processing, run Tools → Statistics and record the pre-mastering numbers. Write them down or screenshot them. The Statistics dialog shows Integrated LUFS, True Peak, Peak Amplitude, RMS Average, and DC Offset for the whole file.
These numbers serve two purposes. First, they tell you what you're working with — how loud the mix is relative to your target, whether there's DC offset that needs removing before processing, where the true peaks are. Second, they give you a before-state to compare against after the chain is applied, which is how you verify that the mastering actually did what you intended and not something different.
My starting routine before every session: open the file, run Statistics, screenshot the readout, paste it into the project note doc with the date and file name. Three months later when a client wants a revision, those before-state numbers are the first thing I check. Without them, there's no reference for what the mastering chain actually changed.
Check for DC offset in the Statistics readout. Any value other than 0.000 on DC offset means the waveform has a constant bias that can cause issues with downstream processing and playback. Process → DC Offset Correction removes it. Apply this before the main chain.
Note the peak amplitude. If peaks are already at or above -1 dBFS, the mix needs some gain reduction before processing — apply Process → Volume at -2 or -3 dB to create working headroom. If peaks are at -6 dBFS or below, you have comfortable room to work.
EQ: Corrective First, Additive Second
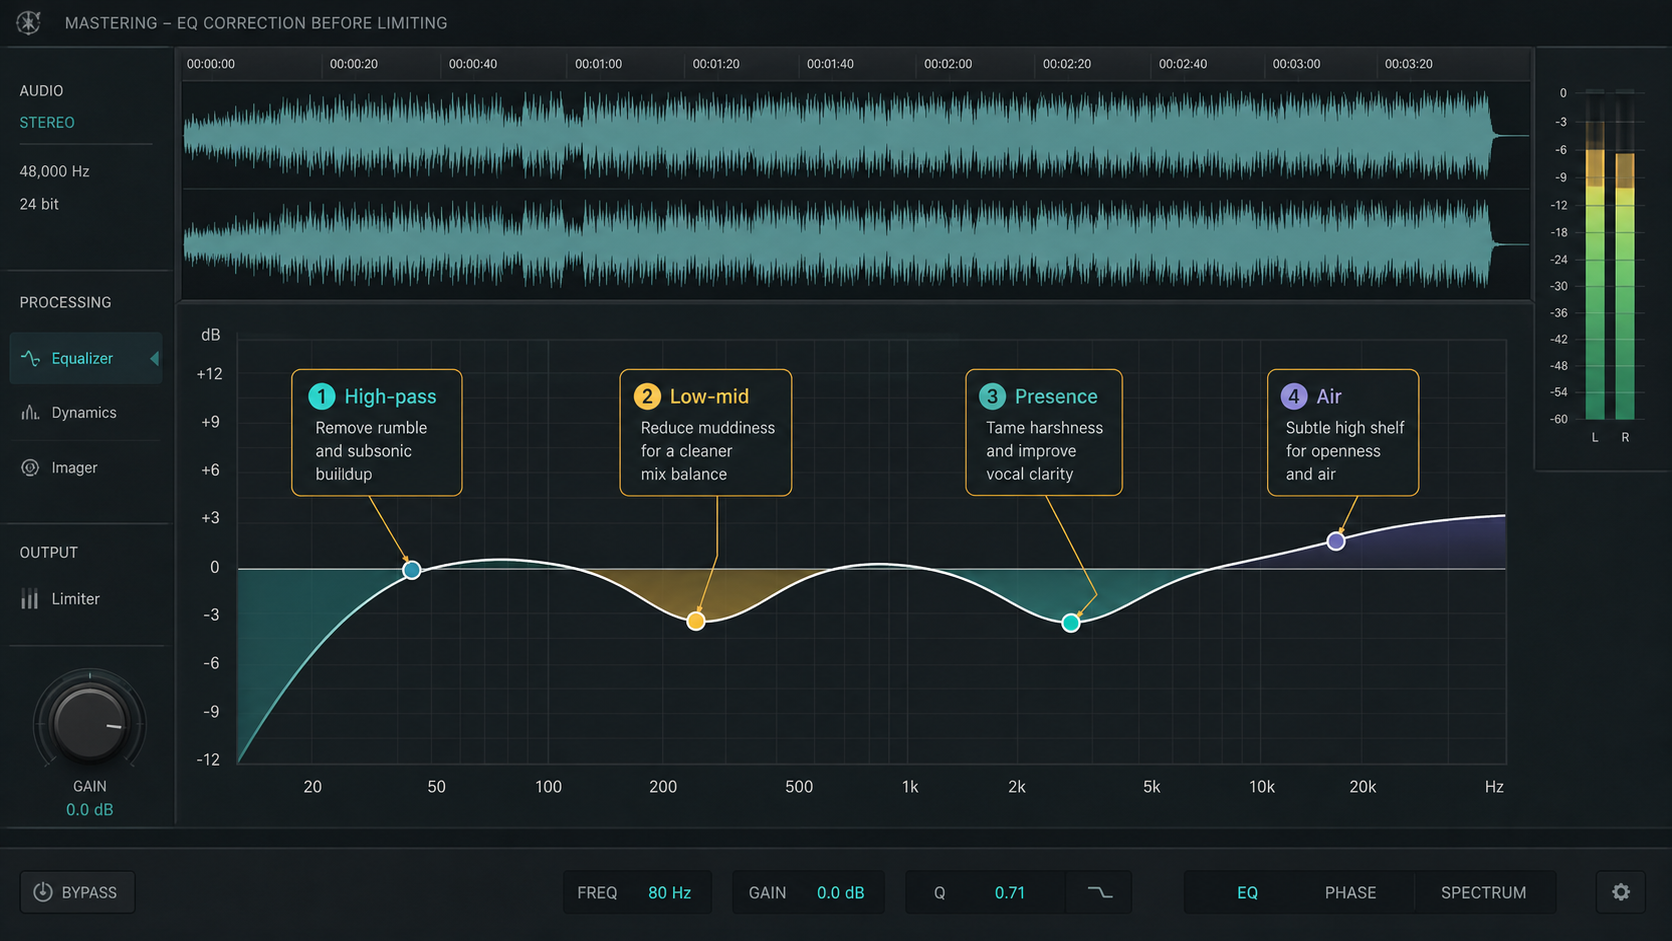
Open the Paragraphic EQ via Process → EQ → Paragraphic EQ or load it inside the Plug-In Chainer. Mastering EQ is different from mix EQ: the moves are smaller, the Q values are wider, and the purpose is frequency balance across the full program material rather than individual instrument control.
Start with corrective moves. These are cuts, not boosts — removing frequency ranges that are causing problems before adding anything. Common problems in mixes arriving for mastering:
Subsonic energy below 30–40 Hz from room resonance or poor recording: apply a high-pass filter at 30 Hz to clean the low end without affecting the audible bass. Low-mid buildup between 200–400 Hz that makes the mix sound boxy or congested: a broad bell cut of 1–2 dB at the offending frequency, Q around 2–3, opens up the mix without thinning it. Harsh upper midrange presence at 2–5 kHz that comes from mix engineer overcompensating: a gentle shelf or broad cut of 0.5–1 dB brings it back. Harsh or brittle top end above 10 kHz from digital limiting artifacts or bright recording chain: a -1 dB high shelf at 10 kHz brings clarity without dulling the air.
After corrective moves, additive EQ is optional — only when the mix actually needs enhancement rather than correction. A +1 to +1.5 dB high shelf above 12 kHz adds air and openness to a mix that sounds dull. A +0.5 to +1 dB bell boost at 60–80 Hz adds weight to a thin low end. These are gentle moves. Mastering EQ at +3 dB anywhere is a sign the mix had a problem that should have been addressed before mastering.
Preview with Bypass in the Paragraphic EQ throughout the EQ decisions. The ear adapts to any curve within seconds. Flipping Bypass every 30 seconds keeps the reference honest. On a singer-songwriter album I mastered last autumn — seven tracks, home studio recordings, excellent performances but noticeably boxy room acoustics — the corrective EQ accounted for about 80% of what the mastering chain did. A -1.5 dB bell at 320 Hz with Q 1.8 on each track removed the room characteristic and made the album sound like it was recorded somewhere with better acoustics. The detailed EQ settings are covered in the EQ guide.
Wave Hammer 2.0: Compression and Limiting
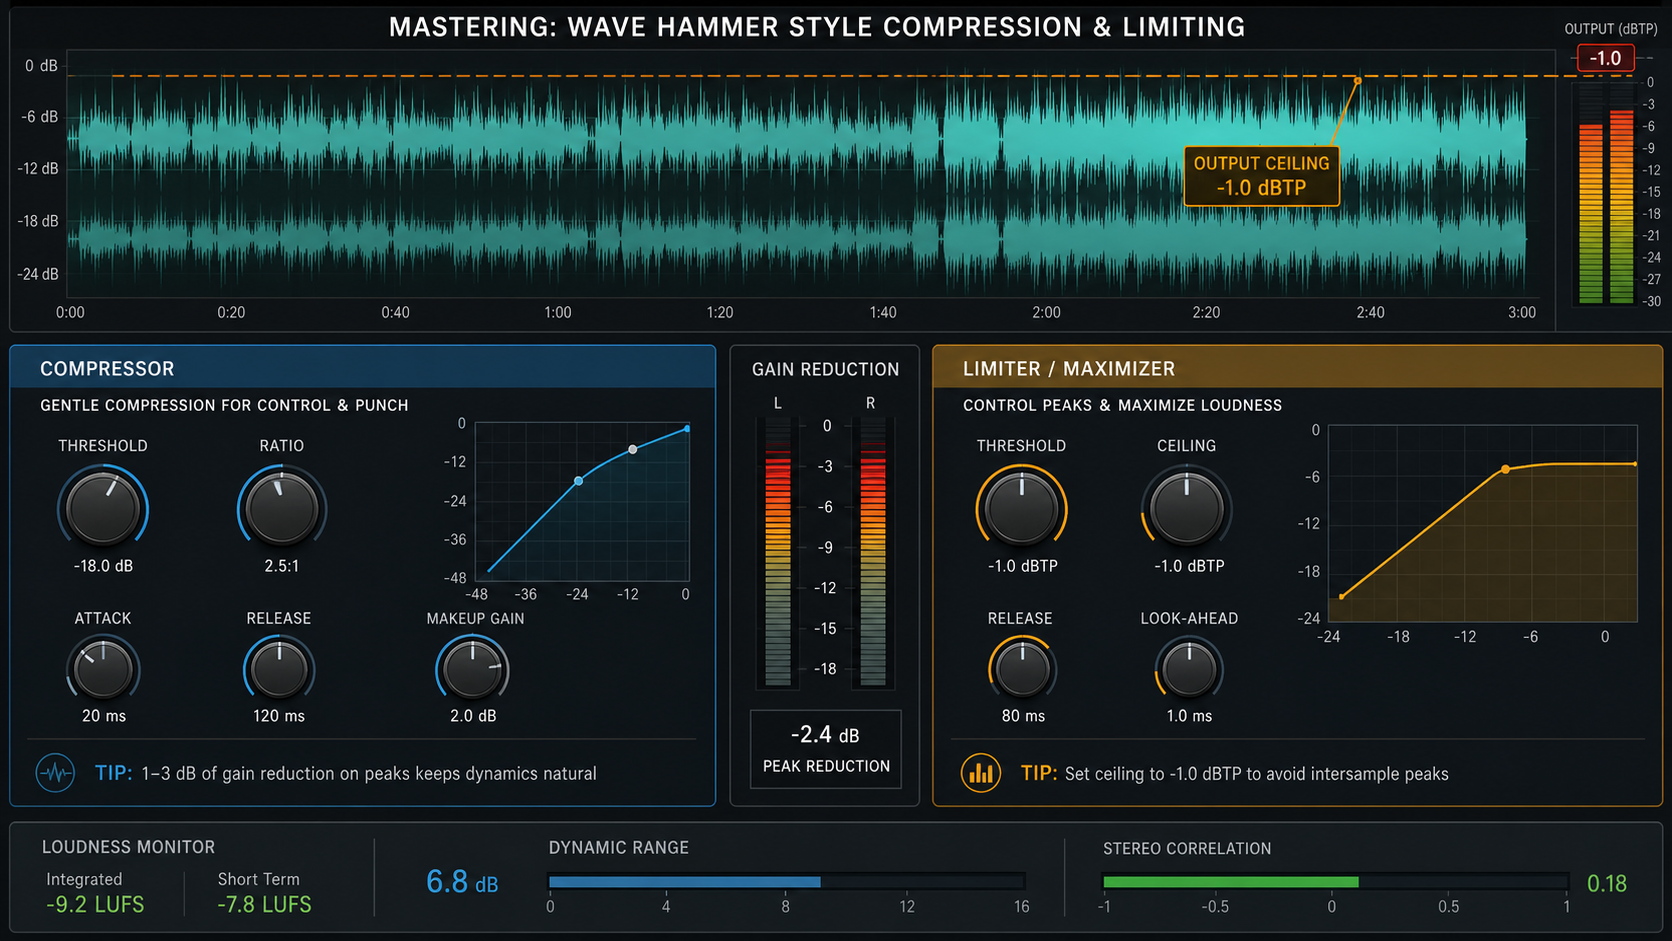
Wave Hammer 2.0 (Effects → Wave Hammer → Wave Hammer 2.0) is a two-stage dynamics processor. The compressor stage reduces peak-to-average ratio — tightening dynamic range without affecting loudness directly. The Volume Maximizer stage brings up the overall level without exceeding a user-set ceiling.
For the compressor stage: mastering compression is subtle. A ratio of 1.5:1 to 2:1 with a threshold set to catch the top 6–8 dB of dynamics produces 1–3 dB of gain reduction during louder passages. Attack around 30–60 ms — fast enough to catch peaks, slow enough to let transients through. Release around 150–300 ms — longer than mix compression, letting the material breathe between peaks. The result is a track that feels more consistent in level without sounding compressed.
A common mastering mistake is setting the compressor to a higher ratio (4:1 or above) and letting it work harder than needed. Heavy mastering compression doesn't make a track louder — the Volume Maximizer does that. Heavy compression makes the track less dynamic, and streaming platforms will normalize the resulting track down to the same playback level as a more dynamic track. The loudness war argument — compress harder to sound louder — only held when playback wasn't normalized. It doesn't hold now.
For the Volume Maximizer stage: set the Out Ceiling at -1.0 dBFS (true peak). This is the standard ceiling for streaming delivery — it prevents inter-sample peaks from clipping during lossy encoding. Adjust the threshold until the integrated LUFS reading in the Wave Hammer meters approaches your target. For streaming: -14 LUFS. For CD: -12 to -14 LUFS depending on genre. Preview extensively before committing.
Wave Hammer has two modes: the original Wave Hammer (DirectX, still present) and Wave Hammer 2.0. The original has a more analog character in the compressor stage — some engineers prefer it for rock and acoustic material where that warmth is useful. Wave Hammer 2.0 is more transparent and accurate for modern production styles. I use the original on blues and folk material where vintage character is appropriate, and 2.0 on electronic and pop where transparency matters more.
Ozone Elements: When to Use It Instead
Sound Forge Pro bundles iZotope Ozone Elements, which provides a parallel mastering chain accessible as a VST through the Plug-In Chainer. Ozone Elements includes Equalizer, Imager (stereo width), and Maximizer modules.
The Ozone Maximizer handles true peak limiting more transparently than Wave Hammer's Volume Maximizer on complex material with dense high-frequency content — cymbals, synthesizers, bright acoustic guitars. The algorithm produces fewer high-frequency artifacts when limiting to -1 dBFS ceiling on complex material. For most music, the audible difference is subtle. For mastering material with significant high-frequency transient content, it's worth using Ozone instead of or after Wave Hammer.
Ozone's Imager module provides stereo width control — narrowing the stereo field at low frequencies (below 200–300 Hz, where stereo information can cause mono playback problems) and adjusting overall width. This is the only width-management tool in the standard SF Pro toolset. For mixes that are too narrow or, conversely, too wide and unfocused, the Imager addresses it without touching the dynamics chain.
The Mastering Wizard in Ozone Elements (Ozone → Assistive features) analyzes the mix, creates an audio profile, and suggests signal chain settings. It's a useful starting point for engineers new to mastering — the suggestions are often in the right ballpark even if they need adjustment. I use it occasionally as a sanity check: if the Wizard is suggesting -6 dB of low-mid cut and 4 dB of limiting and my chain has neither, that's a flag to listen harder to whether the Wizard is hearing something I'm missing.
Reference Tracks: Checking Your Work Against Reality
A mastering session without reference tracks is a mastering session that only checks against itself. Reference tracks — commercially released recordings in the same genre — tell you whether your frequency balance, loudness, and dynamics sit within the range of what's commercially normal for that style.
In Sound Forge Pro, open the reference track as a second file (File → Open, leave the master file open in the background). Match the reference track's playback level to the master's level by checking both in Statistics and applying a volume offset to the reference if needed — your ears can't make a fair comparison if one file is 3 dB louder than the other.
Flip between the master and the reference using the Window menu. Listen for the same qualities: does the low end feel similar in weight? Does the top end have comparable air? Does the overall loudness feel competitive? The goal isn't to match the reference exactly — it's to confirm your master is in the same genre's sonic territory rather than obviously off in a direction that only shows up when compared to something external.
On a pop production last spring, my master was sounding fine in isolation. Against the reference (a recent commercially released pop track in the same tempo and key range), it was immediately clear that the 100–200 Hz range was 3–4 dB too heavy by comparison — the mix engineer had a subwoofer that flattered the bass. One -2.5 dB bell at 150 Hz, Q 1.2 in the Paragraphic EQ, and the master sat in the same tonal territory as the reference. That correction came from the reference comparison, not from my monitoring alone.
LUFS Targets and Loudness by Genre
Every major streaming platform normalizes playback loudness. Mastering louder than the platform's target doesn't result in louder playback — the platform turns it down. What it produces instead is a more compressed master that, when normalized down to the same playback level, sounds more compressed than a dynamic master at the same playback volume. The loudness war strategy inverted: louder masters at the same playback level now sound worse, not better.
Current platform targets (2026, confirmed from platform documentation and the iZotope streaming mastering guide):
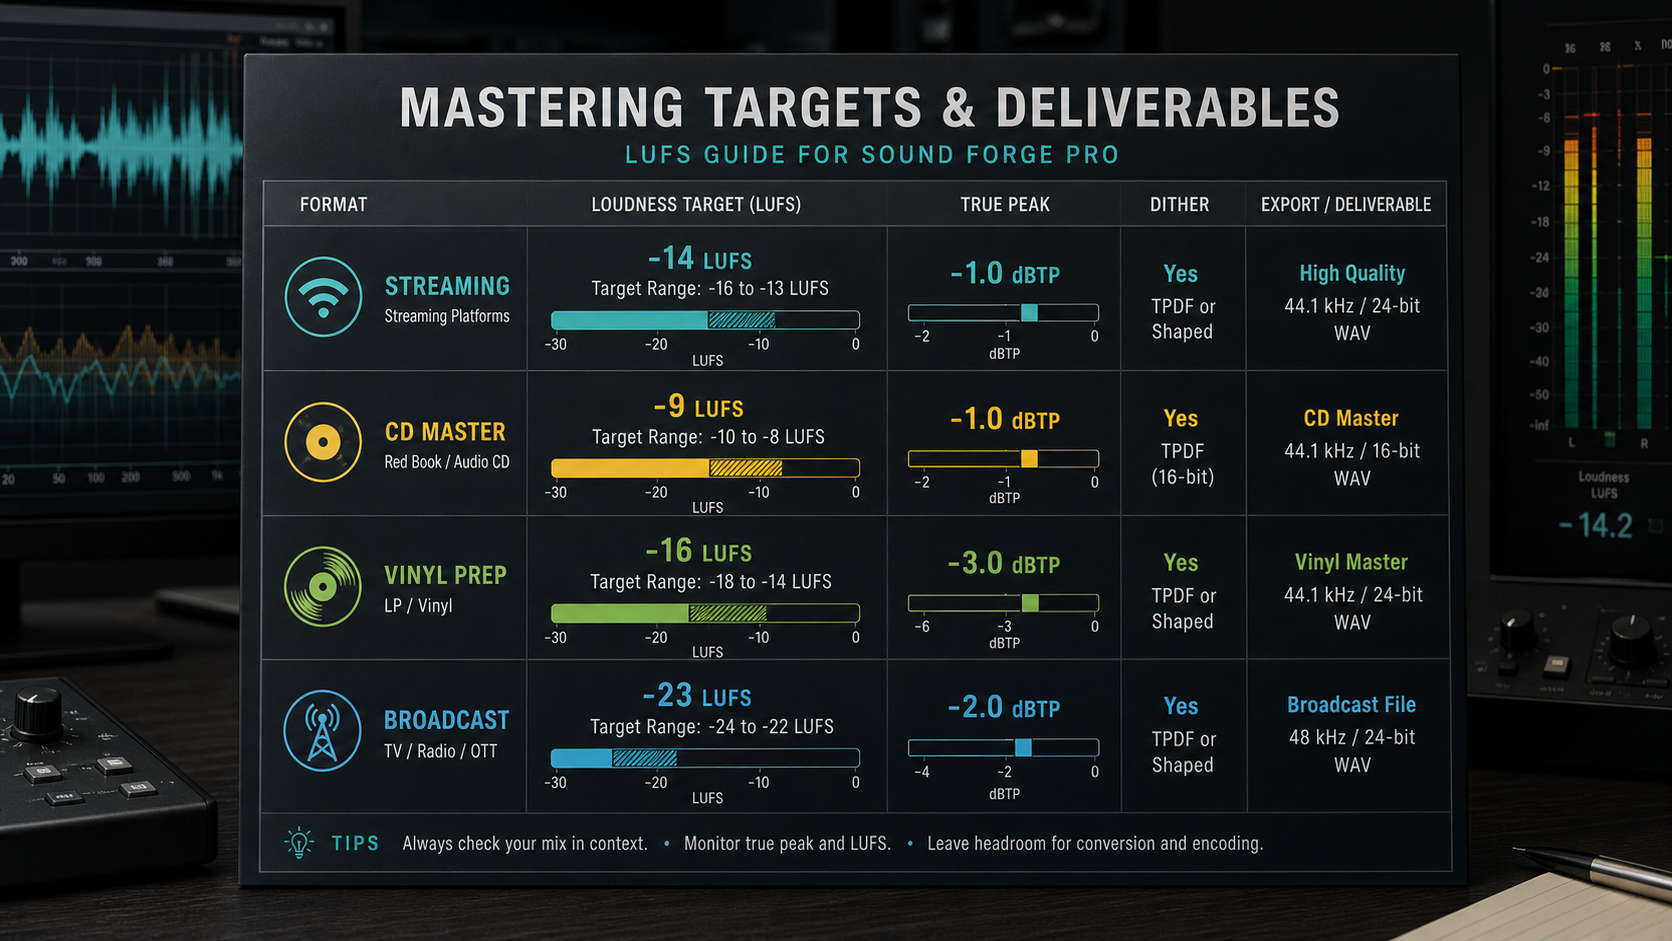
Spotify: -14 LUFS integrated, -1 dBFS true peak. Apple Music: -16 LUFS integrated (quieter target — masters louder than -14 LUFS get turned down noticeably). YouTube: -14 LUFS integrated. Tidal: -14 LUFS. Amazon Music: -14 LUFS. SoundCloud: -14 LUFS (no normalization on SoundCloud Go+). The practical target: master to -14 LUFS integrated with a -1 dBFS true peak ceiling. This meets Spotify, YouTube, Tidal, and Amazon directly. Apple Music will reduce it by 2 dB, which is acceptable.
Gearspace has a long-running thread on Sound Forge mastering technique where one engineer described his entire mastering process as: export from DAW, open in SF, apply his Plug-In Chainer preset (EQ + Wave Hammer), check the LUFS reading, adjust the Volume Maximizer until the LUFS hits his genre target, export. That's a reductive version of a real workflow, but the core principle is correct — the LUFS target is genre-specific and it comes from listening to competitive commercial releases in that genre, not from reading a loudness spec sheet.
Genre-specific considerations — the -14 LUFS target is a starting point, not a rule for every genre:
Electronic, EDM, pop, hip-hop: -14 LUFS is appropriate and competitive. Some producers push to -10 to -12 LUFS for aggressive electronic music specifically because the compressed character survives normalization in a genre where that compression is a sonic identity choice — not because it makes the track louder on streaming.
Rock and metal: -10 to -12 LUFS is common in the genre. The loudness and compression density are part of the genre's sonic expectations. Modern metal particularly sits in the -8 to -10 LUFS range — not because streaming platforms play it louder, but because the heavily compressed character is what the genre sounds like.
Jazz, classical, acoustic, folk: -16 to -18 LUFS preserves the dynamic range that defines these genres. A classical recording mastered to -14 LUFS requires heavy limiting that removes the contrast between pianissimo and fortissimo — which is the entire expressive point of the genre. Master quieter, preserve the dynamics.
CD delivery targets: -12 to -14 LUFS with a true peak ceiling of -0.1 dBFS. The Red Book standard doesn't specify a loudness target, but commercial CDs in most genres sit in this range. A CD master louder than -9 LUFS will usually sound over-compressed on high-quality playback systems.
Measuring LUFS in Sound Forge Pro: Statistics and the LUFS Meter
Sound Forge Pro has two measurement tools for loudness. Understanding which to use at which stage prevents the normalization mistake that appears regularly on magix.info support forums.
View → LUFS Meter shows real-time Integrated, Short-Term, and Momentary LUFS during playback. Use this during processing to monitor where the integrated LUFS is tracking as the chain processes the audio. Play through the whole file — Integrated LUFS only gives an accurate reading once the full program material has passed through.
Tools → Statistics performs a non-real-time analysis (documented in the Statistics documentation) of the entire selected region and returns precise measurements including Integrated LUFS, True Peak, Peak Amplitude, RMS Average, and DC Offset. Use this for the before-state capture and final delivery verification. Statistics gives a more accurate reading than real-time monitoring because it analyzes every sample in the selection rather than metering on the fly.
The specific mistake that shows up regularly on magix.info: engineer runs Process → Normalize to -1 dBFS peak, assumes the track is now mastered, exports. The track measures -19 LUFS integrated because it's a very dynamic recording and the peak normalization did nothing to the average loudness. Statistics would have shown this immediately. Run Statistics, look at the Integrated LUFS number, and work from there.
To hit a specific LUFS target: run Statistics, note the Integrated LUFS, calculate the difference to your target, apply that gain difference via Process → Volume, then run Statistics again to confirm. Example: Statistics reads -18.2 LUFS and the target is -14 LUFS. Apply Process → Volume at +4.2 dB. Run Statistics again — it should read -14 LUFS ±0.2 dB. Check that True Peak hasn't exceeded -1 dBFS after the gain adjustment. If it has, the Volume Maximizer needs to catch it first before the volume adjustment step.
Dithering: When It's Needed and When It Isn't
Dithering applies only when reducing bit depth — specifically when converting from 24-bit (or 32-bit float) to 16-bit for CD delivery. It adds a carefully shaped noise floor that prevents the quantization distortion that would otherwise appear when the 24-bit signal is rounded to 16 bits.
For streaming platforms: most accept 24-bit files, and many accept 32-bit float. For these, no dithering is needed. Applying dithering to a 24-bit master and then delivering 24-bit is adding noise for no reason.
For CD delivery (16-bit/44.1kHz required): use Process → Bit-Depth Converter, select 16-bit output, and choose a dithering type. Sound Forge Pro includes POW-r dithering:
POW-r Type 1 — flat noise shaping, for simpler material like speech or solo instrument recordings. POW-r Type 2 — psychoacoustically optimized, recommended for most musical material including pop, rock, electronic, and jazz. POW-r Type 3 — high-order noise shaping for complex full-spectrum stereo material where maximum perceived dynamic range matters. Type 2 is the correct default for most mastering to CD.
On a classical recording session last year — solo piano, extraordinarily wide dynamic range — I delivered 24-bit FLAC for streaming and 16-bit/44.1kHz WAV for a CD pressing. The 24-bit streaming version had no dithering applied. The 16-bit CD version got POW-r Type 3 because the dynamic range of the recording made the dither type selection matter more than it does on compressed pop material. The difference between Type 2 and Type 3 on that piano recording was audible on high-end playback — Type 3's higher-order noise shaping moved the dither artifacts further into the inaudible upper frequency range.
Apply dithering absolutely last — after all EQ, dynamics, normalization, and gain adjustments are complete. Dithering before normalization or EQ defeats the purpose because subsequent processing modifies the carefully shaped noise profile. The order is: processing → normalization → verify → dither → export CD master.
Multiple Deliverables from One Session
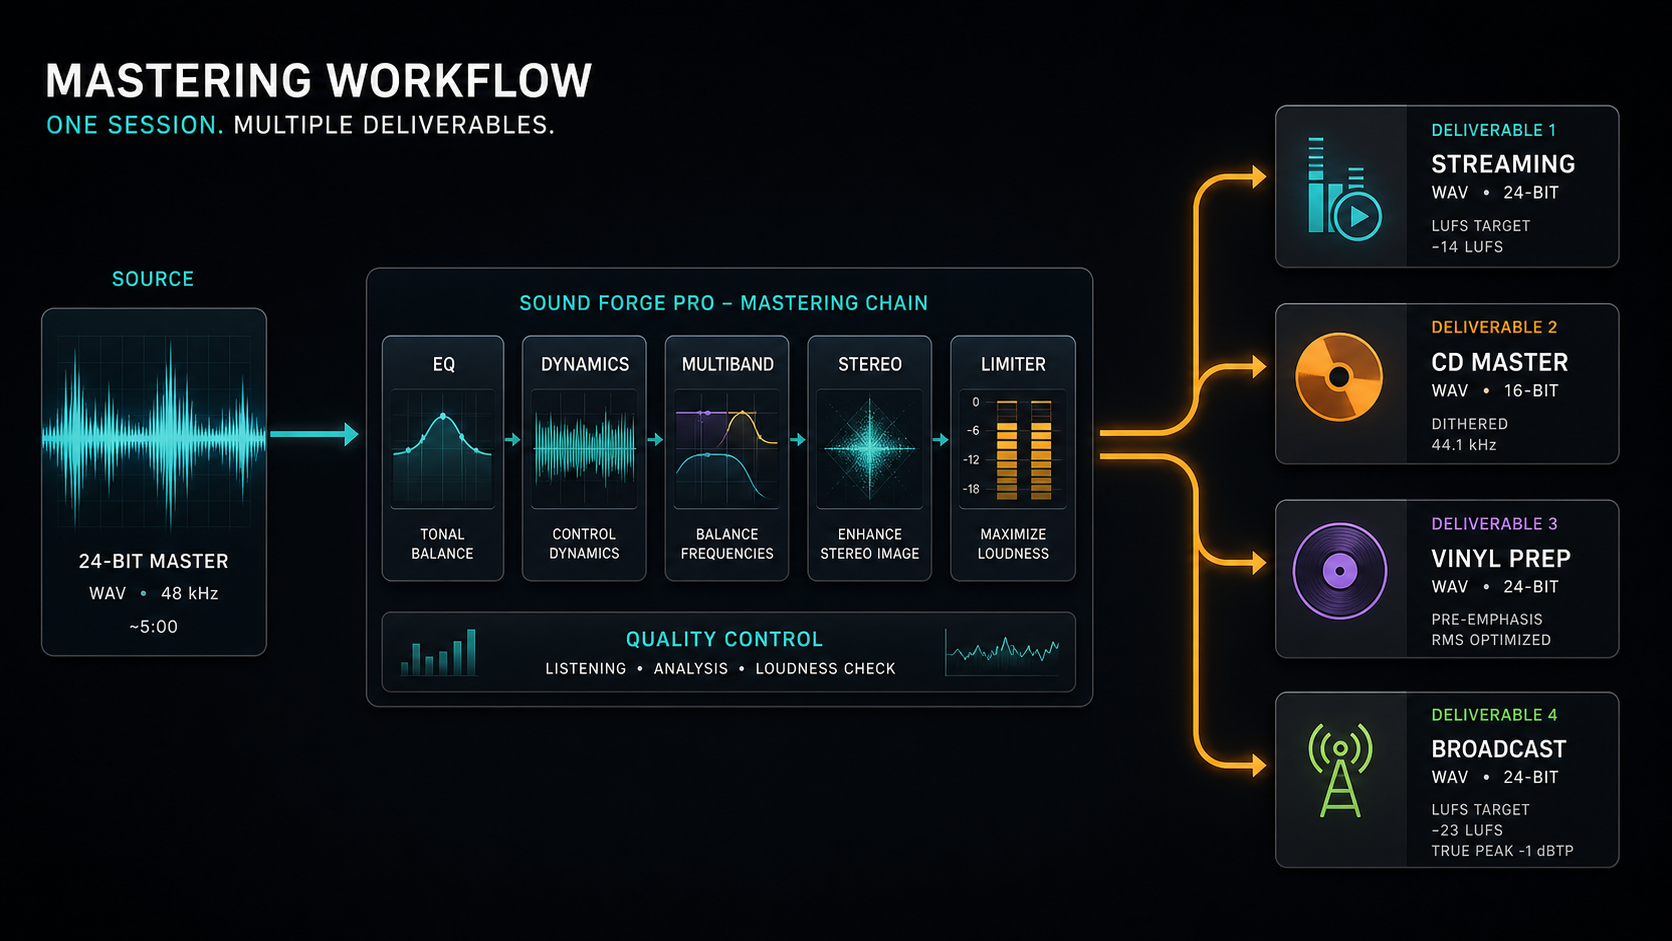
A single production may require different masters for different contexts: streaming, CD, vinyl preparation, broadcast. Each has different requirements. The efficient approach in Sound Forge Pro is to master from the same source file but export different versions with different processing parameters.
Keep the original processed master at its native bit depth (24-bit, 32-bit float, whatever the project source was) as the archival file. From this, produce deliverables:
Streaming master: 24-bit WAV, -14 LUFS integrated, -1 dBFS true peak. No dithering. This file goes to distribution platforms directly or through an aggregator.
CD master: 16-bit/44.1kHz WAV with POW-r Type 2 dithering applied via Bit-Depth Converter. True peak ceiling -0.1 dBFS. Red Book compliant. This file goes to a disc manufacturer or CD duplication service.
Vinyl master: separate mastering decisions are required for vinyl. The RIAA equalization curve affects what frequency balance the cut engineer needs. Vinyl has physical limitations: strong subsonic content (below 40 Hz) causes the stylus to jump; extreme stereo width in the bass frequencies (below 150 Hz) causes groove playback problems on many systems. A vinyl master typically requires a high-pass at 30–40 Hz (steeper than the streaming master), bass mono below 150 Hz via the Ozone Imager, and more dynamic range (less limiting) than the streaming version. Target -16 to -18 LUFS for vinyl — the cut engineer usually requests more headroom than streaming needs.
Broadcast master: EBU R128 standard at -23 LUFS (European broadcast) or ATSC A/85 at -24 LUFS (US broadcast). Use Process → Normalize with the Loudness preset in SF Pro 15+ to hit these targets directly. True peak ceiling at -1 dBFS.
I keep a simple spreadsheet noting the Statistics output for each deliverable — integrated LUFS, true peak, RMS. When a client asks three months later why the streaming version sounds different from the CD version, the numbers tell the exact story of what was done and why.
Common Mastering Mistakes in Sound Forge Pro
These come up regularly on magix.info and Gearspace threads from engineers new to mastering in Sound Forge.
Normalizing before EQ or compression. Process → Normalize moves the level to a target ceiling, but the subsequent EQ and compression will change the level again. Normalizing first and then processing produces an output level that's unpredictable relative to the normalization target. Always normalize after all processing is complete.
Using Process → Normalize for LUFS targeting. Normalize in SF Pro normalizes to a peak level by default, not an integrated loudness level. A file normalized to -1 dBFS peak may measure -18 LUFS integrated or -8 LUFS integrated depending on how dynamic the material is. The correct workflow for LUFS targeting is: run Statistics to get the integrated LUFS reading, then apply the gain difference via Process → Volume.
Dithering to 16-bit and then continuing to process. Once dithering is applied, any subsequent processing modifies the dither noise floor, negating its effect. Dithering is irreversible and must be the final step before the 16-bit export.
Applying heavy limiting on music that doesn't need it. The Volume Maximizer in Wave Hammer and the Maximizer in Ozone produce a louder reading but not a louder result on streaming platforms. If the master is currently reading -18 LUFS and the target is -14 LUFS, the correct move is 4 dB of gain adjustment via Process → Volume, not pushing the limiter threshold 6 dB into the signal. The first approach is transparent gain adjustment. The second is aggressive limiting that reduces dynamic range.
I made the LUFS mistake myself on an early session — normalized to -1 dBFS peak on a very dynamic recording, the integrated LUFS came back at -19. Pushed the Volume Maximizer hard to bring it up, ended up with 6 dB of limiting artifact on a quiet folk recording where the dynamics were the entire point. Undid everything, ran Statistics first, applied the correct gain difference, and the master was clean in two minutes. The Plug-In Chainer guide covers how to preview the full chain before committing.
Frequently Asked Questions
What is the correct mastering chain order in Sound Forge Pro?
EQ first for frequency correction, then compression via Wave Hammer 2.0 compressor stage to reduce dynamic range, then Volume Maximizer or limiting to set the output ceiling, then LUFS normalization to hit the delivery target via Statistics + Process → Volume, then dithering only if converting to 16-bit for CD. Verify with Tools → Statistics before and after the chain. Running normalization before EQ or dithering before normalization both produce incorrect results.
What LUFS target should I use when mastering in Sound Forge Pro?
For music streaming (Spotify, Apple Music, YouTube, Tidal): -14 LUFS integrated, -1 dBFS true peak. For CD: -12 to -14 LUFS, -0.1 dBFS true peak. For broadcast (EBU R128): -23 LUFS. For vinyl preparation: -16 to -18 LUFS with more dynamic range. Genre matters too — electronic and rock can push toward -12 LUFS; classical and jazz should stay at -16 to -18 LUFS to preserve dynamic range. Mastering louder than -14 LUFS for streaming doesn't produce louder playback — platforms normalize the level down and the compression artifacts remain.
When should I use Wave Hammer vs Ozone Elements for mastering in Sound Forge Pro?
Wave Hammer 2.0 is the faster choice for most material. The original Wave Hammer adds analog character useful for organic genres. Ozone Elements handles true peak limiting more transparently on complex material with dense high-frequency content — electronic music, pop with heavy cymbals, acoustic recordings where limiting artifacts are more audible. Ozone also provides stereo imaging control via the Imager module, which Wave Hammer doesn't. For mixes that need width adjustment or where the limiter is introducing artifacts on Wave Hammer, load Ozone Elements through the Plug-In Chainer.
When do I need to apply dithering in Sound Forge Pro?
Only when reducing bit depth — specifically from 24-bit or 32-bit float to 16-bit for CD delivery. For streaming platform delivery at 24-bit, no dithering is needed. Apply dithering as the absolute last step, after all EQ, dynamics, normalization, and gain adjustments. Use Process → Bit-Depth Converter with POW-r Type 2 for most musical material. Applying dithering then continuing to process defeats its purpose.
How do I check the integrated LUFS in Sound Forge Pro?
Two methods: View → LUFS Meter shows real-time integrated LUFS during playback — let the full file play through for an accurate integrated reading. Tools → Statistics performs a non-real-time analysis of the selected region and returns precise Integrated LUFS, True Peak, and RMS values without playing through. Statistics is more accurate for delivery verification. Run Statistics before mastering to capture the pre-processing state, then again after the full chain to confirm the final loudness and true peak numbers.
What mix settings should I prepare before mastering in Sound Forge Pro?
Export the mix as a 24-bit WAV at the original project sample rate with peaks between -2 and -6 dBFS. Remove any master bus limiter or loudness maximizer from the DAW before bouncing — these prevent the mastering chain from working accurately. A light bus compressor for glue (1–2 dB of gain reduction) is fine to keep. Don't dither to 16-bit before mastering. Check for DC offset in Sound Forge via Tools → Statistics after opening the file — any non-zero value should be corrected via Process → DC Offset Correction before the main chain starts.
Can Sound Forge Pro produce masters for both streaming and CD from the same session?
Yes. Master the 24-bit source file to streaming specs first (-14 LUFS, -1 dBFS TP, no dithering), export and save. Then from the same processed 24-bit master, export a CD version using Process → Bit-Depth Converter with 16-bit output and POW-r Type 2 dithering, true peak ceiling -0.1 dBFS. Keep the 24-bit processed file as the archive. For vinyl, the master requires separate processing decisions — different EQ, less limiting, bass mono below 150 Hz — and should be produced as a separate version, not derived from the streaming master. The export guide covers the file format and settings for each delivery target.